Quick Reference Guide
Page 2
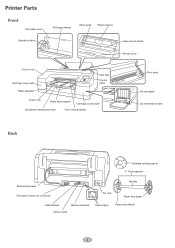
Printer Parts Front Roll paper cover Spindle holders Roll paper feeder Edge guide Paper support Rear manual feeder Printer cover Front cover Cartridge cover (left) Paper cassette Alert light Control panel Output tray Paper eject support Cartridge cover (right) Borderfree maintenance tank Front manual feeder Print head Ink cartridges Ink maintenance tank Back Bordless printing spacer 3" Core adapters Rear access panel Roll paper holder unit connector AC inlet Spindle Paper stop (gray) USB interface Network interface Airflow vents Status lights Paper stop (black) 1
Printer Parts Front Roll paper cover Spindle holders Roll paper feeder Edge guide Paper support Rear manual feeder Printer cover Front cover Cartridge cover (left) Paper cassette Alert light Control panel Output tray Paper eject support Cartridge cover (right) Borderfree maintenance tank Front manual feeder Print head Ink cartridges Ink maintenance tank Back Bordless printing spacer 3" Core adapters Rear access panel Roll paper holder unit connector AC inlet Spindle Paper stop (gray) USB interface Network interface Airflow vents Status lights Paper stop (black) 1
Quick Reference Guide
Page 3
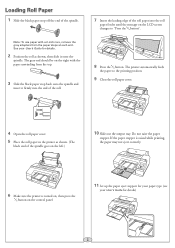
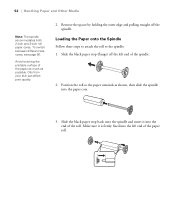
... paper with the paper unwinding from the paper stops at each end. If the paper stopper is raised while printing, the paper may not eject correctly. 6 Make sure the printer is turned on, then press the button... on the left.) 10 Slide out the output tray. Loading Roll Paper 1 Slide the black paper stop back onto the spindle and insert it firmly into the end of the roll. 7 Insert the... onto the spindle. See your User's Guide for details. 2 Position the roll as shown. (The black end of the spindle goes on the control panel. 11 Set up the paper eject support for your paper...
... paper with the paper unwinding from the paper stops at each end. If the paper stopper is raised while printing, the paper may not eject correctly. 6 Make sure the printer is turned on, then press the button... on the left.) 10 Slide out the output tray. Loading Roll Paper 1 Slide the black paper stop back onto the spindle and insert it firmly into the end of the roll. 7 Insert the... onto the spindle. See your User's Guide for details. 2 Position the roll as shown. (The black end of the spindle goes on the control panel. 11 Set up the paper eject support for your paper...

Quick Reference Guide
Page 7
Epson UltraChrome® HDR ink cartridges Ink Bay Left Right Slot no. 1 2 3 4 5 6 7 8 9 10 11 Cartridge Green (GR) Light Light Black (LLK) Yellow (Y) Light Cyan (LC) Vivid Light Magenta (VLM) Orange (OR) Matte Black (MK) Vivid Magenta (VM) Light Black (LK) Cyan (C) Photo Black (PK) Part no. Checking Ink and ... runs out, replace the cartridge, and then continue the job. Checking Ink Levels and Replacing Ink Cartridges Before you begin a large print job, you should check your hands, wash them immediately with soap and water. The numbers above the ink cartridge icons correspond to ...
Epson UltraChrome® HDR ink cartridges Ink Bay Left Right Slot no. 1 2 3 4 5 6 7 8 9 10 11 Cartridge Green (GR) Light Light Black (LLK) Yellow (Y) Light Cyan (LC) Vivid Light Magenta (VLM) Orange (OR) Matte Black (MK) Vivid Magenta (VM) Light Black (LK) Cyan (C) Photo Black (PK) Part no. Checking Ink and ... runs out, replace the cartridge, and then continue the job. Checking Ink Levels and Replacing Ink Cartridges Before you begin a large print job, you should check your hands, wash them immediately with soap and water. The numbers above the ink cartridge icons correspond to ...
Quick Reference Guide
Page 10
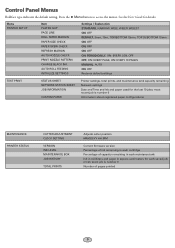
... Menu PRINTER SETUP Item PLATEN GAP PAGE LINE ROLL PAPER MARGIN PAPER SIZE CHECK PAPER SKEW CHECK REFRESH MARGIN AUTO NOZZLE CHECK PRINT NOZZLE PATTERN CHANGE BLACK INK AUTO ROLL FEEDING INITIALIZE SETTINGS Settings / Explanation STANDARD, NARROW, WIDE, WIDER, WIDEST ON, OFF DEFAULT, 3mm, 15m... Information about registered paper configurations MAINTENANCE PRINTER STATUS CUTTER ADJUSTMENT CLOCK SETTING VERSION INK LEVEL MAINTENANCE BOX JOB HISTORY TOTAL PRINTS Adjusts cutter position MM/DD/YY HH:MM Current firmware version Percentage of ink remaining in square centimeters for each cartridge ...
... Menu PRINTER SETUP Item PLATEN GAP PAGE LINE ROLL PAPER MARGIN PAPER SIZE CHECK PAPER SKEW CHECK REFRESH MARGIN AUTO NOZZLE CHECK PRINT NOZZLE PATTERN CHANGE BLACK INK AUTO ROLL FEEDING INITIALIZE SETTINGS Settings / Explanation STANDARD, NARROW, WIDE, WIDER, WIDEST ON, OFF DEFAULT, 3mm, 15m... Information about registered paper configurations MAINTENANCE PRINTER STATUS CUTTER ADJUSTMENT CLOCK SETTING VERSION INK LEVEL MAINTENANCE BOX JOB HISTORY TOTAL PRINTS Adjusts cutter position MM/DD/YY HH:MM Current firmware version Percentage of ink remaining in square centimeters for each cartridge ...
User's Guide
Page 6
... Configurations 58 Selecting Custom Paper Configurations 60 3 Printing With Epson Drivers for Windows Sizing Images for Borderless Printing on Roll Paper 62 Choosing Basic Print Options 63 Selecting the Correct Media Type Setting ...65 Choosing Color Management Options 67 Choosing Roll Paper Options 69 Choosing Cut Sheet Paper Options 72 Choosing Page Layout Options 75 Choosing Paper Configuration Options 76 Choosing Advanced Black...
... Configurations 58 Selecting Custom Paper Configurations 60 3 Printing With Epson Drivers for Windows Sizing Images for Borderless Printing on Roll Paper 62 Choosing Basic Print Options 63 Selecting the Correct Media Type Setting ...65 Choosing Color Management Options 67 Choosing Roll Paper Options 69 Choosing Cut Sheet Paper Options 72 Choosing Page Layout Options 75 Choosing Paper Configuration Options 76 Choosing Advanced Black...
User's Guide
Page 7
...Printing With Epson Drivers for Macintosh Sizing Images for Borderless Printing on Roll Paper 90 Choosing Page Setup and Basic Print Options 91 Choosing Advanced Media Control Options 97 Choosing Roll Paper Settings 98 Controlling Borderless Image Expansion 100 Creating a Custom Preset and Printing 101 Choosing Advanced Black and White Photo Settings 102 Managing Print... Jobs 105 Selecting the Correct Media Type Setting 106 5 Managing Color With Profiles Macintosh Printing With a Color ...
...Printing With Epson Drivers for Macintosh Sizing Images for Borderless Printing on Roll Paper 90 Choosing Page Setup and Basic Print Options 91 Choosing Advanced Media Control Options 97 Choosing Roll Paper Settings 98 Controlling Borderless Image Expansion 100 Creating a Custom Preset and Printing 101 Choosing Advanced Black and White Photo Settings 102 Managing Print... Jobs 105 Selecting the Correct Media Type Setting 106 5 Managing Color With Profiles Macintosh Printing With a Color ...
User's Guide
Page 16
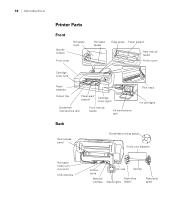
18 | Introduction Printer Parts Front Spindle holders Roll paper cover Front cover Roll paper feeder Edge guide Paper support Rear manual feeder Printer cover Cartridge cover (left) Paper cassette Output tray Paper eject support Cartridge cover (right) Borderfree maintenance tank Front manual feeder Ink maintenance tank Print head Ink cartridges Back Rear access panel Borderless printing spacer 3-inch core adapters Roll paper holder unit connector USB interface Airflow vents Network interface AC inlet Spindle Paper stop Status lights (black) Paper stop (gray) 18
18 | Introduction Printer Parts Front Spindle holders Roll paper cover Front cover Roll paper feeder Edge guide Paper support Rear manual feeder Printer cover Cartridge cover (left) Paper cassette Output tray Paper eject support Cartridge cover (right) Borderfree maintenance tank Front manual feeder Ink maintenance tank Print head Ink cartridges Back Rear access panel Borderless printing spacer 3-inch core adapters Roll paper holder unit connector USB interface Airflow vents Network interface AC inlet Spindle Paper stop Status lights (black) Paper stop (gray) 18
User's Guide
Page 43
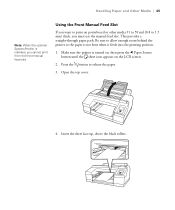
...enough room behind the printer so the paper is not bent when it feeds into the printing position. 1. Open the top cover. 4. This provides a straight-through paper path. Insert the sheet face-up, above the black rollers. 45 Handling Paper and Other Media | 45 Note: When the optional SpectroProofer is... turned on, then press the l Paper Source button until the sheet icon appears on posterboard or other media 31 to 59 mil (0.8 to 1.5 mm) thick, you cannot print from the front ...
...enough room behind the printer so the paper is not bent when it feeds into the printing position. 1. Open the top cover. 4. This provides a straight-through paper path. Insert the sheet face-up, above the black rollers. 45 Handling Paper and Other Media | 45 Note: When the optional SpectroProofer is... turned on, then press the l Paper Source button until the sheet icon appears on posterboard or other media 31 to 59 mil (0.8 to 1.5 mm) thick, you cannot print from the front ...
User's Guide
Page 49
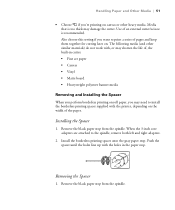
...black paper stop from the spindle. Push the spacer until the holes line up with the printer, depending on roll paper, you may damage the cutter. The following media (and other heavy media. Use of an external cutter/scissor is too thick may need to install the borderless printing...8226; Matte board • Heavyweight polyester banner media Removing and Installing the Spacer When you perform borderless printing on the width of , the built-in the paper stop . Install the borderless printing spacer onto the gray paper stop . Handling Paper and Other Media | 51 • Choose if ...
...black paper stop from the spindle. Push the spacer until the holes line up with the printer, depending on roll paper, you may damage the cutter. The following media (and other heavy media. Use of an external cutter/scissor is too thick may need to install the borderless printing...8226; Matte board • Heavyweight polyester banner media Removing and Installing the Spacer When you perform borderless printing on the width of , the built-in the paper stop . Install the borderless printing spacer onto the gray paper stop . Handling Paper and Other Media | 51 • Choose if ...
User's Guide
Page 50
... it is firmly fixed into the paper core. 3. Make sure it into the end of the roll. Oils from your skin can affect print quality. 2. Slide the black paper stop (flange) off the spindle. Remove the spacer by holding the outer edge and pulling straight off the left end of the spindle...
... it is firmly fixed into the paper core. 3. Make sure it into the end of the roll. Oils from your skin can affect print quality. 2. Slide the black paper stop (flange) off the spindle. Remove the spacer by holding the outer edge and pulling straight off the left end of the spindle...
User's Guide
Page 53
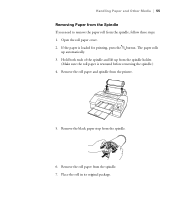
... up automatically. 3. Remove the roll paper and spindle from the spindle holder. (Make sure the roll paper is loaded for printing, press the button. Open the roll paper cover. 2. Remove the black paper stop from the spindle, follow these steps: 1. Handling Paper and Other Media | 55 Removing Paper from the Spindle If...
... up automatically. 3. Remove the roll paper and spindle from the spindle holder. (Make sure the roll paper is loaded for printing, press the button. Open the roll paper cover. 2. Remove the black paper stop from the spindle, follow these steps: 1. Handling Paper and Other Media | 55 Removing Paper from the Spindle If...
User's Guide
Page 54
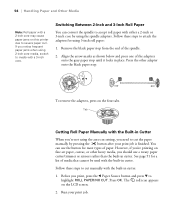
To remove the adapters, press on the LCD screen. 2. However, if you're printing on fine art paper, canvas, or other adapter onto the black paper stop until it locks in place. Press OK. You can convert the spindle to cut the paper manually by using the spindle adapters. Follow... these steps to media with a 3-inch core. Press the other heavy media, you print, press the l Paper Source button and...
To remove the adapters, press on the LCD screen. 2. However, if you're printing on fine art paper, canvas, or other adapter onto the black paper stop until it locks in place. Press OK. You can convert the spindle to cut the paper manually by using the spindle adapters. Follow... these steps to media with a 3-inch core. Press the other heavy media, you print, press the l Paper Source button and...

User's Guide
Page 59
...have installed the Epson driver and utilities from your printer for borderless printing on page 62 to the right folder. See page 109 for instructions. If you print and manage print jobs. 61 Chapter 3: Printing With Epson Drivers for Windows Your Epson Stylus Pro 4900 comes with ... advanced black and white photo settings • Choosing paper configuration options • Saving, exporting, and importing groups of settings • Managing print jobs 61 Tip: Check the Epson Pro Imaging website at www.proimaging.epson. Before you print, you want to set basic printing properties....
...have installed the Epson driver and utilities from your printer for borderless printing on page 62 to the right folder. See page 109 for instructions. If you print and manage print jobs. 61 Chapter 3: Printing With Epson Drivers for Windows Your Epson Stylus Pro 4900 comes with ... advanced black and white photo settings • Choosing paper configuration options • Saving, exporting, and importing groups of settings • Managing print jobs 61 Tip: Check the Epson Pro Imaging website at www.proimaging.epson. Before you print, you want to set basic printing properties....
User's Guide
Page 62
.... (For paper types that don't support this option, print black and white photos with the Color setting.) • Black only if you're printing line drawings or other non-photographic images. 5. Note: The Print Quality settings depend on the Media Type you are printing on. 64 | Printing With Epson Drivers for Windows Note: If a color setting is grayed...
.... (For paper types that don't support this option, print black and white photos with the Color setting.) • Black only if you're printing line drawings or other non-photographic images. 5. Note: The Print Quality settings depend on the Media Type you are printing on. 64 | Printing With Epson Drivers for Windows Note: If a color setting is grayed...

User's Guide
Page 63
... graphics. Select from the following additional options and click OK: • High Speed for advanced black and white photo printing, see page 79. • Click Custom, then follow the instructions on Epson media. If you are using non-Epson paper, consult the manufacturer for large files.) 6. If you 've selected Advanced B&W Photo as your...
... graphics. Select from the following additional options and click OK: • High Speed for advanced black and white photo printing, see page 79. • Click Custom, then follow the instructions on Epson media. If you are using non-Epson paper, consult the manufacturer for large files.) 6. If you 've selected Advanced B&W Photo as your...
User's Guide
Page 77
... and click Open. Advanced Black and White Photo mode also provides settings for Windows | 79 6. This mode is color or grayscale, you that your Epson driver and offers an alternative black and white workflow. Select the rest of the necessary print settings and print. • To save the... settings to a file that you to easily produce neutral and toned black-and-white prints using your settings are correct, ...
... and click Open. Advanced Black and White Photo mode also provides settings for Windows | 79 6. This mode is color or grayscale, you that your Epson driver and offers an alternative black and white workflow. Select the rest of the necessary print settings and print. • To save the... settings to a file that you to easily produce neutral and toned black-and-white prints using your settings are correct, ...
User's Guide
Page 79
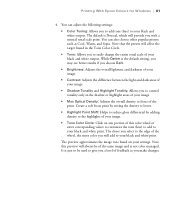
...target found in the shadow or highlight areas of the wheel, the more color you to your black and white output. Create a soft focus print by setting the density to lower. • Highlight Point Shift: Helps to reduce gloss differential...Max Optical Density: Adjusts the overall density or focus of your image. • Tone Color Circle: Click on your black and white print. It is not color managed. The default is Neutral, which will always be of feedback as Cool, Warm, and... of the same image and is just to be used to your settings. Printing With Epson Drivers for Windows | 81 4.
...target found in the shadow or highlight areas of the wheel, the more color you to your black and white output. Create a soft focus print by setting the density to lower. • Highlight Point Shift: Helps to reduce gloss differential...Max Optical Density: Adjusts the overall density or focus of your image. • Tone Color Circle: Click on your black and white print. It is not color managed. The default is Neutral, which will always be of feedback as Cool, Warm, and... of the same image and is just to be used to your settings. Printing With Epson Drivers for Windows | 81 4.

User's Guide
Page 93
...you are using a color-managed workflow, make sure you choose media type and resolution settings that match the ICC profile you are printing black and white photos on select paper types. (For paper types that corresponds to the paper you created a custom paper size for your... for any type of photographic printing. • Advanced B&W Photo if you 're printing line drawings or other non-photographic images. 95 Set the Color option as follows: • AccuPhoto HDR for more information. 11. Select Printer Settings from the drop-down menu. Printing With Epson Drivers for details. 10....
...you are using a color-managed workflow, make sure you choose media type and resolution settings that match the ICC profile you are printing black and white photos on select paper types. (For paper types that corresponds to the paper you created a custom paper size for your... for any type of photographic printing. • Advanced B&W Photo if you 're printing line drawings or other non-photographic images. 95 Set the Color option as follows: • AccuPhoto HDR for more information. 11. Select Printer Settings from the drop-down menu. Printing With Epson Drivers for details. 10....
User's Guide
Page 100
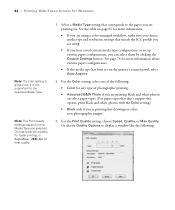
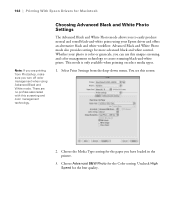
... color management when using your photo is only available when printing on select media types. 1. 102 | Printing With Epson Drivers for Macintosh Note: If you are no profiles associated with this screening and color management technology. Choosing Advanced Black and White Photo Settings The Advanced Black and White Photo mode allows you to easily produce...
... color management when using your photo is only available when printing on select media types. 1. 102 | Printing With Epson Drivers for Macintosh Note: If you are no profiles associated with this screening and color management technology. Choosing Advanced Black and White Photo Settings The Advanced Black and White Photo mode allows you to easily produce...

User's Guide
Page 101
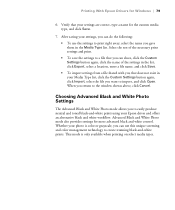
Printing With Epson Drivers for your photo. The default is the default setting, you may see this screen: 5. While Darker is Neutral, which will affect the target found ... Circle. • Tone: Allows you to easily change the entire tonal scale of your black and white output. You can also choose other popular presets such as a guide. • Color Toning: Allows you with a neutral tonal scale print. Note that are best for Macintosh | 103 4. Choose the settings that the presets will...
Printing With Epson Drivers for your photo. The default is the default setting, you may see this screen: 5. While Darker is Neutral, which will affect the target found ... Circle. • Tone: Allows you to easily change the entire tonal scale of your black and white output. You can also choose other popular presets such as a guide. • Color Toning: Allows you with a neutral tonal scale print. Note that are best for Macintosh | 103 4. Choose the settings that the presets will...


