
User Manual (P.I.M Plug-in)
Page 2
... Epson Stylus® Photo R200 ■ Epson Stylus Photo R300/R300M ■ Epson Stylus Photo R320 ■ Epson Stylus Photo R800 ■ Epson Stylus Photo RX500 ■ Epson Stylus Photo RX600 ■ Epson Stylus Photo 780 ■ Epson Stylus Photo 785EPX ■ Epson Stylus Photo 820 ■ Epson Stylus Photo 825 ■ Epson Stylus Photo 890 ■ Epson Stylus Photo 900 ■ Epson Stylus Photo 925 ■ Epson Stylus Photo 960 ■ Epson Stylus Photo 1280 ■ Epson Stylus Photo 2000P* ■ Epson Stylus Photo 2200 ■ PictureMate™ by Epson * This printer...
... Epson Stylus® Photo R200 ■ Epson Stylus Photo R300/R300M ■ Epson Stylus Photo R320 ■ Epson Stylus Photo R800 ■ Epson Stylus Photo RX500 ■ Epson Stylus Photo RX600 ■ Epson Stylus Photo 780 ■ Epson Stylus Photo 785EPX ■ Epson Stylus Photo 820 ■ Epson Stylus Photo 825 ■ Epson Stylus Photo 890 ■ Epson Stylus Photo 900 ■ Epson Stylus Photo 925 ■ Epson Stylus Photo 960 ■ Epson Stylus Photo 1280 ■ Epson Stylus Photo 2000P* ■ Epson Stylus Photo 2200 ■ PictureMate™ by Epson * This printer...

Product Brochure
Page 1
... digital cameras - black text at up to print outstanding photos. A full-featured performer with or without a computer! Print brilliant photos-with CD printing and built-in card slots, the Epson Stylus® Photo R300 makes it easy to 15 ppm* BorderFree™ printing in 39 seconds; INK JET PRINTER EPSON® STYLUS® PHOTOR300 The perfect companion for quick, easy operations...
... digital cameras - black text at up to print outstanding photos. A full-featured performer with or without a computer! Print brilliant photos-with CD printing and built-in card slots, the Epson Stylus® Photo R300 makes it easy to 15 ppm* BorderFree™ printing in 39 seconds; INK JET PRINTER EPSON® STYLUS® PHOTOR300 The perfect companion for quick, easy operations...

Product Brochure - Bluetooth Photo Print Adapter
Page 2
...) Hardware Specifications Buffer will hold up to change without notice. over 100,000 POH System Requirements Devices that support the standard Bluetooth printing profiles Printers Supported Epson Stylus® Photo R300 Regulatory Requirements UL, CSA, CE, FCC Class B Certification Bluetooth V1.1 qualified Part Number C12C824142 Warranty One year limited in these marks. © Copyright 2003...
...) Hardware Specifications Buffer will hold up to change without notice. over 100,000 POH System Requirements Devices that support the standard Bluetooth printing profiles Printers Supported Epson Stylus® Photo R300 Regulatory Requirements UL, CSA, CE, FCC Class B Certification Bluetooth V1.1 qualified Part Number C12C824142 Warranty One year limited in these marks. © Copyright 2003...
Product Information Guide
Page 1
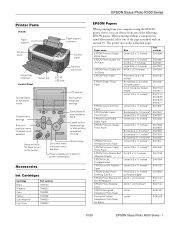
... S041500 S041467 S041257 S041568 S041286/ S041667 S041682 S041464 S041465 S041331 S041405 S041106 S041064 S041153 S041606 S041144KIT S041144 SCR1001 SCR1002 10/03 EPSON Stylus Photo R300 Series - 1 EPSON Stylus Photo R300 Series Printer Parts Printer Paper support Paper support extension Printer cover Control panel Output tray extension Control Panel Output tray EXT I/F USB port Memory card cover Choose Basic or Advanced mode...
... S041500 S041467 S041257 S041568 S041286/ S041667 S041682 S041464 S041465 S041331 S041405 S041106 S041064 S041153 S041606 S041144KIT S041144 SCR1001 SCR1002 10/03 EPSON Stylus Photo R300 Series - 1 EPSON Stylus Photo R300 Series Printer Parts Printer Paper support Paper support extension Printer cover Control panel Output tray extension Control Panel Output tray EXT I/F USB port Memory card cover Choose Basic or Advanced mode...

Product Information Guide
Page 2
...; H) 1.9 × 2.4 × 1.5 inches (W × D × H) 49.1 × 60 × 38.5 mm (W × D × H) * The figure given is empty. 2 - Do not refill ink cartridges. Products not manufactured by Epson's warranties. EPSON Stylus Photo R300 Series Printer Specifications Printing Nozzle configuration Print direction Control code Input buffer 540 nozzles (90 each color Cartridge life 2 years from production date (if...
...; H) 1.9 × 2.4 × 1.5 inches (W × D × H) 49.1 × 60 × 38.5 mm (W × D × H) * The figure given is empty. 2 - Do not refill ink cartridges. Products not manufactured by Epson's warranties. EPSON Stylus Photo R300 Series Printer Specifications Printing Nozzle configuration Print direction Control code Input buffer 540 nozzles (90 each color Cartridge life 2 years from production date (if...

Product Information Guide
Page 3
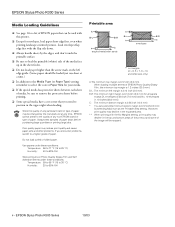
...EPSON Premium Glossy Photo Paper EPSON Photo Stickers Premium Glossy Photo Paper EPSON Premium Luster Photo Paper Premium Luster Photo Paper EPSON Premium Semigloss Photo Paper Premium Semigloss Photo EPSON Semigloss Scrapbook Photo Paper Paper EPSON Photo Quality Glossy Film Photo Quality Glossy Film EPSON Ink Jet Transparencies Ink Jet Transparencies EPSON ColorLife Photo Paper ColorLife Photo Paper When printing without a computer (in stand-alone mode), select the following Paper Type settings from the printer...driver software. EPSON Stylus Photo R300 Series Selecting the Media ...
...EPSON Premium Glossy Photo Paper EPSON Photo Stickers Premium Glossy Photo Paper EPSON Premium Luster Photo Paper Premium Luster Photo Paper EPSON Premium Semigloss Photo Paper Premium Semigloss Photo EPSON Semigloss Scrapbook Photo Paper Paper EPSON Photo Quality Glossy Film Photo Quality Glossy Film EPSON Ink Jet Transparencies Ink Jet Transparencies EPSON ColorLife Photo Paper ColorLife Photo Paper When printing without a computer (in stand-alone mode), select the following Paper Type settings from the printer...driver software. EPSON Stylus Photo R300 Series Selecting the Media ...
Product Information Guide
Page 4
... Maximum as the Printable Area setting. EPSON Stylus Photo R300 Series 10/03 Always test samples of paper. B-R: The minimum right margin is 0.12 inch (3.0 mm). Load envelopes flap edge first with this printer. ❏ Except for envelopes, load paper short edge first, even when printing landscape-oriented pictures. EPSON Stylus Photo R300 Series Media Loading Guidelines ❏ See...
... Maximum as the Printable Area setting. EPSON Stylus Photo R300 Series 10/03 Always test samples of paper. B-R: The minimum right margin is 0.12 inch (3.0 mm). Load envelopes flap edge first with this printer. ❏ Except for envelopes, load paper short edge first, even when printing landscape-oriented pictures. EPSON Stylus Photo R300 Series Media Loading Guidelines ❏ See...
Product Information Guide
Page 5
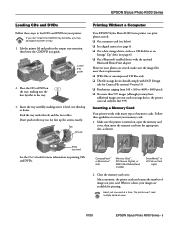
...Push the tray under the tab and the two rollers. Tab Arrows Printing Without a Computer Your EPSON Stylus Photo R300 Series printer can 't read only the first 999) Inserting a Memory Card Your printer works with DCF (Design rule for Camera File systems) Version 1.0 ❏ Resolutions ranging from ...images on printing CDs and DVDs. Insert just one card at once. 10/03 EPSON Stylus Photo R300 Series - 5 Insert the tray carefully, making sure the disc lays flat in your printer. EPSON Stylus Photo R300 Series Loading CDs and DVDs Follow these guidelines to insert your memory card: 1.
...Push the tray under the tab and the two rollers. Tab Arrows Printing Without a Computer Your EPSON Stylus Photo R300 Series printer can 't read only the first 999) Inserting a Memory Card Your printer works with DCF (Design rule for Camera File systems) Version 1.0 ❏ Resolutions ranging from ...images on printing CDs and DVDs. Insert just one card at once. 10/03 EPSON Stylus Photo R300 Series - 5 Insert the tray carefully, making sure the disc lays flat in your printer. EPSON Stylus Photo R300 Series Loading CDs and DVDs Follow these guidelines to insert your memory card: 1.
Product Information Guide
Page 6
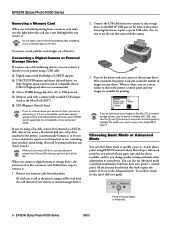
...the EXT I/F USB port on the front of your camera or external storage device.) 2. EPSON Stylus Photo R300 Series 10/03 Remove any memory cards from the printer. (If you leave a card in this on the printer's control panel and your images are available for a list of the following devices, you.... if so, be sure to use Basic mode, see a screen similar to this book require the printer to be prompted before you remove it directly to the Advanced mode. EPSON Stylus Photo R300 Series Removing a Memory Card When you're finished printing from a memory card, make other adjustments to ...
...the EXT I/F USB port on the front of your camera or external storage device.) 2. EPSON Stylus Photo R300 Series 10/03 Remove any memory cards from the printer. (If you leave a card in this on the printer's control panel and your images are available for a list of the following devices, you.... if so, be sure to use Basic mode, see a screen similar to this book require the printer to be prompted before you remove it directly to the Advanced mode. EPSON Stylus Photo R300 Series Removing a Memory Card When you're finished printing from a memory card, make other adjustments to ...
Product Information Guide
Page 7
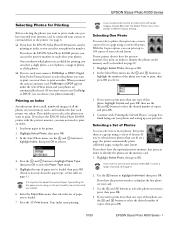
EPSON Stylus Photo R300 Series Selecting Photos for Printing Before selecting the photos you want to print, make sure you have inserted your memory card or connected your camera or external device to select it. 4. If you have the EPSON Stylus Photo R300M printer with larger images, choose All under the Select Photo menu and your photos..., then use the and buttons to select the desired number of paper you've loaded, then press OK. (If you have the EPSON Stylus Photo R300 printer, start by printing an index, so you expect. 6. See page 6. ❏ If you have the preview monitor, it . ...
EPSON Stylus Photo R300 Series Selecting Photos for Printing Before selecting the photos you want to print, make sure you have inserted your memory card or connected your camera or external device to select it. 4. If you have the EPSON Stylus Photo R300M printer with larger images, choose All under the Select Photo menu and your photos..., then use the and buttons to select the desired number of paper you've loaded, then press OK. (If you have the EPSON Stylus Photo R300 printer, start by printing an index, so you expect. 6. See page 6. ❏ If you have the preview monitor, it . ...

Product Information Guide
Page 8
... on the right side of the insert. you 've selected your paper in your selected photos, highlight Copies and press OK. see the entire image in the printer. 2. Repeat steps 3 and 4 for printing, or if you don't see step 4. 8. EPSON Stylus Photo R300 Series 5. When you want to enter the Paper Type menu. 3. Selecting a Range of...
... on the right side of the insert. you 've selected your paper in your selected photos, highlight Copies and press OK. see the entire image in the printer. 2. Repeat steps 3 and 4 for printing, or if you don't see step 4. 8. EPSON Stylus Photo R300 Series 5. When you want to enter the Paper Type menu. 3. Selecting a Range of...
Product Information Guide
Page 9
... the print head nozzles may have obtained a replacement, otherwise the ink remaining in your memory card, software settings, interface cable, or computer, or your printer not covered by looking at 5% coverage * The figure given is empty. To ensure good results, use . 10/03 EPSON Stylus Photo R300 Series - 9 Make sure letter-size or larger paper is...
... the print head nozzles may have obtained a replacement, otherwise the ink remaining in your memory card, software settings, interface cable, or computer, or your printer not covered by looking at 5% coverage * The figure given is empty. To ensure good results, use . 10/03 EPSON Stylus Photo R300 Series - 9 Make sure letter-size or larger paper is...
Product Information Guide
Page 10
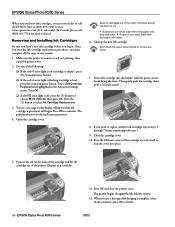
... the cartridge cover forward to choose More Options, then press OK. EPSON Stylus Photo R300 Series 11. Press OK and close the printer cover. Once you start the ink cartridge replacement procedure, you see a message that ink cartridge replacement will begin . Open the cartridge cover. Keep ink cartridges out of the reach of it is off, press the...
... the cartridge cover forward to choose More Options, then press OK. EPSON Stylus Photo R300 Series 11. Press OK and close the printer cover. Once you start the ink cartridge replacement procedure, you see a message that ink cartridge replacement will begin . Open the cartridge cover. Keep ink cartridges out of the reach of it is off, press the...

Product Information Guide
Page 11
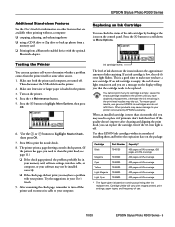
...print head from the printer's control panel or using the printer software, the printer must be complete, with no gaps in the printer whenever you see page 9 for details. see your User's Guide. For the best results, load letter-size EPSON Photo Quality Ink Jet Paper in the dot ...from the printer software, the printer must be connected directly to replace the ink cartridge; To clean using your printer for a long time, the print quality can also turn it only if quality declines. Press the button to print the alignment pattern. 10/03 EPSON Stylus Photo R300 Series - ...
...print head from the printer's control panel or using the printer software, the printer must be complete, with no gaps in the printer whenever you see page 9 for details. see your User's Guide. For the best results, load letter-size EPSON Photo Quality Ink Jet Paper in the dot ...from the printer software, the printer must be connected directly to replace the ink cartridge; To clean using your printer for a long time, the print quality can also turn it only if quality declines. Press the button to print the alignment pattern. 10/03 EPSON Stylus Photo R300 Series - ...
Product Information Guide
Page 12
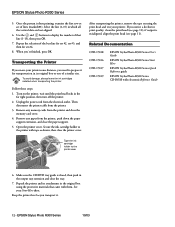
... you notice a decline in the output tray extension and close the printer cover. EPSON Stylus Photo R300 Series 10/03 To avoid damage, always leave the ink cartridges installed when transporting the printer. Then disconnect the printer cable from the electrical outlet. Remove any memory cards from the printer, push down the paper support extension, and close the memory...
... you notice a decline in the output tray extension and close the printer cover. EPSON Stylus Photo R300 Series 10/03 To avoid damage, always leave the ink cartridges installed when transporting the printer. Then disconnect the printer cable from the electrical outlet. Remove any memory cards from the printer, push down the paper support extension, and close the memory...

Quick Reference Guide
Page 1
EPSON Stylus® Photo R300 Series Quick Reference Printing Without a Computer Here's how to use the control panel: LCD Screen Choose Basic or Advanced Mode Choose Menu Settings Return to previous menu or cancel menu selection Press and hold for quick and easy 4 x 6" photo prints. to turn on printer Basic ...Advanced Custom Direct Save OK Back Stop Power Print Save custom advanced settings Save photos to external disk or CD-R Cancel control panel settings or stop printing and cancel print job Start printing Press to replace ink or Go to choose Basic...
EPSON Stylus® Photo R300 Series Quick Reference Printing Without a Computer Here's how to use the control panel: LCD Screen Choose Basic or Advanced Mode Choose Menu Settings Return to previous menu or cancel menu selection Press and hold for quick and easy 4 x 6" photo prints. to turn on printer Basic ...Advanced Custom Direct Save OK Back Stop Power Print Save custom advanced settings Save photos to external disk or CD-R Cancel control panel settings or stop printing and cancel print job Start printing Press to replace ink or Go to choose Basic...

Start Here Card
Page 1
... CD/DVD tray guide is up continue Printer Ink cartridges Small CD insert Quick Reference CD position check paper CD/DVD Tray Preview Monitor (included with EPSON Stylus Photo R300M only) Preview Monitor Base (included with EPSON Stylus Photo R300M only) 2 Remove all the tape and packing material from the box. EPSON Stylus Photo R300 Series EPSON Stylus® Photo R300 Series Start Here CPD-17016 4044644-00...
... CD/DVD tray guide is up continue Printer Ink cartridges Small CD insert Quick Reference CD position check paper CD/DVD Tray Preview Monitor (included with EPSON Stylus Photo R300M only) Preview Monitor Base (included with EPSON Stylus Photo R300M only) 2 Remove all the tape and packing material from the box. EPSON Stylus Photo R300 Series EPSON Stylus® Photo R300 Series Start Here CPD-17016 4044644-00...
Start Here Card
Page 6
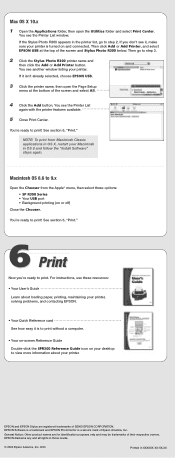
... General Notice: Other product names are registered trademarks of SEIKO EPSON CORPORATION. If the Stylus Photo R300 appears in OS X, restart your printer. If you 're ready to step 3. 2 Click the Stylus Photo R300 printer name and then click the Add or Add Printer button. See section 6, "Print." See section 6, "Print."... Applications folder, then open the Page Setup menu at the top of the screen and Stylus Photo R300 below. Then click Add or Add Printer, and select EPSON USB at the bottom of Epson America, Inc. NOTE: To print from the Apple® menu, then select these ...
... General Notice: Other product names are registered trademarks of SEIKO EPSON CORPORATION. If the Stylus Photo R300 appears in OS X, restart your printer. If you 're ready to step 3. 2 Click the Stylus Photo R300 printer name and then click the Add or Add Printer button. See section 6, "Print." See section 6, "Print."... Applications folder, then open the Page Setup menu at the top of the screen and Stylus Photo R300 below. Then click Add or Add Printer, and select EPSON USB at the bottom of Epson America, Inc. NOTE: To print from the Apple® menu, then select these ...

User Manual
Page 1
EPSON Stylus® Photo R300 Series User's Guide
EPSON Stylus® Photo R300 Series User's Guide
User Manual
Page 7
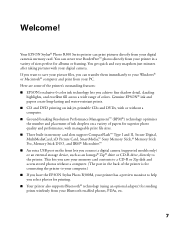
...; Three built-in the back of the printer is for connecting the printer to your computer.) ■ If you have the EPSON Stylus Photo R300M, your printer has a preview monitor to help you can print pictures directly from your printer in a variety of sizes perfect for sending...computer and print from your digital camera. Your EPSON Stylus® Photo R300 Series printer can transfer them immediately to the printer. Genuine EPSON® ink and papers create long-lasting and water-resistant prints. ■ CD and DVD printing on ink jet-printable CDs and DVDs, with your digital camera...
...; Three built-in the back of the printer is for connecting the printer to your computer.) ■ If you have the EPSON Stylus Photo R300M, your printer has a preview monitor to help you can print pictures directly from your printer in a variety of sizes perfect for sending...computer and print from your digital camera. Your EPSON Stylus® Photo R300 Series printer can transfer them immediately to the printer. Genuine EPSON® ink and papers create long-lasting and water-resistant prints. ■ CD and DVD printing on ink jet-printable CDs and DVDs, with your digital camera...

