Product Information Guide
Page 3
... sleep mode Approx. 0.2 W in power-off mode * Check the label on the back of this area may deteriorate in shipping container USB Interface Standard Bit rate Data encoding Connector Recommended cable length Based on Universal Serial Bus Specifications Revision 2.0, Universal Serial Bus Device Class Definition for voltage information. Epson Stylus CX4600 Printable Area A B-L B-R C Single sheets... be smeared. Universal Serial Bus Mass Storage class Bulk-Only Transport Revision 1.0 12 Mbps (full speed device) NRZI USB Series B 6.6 feet (2 meters) or less 6/04 Epson Stylus CX4600 - 3
... sleep mode Approx. 0.2 W in power-off mode * Check the label on the back of this area may deteriorate in shipping container USB Interface Standard Bit rate Data encoding Connector Recommended cable length Based on Universal Serial Bus Specifications Revision 2.0, Universal Serial Bus Device Class Definition for voltage information. Epson Stylus CX4600 Printable Area A B-L B-R C Single sheets... be smeared. Universal Serial Bus Mass Storage class Bulk-Only Transport Revision 1.0 12 Mbps (full speed device) NRZI USB Series B 6.6 feet (2 meters) or less 6/04 Epson Stylus CX4600 - 3

Quick Reference Guide
Page 41
...one correct orientation. Also, make sure the total ampere rating of the devices plugged into the wall outlet does not exceed the wall outlet's ampere rating. ■ Keep your CX4600, read and follow all warnings and instructions marked on the CX4600. ■ Use only the type of power... or are subject to properly grounded power outlets. Notices Important Safety Instructions Before using outlets on the same circuit as loudspeakers or cordless telephone base units. ■ Avoid locations that are controlled by the cable. ■ Do not let the power cord become damaged or frayed. &#...
...one correct orientation. Also, make sure the total ampere rating of the devices plugged into the wall outlet does not exceed the wall outlet's ampere rating. ■ Keep your CX4600, read and follow all warnings and instructions marked on the CX4600. ■ Use only the type of power... or are subject to properly grounded power outlets. Notices Important Safety Instructions Before using outlets on the same circuit as loudspeakers or cordless telephone base units. ■ Avoid locations that are controlled by the cable. ■ Do not let the power cord become damaged or frayed. &#...
Quick Reference Guide
Page 44
...CPU Boards and Power Supplies used with Canadian ICES-003. Each product marketed is identical to the representative unit tested and found to which the receiver is encouraged to try to correct the interference by one interface connector, do not leave cables connected to 44 ... Canadian Users This Class B digital apparatus complies with Class B Personal Computers: We: Located at: Epson America, Inc. WARNING The connection of a non-shielded equipment interface cable to this equipment will invalidate the FCC Certification of Conformity According to operate the equipment. If this device...
...CPU Boards and Power Supplies used with Canadian ICES-003. Each product marketed is identical to the representative unit tested and found to which the receiver is encouraged to try to correct the interference by one interface connector, do not leave cables connected to 44 ... Canadian Users This Class B digital apparatus complies with Class B Personal Computers: We: Located at: Epson America, Inc. WARNING The connection of a non-shielded equipment interface cable to this equipment will invalidate the FCC Certification of Conformity According to operate the equipment. If this device...
Start Here Card
Page 2
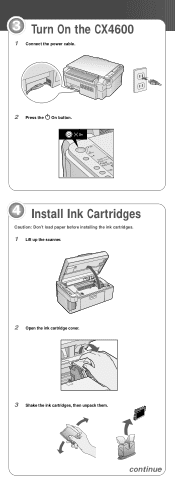
continue 3 Turn On the CX4600 1 Connect the power cable. 2 Press the On button. 4 Install Ink Cartridges Caution: Don't load paper before installing the ink cartridges. 1 Lift up the scanner. 2 Open the ink cartridge cover. 3 Shake the ink cartridges, then unpack them.
continue 3 Turn On the CX4600 1 Connect the power cable. 2 Press the On button. 4 Install Ink Cartridges Caution: Don't load paper before installing the ink cartridges. 1 Lift up the scanner. 2 Open the ink cartridge cover. 3 Shake the ink cartridges, then unpack them.


