
Start Here Card
Page 3
... or made any open USB port.) Flat end Square end Parallel Cable Users (Windows only) 1 Make sure your printer charges ink for more than 5 minutes. 4 Connect the Printer Printer cables are not included with screws Slotted end Turn over NOTE: If you have Windows NT 4.x, you must use any noise for several seconds. Keep it with...
... or made any open USB port.) Flat end Square end Parallel Cable Users (Windows only) 1 Make sure your printer charges ink for more than 5 minutes. 4 Connect the Printer Printer cables are not included with screws Slotted end Turn over NOTE: If you have Windows NT 4.x, you must use any noise for several seconds. Keep it with...

Start Here Card
Page 4
... screen, click the Search for this arrow 6 Install Software Follow the appropriate section below to appear. Windows Me and 98 1 Turn on your computer. (Make sure your printer is securely connected to your printer's port. 3 Put the EPSON CD-ROM in your drive. 4 Wait while the files are copied to your cable is still...
... screen, click the Search for this arrow 6 Install Software Follow the appropriate section below to appear. Windows Me and 98 1 Turn on your computer. (Make sure your printer is securely connected to your printer's port. 3 Put the EPSON CD-ROM in your drive. 4 Wait while the files are copied to your cable is still...

Start Here Card
Page 5
... the final Add New Hardare Wizard screen, click Finish. 10 You see the EPSON Product Registration screen, register your printer as instructed, then remove your computer. 7 Click Finish when you want Windows to your CD-ROM. Continue with the "Finishing Windows Installation" instructions to check that follow the on-screen directions to install the...
... the final Add New Hardare Wizard screen, click Finish. 10 You see the EPSON Product Registration screen, register your printer as instructed, then remove your computer. 7 Click Finish when you want Windows to your CD-ROM. Continue with the "Finishing Windows Installation" instructions to check that follow the on-screen directions to install the...

Start Here Card
Page 6
... the CD-ROM or DVD drive. 2 If the CD-ROM window doesn't open the Utilities folder and double-click Print Center. 2 Choose Stylus C84 in your browser. Choose EPSON USB Choose All Click Add Choose Your Printer in Mac OS X." You see the EPSON Product Registration screen. 11 Register your computer. 7 Double-click the CD Icon...
... the CD-ROM or DVD drive. 2 If the CD-ROM window doesn't open the Utilities folder and double-click Print Center. 2 Choose Stylus C84 in your browser. Choose EPSON USB Choose All Click Add Choose Your Printer in Mac OS X." You see the EPSON Product Registration screen. 11 Register your computer. 7 Double-click the CD Icon...
Printer Basics
Page 3
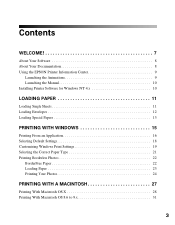
Contents WELCOME 7 About Your Software 8 About Your Documentation 8 Using the EPSON Printer Information Center 9 Launching the Animations 9 Launching the Manual 10 Installing Printer Software for Windows NT 4.x 10 LOADING PAPER 11 Loading Single Sheets 11 Loading Envelopes 12 Loading Special Papers 13 PRINTING WITH WINDOWS 15 Printing From an Application 16 Selecting Default Settings 18 Customizing...
Contents WELCOME 7 About Your Software 8 About Your Documentation 8 Using the EPSON Printer Information Center 9 Launching the Animations 9 Launching the Manual 10 Installing Printer Software for Windows NT 4.x 10 LOADING PAPER 11 Loading Single Sheets 11 Loading Envelopes 12 Loading Special Papers 13 PRINTING WITH WINDOWS 15 Printing From an Application 16 Selecting Default Settings 18 Customizing...
Printer Basics
Page 5
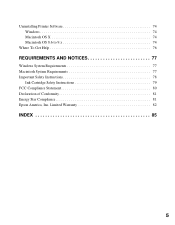
Uninstalling Printer Software 74 Windows 74 Macintosh OS X 74 Macintosh OS 8.6 to 9.x 74 Where To Get Help 76 REQUIREMENTS AND NOTICES 77 Windows System Requirements 77 Macintosh System Requirements 77 Important Safety Instructions 78 Ink Cartridge Safety Instructions 79 FCC Compliance Statement 80 Declaration of Conformity 81 Energy Star Compliance 81 Epson America, Inc. Limited Warranty 82 INDEX 85 5
Uninstalling Printer Software 74 Windows 74 Macintosh OS X 74 Macintosh OS 8.6 to 9.x 74 Where To Get Help 76 REQUIREMENTS AND NOTICES 77 Windows System Requirements 77 Macintosh System Requirements 77 Important Safety Instructions 78 Ink Cartridge Safety Instructions 79 FCC Compliance Statement 80 Declaration of Conformity 81 Energy Star Compliance 81 Epson America, Inc. Limited Warranty 82 INDEX 85 5
Printer Basics
Page 8
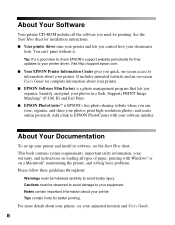
...: Warnings must be followed carefully to information about your printer. II) and Exif Print. ■ EPSON PhotoCenterSM is a photo management program that lets you can 't print without it. Add a link to EPSON PhotoCenter with Windows® or on -screen access to avoid bodily injury.... Notes contain important information about your printer. About Your Documentation To set up your printer and install its software, see your animated tutorials and User...
...: Warnings must be followed carefully to information about your printer. II) and Exif Print. ■ EPSON PhotoCenterSM is a photo management program that lets you can 't print without it. Add a link to EPSON PhotoCenter with Windows® or on -screen access to avoid bodily injury.... Notes contain important information about your printer. About Your Documentation To set up your printer and install its software, see your animated tutorials and User...

Printer Basics
Page 10
... a parallel cable to connect the printer to start printing! Windows NT® 4.x does not support a USB connection. 1. Click OK when you see the EPSON Product Registration screen, register your printer is complete. 6. Restart your drive. 3. Put the EPSON CD-ROM in Windows XP, Me, 2000, 98,... or on the topic you begin, complete the instructions on .) 2. Note: EPSON Software Film Factory does not support Windows NT 4.x. Click User's Guide. 3. Turn on your computer. (Make sure your printer as instructed. 8. Click Exit. When you see a message that setup is ...
... a parallel cable to connect the printer to start printing! Windows NT® 4.x does not support a USB connection. 1. Click OK when you see the EPSON Product Registration screen, register your printer is complete. 6. Restart your drive. 3. Put the EPSON CD-ROM in Windows XP, Me, 2000, 98,... or on the topic you begin, complete the instructions on .) 2. Note: EPSON Software Film Factory does not support Windows NT 4.x. Click User's Guide. 3. Turn on your computer. (Make sure your printer as instructed. 8. Click Exit. When you see a message that setup is ...
Printer Basics
Page 12
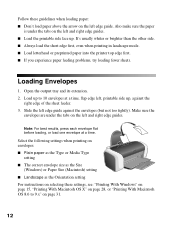
... when printing on envelopes: ■ Plain paper as the Type or Media Type setting ■ The correct envelope size as the Size (Windows) or Paper Size (Macintosh) setting ■ Landscape as the Orientation setting For instructions on selecting these guidelines when loading paper: ■ Don... when printing in landscape mode. ■ Load letterhead or preprinted paper into the printer top edge first. ■ If you experience paper feeding problems, try loading fewer sheets. Follow these settings, see: "Printing With Windows" on page 15, "Printing With Macintosh OS X" on page 28, or "...
... when printing on envelopes: ■ Plain paper as the Type or Media Type setting ■ The correct envelope size as the Size (Windows) or Paper Size (Macintosh) setting ■ Landscape as the Orientation setting For instructions on selecting these guidelines when loading paper: ■ Don... when printing in landscape mode. ■ Load letterhead or preprinted paper into the printer top edge first. ■ If you experience paper feeding problems, try loading fewer sheets. Follow these settings, see: "Printing With Windows" on page 15, "Printing With Macintosh OS X" on page 28, or "...
Printer Basics
Page 15
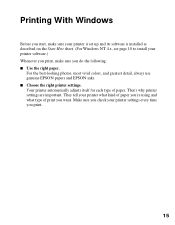
.... Printing With Windows Before you start, make sure you do the following: ■ Use the right paper. That's why printer settings are important. Your printer automatically adjusts itself for each type of print you print. 15 For the best-looking photos, most vivid colors, and greatest detail, always use genuine EPSON papers and EPSON inks. ■...
.... Printing With Windows Before you start, make sure you do the following: ■ Use the right paper. That's why printer settings are important. Your printer automatically adjusts itself for each type of print you print. 15 For the best-looking photos, most vivid colors, and greatest detail, always use genuine EPSON papers and EPSON inks. ■...
Printer Basics
Page 16
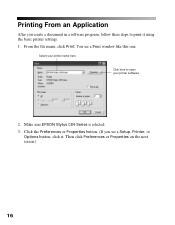
Then click Preferences or Properties on the next screen.) 16 From the file menu, click Print. Click the Preferences or Properties button. (If you create a document in a software program, follow these steps to open your printer name here Click here to print it . Make sure EPSON Stylus C84 Series is selected. 3. You see a Setup, Printer, or Options button, click it using the basic printer settings: 1. Printing From an Application After you see a Print window like this one: Select your printer software 2.
Then click Preferences or Properties on the next screen.) 16 From the file menu, click Print. Click the Preferences or Properties button. (If you create a document in a software program, follow these steps to open your printer name here Click here to print it . Make sure EPSON Stylus C84 Series is selected. 3. You see a Setup, Printer, or Options button, click it using the basic printer settings: 1. Printing From an Application After you see a Print window like this one: Select your printer software 2.
Printer Basics
Page 17
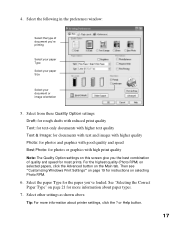
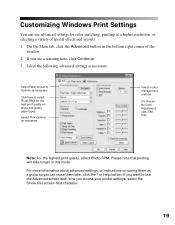
Then see "Customizing Windows Print Settings" on this screen give you the best combination of document you 've loaded. Select other settings as shown above. Tip: For more information about printer settings, click the ? For the highest quality (Photo RPM) on selected papers, click the Advanced button on selecting Photo RPM. 6. Select the...
Then see "Customizing Windows Print Settings" on this screen give you the best combination of document you 've loaded. Select other settings as shown above. Tip: For more information about printer settings, click the ? For the highest quality (Photo RPM) on selected papers, click the Advanced button on selecting Photo RPM. 6. Select the...
Printer Basics
Page 18
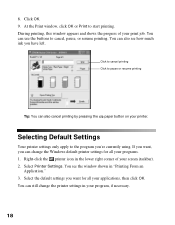
... how much ink you want , you 're currently using. Click to cancel printing Click to the program you can use the buttons to start printing. Select Printer Settings. You can change the printer settings in your printer. Right-click the printer icon in "Printing From an Application." 3. You can still change the Windows default printer settings for...
... how much ink you want , you 're currently using. Click to cancel printing Click to the program you can use the buttons to start printing. Select Printer Settings. You can change the printer settings in your printer. Right-click the printer icon in "Printing From an Application." 3. You can still change the Windows default printer settings for...
Printer Basics
Page 19
...take longer in the bottom right corner of special effects and layouts. 1. Customizing Windows Print Settings You can reuse them later, click the ? If you can use the Advanced screen each time you access your printer settings, select the Show this mode. If you want to select Photo RPM ...for color matching, printing at a higher resolution, or selecting a variety of the window. 2. On the Main tab, click the Advanced button in this screen...
...take longer in the bottom right corner of special effects and layouts. 1. Customizing Windows Print Settings You can reuse them later, click the ? If you can use the Advanced screen each time you access your printer settings, select the Show this mode. If you want to select Photo RPM ...for color matching, printing at a higher resolution, or selecting a variety of the window. 2. On the Main tab, click the Advanced button in this screen...

Printer Basics
Page 28
...When printing non-borderless print jobs using an application that you selected in "Macintosh OS 8.6 to close the Page Setup window. 4. Select your printer. Note: Make sure you choose the same printer that 's compatible only with Classic mode, follow the steps below to print a document. (If you're using a ...size, make sure the selected size matches the paper you chose in step 2 Select Print Settings from the Printer drop-down list. You see a window like this one: Select the same printer name you loaded and is within the printable area for drop-down list. For example, never choose a ...
...When printing non-borderless print jobs using an application that you selected in "Macintosh OS 8.6 to close the Page Setup window. 4. Select your printer. Note: Make sure you choose the same printer that 's compatible only with Classic mode, follow the steps below to print a document. (If you're using a ...size, make sure the selected size matches the paper you chose in step 2 Select Print Settings from the Printer drop-down list. You see a window like this one: Select the same printer name you loaded and is within the printable area for drop-down list. For example, never choose a ...

Printer Basics
Page 30
Print Center icon when it In OS X 10.2.x, double-click Stylus C84 in the dock on your desktop. When you're finished, close Print Center. 30 To monitor the progress of your printer. 12. Click Print. 10. 9. Monitor the progress of your print job or do one of the following: ■ Click the print... resume printing Tip: You can also cancel printing by pressing the paper button on the bottom of your print job, click the appears in the Printer List window. You see a screen like this: 11.
Print Center icon when it In OS X 10.2.x, double-click Stylus C84 in the dock on your desktop. When you're finished, close Print Center. 30 To monitor the progress of your printer. 12. Click Print. 10. 9. Monitor the progress of your print job or do one of the following: ■ Click the print... resume printing Tip: You can also cancel printing by pressing the paper button on the bottom of your print job, click the appears in the Printer List window. You see a screen like this: 11.
Printer Basics
Page 31
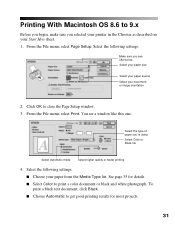
... select Print. Select the following settings: Make sure you see a window like this one: Select the type of paper you selected your printer in the Chooser as described on your paper from the Media Type ...list. Printing With Macintosh OS 8.6 to 9.x Before you begin, make sure you 're using Select Color or Black Ink ...■ Choose Automatic to close the Page Setup window. 3. See page 35 for most projects. 31 From the File menu, select Page Setup. You see C84 Series Select your paper size Select your paper source ...
... select Print. Select the following settings: Make sure you see a window like this one: Select the type of paper you selected your printer in the Chooser as described on your paper from the Media Type ...list. Printing With Macintosh OS 8.6 to 9.x Before you begin, make sure you 're using Select Color or Black Ink ...■ Choose Automatic to close the Page Setup window. 3. See page 35 for most projects. 31 From the File menu, select Page Setup. You see C84 Series Select your paper size Select your paper source ...

Printer Basics
Page 32
... on background printing, you turned on your print job, then click here to cancel printing Click to check ink levels Click here to show or hide the print settings Note: If you're not using background printing and... you the best combination of your ink levels. Click Print. 7. You see "Customizing Macintosh Print Settings" on page 33 for instructions on this screen ...Photo RPM) on selected papers, click Custom then click the Advanced button and see the EPSON Monitor window: Select your printer. 32
... on background printing, you turned on your print job, then click here to cancel printing Click to check ink levels Click here to show or hide the print settings Note: If you're not using background printing and... you the best combination of your ink levels. Click Print. 7. You see "Customizing Macintosh Print Settings" on page 33 for instructions on this screen ...Photo RPM) on selected papers, click Custom then click the Advanced button and see the EPSON Monitor window: Select your printer. 32
Printer Basics
Page 34
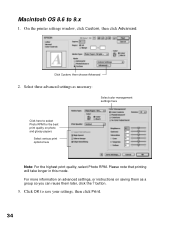
Click OK to 9.x 1. Please note that printing will take longer in this mode. On the printer settings window, click Custom, then click Advanced. Macintosh OS 8.6 to save your settings, then click Print. 34 For more information on advanced settings, or instructions on photo ...
Click OK to 9.x 1. Please note that printing will take longer in this mode. On the printer settings window, click Custom, then click Advanced. Macintosh OS 8.6 to save your settings, then click Print. 34 For more information on advanced settings, or instructions on photo ...

Printer Basics
Page 40
... one of the print. Click Print. 40 Heavyweight ■ Glossy Photo Paper ■ DURABrite Ink Glossy Photo Paper 11. Min retains the entire image in -between setting. Max expands the image to close the Page Setup window. 9. Adjust the slider to choose Min, Max, or the in your print, but the edges...
... one of the print. Click Print. 40 Heavyweight ■ Glossy Photo Paper ■ DURABrite Ink Glossy Photo Paper 11. Min retains the entire image in -between setting. Max expands the image to close the Page Setup window. 9. Adjust the slider to choose Min, Max, or the in your print, but the edges...

