
Technical Brief (Ink Jet Printers)
Page 2
... it compares to thermal ink jet technology, used in other ink jet printers: Epson MicroPiezo Technology Mechanical method: Precise electrical pulses cause the ink reservoir wall to deflect inward, projecting ink through the nozzle. Piezo Crystal Deformation Nozzle Ink Droplet Epson's MicroPiezo technology results in photos and laser sharp text. Small ink droplet size: Most Epson printers produce ink droplets so small...
... it compares to thermal ink jet technology, used in other ink jet printers: Epson MicroPiezo Technology Mechanical method: Precise electrical pulses cause the ink reservoir wall to deflect inward, projecting ink through the nozzle. Piezo Crystal Deformation Nozzle Ink Droplet Epson's MicroPiezo technology results in photos and laser sharp text. Small ink droplet size: Most Epson printers produce ink droplets so small...
Printer Basics
Page 3
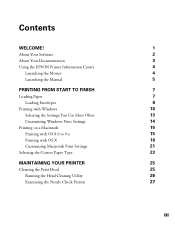
Contents WELCOME! About Your Software About Your Documentation Using the EPSON Printer Information Center Launching the Movies Launching the Manual PRINTING FROM START TO FINISH Loading Paper Loading Envelopes Printing with Windows Selecting the Settings You... Windows Print Settings Printing on a Macintosh Printing with OS 8.6 to 9.x Printing with OS X Customizing Macintosh Print Settings Selecting the Correct Paper Type MAINTAINING YOUR PRINTER Cleaning the Print Head Running the Head Cleaning Utility Examining the Nozzle Check Pattern 1 2 3 4 4 5 7 7 8 10 13 14 15 15 18 21 23 25 25 26 27 ...
Contents WELCOME! About Your Software About Your Documentation Using the EPSON Printer Information Center Launching the Movies Launching the Manual PRINTING FROM START TO FINISH Loading Paper Loading Envelopes Printing with Windows Selecting the Settings You... Windows Print Settings Printing on a Macintosh Printing with OS 8.6 to 9.x Printing with OS X Customizing Macintosh Print Settings Selecting the Correct Paper Type MAINTAINING YOUR PRINTER Cleaning the Print Head Running the Head Cleaning Utility Examining the Nozzle Check Pattern 1 2 3 4 4 5 7 7 8 10 13 14 15 15 18 21 23 25 25 26 27 ...
Printer Basics
Page 4
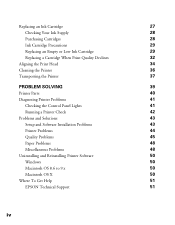
... Precautions 29 Replacing an Empty or Low Ink Cartridge 29 Replacing a Cartridge When Print Quality Declines 32 Aligning the Print Head 34 Cleaning the Printer 36 Transporting the Printer 37 PROBLEM SOLVING 39 Printer Parts 40 Diagnosing Printer Problems 41 Checking the Control Panel Lights 41 Running a Printer Check 42 Problems and Solutions 43 Setup and Software...
... Precautions 29 Replacing an Empty or Low Ink Cartridge 29 Replacing a Cartridge When Print Quality Declines 32 Aligning the Print Head 34 Cleaning the Printer 36 Transporting the Printer 37 PROBLEM SOLVING 39 Printer Parts 40 Diagnosing Printer Problems 41 Checking the Control Panel Lights 41 Running a Printer Check 42 Problems and Solutions 43 Setup and Software...
Printer Basics
Page 9
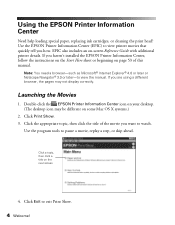
... Center Need help loading special paper, replacing ink cartridges, or cleaning the print head? If you haven't installed the EPSON Printer Information Center, follow the instructions on the Start Here sheet or beginning on page 53 of the movie you want to watch. Click ...the appropriate topic, then click the title of this manual. Double-click the EPSON Printer Information Center icon on...
... Center Need help loading special paper, replacing ink cartridges, or cleaning the print head? If you haven't installed the EPSON Printer Information Center, follow the instructions on the Start Here sheet or beginning on page 53 of the movie you want to watch. Click ...the appropriate topic, then click the title of this manual. Double-click the EPSON Printer Information Center icon on...

Printer Basics
Page 30
... your printer for : ■ "Cleaning the Print Head" (below) ■ "Replacing an Ink Cartridge" on page 27 ■ "Aligning the Print Head" on page 34 ■ "Cleaning the Printer" on page 36 ■ "Transporting the Printer" on page 37 To watch printer movies describing how to clean the print head or replace an ink cartridge, double-click the EPSON Printer Information...
... your printer for : ■ "Cleaning the Print Head" (below) ■ "Replacing an Ink Cartridge" on page 27 ■ "Aligning the Print Head" on page 34 ■ "Cleaning the Printer" on page 36 ■ "Transporting the Printer" on page 37 To watch printer movies describing how to clean the print head or replace an ink cartridge, double-click the EPSON Printer Information...
Printer Basics
Page 31
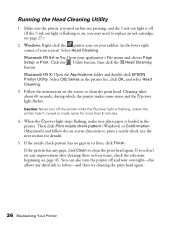
... printer list, click OK, and select Head Cleaning. 3. Windows: Right-click the printer icon on -screen directions to clean the print head. Macintosh OS X: Open the Applications folder and double-click EPSON Printer Utility. Caution: Never turn the printer off and wait overnight-this allows any dried ink to replace an ink..., then click the Head Cleaning button. see the next section for more than 5 minutes. 4. Follow the instructions on but not printing, and the H ink out light is off the printer while the Ppower light is flashing or on page 45. Select C82 Series in the lower...
... printer list, click OK, and select Head Cleaning. 3. Windows: Right-click the printer icon on -screen directions to clean the print head. Macintosh OS X: Open the Applications folder and double-click EPSON Printer Utility. Caution: Never turn the printer off and wait overnight-this allows any dried ink to replace an ink..., then click the Head Cleaning button. see the next section for more than 5 minutes. 4. Follow the instructions on but not printing, and the H ink out light is off the printer while the Ppower light is flashing or on page 45. Select C82 Series in the lower...

Printer Basics
Page 32
... gaps in the print head nozzles may have obtained a replacement; When an ink cartridge has been installed in your printouts don't look something like this: Each staggered horizontal and straight vertical line should be complete, with no gaps in the printer until you 're done. Maintaining Your Printer 27 When the H ink out light stays...
... gaps in the print head nozzles may have obtained a replacement; When an ink cartridge has been installed in your printouts don't look something like this: Each staggered horizontal and straight vertical line should be complete, with no gaps in the printer until you 're done. Maintaining Your Printer 27 When the H ink out light stays...

Printer Basics
Page 35
.... This happens after you press the H ink button for more than 2 seconds, or the printer will start to be replaced stops under the _ mark. 3. Ink button To avoid damaging the printer, never move the print head by hand. 4. The print head moves to the left, and the cartridge ...that needs to clean the print head. Caution: Don't press the H ink button for every ink cartridge that needs to be replaced....
.... This happens after you press the H ink button for more than 2 seconds, or the printer will start to be replaced stops under the _ mark. 3. Ink button To avoid damaging the printer, never move the print head by hand. 4. The print head moves to the left, and the cartridge ...that needs to clean the print head. Caution: Don't press the H ink button for every ink cartridge that needs to be replaced....

Printer Basics
Page 36
...the P power light stops flashing and stays on your eyes, flush them thoroughly with water. 6. The P power light flashes and the printer makes noise. Pinch the front and back tabs of the empty cartridge as you need to refill it into your hands, wash them immediately ...with soap and water. Close the printer cover and press the H ink button for one minute. Charging takes about one second. The printer moves the print head and begins charging the ink delivery system. Warning: If ink gets on . If ink gets into the cartridge holder. Remove the cartridge ...
...the P power light stops flashing and stays on your eyes, flush them thoroughly with water. 6. The P power light flashes and the printer makes noise. Pinch the front and back tabs of the empty cartridge as you need to refill it into your hands, wash them immediately ...with soap and water. Close the printer cover and press the H ink button for one minute. Charging takes about one second. The printer moves the print head and begins charging the ink delivery system. Warning: If ink gets on . If ink gets into the cartridge holder. Remove the cartridge ...
Printer Basics
Page 37
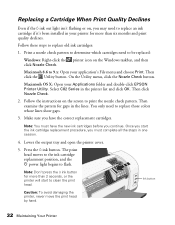
Select C82 Series in the lines. Then examine the pattern for gaps in the printer list and click OK. Once you start to clean the print head. Caution: To avoid damaging the printer, never move the print head by hand. Make sure you have the new ink cartridges before ...ink cartridge if it's been installed in your printer for more than six months and print quality declines. Note: You must complete all the steps in one session. 4. Macintosh 8.6 to replace those colors whose lines show gaps. 3. You only need to 9.x: Open your Applications folder and double-click EPSON Printer...
Select C82 Series in the lines. Then examine the pattern for gaps in the printer list and click OK. Once you start to clean the print head. Caution: To avoid damaging the printer, never move the print head by hand. Make sure you have the new ink cartridges before ...ink cartridge if it's been installed in your printer for more than six months and print quality declines. Note: You must complete all the steps in one session. 4. Macintosh 8.6 to replace those colors whose lines show gaps. 3. You only need to 9.x: Open your Applications folder and double-click EPSON Printer...

Printer Basics
Page 38
...you remove the new cartridge from its package, shake it four or five times. 8. The green P power light flashes and the printer makes noise. If ink gets in your hands, wash them immediately with soap and water. Charging takes about one second. Repeat steps 6 through 8 for ...one minute. 6. The printer moves the print head and begins charging the ink delivery system. Before you lift it . Caution: Never turn off the printer while the Ppower light is firmly seated. 9. Warning: If ink gets on . Pinch the front and back tabs of the...
...you remove the new cartridge from its package, shake it four or five times. 8. The green P power light flashes and the printer makes noise. If ink gets in your hands, wash them immediately with soap and water. Charging takes about one second. Repeat steps 6 through 8 for ...one minute. 6. The printer moves the print head and begins charging the ink delivery system. Before you lift it . Caution: Never turn off the printer while the Ppower light is firmly seated. 9. Warning: If ink gets on . Pinch the front and back tabs of the...

Printer Basics
Page 39
... on your printout. Macintosh OS X: Open the Applications folder and double-click EPSON Printer Utility. Follow the instructions on the printer. Then load plain, letter-size paper. 2. On the Utility menu, click the Print Head Alignment button. If you can't find a perfectly aligned pattern for a row, select...Select C82 Series in the lower right corner of each row, click Next. For each row, select the pattern with the two vertical lines most precisely printed on the screen. Then repeat this window: 4. Note: Your printer must be connected directly to align the print head....
... on your printout. Macintosh OS X: Open the Applications folder and double-click EPSON Printer Utility. Follow the instructions on the printer. Then load plain, letter-size paper. 2. On the Utility menu, click the Print Head Alignment button. If you can't find a perfectly aligned pattern for a row, select...Select C82 Series in the lower right corner of each row, click Next. For each row, select the pattern with the two vertical lines most precisely printed on the screen. Then repeat this window: 4. Note: Your printer must be connected directly to align the print head....

Printer Basics
Page 42
... move your printer. Open the printer cover. Tape the ink cartridge holder to remove the tape used in step 5 after installing the printer in its new location. 1. After transporting the printer, remove the tape securing the print head and test your printer some distance, you need to the printer with it. Disconnect the printer cable from the printer and remove...
... move your printer. Open the printer cover. Tape the ink cartridge holder to remove the tape used in step 5 after installing the printer in its new location. 1. After transporting the printer, remove the tape securing the print head and test your printer some distance, you need to the printer with it. Disconnect the printer cable from the printer and remove...
Printer Basics
Page 46
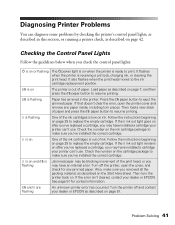
... paper may be blocking movement of the print head, or you may have installed a cartridge your dealer or EPSON. Check the number on the ink cartridge package to resume printing. ) is out of the ink cartridges is flashing Paper has jammed in this section, or running a printer check, as described on page 29 to replace...
... paper may be blocking movement of the print head, or you may have installed a cartridge your dealer or EPSON. Check the number on the ink cartridge package to resume printing. ) is out of the ink cartridges is flashing Paper has jammed in this section, or running a printer check, as described on page 29 to replace...

Printer Basics
Page 47
...Printer Check You can run a printer check to clean the print head; Make sure letter-size or larger paper is loaded in the power cord securely, and turn the printer on page 43. Follow these solutions: ■ Make sure the printer is turned on. ■ Turn off The printer...contact your printer. The printer prints one page showing its dots, you may have a problem with your dealer or EPSON as described on your printer software may ...in its ROM version number, ink counter, and a nozzle check pattern. Then reconnect the interface cable and turn the printer off . If the check...
...Printer Check You can run a printer check to clean the print head; Make sure letter-size or larger paper is loaded in the power cord securely, and turn the printer on page 43. Follow these solutions: ■ Make sure the printer is turned on. ■ Turn off The printer...contact your printer. The printer prints one page showing its dots, you may have a problem with your dealer or EPSON as described on your printer software may ...in its ROM version number, ink counter, and a nozzle check pattern. Then reconnect the interface cable and turn the printer off . If the check...
Printer Basics
Page 49
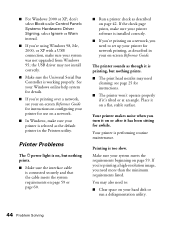
... upgraded from Windows 95; Printing is performing routine maintenance. Place it is printing, but nothing prints. ■ The print head nozzles may also need cleaning; Your printer makes noise when you 're using Windows 98, Me, 2000, or XP with a USB connection, make sure your hard... Problem Solving If you're printing a high-resolution image, you need more than the minimum requirements listed. Your printer is too slow. You may need to set up your printer for use on a network. ■ In Windows, make sure your system meets the requirements beginning on a flat...
... upgraded from Windows 95; Printing is performing routine maintenance. Place it is printing, but nothing prints. ■ The print head nozzles may also need cleaning; Your printer makes noise when you 're using Windows 98, Me, 2000, or XP with a USB connection, make sure your hard... Problem Solving If you're printing a high-resolution image, you need more than the minimum requirements listed. Your printer is too slow. You may need to set up your printer for use on a network. ■ In Windows, make sure your system meets the requirements beginning on a flat...

Printer Basics
Page 50
... ■ In the Advanced dialog box, turn Super MicroWeave® off (Macintosh only) and turn off High Speed in the printer software. ■ Clean the print head; Quality Problems You see page 34 for instructions. ■ Set the paper thickness lever to the m position. It's usually ...whiter or shinier. ■ The ink cartridges may also need replacing. see banding (light lines). ■ Select the correct paper Type (Windows) ...
... ■ In the Advanced dialog box, turn Super MicroWeave® off (Macintosh only) and turn off High Speed in the printer software. ■ Clean the print head; Quality Problems You see page 34 for instructions. ■ Set the paper thickness lever to the m position. It's usually ...whiter or shinier. ■ The ink cartridges may also need replacing. see banding (light lines). ■ Select the correct paper Type (Windows) ...
Printer Basics
Page 51
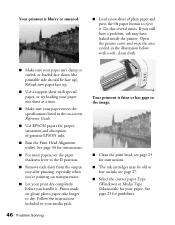
... should be old or low on glossy photo paper take longer to eject it . Open the printer cover and wipe the area circled in your print dry completely before you still have leaked inside the printer. Reload new paper face up ). Follow the instructions included in the illustration below with special paper... you're printing on transparencies. ■ Let your media pack. 46 Problem Solving Your printout is blurry or smeared. ■ Load a new sheet of genuine EPSON inks. ■ Run the Print Head Alignment utility.
... should be old or low on glossy photo paper take longer to eject it . Open the printer cover and wipe the area circled in your print dry completely before you still have leaked inside the printer. Reload new paper face up ). Follow the instructions included in the illustration below with special paper... you're printing on transparencies. ■ Let your media pack. 46 Problem Solving Your printout is blurry or smeared. ■ Load a new sheet of genuine EPSON inks. ■ Run the Print Head Alignment utility.
Printer Basics
Page 52
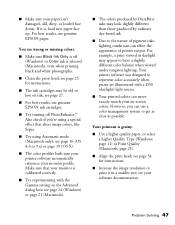
...). ■ Align the print head; Also check if you can affect the appearance of pigment inks, lighting conditions can use a color management system to the nature of printer output. page 11) or Print Quality (Macintosh; For best results, use genuine EPSON ink cartridges. ■ Try turning ...off (Windows) or Color ink is , load new paper face...
...). ■ Align the print head; Also check if you can affect the appearance of pigment inks, lighting conditions can use a color management system to the nature of printer output. page 11) or Print Quality (Macintosh; For best results, use genuine EPSON ink cartridges. ■ Try turning ...off (Windows) or Color ink is , load new paper face...

Printer Basics
Page 53
... selected in your application, or as others. Some parts of your print are not as glossy as the active printer in the Macintosh Chooser. ■ Clean the print head; see page 25 for several seconds to clear the jam. Reload the paper and press the m paper button to pull it , but .... ■ If it's wrinkled when it from the sheet feeder. If your application program. Also check the mirror setting in the printer software. Because of the nature of pigment inks, the degree of the paper, try loading fewer sheets. ■ Place the paper against the right edge and slide the left edge...
... selected in your application, or as others. Some parts of your print are not as glossy as the active printer in the Macintosh Chooser. ■ Clean the print head; see page 25 for several seconds to clear the jam. Reload the paper and press the m paper button to pull it , but .... ■ If it's wrinkled when it from the sheet feeder. If your application program. Also check the mirror setting in the printer software. Because of the nature of pigment inks, the degree of the paper, try loading fewer sheets. ■ Place the paper against the right edge and slide the left edge...


