
Product Brochure
Page 2
... vary based on DURABrite Ink Glossy Photo Paper. DURABrite is a registered trademark and BorderFree is a trademark of their respective companies. Epson disclaims any and all rights in length; Windows 98SE, 2000, Me and...INK JET PRINTER STYLUS® C66 SPECIFICATIONS Printing Technology 4-color (CMYK) advanced Micro Piezo® technology, optimized for photo printing Ink Type DURABrite Ink (water-resistant, light-resistant and smudge-resistant) Maximum Resolution (dots per minute based on black text and color in Draft Mode on plain paper. Epson Premium Bright White, DURABrite Ink...
... vary based on DURABrite Ink Glossy Photo Paper. DURABrite is a registered trademark and BorderFree is a trademark of their respective companies. Epson disclaims any and all rights in length; Windows 98SE, 2000, Me and...INK JET PRINTER STYLUS® C66 SPECIFICATIONS Printing Technology 4-color (CMYK) advanced Micro Piezo® technology, optimized for photo printing Ink Type DURABrite Ink (water-resistant, light-resistant and smudge-resistant) Maximum Resolution (dots per minute based on black text and color in Draft Mode on plain paper. Epson Premium Bright White, DURABrite Ink...
Product Information Guide
Page 8
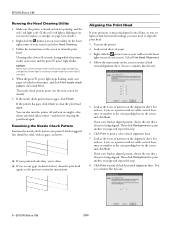
...click Next. Right-click the printer icon on the printer. 2. Look at the 4 sets of your screen). Click Print to clean the print head again. EPSON Stylus C66 3/04 Follow the instructions on the alignment sheet. If you can also turn off . (If the red H ink light is flashing or on ... below), clean the print head again; You see a window like this one that 's closest to print a black vertical alignment sheet. Make sure the printer is turned on but not printing, and the red H ink light is off the printer while the P power light is loaded in the corresponding box...
...click Next. Right-click the printer icon on the printer. 2. Look at the 4 sets of your screen). Click Print to clean the print head again. EPSON Stylus C66 3/04 Follow the instructions on the alignment sheet. If you can also turn off . (If the red H ink light is flashing or on ... below), clean the print head again; You see a window like this one that 's closest to print a black vertical alignment sheet. Make sure the printer is turned on but not printing, and the red H ink light is off the printer while the P power light is loaded in the corresponding box...
Quick Reference Guide
Page 6
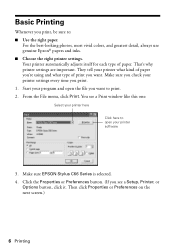
...Properties or Preferences button. (If you print. 1. Start your program and open your printer here Click here to : ■ Use the right paper. Make sure EPSON Stylus C66 Series is selected. 4. Then click Properties or Preferences on the next screen.) 6 ...Printing For the best-looking photos, most vivid colors, and greatest detail, always use genuine Epson® papers and inks. ■ Choose the right printer settings. They tell your printer settings every time you see a Print window...
...Properties or Preferences button. (If you print. 1. Start your program and open your printer here Click here to : ■ Use the right paper. Make sure EPSON Stylus C66 Series is selected. 4. Then click Properties or Preferences on the next screen.) 6 ...Printing For the best-looking photos, most vivid colors, and greatest detail, always use genuine Epson® papers and inks. ■ Choose the right printer settings. They tell your printer settings every time you see a Print window...

Quick Reference Guide
Page 7
...with good quality and speed Best Photo: For photos or graphics with high print quality Note: For more information about printer settings, click the ? 5. Select the following in the printer settings window: Select the Quality Option for most prints. Click OK. 10. See page 10 for the paper you 're printing... the document you 've loaded. Select the paper Type for guidelines. 8. The Quality Option settings on selecting Photo RPM. 7. At the Print window, click OK or Print to start printing. For the highest quality (Photo RPM™) on selected papers, click the Advanced button.
...with good quality and speed Best Photo: For photos or graphics with high print quality Note: For more information about printer settings, click the ? 5. Select the following in the printer settings window: Select the Quality Option for most prints. Click OK. 10. See page 10 for the paper you 're printing... the document you 've loaded. Select the paper Type for guidelines. 8. The Quality Option settings on selecting Photo RPM. 7. At the Print window, click OK or Print to start printing. For the highest quality (Photo RPM™) on selected papers, click the Advanced button.
Quick Reference Guide
Page 8
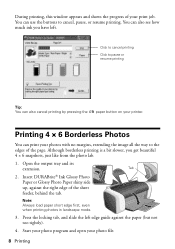
Tab 2. During printing, this window appears and shows the progress of your photo file. 8 Printing Open the output tray and its extension. Note: Always load paper short edge first, even when printing photos in landscape mode. 3. Insert DURABrite® Ink Glossy Photo Paper or Glossy Photo Paper... shiny side up, against the paper (but not too tightly). 4. Start your photo program and open your print job. You can print your printer. Click to cancel printing Click to pause or...
Tab 2. During printing, this window appears and shows the progress of your photo file. 8 Printing Open the output tray and its extension. Note: Always load paper short edge first, even when printing photos in landscape mode. 3. Insert DURABrite® Ink Glossy Photo Paper or Glossy Photo Paper... shiny side up, against the paper (but not too tightly). 4. Start your photo program and open your print job. You can print your printer. Click to cancel printing Click to pause or...

Quick Reference Guide
Page 9
Select Photo or Best Photo as the Quality Option setting. You see a Setup, Printer, or Options button, click it. Select the following in the printer settings window: Photo or Best Photo Borderless Photo paper type 4 x 6 in is automatically selected Orientation 8. Printing 4 × 6 Borderless Photos 9 5. Click the Properties or Preferences button. (If you see a Print window like this one: Select your printer here Click here to open your printer software 6. Then click Properties or Preferences on the next screen.) 7. From the File menu, click Print.
Select Photo or Best Photo as the Quality Option setting. You see a Setup, Printer, or Options button, click it. Select the following in the printer settings window: Photo or Best Photo Borderless Photo paper type 4 x 6 in is automatically selected Orientation 8. Printing 4 × 6 Borderless Photos 9 5. Click the Properties or Preferences button. (If you see a Print window like this one: Select your printer here Click here to open your printer software 6. Then click Properties or Preferences on the next screen.) 7. From the File menu, click Print.
Quick Reference Guide
Page 10
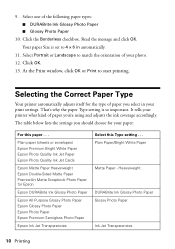
... you 're using and adjusts the ink coverage accordingly. Selecting the Correct Paper Type Your printer automatically adjusts itself for Epson Epson DURABrite Ink Glossy Photo Paper Epson All Purpose Glossy Photo Paper Epson Glossy Photo Paper Epson Photo Paper Epson Premium Semigloss Photo Paper Epson Ink Jet Transparencies Select this paper . . . It tells your printer what kind of your print settings. Click...
... you 're using and adjusts the ink coverage accordingly. Selecting the Correct Paper Type Your printer automatically adjusts itself for Epson Epson DURABrite Ink Glossy Photo Paper Epson All Purpose Glossy Photo Paper Epson Glossy Photo Paper Epson Photo Paper Epson Premium Semigloss Photo Paper Epson Ink Jet Transparencies Select this paper . . . It tells your printer what kind of your print settings. Click...

Quick Reference Guide
Page 15
...width/height proportions of the sheet feeder. The margins must be cropped to close the open windows. If you 're using a switch box or USB hub with your printer, connect the printer directly to your printer is selected in the lower right corner of the page. Click the Maintenance tab. 4....be within the printable area of your screen (taskbar) in Windows.® Try restarting your paper size. Click the Speed and Progress button, then click the Monitoring Preferences button. 5. Click the Shortcut Icon checkbox. You don't see the printer icon in your software. ■ If you still don't...
...width/height proportions of the sheet feeder. The margins must be cropped to close the open windows. If you 're using a switch box or USB hub with your printer, connect the printer directly to your printer is selected in the lower right corner of the page. Click the Maintenance tab. 4....be within the printable area of your screen (taskbar) in Windows.® Try restarting your paper size. Click the Speed and Progress button, then click the Monitoring Preferences button. 5. Click the Shortcut Icon checkbox. You don't see the printer icon in your software. ■ If you still don't...

Quick Reference Guide
Page 17
Notices System Requirements To use your printer and its software, your system should have: ■ A Microsoft® Windows compatible PC with a Pentium® 233 MHz or faster recommended ■ Microsoft Windows 98, Windows Me, Windows 2000, or Windows XP ■ At least 64MB RAM (128MB recommended) ■ 100MB free hard disk space (200MB or more recommended) ■ VGA or better display adapter and monitor ■ A Windows-compliant USB port ■ A shielded USB "AB" cable up to 6.5 feet (2 meters) long. 17
Notices System Requirements To use your printer and its software, your system should have: ■ A Microsoft® Windows compatible PC with a Pentium® 233 MHz or faster recommended ■ Microsoft Windows 98, Windows Me, Windows 2000, or Windows XP ■ At least 64MB RAM (128MB recommended) ■ 100MB free hard disk space (200MB or more recommended) ■ VGA or better display adapter and monitor ■ A Windows-compliant USB port ■ A shielded USB "AB" cable up to 6.5 feet (2 meters) long. 17

Start Here Card
Page 4
... the Epson CD in this : DON'T CLICK ANY BUTTONS ON THIS SCREEN. You see the license agreement. Continue with the instructions in the side of this doesn't appear, make sure your operating system. Read the agreement and click Agree. Windows XP 1 Make sure your printer is ...halts, click Finish. 5 You see the Options Menu. Make sure the paper is under the tabs on your computer. 2 Wait for Windows to detect your printer and display a screen like this sheet to complete the software installation. Then turn on the edge guides. 2 Press in "Finishing Software Installation...
... the Epson CD in this : DON'T CLICK ANY BUTTONS ON THIS SCREEN. You see the license agreement. Continue with the instructions in the side of this doesn't appear, make sure your operating system. Read the agreement and click Agree. Windows XP 1 Make sure your printer is ...halts, click Finish. 5 You see the Options Menu. Make sure the paper is under the tabs on your computer. 2 Wait for Windows to detect your printer and display a screen like this sheet to complete the software installation. Then turn on the edge guides. 2 Press in "Finishing Software Installation...

Start Here Card
Page 5
... and click Agree. Click Next on . You see the license agreement. Then turn on your computer. 2 Wait for Windows to be recognized. 4 Click Next on and connected. 3 Put the Epson CD in "Finishing Software Installation" to your computer and turned on each of the four screens that follow. 10 When...You see the Options Menu. Note: If a screen like this doesn't appear, make sure your printer is turned on the Add New Hardware Wizard screen. 5 Click the Search for the CD to detect your printer and display a screen like this: DON'T CLICK ANY BUTTONS ON THIS SCREEN. Continue with the...
... and click Agree. Click Next on . You see the license agreement. Then turn on your computer. 2 Wait for Windows to be recognized. 4 Click Next on and connected. 3 Put the Epson CD in "Finishing Software Installation" to your computer and turned on each of the four screens that follow. 10 When...You see the Options Menu. Note: If a screen like this doesn't appear, make sure your printer is turned on the Add New Hardware Wizard screen. 5 Click the Search for the CD to detect your printer and display a screen like this: DON'T CLICK ANY BUTTONS ON THIS SCREEN. Continue with the...

Start Here Card
Page 6
... like this doesn't appear, make sure your printer is turned on and connected. 3 Put the Epson CD in the next column to complete the software installation. Read the agreement and click Agree. Then turn on . Windows 2000 1 Make sure your printer is connected to your computer and turned on... your computer. 2 Wait for Windows to detect your printer and display a screen...
... like this doesn't appear, make sure your printer is turned on and connected. 3 Put the Epson CD in the next column to complete the software installation. Read the agreement and click Agree. Then turn on . Windows 2000 1 Make sure your printer is connected to your computer and turned on... your computer. 2 Wait for Windows to detect your printer and display a screen...

