User Manual
Page 8
... to Use This Manual 2 Warnings, Cautions, and Notes 2 Chapter 1 Setting Up Your Printer About Your Ink Jet Printer l-2 A few precautions l-2 Choosing the right paper l-3 Unpacking the Printer l-4 Attaching the paper support l-5 Choosing a Place for the Printer l-6 Plugging in the Printer l-7 Installing the Ink Cartridge l-8 Testing the Printer l-13 Loading paper in the paper feeder l-13 Running the self test l-14...
... to Use This Manual 2 Warnings, Cautions, and Notes 2 Chapter 1 Setting Up Your Printer About Your Ink Jet Printer l-2 A few precautions l-2 Choosing the right paper l-3 Unpacking the Printer l-4 Attaching the paper support l-5 Choosing a Place for the Printer l-6 Plugging in the Printer l-7 Installing the Ink Cartridge l-8 Testing the Printer l-13 Loading paper in the paper feeder l-13 Running the self test l-14...
User Manual
Page 9
... Changing the default settings 2-15 Chapter 3 Mainfenunce and Troubleshooting Replacing the Ink Cartridge 3-2 Cleaning the Print Head 3-3 Cleaning the Printer 3-4 Transporting the Printer 3-4 Troubleshooting 3-5 Power supply 3-5 Printing 3-6 Paper handling 3-10 Appendix Technical Specifications A-2 Printer specifications A-2 Interface specifications A-7 Initialization A-11 Command Summary A-13 Sending printer commands A-13 Using the command summary A-13 General operation A-13 Paper feeding...
... Changing the default settings 2-15 Chapter 3 Mainfenunce and Troubleshooting Replacing the Ink Cartridge 3-2 Cleaning the Print Head 3-3 Cleaning the Printer 3-4 Transporting the Printer 3-4 Troubleshooting 3-5 Power supply 3-5 Printing 3-6 Paper handling 3-10 Appendix Technical Specifications A-2 Printer specifications A-2 Interface specifications A-7 Initialization A-11 Command Summary A-13 Sending printer commands A-13 Using the command summary A-13 General operation A-13 Paper feeding...
User Manual
Page 11
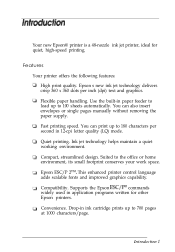
... adds scalable fonts and improved graphics capability. Convenience. Use the built-in ink cartridge prints up to the office or home environment, its small footprint conserves your work space. Quiet printing. Your new Epson@ printer is a 48-nozzle ink jet printer, ideal for other Epson printers. You can also insert envelopes or single pages manually without removing the paper...
... adds scalable fonts and improved graphics capability. Convenience. Use the built-in ink cartridge prints up to the office or home environment, its small footprint conserves your work space. Quiet printing. Your new Epson@ printer is a 48-nozzle ink jet printer, ideal for other Epson printers. You can also insert envelopes or single pages manually without removing the paper...
User Manual
Page 13
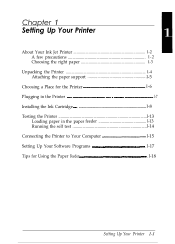
Chapter 1 Setting Up Your Printer About Your Ink Jet Printer 1-2 A few precautions 1-2 Choosing the right paper 1-3 Unpacking the Printer 1-4 Attaching the paper support l-5 Choosing a Place for the Printer l-6 Plugging in the Printer l-7 Installing the Ink Cartridge l-8 Testing the Printer l-13 Loading paper in the paper feeder l-13 Running the self test l-14 Connecting the Printer to Your Computer l-15 Setting Up Your Software Programs l-17 Tips for Using the Paper Feeder l-18 Setting Up Your Printer 1-1
Chapter 1 Setting Up Your Printer About Your Ink Jet Printer 1-2 A few precautions 1-2 Choosing the right paper 1-3 Unpacking the Printer 1-4 Attaching the paper support l-5 Choosing a Place for the Printer l-6 Plugging in the Printer l-7 Installing the Ink Cartridge l-8 Testing the Printer l-13 Loading paper in the paper feeder l-13 Running the self test l-14 Connecting the Printer to Your Computer l-15 Setting Up Your Software Programs l-17 Tips for Using the Paper Feeder l-18 Setting Up Your Printer 1-1
User Manual
Page 14
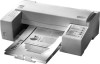
... to operate your printer is much quieter than the toner cartridges used by lasers. An ink jet printer produces cost-effective, quality print results. And the ink cartridge inside your ink jet printer safely and efficiently: CI Under normal circumstances, ink will not come out of the cartridge. When you use... may wonder how they differ from its package. About Your Ink Jet Printer If you're new to ink jet printers, you install the ink cartridge, do not open the clamp or remove the ink cartridge except to replace it with water. 0 Keep the ink cartridges out of the reach of children.
... to operate your printer is much quieter than the toner cartridges used by lasers. An ink jet printer produces cost-effective, quality print results. And the ink cartridge inside your ink jet printer safely and efficiently: CI Under normal circumstances, ink will not come out of the cartridge. When you use... may wonder how they differ from its package. About Your Ink Jet Printer If you're new to ink jet printers, you install the ink cartridge, do not open the clamp or remove the ink cartridge except to replace it with water. 0 Keep the ink cartridges out of the reach of children.

User Manual
Page 15
...or too thin. 0 Install the ink cartridge immediately after you remove it is in your hand inside the printer or touch the cartridge during printing. 0 Before transporting the printer, make sure the print head is not absorbent enough, the ink may result in the Appendix for more... information. Setting Up Your Printer 1-3 With paper that is capped, and do not remove the ink cartridge. Also, avoid paper that has a rough finish or a slick, coated finish. Paper absorbency is selecting the right paper. However, with your ink jet printer...
...or too thin. 0 Install the ink cartridge immediately after you remove it is in your hand inside the printer or touch the cartridge during printing. 0 Before transporting the printer, make sure the print head is not absorbent enough, the ink may result in the Appendix for more... information. Setting Up Your Printer 1-3 With paper that is capped, and do not remove the ink cartridge. Also, avoid paper that has a rough finish or a slick, coated finish. Paper absorbency is selecting the right paper. However, with your ink jet printer...
User Manual
Page 16
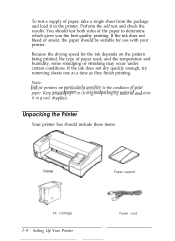
...its origind pnckqing rrznterial and store it in 0 cool, dry plnce. Note: Ink jet printers me plrrticulmdy sensitizle to determine which gives you the best quality printing. You should be suitable for the ink depends on the pattern being printed, the type of paper used, and the ... speed for use with your printer. To test a supply of paper, take a single sheet from the package and load it in the printer. Unpacking the Printer Your printer box should include these items: Ink cartridge 1-4 Setting Up Your Printer Paper support Power cord If the ink does not dry quickly enough,...
...its origind pnckqing rrznterial and store it in 0 cool, dry plnce. Note: Ink jet printers me plrrticulmdy sensitizle to determine which gives you the best quality printing. You should be suitable for the ink depends on the pattern being printed, the type of paper used, and the ... speed for use with your printer. To test a supply of paper, take a single sheet from the package and load it in the printer. Unpacking the Printer Your printer box should include these items: Ink cartridge 1-4 Setting Up Your Printer Paper support Power cord If the ink does not dry quickly enough,...
User Manual
Page 20
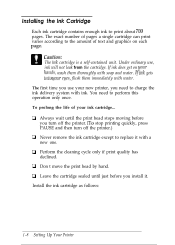
...PAUSE and then turn off the printer.) Cl Never remove the ink cartridge except to perform this operation only once. Install the ink cartridge as follows: 1-8 Setting Up Your Printer lf mk gets iuto l/our et/es, flush them thoroughly with ink. tJ Perform the cleaning cycle ...your ink cartridge... The first time you need to replace it . U Don't move the print head by hand. Installing the Ink Cartridge Each ink cartridge contains enough ink to the amount of your new printer, you use , ink will not leak from the cartridge. The exact number of pages a single cartridge can...
...PAUSE and then turn off the printer.) Cl Never remove the ink cartridge except to perform this operation only once. Install the ink cartridge as follows: 1-8 Setting Up Your Printer lf mk gets iuto l/our et/es, flush them thoroughly with ink. tJ Perform the cleaning cycle ...your ink cartridge... The first time you need to replace it . U Don't move the print head by hand. Installing the Ink Cartridge Each ink cartridge contains enough ink to the amount of your new printer, you use , ink will not leak from the cartridge. The exact number of pages a single cartridge can...
User Manual
Page 21
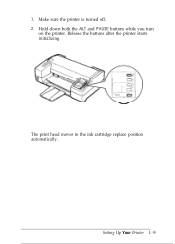
Setting Up Your Printer 1 - 9 Make sure the printer is turned off. 2. Hold down both the ALT and PAUSE buttons while you turn on the printer. Release the buttons after the printer starts initializing. The print head moves to the ink cartridge replace position automatically. 1.
Setting Up Your Printer 1 - 9 Make sure the printer is turned off. 2. Hold down both the ALT and PAUSE buttons while you turn on the printer. Release the buttons after the printer starts initializing. The print head moves to the ink cartridge replace position automatically. 1.
User Manual
Page 22
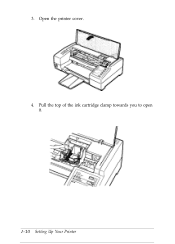
Open the printer cover. 4. Pull the top of the ink cartridge clamp towards you to open it. 1-10 Setting Up Your Printer 3.
Open the printer cover. 4. Pull the top of the ink cartridge clamp towards you to open it. 1-10 Setting Up Your Printer 3.
User Manual
Page 23
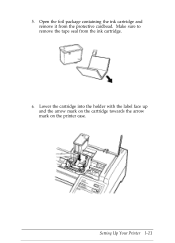
Setting Up Your Printer l-11 Make sure to remove the tape seal from the protective cardboad. Lower the cartridge into the holder with the label face up and the arrow mark on the cartridge towards the arrow mark on the printer case. Open the foil package containing the ink cartridge and remove it from the ink cartridge. 6. 5.
Setting Up Your Printer l-11 Make sure to remove the tape seal from the protective cardboad. Lower the cartridge into the holder with the label face up and the arrow mark on the cartridge towards the arrow mark on the printer case. Open the foil package containing the ink cartridge and remove it from the ink cartridge. 6. 5.
User Manual
Page 24
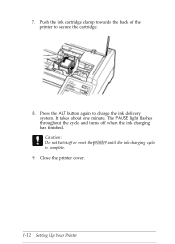
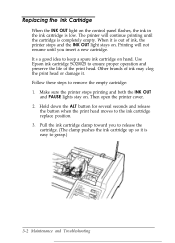
The PAUSE light flashes throughout the cycle and turns off or reset the printer until the ink-charging cycle is complete. 9. Caution: Do not tur~z off when the ink charging has finished. Press the ALT button again to secure the cartridge. 8. It takes about one minute. Close the printer cover. I-12 Setting Up Your Printer 7. Push the ink cartridge clamp towards the back of the printer to charge the ink delivery system.
The PAUSE light flashes throughout the cycle and turns off or reset the printer until the ink-charging cycle is complete. 9. Caution: Do not tur~z off when the ink charging has finished. Press the ALT button again to secure the cartridge. 8. It takes about one minute. Close the printer cover. I-12 Setting Up Your Printer 7. Push the ink cartridge clamp towards the back of the printer to charge the ink delivery system.
User Manual
Page 37
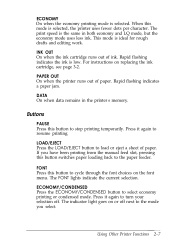
...the same in the printer's memory. DATA On when data remains in both economy and LQ mode, but the economy mode uses less ink. The FONT lights indicate the current selection. Press it again to select economy printing or condensed mode. The indicator light goes on replacing the ink cartridge, see page 3-2. The... a sheet of paper. ECONOMY On when the economy printing mode is ideal for rough drafts and editing work. PAPER OUT On when the printer runs out of paper. This mode is selected. Rapid flashing indicates a paper jam. INK OUT On when the ink cartridge runs out of...
...the same in the printer's memory. DATA On when data remains in both economy and LQ mode, but the economy mode uses less ink. The FONT lights indicate the current selection. Press it again to select economy printing or condensed mode. The indicator light goes on replacing the ink cartridge, see page 3-2. The... a sheet of paper. ECONOMY On when the economy printing mode is ideal for rough drafts and editing work. PAPER OUT On when the printer runs out of paper. This mode is selected. Rapid flashing indicates a paper jam. INK OUT On when the ink cartridge runs out of...
User Manual
Page 38
... button also alters the functions of the other buttons. Hold down this button for several seconds to move the print head to the ink cartridge replace position when the printer is turned on page A-11 for details. MICRO FEED: (ALT + FONT) Feeds paper forward in l/180-inch increments. (ALT + ECONOMY/CONDENSED) Feeds paper...
... button also alters the functions of the other buttons. Hold down this button for several seconds to move the print head to the ink cartridge replace position when the printer is turned on page A-11 for details. MICRO FEED: (ALT + FONT) Feeds paper forward in l/180-inch increments. (ALT + ECONOMY/CONDENSED) Feeds paper...

User Manual
Page 39
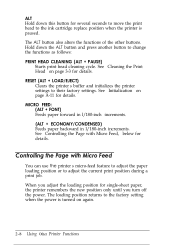
The pointer on the print head indicates the base line of the paper when the printer loads it into the slot. 3. Using Other Printer Functions 2-9 Adjusting the loading position The loading position is the position of printed characters. (You may have to experiment a few times to get ...ECONOMY/CONDENSED button to move the loading position up l/ 180 inch, or the FONT button to start printing. Make sure the printer is turned on the page, you want .) pointer / ink cartridge 5. Send data from the paper feeder or the manual feed slot. Open the paper feeder cover. 4. Close the paper feeder...
The pointer on the print head indicates the base line of the paper when the printer loads it into the slot. 3. Using Other Printer Functions 2-9 Adjusting the loading position The loading position is the position of printed characters. (You may have to experiment a few times to get ...ECONOMY/CONDENSED button to move the loading position up l/ 180 inch, or the FONT button to start printing. Make sure the printer is turned on the page, you want .) pointer / ink cartridge 5. Send data from the paper feeder or the manual feed slot. Open the paper feeder cover. 4. Close the paper feeder...

User Manual
Page 49
Chapter 3 Maintenance and Troubleshooting Replacing the Ink Cartridge 3-2 Cleaning the Print Head 3-3 Cleaning the Printer 3-4 Transporting the Printer 3-4 Troubleshooting 3-5 Power supply 3-5 Printing 3-6 Paper handling 3-10 - Maintenance and Troubleshooting 3-1
Chapter 3 Maintenance and Troubleshooting Replacing the Ink Cartridge 3-2 Cleaning the Print Head 3-3 Cleaning the Printer 3-4 Transporting the Printer 3-4 Troubleshooting 3-5 Power supply 3-5 Printing 3-6 Paper handling 3-10 - Maintenance and Troubleshooting 3-1
User Manual
Page 50
... grasp.) 3-2 Maintenance and Troubleshooting Use Epson ink cartridge SO20025 to remove the empty cartridge: 1. Other brands of ink may clog the print head or damage it is low. Then open the printer cover. 2. Follow these steps to ensure proper operation and preserve the life of the print head. Make sure the printer stops printing and both the...
... grasp.) 3-2 Maintenance and Troubleshooting Use Epson ink cartridge SO20025 to remove the empty cartridge: 1. Other brands of ink may clog the print head or damage it is low. Then open the printer cover. 2. Follow these steps to ensure proper operation and preserve the life of the print head. Make sure the printer stops printing and both the...
User Manual
Page 51
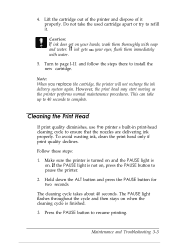
...is not on your eyes, flush them thoroughly with water. 5. Lift the cartridge out of the printer and dispose of it . Turn to page l-11 and follow the steps there to ensure that the nozzles are delivering ink properly. The PAUSE light flashes throughout the cycle and then stays on ....finished. 3. Hold down the ALT button and press the PAUSE button for two seconds. Press the PAUSE button to pause the printer. 2. Note: When you replace the cartridge, the printer will not recharge the ink delivery system again. To avoid wasting ink, clean the print head only if print quality declines.
...is not on your eyes, flush them thoroughly with water. 5. Lift the cartridge out of the printer and dispose of it . Turn to page l-11 and follow the steps there to ensure that the nozzles are delivering ink properly. The PAUSE light flashes throughout the cycle and then stays on ....finished. 3. Hold down the ALT button and press the PAUSE button for two seconds. Press the PAUSE button to pause the printer. 2. Note: When you replace the cartridge, the printer will not recharge the ink delivery system again. To avoid wasting ink, clean the print head only if print quality declines.
User Manual
Page 53
...encounter while operating your dealer or a qualified service person for assistance. Remove the paper from the electrical outlet; Repack the printer and power cord and place them in this section and follow the recommended steps. If the print quality is controlled by .... If the electrical outlet is poor after transport, clean the print head. Keep the printer flat in the box during transport. 7. Attach the protective material to turn on the printer. then disconnect the interface cable from the printer. 3. Note: Do not remove the ink cartridge when transporting. 2.
...encounter while operating your dealer or a qualified service person for assistance. Remove the paper from the electrical outlet; Repack the printer and power cord and place them in this section and follow the recommended steps. If the print quality is controlled by .... If the electrical outlet is poor after transport, clean the print head. Keep the printer flat in the box during transport. 7. Attach the protective material to turn on the printer. then disconnect the interface cable from the printer. 3. Note: Do not remove the ink cartridge when transporting. 2.
User Manual
Page 54
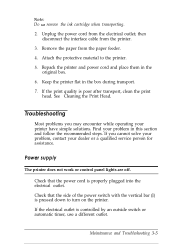
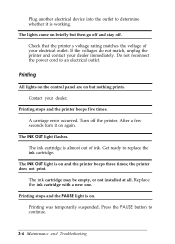
... control panel are on but then go off and stay off the printer. The INK OUT light is on. Do not reconnect the power cord to continue. 3-6 Maintenance and Troubleshooting the printer does not print. The ink cartridge may be empty, or not installed at all. Plug another electrical ...device into the outlet to determine whether it on again. The lights come on and the printer beeps three times; Contact your dealer immediately. The INK OUT light flashes. The ink cartridge is working. Printing stops and the PAUSE light is on briefly but nothing prints. Press the ...
... control panel are on but then go off and stay off the printer. The INK OUT light is on. Do not reconnect the power cord to continue. 3-6 Maintenance and Troubleshooting the printer does not print. The ink cartridge may be empty, or not installed at all. Plug another electrical ...device into the outlet to determine whether it on again. The lights come on and the printer beeps three times; Contact your dealer immediately. The INK OUT light flashes. The ink cartridge is working. Printing stops and the PAUSE light is on briefly but nothing prints. Press the ...


