
User Manual
Page 2
Neither Seiko Epson Corporation nor its subsidiaries. EPSON Stylus and EPSON ESC/P 2 are trademarks of Seiko Epson Corporation. No patent liability is a registered trademark of Seiko Epson Corporation. Seiko Epson Corporation shall not be reproduced, stored in...Epson Corporation. EPSON disclaims any form or by purchaser or third parties as Original EPSON products or EPSON Approved Products by Seiko Epson Corporation Nagano, Japan User's Guide EPSON and EPSON ESC/P are registered trademarks of CompuServe Information Service. EPSON® 48-NOZZLE INK JET PRINTER...
Neither Seiko Epson Corporation nor its subsidiaries. EPSON Stylus and EPSON ESC/P 2 are trademarks of Seiko Epson Corporation. No patent liability is a registered trademark of Seiko Epson Corporation. Seiko Epson Corporation shall not be reproduced, stored in...Epson Corporation. EPSON disclaims any form or by purchaser or third parties as Original EPSON products or EPSON Approved Products by Seiko Epson Corporation Nagano, Japan User's Guide EPSON and EPSON ESC/P are registered trademarks of CompuServe Information Service. EPSON® 48-NOZZLE INK JET PRINTER...

User Manual
Page 4
... Computer 1-16 Using Software Programs 1-17 Microsoft Windows 3.1 and all Windows Programs . . . . . 1-17 What is a Printer Driver 1-18 Fonts with Windows 1-19 WordPerfect 6.0 or 5.1 for MS-DOS 1-19 Microsoft Word for MS-DOS l-20 Lotus ... and Notes 10 Chapter 7 Setting Up Your Printer About Your Ink Jet Printer 1-2 A few precautions 1-2 Choosing the right paper 1-4 Unpacking the Printer l-5 Attaching the paper support l-6 Choosing a Place for the Printer l-6 Plugging in the Printer l-7 Installing the Ink Cartridge l-8 Testing the Printer 1-13 Loading paper in the paper feeder 1-...
... Computer 1-16 Using Software Programs 1-17 Microsoft Windows 3.1 and all Windows Programs . . . . . 1-17 What is a Printer Driver 1-18 Fonts with Windows 1-19 WordPerfect 6.0 or 5.1 for MS-DOS 1-19 Microsoft Word for MS-DOS l-20 Lotus ... and Notes 10 Chapter 7 Setting Up Your Printer About Your Ink Jet Printer 1-2 A few precautions 1-2 Choosing the right paper 1-4 Unpacking the Printer l-5 Attaching the paper support l-6 Choosing a Place for the Printer l-6 Plugging in the Printer l-7 Installing the Ink Cartridge l-8 Testing the Printer 1-13 Loading paper in the paper feeder 1-...

User Manual
Page 5
Chapter 2 Using Other Printer Functions Loading Paper Manually 2-2 Paper sizes 2-2 Printing on single sheets 2-2 Printing on envelopes 2-4 Tips for Maintaining the Correct ...setting 2-16 Chapter 3 Maintenance and Troubleshooting Replacing the Ink Cartridge Cleaning the Print Head Cleaning the Printer 3-4 Transporting the Printer 3-5 Troubleshooting 3-5 Error indicators 3-6 Power supply 3-7 Printing 3-7 Paper handling 3-12 Appendix Technical Specifications A-2 Printer specifications A-2 Command Summary A-12 Sending printer commands A-12 Using the command summary A-12 Character ...
Chapter 2 Using Other Printer Functions Loading Paper Manually 2-2 Paper sizes 2-2 Printing on single sheets 2-2 Printing on envelopes 2-4 Tips for Maintaining the Correct ...setting 2-16 Chapter 3 Maintenance and Troubleshooting Replacing the Ink Cartridge Cleaning the Print Head Cleaning the Printer 3-4 Transporting the Printer 3-5 Troubleshooting 3-5 Error indicators 3-6 Power supply 3-7 Printing 3-7 Paper handling 3-12 Appendix Technical Specifications A-2 Printer specifications A-2 Command Summary A-12 Sending printer commands A-12 Using the command summary A-12 Character ...
User Manual
Page 8
Features Your new EPSON@ printer is a 48-nozzle ink jet printer, ideal for other EPSON printers. Use the built-in paper feeder to load up to 144 characters per inch (dpi) text and graphics. You can also insert envelopes or single pages manually without removing the paper supply. 0 Fast printing speed. cl Convenience. Your printer offers the following features...
Features Your new EPSON@ printer is a 48-nozzle ink jet printer, ideal for other EPSON printers. Use the built-in paper feeder to load up to 144 characters per inch (dpi) text and graphics. You can also insert envelopes or single pages manually without removing the paper supply. 0 Fast printing speed. cl Convenience. Your printer offers the following features...

User Manual
Page 10
.... If you are already a CompuServe member, simply type GO EPSON at the menu prompt to reach the Epson America Forum. 4 Zntroduction 0 Product literature with technical specifications on our current and new products 0 Sales of ink cartridges, supplies, parts, documentation, and accessories for your EPSON product 0 Customer Relations CompuServe@ On-line Support The fastest way...
.... If you are already a CompuServe member, simply type GO EPSON at the menu prompt to reach the Epson America Forum. 4 Zntroduction 0 Product literature with technical specifications on our current and new products 0 Sales of ink cartridges, supplies, parts, documentation, and accessories for your EPSON product 0 Customer Relations CompuServe@ On-line Support The fastest way...

User Manual
Page 17
Chapter 1 Setting Up Your Printer About Your Ink Jet Printer l-2 A few precautions l-2 Choosing the right paper 1-4 Unpacking the Printer 1-5 Attaching the paper support l-6 Choosing a Place for the Printer l-6 Plugging in the Printer l-7 Installing the Ink Cartridge l-8 Testing the Printer 1-13 Loading paper in the paper feeder 1-13 Running the self test 1-15 Connecting the Printer to Your Computer 1-16 Using Software...
Chapter 1 Setting Up Your Printer About Your Ink Jet Printer l-2 A few precautions l-2 Choosing the right paper 1-4 Unpacking the Printer 1-5 Attaching the paper support l-6 Choosing a Place for the Printer l-6 Plugging in the Printer l-7 Installing the Ink Cartridge l-8 Testing the Printer 1-13 Loading paper in the paper feeder 1-13 Running the self test 1-15 Connecting the Printer to Your Computer 1-16 Using Software...

User Manual
Page 18
... removing an empty cartridge, put it gets in your ink jet printer safely and efficiently: cl Under normal circumstances, ink will not come out of the cartridge. About Your Ink Jet Printer If you're new to ink jet printers, you may wonder how they differ from the cartridge and then propel ink dots onto the page in a plastic bag for...
... removing an empty cartridge, put it gets in your ink jet printer safely and efficiently: cl Under normal circumstances, ink will not come out of the cartridge. About Your Ink Jet Printer If you're new to ink jet printers, you may wonder how they differ from the cartridge and then propel ink dots onto the page in a plastic bag for...
User Manual
Page 19
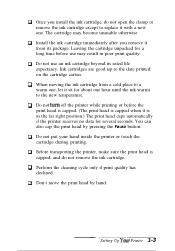
.... You can also cap the print head by hand. .-___--Setting Up Your Printer 1-3 The cartridge may result in the far right position.) The print head caps automatically if the printer receives no data for about one hour until the ink warms to the new temperature. 0 Do not turn off the... printer while printing or before use an ink cartridge beyond its package. Q Perform the cleaning cycle only if print ...
.... You can also cap the print head by hand. .-___--Setting Up Your Printer 1-3 The cartridge may result in the far right position.) The print head caps automatically if the printer receives no data for about one hour until the ink warms to the new temperature. 0 Do not turn off the... printer while printing or before use an ink cartridge beyond its package. Q Perform the cleaning cycle only if print ...

User Manual
Page 20
...See the paper specifications in the Appendix for use with your ink jet printer is too absorbent, the ink can bleed slightly, causing characters to blur. Keep unused paper in its original packaging material and store it in a cool, dry place. 1-4 Setting Up Your Printer With paper that has a rough finish or a slick, coated.... Paper absorbency is a good practice to the condition of the paper are particularly sensitive to test any paper or envelopes in your printer without problems. However, it is an especially important consideration. Note: Ink jet printers are also important.
...See the paper specifications in the Appendix for use with your ink jet printer is too absorbent, the ink can bleed slightly, causing characters to blur. Keep unused paper in its original packaging material and store it in a cool, dry place. 1-4 Setting Up Your Printer With paper that has a rough finish or a slick, coated.... Paper absorbency is a good practice to the condition of the paper are particularly sensitive to test any paper or envelopes in your printer without problems. However, it is an especially important consideration. Note: Ink jet printers are also important.

User Manual
Page 21
... with your location. Setting Up Your Printer 1-5 Follow the directions on the power. The shape of the packaging and the protective materials in case you can set it up and turn on the Notice Sheet (inserted in your printer) to remove these items: Ink Cartridge Power Cord In some locations, ...the power cord comes attached to transport the printer. Q Caution: You must remove all of the AC plug varies by country; Unpacking the...
... with your location. Setting Up Your Printer 1-5 Follow the directions on the power. The shape of the packaging and the protective materials in case you can set it up and turn on the Notice Sheet (inserted in your printer) to remove these items: Ink Cartridge Power Cord In some locations, ...the power cord comes attached to transport the printer. Q Caution: You must remove all of the AC plug varies by country; Unpacking the...

User Manual
Page 24
...to the amount of text and graphics on the back of the printer to make sure that of the printer. 4. lf ink does get on the back of your dealer for your new printer, you use your power source. Also, make sure the voltage ...first time you need to charge the ink delivery system with ink. You need to perform this operation only once. 1-8 Setting Up Your Printer Ipfostshieblreatteodavdojultsatgtehaenpdriynotuerrfoourtluetsevaotltaangeotdhoernot match, contact your electrical outlet. e Caution: The ink cartridge is not attached to the printer, connect it to print about 700 ...
...to the amount of text and graphics on the back of the printer to make sure that of the printer. 4. lf ink does get on the back of your dealer for your new printer, you use your power source. Also, make sure the voltage ...first time you need to charge the ink delivery system with ink. You need to perform this operation only once. 1-8 Setting Up Your Printer Ipfostshieblreatteodavdojultsatgtehaenpdriynotuerrfoourtluetsevaotltaangeotdhoernot match, contact your electrical outlet. e Caution: The ink cartridge is not attached to the printer, connect it to print about 700 ...

User Manual
Page 25
...with a new one. Release the buttons after the printer starts initializing. cl Leave the cartridge sealed until the print head stops moving , and then turn on the printer. Make sure the printer is turned off the printer.) cl Never remove the ink cartridge except to replace it . Hold down both... the AH and Pause buttons while you need to print quickly using less ink. Setting Up Your Printer 1-9 a Always wait until just...
...with a new one. Release the buttons after the printer starts initializing. cl Leave the cartridge sealed until the print head stops moving , and then turn on the printer. Make sure the printer is turned off the printer.) cl Never remove the ink cartridge except to replace it . Hold down both... the AH and Pause buttons while you need to print quickly using less ink. Setting Up Your Printer 1-9 a Always wait until just...
User Manual
Page 26
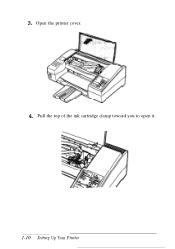
Open the printer cover. 4. Pull the top of the ink cartridge clamp toward you to open it. 1-10 Setting Up Your Printer 3.
Open the printer cover. 4. Pull the top of the ink cartridge clamp toward you to open it. 1-10 Setting Up Your Printer 3.

User Manual
Page 27
Make sure to remove the tape seal from the protective cardboad. 5. Setting Up Your Printer 1-11 Lower the cartridge into the holder with the label face up and the arrow mark on the cartridge towards the arrow mark on the printer case. Open the foil package containing the ink cartridge and remove it from the ink cartridge. 6.
Make sure to remove the tape seal from the protective cardboad. 5. Setting Up Your Printer 1-11 Lower the cartridge into the holder with the label face up and the arrow mark on the cartridge towards the arrow mark on the printer case. Open the foil package containing the ink cartridge and remove it from the ink cartridge. 6.

User Manual
Page 28
Charging takes about one minute. e Caution: Do not turn off when ink charging is complete. 9. 7. Close the printer cover. 1-12 Setting Up Your Printer Press the Alt button again to return the print head to the far right position and to secure the cartridge. 8. The Pause light flashes throughout the cycle and turns off or reset the printer until the ink-charging cycle is finished. Push the ink cartridge clamp toward the back of the printer to charge the ink delivery system.
Charging takes about one minute. e Caution: Do not turn off when ink charging is complete. 9. 7. Close the printer cover. 1-12 Setting Up Your Printer Press the Alt button again to return the print head to the far right position and to secure the cartridge. 8. The Pause light flashes throughout the cycle and turns off or reset the printer until the ink-charging cycle is finished. Push the ink cartridge clamp toward the back of the printer to charge the ink delivery system.

User Manual
Page 29
Fan a stack of letter-size or A4 paper; Setting Up Your Printer 1-13 Testing the Printer After you install the ink cartridge, you can run the self test with paper from the built-in paper feeder or by feeding a sheet manually. You can use the built-... paper in the paper feeder 1. Open the paper feeder cover and lift the paper separator. 2. then tap it on a flat surface to make sure the printer is working properly. Note: The paper feeder holds up to 100 sheets (64 g/m2 or 18 lb) maximum.
Fan a stack of letter-size or A4 paper; Setting Up Your Printer 1-13 Testing the Printer After you install the ink cartridge, you can run the self test with paper from the built-in paper feeder or by feeding a sheet manually. You can use the built-... paper in the paper feeder 1. Open the paper feeder cover and lift the paper separator. 2. then tap it on a flat surface to make sure the printer is working properly. Note: The paper feeder holds up to 100 sheets (64 g/m2 or 18 lb) maximum.

User Manual
Page 39
You can change it using your application program or printer commands, if necessary. Setting Up Your Printer 1-23 You can change the default loading position. See the Appendix for paper loaded from the paper feeder is 61 lines (letter-size paper) and ...65 lines (A44ze paper). See "Using the Default-Setting Mode" in Chapter 2. 0 The default page length for more about printer commands. 0 If the ink does not dry fast enough, try removing sheets 'one at a time as they finish printing. 0 Because most application programs take care of the top...
You can change it using your application program or printer commands, if necessary. Setting Up Your Printer 1-23 You can change the default loading position. See the Appendix for paper loaded from the paper feeder is 61 lines (letter-size paper) and ...65 lines (A44ze paper). See "Using the Default-Setting Mode" in Chapter 2. 0 The default page length for more about printer commands. 0 If the ink does not dry fast enough, try removing sheets 'one at a time as they finish printing. 0 Because most application programs take care of the top...

User Manual
Page 43
... The Pause light comes on the printer and open the printer cover. 2. Note: If the ink does not dry fast enough, try removing sheets one at a time as it will go. 5. Hold down the Replace Ink (AN) button for several seconds and release the button when the carriage moves to print on individual envelopes... the Pause button to set the Pause light on envelopes You can also use the manual feed slot to the middle position. Press the Replace Ink button to return the carriage to the far right position. Turn the paper-thickness lever clockwise as far as they finish printing.
... The Pause light comes on the printer and open the printer cover. 2. Note: If the ink does not dry fast enough, try removing sheets one at a time as it will go. 5. Hold down the Replace Ink (AN) button for several seconds and release the button when the carriage moves to print on individual envelopes... the Pause button to set the Pause light on envelopes You can also use the manual feed slot to the middle position. Press the Replace Ink button to return the carriage to the far right position. Turn the paper-thickness lever clockwise as far as they finish printing.

User Manual
Page 44
...under normal temperature and humidity conditions. 0 If the ink is finished printing. Next hold down the Replace ink (Alt) button until it is not drying fas t enough, try removing envelopes one at the top entering the printer first and the printable side face-up until the ...first press the Pause button to turn the paper-thickness lever all the way to the print position automatically. 9. 8. Using Other Printer Functions 2-5 The printer loads the envelope to the left (counterclockwise). Note: Q . Now give your application program keeps the printing entirely within the ...
...under normal temperature and humidity conditions. 0 If the ink is finished printing. Next hold down the Replace ink (Alt) button until it is not drying fas t enough, try removing envelopes one at the top entering the printer first and the printable side face-up until the ...first press the Pause button to turn the paper-thickness lever all the way to the print position automatically. 9. 8. Using Other Printer Functions 2-5 The printer loads the envelope to the left (counterclockwise). Note: Q . Now give your application program keeps the printing entirely within the ...

User Manual
Page 46
...the control panel helps you press the Font button. For instructions on and off when you determine which font is empty. Paper Out/Ink Out On when the printer runs out of selected fonts. When this light and the Data light are flashing at the same time, the cartridge is selected. Condensed... paused. Data On when data remains in both economy and LQ mode, but the economy mode uses less ink This mode is selected, the printer prints a condensed version of paper. These two lights go on selecting fonts, see page 2-9. Economy On when the economy printing mode is selected. Indicator ...
...the control panel helps you press the Font button. For instructions on and off when you determine which font is empty. Paper Out/Ink Out On when the printer runs out of selected fonts. When this light and the Data light are flashing at the same time, the cartridge is selected. Condensed... paused. Data On when data remains in both economy and LQ mode, but the economy mode uses less ink This mode is selected, the printer prints a condensed version of paper. These two lights go on selecting fonts, see page 2-9. Economy On when the economy printing mode is selected. Indicator ...


