
Product Information Guide
Page 6
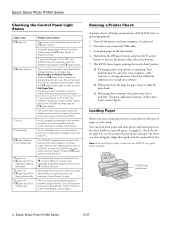
...error has occurred. Turn off the printer and your computer, cable, software, or setting selections. If the error persists, contact Epson. see if you are at a time using . Note: When printing on . Epson Stylus Photo R1900 Series Checking the Control Panel Light ...Status Light status I paper on I paper flashing H ink on H ink flashing I paper flashing H ink flashing fast P power on paper. Turn off the printer, remove any paper jammed inside the printer are using the single sheet guide and the manual...
...error has occurred. Turn off the printer and your computer, cable, software, or setting selections. If the error persists, contact Epson. see if you are at a time using . Note: When printing on . Epson Stylus Photo R1900 Series Checking the Control Panel Light ...Status Light status I paper on I paper flashing H ink on H ink flashing I paper flashing H ink flashing fast P power on paper. Turn off the printer, remove any paper jammed inside the printer are using the single sheet guide and the manual...
Product Information Guide
Page 9
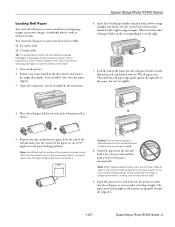
... it . 11/07 Epson Stylus Photo R1900 Series - 9 Guide the paper into the manual feed slot (marked with a right orange triangle). The paper must remove roll paper from the end of the paper roll as it , making sure to keep the roll slack. 9. Remove any tape and protective paper from the printer before loading roll paper...
... it . 11/07 Epson Stylus Photo R1900 Series - 9 Guide the paper into the manual feed slot (marked with a right orange triangle). The paper must remove roll paper from the end of the paper roll as it , making sure to keep the roll slack. 9. Remove any tape and protective paper from the printer before loading roll paper...
Product Information Guide
Page 14
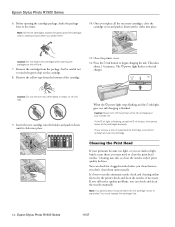
... or light bands across them, you don't clean them unnecessarily. Close the printer cover. 12. If you remove a low or expended ink cartridge, you shake them so you may need to let...ink light goes out, ink charging is charging or you replace all the cartridges securely. Caution: Never turn off the printer while ink is finished. Press the H ink button to touch the green chip on the cartridge. 8. The P power... not to begin charging the ink. You can check and clean the nozzles manually. Before opening the packages or ink will leak. 9. Epson Stylus Photo R1900 Series 11/07
... or light bands across them, you don't clean them unnecessarily. Close the printer cover. 12. If you remove a low or expended ink cartridge, you shake them so you may need to let...ink light goes out, ink charging is charging or you replace all the cartridges securely. Caution: Never turn off the printer while ink is finished. Press the H ink button to touch the green chip on the cartridge. 8. The P power... not to begin charging the ink. You can check and clean the nozzles manually. Before opening the packages or ink will leak. 9. Epson Stylus Photo R1900 Series 11/07
Product Information Guide
Page 15
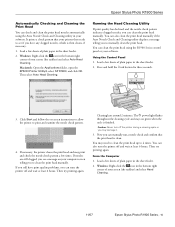
... then cleans, if necessary. 1. Caution: Never turn the printer off the printer during a cleaning cycle or you can manually run a nozzle check and confirm that your screen (the taskbar) and select Head Cleaning. 11/07 Epson Stylus Photo R1900 Series - 15 Using the Control Panel 1. Now you can...to clean the print head manually. Load a few sheets of plain paper in the sheet feeder. 2. Click Start and follow the on-screen instructions to allow the printer to see a message on green when the cycle is clean. Epson Stylus Photo R1900 Series Automatically Checking and ...
... then cleans, if necessary. 1. Caution: Never turn the printer off the printer during a cleaning cycle or you can manually run a nozzle check and confirm that your screen (the taskbar) and select Head Cleaning. 11/07 Epson Stylus Photo R1900 Series - 15 Using the Control Panel 1. Now you can...to clean the print head manually. Load a few sheets of plain paper in the sheet feeder. 2. Click Start and follow the on-screen instructions to allow the printer to see a message on green when the cycle is clean. Epson Stylus Photo R1900 Series Automatically Checking and ...
Product Information Guide
Page 16
...head up to align the print head. You may damage it. 4. To have on hand) in the sheet feeder. Epson Stylus Photo R1900 Series 11/07 Caution: Never turn the printer off the printer during a cleaning cycle or you may need cleaning 6. Macintosh: Click Confirmation and click Next. 5. If you still ...can align the print head manually. To align the print head manually, click the Manual button, click OK, and continue with the rest of Epson Presentation Paper Matte (or the photo paper you can also turn off and wait at least 6 hours. It's best to let the printer check and align the ...
...head up to align the print head. You may damage it. 4. To have on hand) in the sheet feeder. Epson Stylus Photo R1900 Series 11/07 Caution: Never turn the printer off the printer during a cleaning cycle or you may need cleaning 6. Macintosh: Click Confirmation and click Next. 5. If you still ...can align the print head manually. To align the print head manually, click the Manual button, click OK, and continue with the rest of Epson Presentation Paper Matte (or the photo paper you can also turn off and wait at least 6 hours. It's best to let the printer check and align the ...
Start Here
Page 4
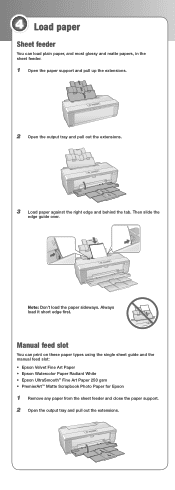
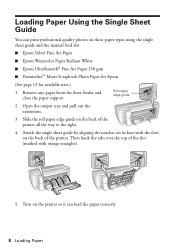
...these paper types using the single sheet guide and the manual feed slot: • Epson Velvet Fine Art Paper • Epson Watercolor Paper Radiant White • Epson UltraSmooth® Fine Art Paper 250 gsm • PremierArt™ Matte Scrapbook Photo Paper for Epson 1 Remove any paper from the sheet feeder and ...close the paper support. 2 Open the output tray and pull out the extensions. Manual feed slot You can load plain paper, and most glossy and matte...
...these paper types using the single sheet guide and the manual feed slot: • Epson Velvet Fine Art Paper • Epson Watercolor Paper Radiant White • Epson UltraSmooth® Fine Art Paper 250 gsm • PremierArt™ Matte Scrapbook Photo Paper for Epson 1 Remove any paper from the sheet feeder and ...close the paper support. 2 Open the output tray and pull out the extensions. Manual feed slot You can load plain paper, and most glossy and matte...
Start Here
Page 8
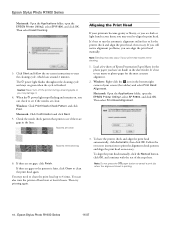
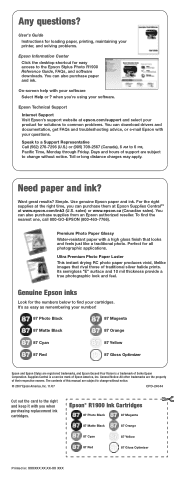
...), 6 AM to the Epson Stylus Photo R1900 Reference Guide, FAQs, and software downloads. Perfect for solutions to common problems. You can purchase them at Epson Supplies CentralSM at epson.com/support and select your software Select Help or ? Days and hours of this manual are subject to the right...Friday. User's Guide Instructions for loading paper, printing, maintaining your printer, and solving problems. Epson Information Center Click the desktop shortcut for the numbers below to find the nearest one, call 800-GO-EPSON (800-463-7766). Want great results? You can also purchase...
...), 6 AM to the Epson Stylus Photo R1900 Reference Guide, FAQs, and software downloads. Perfect for solutions to common problems. You can purchase them at Epson Supplies CentralSM at epson.com/support and select your software Select Help or ? Days and hours of this manual are subject to the right...Friday. User's Guide Instructions for loading paper, printing, maintaining your printer, and solving problems. Epson Information Center Click the desktop shortcut for the numbers below to find the nearest one, call 800-GO-EPSON (800-463-7766). Want great results? You can also purchase...

User's Guide - PDF
Page 2
... of Epson America, Inc. Trademarks Epson, Epson Stylus, Epson UltraChrome, and Epson UltraChrome Hi-Gloss are for damages, losses, costs, or expenses incurred by purchaser or third parties as Original Epson Products or Epson Approved Products by any Epson product. Neither Seiko Epson Corporation nor its affiliates shall be responsible and respectful of this manual are service marks of Seiko Epson Corporation...
... of Epson America, Inc. Trademarks Epson, Epson Stylus, Epson UltraChrome, and Epson UltraChrome Hi-Gloss are for damages, losses, costs, or expenses incurred by purchaser or third parties as Original Epson Products or Epson Approved Products by any Epson product. Neither Seiko Epson Corporation nor its affiliates shall be responsible and respectful of this manual are service marks of Seiko Epson Corporation...
User's Guide - PDF
Page 6
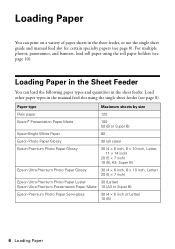
... the manual feed slot using the roll paper holders (see page 10). Paper type Maximum sheets by size Plain paper 120 Epson® Presentation Paper Matte 100 50 (B or Super B) Epson Bright White Paper 80 Epson Photo Paper Glossy 30 (all sizes) Epson Premium Photo Paper Glossy... 7 inch) 10 (B, A3, Super B) Epson Ultra Premium Photo Paper Glossy 30 (4 × 6 inch, 8 × 10 inch, Letter) 20 (5 × 7 inch) Epson Ultra Premium Photo Paper Luster 30 (Letter) Epson Ultra Premium Presentation Paper Matte 10 (A3 or Super B) Epson Premium Photo Paper Semi-gloss 30 (4 × 6 inch...
... the manual feed slot using the roll paper holders (see page 10). Paper type Maximum sheets by size Plain paper 120 Epson® Presentation Paper Matte 100 50 (B or Super B) Epson Bright White Paper 80 Epson Photo Paper Glossy 30 (all sizes) Epson Premium Photo Paper Glossy... 7 inch) 10 (B, A3, Super B) Epson Ultra Premium Photo Paper Glossy 30 (4 × 6 inch, 8 × 10 inch, Letter) 20 (5 × 7 inch) Epson Ultra Premium Photo Paper Luster 30 (Letter) Epson Ultra Premium Presentation Paper Matte 10 (A3 or Super B) Epson Premium Photo Paper Semi-gloss 30 (4 × 6 inch...
User's Guide - PDF
Page 8
...on these paper types using the single sheet guide and the manual feed slot: ■ Epson Velvet Fine Art Paper ■ Epson Watercolor Paper Radiant White ■ Epson UltraSmooth® Fine Art Paper 250 gsm ■ PremierArt™ Matte Scrapbook Photo Paper for Epson (See page 13 for available sizes.) 1. Loading Paper ... orange triangles). 5. Slide the roll paper edge guide on the back of the slot (marked with the slots on the back of the printer all the way to the right. 4. Roll paper edge guide 2. Remove any paper from the sheet feeder and close the paper support....
...on these paper types using the single sheet guide and the manual feed slot: ■ Epson Velvet Fine Art Paper ■ Epson Watercolor Paper Radiant White ■ Epson UltraSmooth® Fine Art Paper 250 gsm ■ PremierArt™ Matte Scrapbook Photo Paper for Epson (See page 13 for available sizes.) 1. Loading Paper ... orange triangles). 5. Slide the roll paper edge guide on the back of the slot (marked with the slots on the back of the printer all the way to the right. 4. Roll paper edge guide 2. Remove any paper from the sheet feeder and close the paper support....

User's Guide - PDF
Page 11
... in the roll as it feeds and prints for the best results. Insert the left roll paper holder (marked with a down orange triangle) into the manual feed slot (marked with a right orange triangle). Caution: Do not load roll paper or canvas media into the far left slot on the right. 7. ... trouble feeding canvas media, check that the edge is straight and reload it . 6. Slide the roll paper edge guide against the right side of the printer (marked with up orange triangles). 9. Loading Paper 11 Then insert the right roll paper holder in the corresponding slot on the back of the paper...
... in the roll as it feeds and prints for the best results. Insert the left roll paper holder (marked with a down orange triangle) into the manual feed slot (marked with a right orange triangle). Caution: Do not load roll paper or canvas media into the far left slot on the right. 7. ... trouble feeding canvas media, check that the edge is straight and reload it . 6. Slide the roll paper edge guide against the right side of the printer (marked with up orange triangles). 9. Loading Paper 11 Then insert the right roll paper holder in the corresponding slot on the back of the paper...
User's Guide - PDF
Page 17
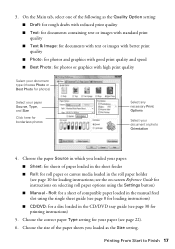
... Start to Finish 17 Choose the size of compatible paper loaded in the manual feed slot using the Settings button) ■ Manual - see the on-screen Reference Guide for borderless photos Select any necessary Print Options Select your document or photo Orientation 4. Choose the correct paper Type setting for your paper: ■ Sheet: for...
... Start to Finish 17 Choose the size of compatible paper loaded in the manual feed slot using the Settings button) ■ Manual - see the on-screen Reference Guide for borderless photos Select any necessary Print Options Select your document or photo Orientation 4. Choose the correct paper Type setting for your paper: ■ Sheet: for...
User's Guide - PDF
Page 20
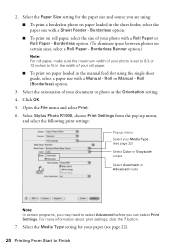
...photo as the Orientation setting. 4. Roll or Manual - Roll (Borderless) option. 3. Open the File menu and select Print. 6. button. 7. Select Stylus Photo R1900, choose Print Settings from the pop-up menu, and select the following print settings: Pop-up menu Select your paper (see page 22) Select Color...For more information about print settings, click the ? Borderless option. (To eliminate space between photos on paper loaded in the manual feed slot using : ■ To print a borderless photo on certain sizes, select a Roll Paper - Select the Media Type setting for the paper...
...photo as the Orientation setting. 4. Roll or Manual - Roll (Borderless) option. 3. Open the File menu and select Print. 6. button. 7. Select Stylus Photo R1900, choose Print Settings from the pop-up menu, and select the following print settings: Pop-up menu Select your paper (see page 22) Select Color...For more information about print settings, click the ? Borderless option. (To eliminate space between photos on paper loaded in the manual feed slot using : ■ To print a borderless photo on certain sizes, select a Roll Paper - Select the Media Type setting for the paper...

User's Guide - PDF
Page 34
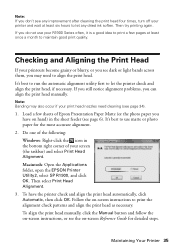
Macintosh: Open the Applications folder, open the EPSON Printer Utility2, select SP R1900, and click OK. It prints a check pattern that your printer then reads to see if you to clean the print head manually. See the on page 37 Checking and Cleaning the Print Head You can check and clean ... the print head, and may print and check the nozzle check pattern a few sheets of your printer software. Maintaining Your Printer Follow the steps in these sections to keep the R1900 Series working at its best: ■ "Checking and Cleaning the Print Head" below ■ "Checking and Aligning the...
Macintosh: Open the Applications folder, open the EPSON Printer Utility2, select SP R1900, and click OK. It prints a check pattern that your printer then reads to see if you to clean the print head manually. See the on page 37 Checking and Cleaning the Print Head You can check and clean ... the print head, and may print and check the nozzle check pattern a few sheets of your printer software. Maintaining Your Printer Follow the steps in these sections to keep the R1900 Series working at its best: ■ "Checking and Cleaning the Print Head" below ■ "Checking and Aligning the...
User's Guide - PDF
Page 35
... head manually, click the Manual button and follow the on-screen instructions, or see the on -screen instructions to let the printer check and align the print head, if necessary. Follow the on -screen Reference Guide for the most accurate alignment. 2. If you do not use matte or photo paper... one of the following: Windows: Right-click the icon in the sheet feeder (see page 6). Macintosh: Open the Applications folder, open the EPSON Printer Utility2, select SP R1900, and click OK. Note: If you don't see any dried ink soften. Then try printing again. If you still notice alignment problems, ...
... head manually, click the Manual button and follow the on-screen instructions, or see the on -screen instructions to let the printer check and align the print head, if necessary. Follow the on -screen Reference Guide for the most accurate alignment. 2. If you do not use matte or photo paper... one of the following: Windows: Right-click the icon in the sheet feeder (see page 6). Macintosh: Open the Applications folder, open the EPSON Printer Utility2, select SP R1900, and click OK. Note: If you don't see any dried ink soften. Then try printing again. If you still notice alignment problems, ...
User's Guide - PDF
Page 42
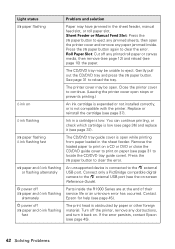
...the on An ink cartridge is expended or not installed correctly, or is open . P power off the printer, remove any obstructions, and turn it (see page 45). 42 Solving Problems Sheet Feeder or Manual Feed Slot: Press the I paper flashing H ink flashing fast The CD/DVD tray guide cover is ...P power off any paper jammed inside the R1900 Series are at the end of their I paper and H ink flashing fast The print head is low. Roll Paper Slot: Cut off I paper and H ink flashing service life or an unknown error has occurred. If the error persists, contact Epson (see page 37).
...the on An ink cartridge is expended or not installed correctly, or is open . P power off the printer, remove any obstructions, and turn it (see page 45). 42 Solving Problems Sheet Feeder or Manual Feed Slot: Press the I paper flashing H ink flashing fast The CD/DVD tray guide cover is ...P power off any paper jammed inside the R1900 Series are at the end of their I paper and H ink flashing fast The print head is low. Roll Paper Slot: Cut off I paper and H ink flashing service life or an unknown error has occurred. If the error persists, contact Epson (see page 37).
User's Guide - PDF
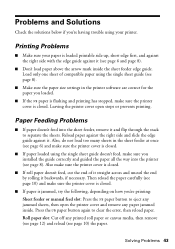
Page 43
...: Cut off any jammed sheets, then open stops or prevents printing. Problems and Solutions Check the solutions below if you 're printing: Sheet feeder or manual feed slot: Press the I paper button again to clear the error, then reload paper. Paper Feeding Problems ■ If paper doesn't feed into the... through the stack to eject any printed roll paper or canvas media, then remove (see page 12) and reload (see page 6) and make sure the printer cover is closed . ■ If roll paper doesn't feed, cut the end of compatible paper using your paper is loaded printable side up, short edge...
...: Cut off any jammed sheets, then open stops or prevents printing. Problems and Solutions Check the solutions below if you 're printing: Sheet feeder or manual feed slot: Press the I paper button again to clear the error, then reload paper. Paper Feeding Problems ■ If paper doesn't feed into the... through the stack to eject any printed roll paper or canvas media, then remove (see page 12) and reload (see page 6) and make sure the printer cover is closed . ■ If roll paper doesn't feed, cut the end of compatible paper using your paper is loaded printable side up, short edge...

