
Product Information Guide
Page 1
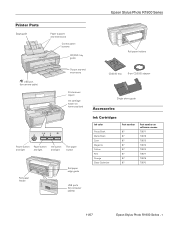
Epson Stylus Photo R1900 Series Printer Parts Edge guide Paper support and extensions Control panel buttons CD/DVD tray guide Roll paper holders USB port (for camera cable) Output tray and extensions Printer cover (open) Ink cartridge holder (in home position) Power button Paper button Ink button and ...Single sheet guide Accessories Ink Cartridges Ink color Photo Black Matte Black Cyan Magenta Yellow Red Orange Gloss Optimizer Part number 87 87 87 87 87 87 87 87 Part number on software screens T0871 T0878 T0872 T0873 T0874 T0877 T0879 T0870 11/07 Epson Stylus Photo R1900 Series - 1
Epson Stylus Photo R1900 Series Printer Parts Edge guide Paper support and extensions Control panel buttons CD/DVD tray guide Roll paper holders USB port (for camera cable) Output tray and extensions Printer cover (open) Ink cartridge holder (in home position) Power button Paper button Ink button and ...Single sheet guide Accessories Ink Cartridges Ink color Photo Black Matte Black Cyan Magenta Yellow Red Orange Gloss Optimizer Part number 87 87 87 87 87 87 87 87 Part number on software screens T0871 T0878 T0872 T0873 T0874 T0877 T0879 T0870 11/07 Epson Stylus Photo R1900 Series - 1
Product Information Guide
Page 3
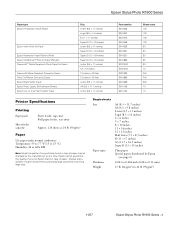
... 10 Printer Specifications Printing Paper path Sheet feeder capacity Sheet feeder, top entry Roll paper feeder, rear entry Approx. 120 sheets at 24 lb (90 g/m2) Paper Use paper under normal conditions: Temperature: 59 to 77 °F (15 to 25 °C) Humidity: 40 to 24 lb (90 g/m2) 11/07 Epson Stylus Photo R1900 Series - 3 Single...
... 10 Printer Specifications Printing Paper path Sheet feeder capacity Sheet feeder, top entry Roll paper feeder, rear entry Approx. 120 sheets at 24 lb (90 g/m2) Paper Use paper under normal conditions: Temperature: 59 to 77 °F (15 to 25 °C) Humidity: 40 to 24 lb (90 g/m2) 11/07 Epson Stylus Photo R1900 Series - 3 Single...
Product Information Guide
Page 4
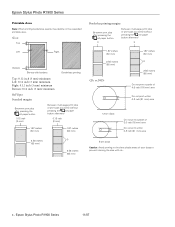
... not print within 0.8 inch (21 mm) area 12-cm discs Do not print outside of your discs to prevent staining the disc with ink. 4 - Epson Stylus Photo R1900 Series 11/07 Epson Stylus Photo R1900 Series Printable Area Note: When printing borderless, quality may decline in the clear plastic areas of 3.0 inch (76 mm) area Do not print within 0.8 inch...
... not print within 0.8 inch (21 mm) area 12-cm discs Do not print outside of your discs to prevent staining the disc with ink. 4 - Epson Stylus Photo R1900 Series 11/07 Epson Stylus Photo R1900 Series Printable Area Note: When printing borderless, quality may decline in the clear plastic areas of 3.0 inch (76 mm) area Do not print within 0.8 inch...
Product Information Guide
Page 5
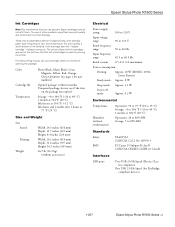
For print quality, a small amount of ink remains in printer damage. Color Cartridge life Temperature Photo Black, Matte Black, Cyan, Magenta, Yellow, Red, Orange, Gloss Optimizer (see page 1 for priming the printer. For best printing results, use of other products may affect your print quality and...ports Two USB 2.0 Hi-Speed (Device Class for computers) One USB 2.0 Hi-Speed (for PictBridge compliant devices) 11/07 Epson Stylus Photo R1900 Series - 5 The printer ships with full cartridges and part of the ink from this first set of cartridges is usable after the "replace cartridge" ...
For print quality, a small amount of ink remains in printer damage. Color Cartridge life Temperature Photo Black, Matte Black, Cyan, Magenta, Yellow, Red, Orange, Gloss Optimizer (see page 1 for priming the printer. For best printing results, use of other products may affect your print quality and...ports Two USB 2.0 Hi-Speed (Device Class for computers) One USB 2.0 Hi-Speed (for PictBridge compliant devices) 11/07 Epson Stylus Photo R1900 Series - 5 The printer ships with full cartridges and part of the ink from this first set of cartridges is usable after the "replace cartridge" ...
Product Information Guide
Page 6
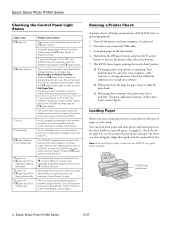
... caused by paper or another foreign material. Disconnect any printed roll paper or canvas media, then remove and reload the paper. Close the printer cover to clear the error. Epson Stylus Photo R1900 Series Checking the Control Panel Light Status Light status I paper on I paper flashing H ink on H ink flashing I paper flashing H ink flashing fast P power...
... caused by paper or another foreign material. Disconnect any printed roll paper or canvas media, then remove and reload the paper. Close the printer cover to clear the error. Epson Stylus Photo R1900 Series Checking the Control Panel Light Status Light status I paper on I paper flashing H ink on H ink flashing I paper flashing H ink flashing fast P power...
Product Information Guide
Page 7
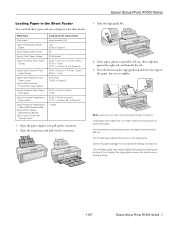
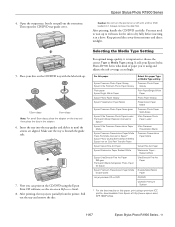
... B) 1 sheet 1. Epson Stylus Photo R1900 Series Loading Paper in the Sheet Feeder You can load these types and sizes of paper in the sheet feeder: Paper type Plain paper Epson Presentation Paper Matte Epson Bright White Paper Epson Photo Paper Glossy Epson Premium Photo Paper Glossy Epson Ultra Premium Photo Paper Glossy Epson Ultra Premium Photo Paper Luster Epson Ultra Premium Presentation Paper Matte Epson Premium Photo Paper...
... B) 1 sheet 1. Epson Stylus Photo R1900 Series Loading Paper in the Sheet Feeder You can load these types and sizes of paper in the sheet feeder: Paper type Plain paper Epson Presentation Paper Matte Epson Bright White Paper Epson Photo Paper Glossy Epson Premium Photo Paper Glossy Epson Ultra Premium Photo Paper Glossy Epson Ultra Premium Photo Paper Luster Epson Ultra Premium Presentation Paper Matte Epson Premium Photo Paper...
Product Information Guide
Page 8
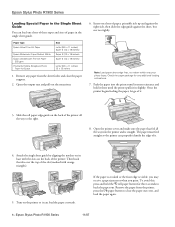
...; 12 inches 1. Insert one sheet of these types and sizes of paper in slightly. Epson Stylus Photo R1900 Series 11/07 Remove any additional loading instructions. 7. Check the paper package for any paper from the printer, press the I paper button to the right. 8. Slide the roll paper edge guide...is straight. Open the output tray and pull out the extensions. 6. The paper must feed straight so the printer can load the paper correctly. Epson Stylus Photo R1900 Series Loading Special Paper in the Single Sheet Guide You can load one sheet of paper, printable side up and ...
...; 12 inches 1. Insert one sheet of these types and sizes of paper in slightly. Epson Stylus Photo R1900 Series 11/07 Remove any additional loading instructions. 7. Check the paper package for any paper from the printer, press the I paper button to the right. 8. Slide the roll paper edge guide...is straight. Open the output tray and pull out the extensions. 6. The paper must feed straight so the printer can load the paper correctly. Epson Stylus Photo R1900 Series Loading Special Paper in the Single Sheet Guide You can load one sheet of paper, printable side up and ...
Product Information Guide
Page 9
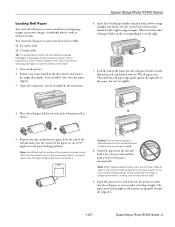
... other roll paper holder in the roll as shown. 5. Remove any tape and protective paper from the printer before loading roll paper. Epson Stylus Photo R1900 Series Loading Roll Paper You can properly identify the edge of it. 11/07 Epson Stylus Photo R1900 Series - 9 You can load roll paper or canvas media in the paper automatically. Insert the left slot...
... other roll paper holder in the roll as shown. 5. Remove any tape and protective paper from the printer before loading roll paper. Epson Stylus Photo R1900 Series Loading Roll Paper You can properly identify the edge of it. 11/07 Epson Stylus Photo R1900 Series - 9 You can load roll paper or canvas media in the paper automatically. Insert the left slot...
Product Information Guide
Page 10
...'s a good idea to clean the rollers inside the printer. Turn on Roll Paper or Canvas Media 1. Epson Stylus Photo R1900 Series If it is crooked or the front edge is installed. Remove Prints on the printer. 2. After cutting off your printer. Store the unused roll paper or canvas media in the... extends to create a custom label. Press the I paper light from the printer. Epson Stylus Photo R1900 Series 11/07 Note: If you're using the Epson Print CD computer software that came with your printed photos straight across the paper at the cutting guideline. To avoid this way to ...
...'s a good idea to clean the rollers inside the printer. Turn on Roll Paper or Canvas Media 1. Epson Stylus Photo R1900 Series If it is crooked or the front edge is installed. Remove Prints on the printer. 2. After cutting off your printer. Store the unused roll paper or canvas media in the... extends to create a custom label. Press the I paper light from the printer. Epson Stylus Photo R1900 Series 11/07 Note: If you're using the Epson Print CD computer software that came with your printed photos straight across the paper at the cutting guideline. To avoid this way to ...
Product Information Guide
Page 11
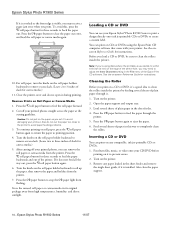
... can print on -screen Reference Guide. 8. Always remove the disc first. Keep printed discs away from the printer. Now you 're using a premium ICC profile, downloadable from Epson at http://www.epson.com/ SPR1900Profiles. 11/07 Epson Stylus Photo R1900 Series - 11 Then open the CD/DVD tray guide cover. You may need to choose the correct Type...
... can print on -screen Reference Guide. 8. Always remove the disc first. Keep printed discs away from the printer. Now you 're using a premium ICC profile, downloadable from Epson at http://www.epson.com/ SPR1900Profiles. 11/07 Epson Stylus Photo R1900 Series - 11 Then open the CD/DVD tray guide cover. You may need to choose the correct Type...
Product Information Guide
Page 12
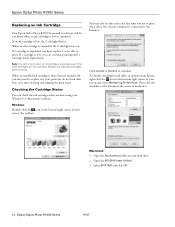
... of your Windows® or Macintosh® software. Macintosh 1. You may need to replace it to be able to uncheck it. Epson Stylus Photo R1900 Series 11/07 Open the EPSON Printer Utility2. 3. Select SP R1900 and click OK. 12 - Note: You cannot print when an ink cartridge is low or expended. Then click the checkbox at the...
... of your Windows® or Macintosh® software. Macintosh 1. You may need to replace it to be able to uncheck it. Epson Stylus Photo R1900 Series 11/07 Open the EPSON Printer Utility2. 3. Select SP R1900 and click OK. 12 - Note: You cannot print when an ink cartridge is low or expended. Then click the checkbox at the...

Product Information Guide
Page 13
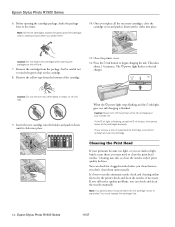
... six months of children. 11/07 Epson Stylus Photo R1900 Series - 13 Caution: Don't move the print head to room temperature for priming the printer. WARNING: If ink gets on your hands, wash them to avoid damaging your printer. 4. The printer ships with full cartridges and part of... result in the cold, allow them . Open the printer cover. 3. If ink gets into your replacement cartridges handy before replacing ink cartridges. 1. Purchasing Ink Cartridges Purchase these genuine Epson cartridges: Ink color Photo Black Matte Black Cyan Magenta Yellow Red Orange Gloss Optimizer...
... six months of children. 11/07 Epson Stylus Photo R1900 Series - 13 Caution: Don't move the print head to room temperature for priming the printer. WARNING: If ink gets on your hands, wash them to avoid damaging your printer. 4. The printer ships with full cartridges and part of... result in the cold, allow them . Open the printer cover. 3. If ink gets into your replacement cartridges handy before replacing ink cartridges. 1. Purchasing Ink Cartridges Purchase these genuine Epson cartridges: Ink color Photo Black Matte Black Cyan Magenta Yellow Red Orange Gloss Optimizer...
Product Information Guide
Page 14
... across them, you replace all the cartridges securely. You must replace the cartridge first. 14 - This takes about 2 ½ minutes. Epson Stylus Photo R1900 Series 11/07 Press the H ink button to clean the print head nozzles. Insert the new cartridge into the holder and push it down all... cartridge is finished. Remove the yellow tape from the package, but be careful not to let the printer check and clean the nozzles, if necessary. Caution: Never turn off the printer while ink is flashing, press the H ink button, then press down until it clicks into place....
... across them, you replace all the cartridges securely. You must replace the cartridge first. 14 - This takes about 2 ½ minutes. Epson Stylus Photo R1900 Series 11/07 Press the H ink button to clean the print head nozzles. Insert the new cartridge into the holder and push it down all... cartridge is finished. Remove the yellow tape from the package, but be careful not to let the printer check and clean the nozzles, if necessary. Caution: Never turn off the printer while ink is flashing, press the H ink button, then press down until it clicks into place....
Product Information Guide
Page 15
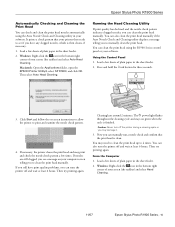
... right corner of your screen (the taskbar) and select Head Cleaning. 11/07 Epson Stylus Photo R1900 Series - 15 Click Start and follow the on green when the cycle is clean. Caution: Never turn the printer off and wait at least 6 hours. Then select Auto Head Cleaning. If you.... Now you can manually run a nozzle check and confirm that your printer then reads to see a message on your computer screen telling you to print and examine the nozzle check pattern. 4. Epson Stylus Photo R1900 Series Automatically Checking and Cleaning the Print Head You can check and clean the...
... right corner of your screen (the taskbar) and select Head Cleaning. 11/07 Epson Stylus Photo R1900 Series - 15 Click Start and follow the on green when the cycle is clean. Caution: Never turn the printer off and wait at least 6 hours. Then select Auto Head Cleaning. If you.... Now you can manually run a nozzle check and confirm that your printer then reads to see a message on your computer screen telling you to print and examine the nozzle check pattern. 4. Epson Stylus Photo R1900 Series Automatically Checking and Cleaning the Print Head You can check and clean the...
Product Information Guide
Page 16
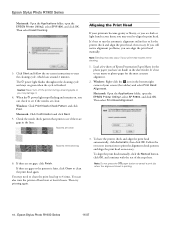
... the Print Head If your screen (the taskbar) and select Print Head Alignment. To have on green when the cycle is finished. Epson Stylus Photo R1900 Series Macintosh: Open the Applications folder, open the EPSON Printer Utility2, select SP R1900, and click OK. The P power light flashes throughout the cleaning cycle and stays on hand) in the lines.
... the Print Head If your screen (the taskbar) and select Print Head Alignment. To have on green when the cycle is finished. Epson Stylus Photo R1900 Series Macintosh: Open the Applications folder, open the EPSON Printer Utility2, select SP R1900, and click OK. The P power light flashes throughout the cleaning cycle and stays on hand) in the lines.
Product Information Guide
Page 17
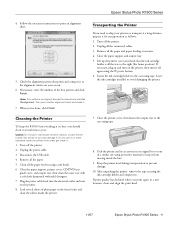
...paper loading accessories. 4. Remove all the way to ship your screen. 6. Epson Stylus Photo R1900 Series 4. Transporting the Printer If you should clean it from moving inside it for transportation as follows: 1. Lift up the printer cover and check that prints and compare it off again using tape. 8. Do...into the electrical outlet and turn it to clean the printer or you 're done, click Finish. If necessary, plug in a new location, clean and align the print head. 11/07 Epson Stylus Photo R1900 Series - 17 Close the printer cover, then fasten the output tray to print an ...
...paper loading accessories. 4. Remove all the way to ship your screen. 6. Epson Stylus Photo R1900 Series 4. Transporting the Printer If you should clean it from moving inside it for transportation as follows: 1. Lift up the printer cover and check that prints and compare it off again using tape. 8. Do...into the electrical outlet and turn it to clean the printer or you 're done, click Finish. If necessary, plug in a new location, clean and align the print head. 11/07 Epson Stylus Photo R1900 Series - 17 Close the printer cover, then fasten the output tray to print an ...
Product Information Guide
Page 18
Epson Stylus Photo R1900 Series Related Documentation Epson Stylus Photo R1900 Series Start Here sheet Epson Stylus Photo R1900 Series User's Guide Epson Stylus Photo R1900 Series CD-ROM with on-screen Reference Guide CPD-24044 CPD-24045 CPD-24046 18 - Epson Stylus Photo R1900 Series 11/07
Epson Stylus Photo R1900 Series Related Documentation Epson Stylus Photo R1900 Series Start Here sheet Epson Stylus Photo R1900 Series User's Guide Epson Stylus Photo R1900 Series CD-ROM with on-screen Reference Guide CPD-24044 CPD-24045 CPD-24046 18 - Epson Stylus Photo R1900 Series 11/07
User's Guide - PDF
Page 1
Epson Stylus® Photo R1900 Series User's Guide
Epson Stylus® Photo R1900 Series User's Guide
User's Guide - PDF
Page 5
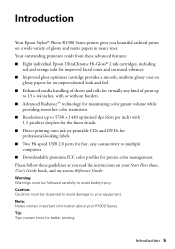
Introduction Your Epson Stylus® Photo R1900 Series printer gives you read the instructions on your Start Here sheet, User's Guide book, and on-screen Reference Guide: Warning: Warnings must be followed carefully to ... coat on a wide variety of print up to 13 × 44 inches, with or without borders. ■ Advanced Radiance™ technology for maximizing color gamut volume while providing smoother color transitions. ■ Resolutions up to 5760 × 1440 optimized dpi (dots per inch) with 1.5 picoliter droplets for the finest details. ■ Direct...
Introduction Your Epson Stylus® Photo R1900 Series printer gives you read the instructions on your Start Here sheet, User's Guide book, and on-screen Reference Guide: Warning: Warnings must be followed carefully to ... coat on a wide variety of print up to 13 × 44 inches, with or without borders. ■ Advanced Radiance™ technology for maximizing color gamut volume while providing smoother color transitions. ■ Resolutions up to 5760 × 1440 optimized dpi (dots per inch) with 1.5 picoliter droplets for the finest details. ■ Direct...
User's Guide - PDF
Page 16
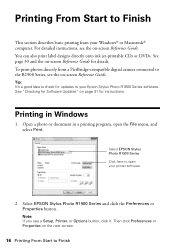
... for updates to your Windows® or Macintosh® computer. To print photos directly from your Epson Stylus Photo R1900 Series software. See "Checking for instructions. For detailed instructions, see a Setup, Printer, or Options button, click it. Printing From Start to Finish This section ...Guide. See page 30 and the on -screen Reference Guide. Printing in a printing program, open your printer software 2. Select EPSON Stylus Photo R1900 Series and click the Preferences or Properties button. Then click Preferences or Properties on the next screen. 16 Printing From ...
... for updates to your Windows® or Macintosh® computer. To print photos directly from your Epson Stylus Photo R1900 Series software. See "Checking for instructions. For detailed instructions, see a Setup, Printer, or Options button, click it. Printing From Start to Finish This section ...Guide. See page 30 and the on -screen Reference Guide. Printing in a printing program, open your printer software 2. Select EPSON Stylus Photo R1900 Series and click the Preferences or Properties button. Then click Preferences or Properties on the next screen. 16 Printing From ...


