
User's Guide
Page 6
... Glass 125 Cleaning the Projector Case...126 Air Filter and Vent Maintenance 126 Cleaning the Air Filter ...127 Replacing the Air Filter...130 Projector Lamp Maintenance...132 Replacing the Lamp ...133 Resetting the Lamp Timer...137 6 Signal Menu 111 Projector Feature Settings - Info Menu 121 Event ID Code List...122 Projector Reset Options -
... Glass 125 Cleaning the Projector Case...126 Air Filter and Vent Maintenance 126 Cleaning the Air Filter ...127 Replacing the Air Filter...130 Projector Lamp Maintenance...132 Replacing the Lamp ...133 Resetting the Lamp Timer...137 6 Signal Menu 111 Projector Feature Settings - Info Menu 121 Event ID Code List...122 Projector Reset Options -

User's Guide
Page 7
... Password Problems 154 Solutions When Network Alert E-Mails are Not Received 154 Where to Get Help...154 Technical Specifications ...156 General Projector Specifications ...156 Projector Lamp Specifications...158 Remote Control Specifications ...159 Projector Dimension Specifications 159 Projector Electrical Specifications ...160 Projector Environmental Specifications 161 Projector Safety and Approvals Specifications 161 7
... Password Problems 154 Solutions When Network Alert E-Mails are Not Received 154 Where to Get Help...154 Technical Specifications ...156 General Projector Specifications ...156 Projector Lamp Specifications...158 Remote Control Specifications ...159 Projector Dimension Specifications 159 Projector Electrical Specifications ...160 Projector Environmental Specifications 161 Projector Safety and Approvals Specifications 161 7
User's Guide
Page 9
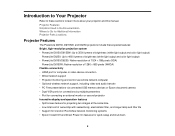
... (white light output and color light output) PowerLite D6250: Up to 4000 lumens of brightness (white light output and color light output) • PowerLite D6150/D6250: Native resolution of 1024 × 768 pixels (XGA) PowerLite D6155W: Native resolution of 1280 × 800 pixels... electrostatic filter, and longer lamp and filter life • Support for Crestron RoomView network monitoring systems • Epson Instant Off and Direct Power On features for Additional Information Projector Parts Locations Projector Features The PowerLite D6150, D6155W, and D6250 projectors include these...
... (white light output and color light output) PowerLite D6250: Up to 4000 lumens of brightness (white light output and color light output) • PowerLite D6150/D6250: Native resolution of 1024 × 768 pixels (XGA) PowerLite D6155W: Native resolution of 1280 × 800 pixels... electrostatic filter, and longer lamp and filter life • Support for Crestron RoomView network monitoring systems • Epson Instant Off and Direct Power On features for Additional Information Projector Parts Locations Projector Features The PowerLite D6150, D6155W, and D6250 projectors include these...
User's Guide
Page 12
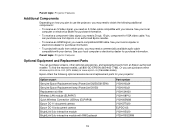
...). See your local computer or electronics dealer for your projector: Option or part Genuine Epson Replacement lamp (PowerLite D6250/D6155W) Genuine Epson Replacement lamp (PowerLite D6150) Replacement air filter Wireless LAN module (ELPAP07) Quick Wireless Connection USB key (ELPAP08) Epson DC-11 document camera Epson DC-10s document camera BrightLink Solo interactive module BrightLink Solo interactive module with your...
...). See your local computer or electronics dealer for your projector: Option or part Genuine Epson Replacement lamp (PowerLite D6250/D6155W) Genuine Epson Replacement lamp (PowerLite D6150) Replacement air filter Wireless LAN module (ELPAP07) Quick Wireless Connection USB key (ELPAP08) Epson DC-11 document camera Epson DC-10s document camera BrightLink Solo interactive module BrightLink Solo interactive module with your...

User's Guide
Page 16
12 Focus ring 13 Cable cover 14 Control panel 15 Lamp cover Parent topic: Projector Parts Locations Projector Parts - Rear 1 Optional wireless LAN module port and stopper 2 Cable cover screw holes 3 RS-232C port 4 Monitor Out port 5 Audio Out port 6 A/C input port 7 Cable clip holes 8 Security slot 9 Security lock port 10 Network (LAN) port 16
12 Focus ring 13 Cable cover 14 Control panel 15 Lamp cover Parent topic: Projector Parts Locations Projector Parts - Rear 1 Optional wireless LAN module port and stopper 2 Cable cover screw holes 3 RS-232C port 4 Monitor Out port 5 Audio Out port 6 A/C input port 7 Cable clip holes 8 Security slot 9 Security lock port 10 Network (LAN) port 16

User's Guide
Page 66
... the power button on the projector or the remote control to the projector's power inlet. 2. Plug the power cord into the projector lens when the lamp is especially dangerous for children and pets. 66 Connect the power cord to turn on . Note: With Direct Power On turned on, the projector turns...
... the power button on the projector or the remote control to the projector's power inlet. 2. Plug the power cord into the projector lens when the lamp is especially dangerous for children and pets. 66 Connect the power cord to turn on . Note: With Direct Power On turned on, the projector turns...

User's Guide
Page 67
Lamp life will vary depending upon mode selected, environmental conditions, and usage. Brightness decreases over time. 1. Note: With Epson's Instant Off ...technology, there is no cool-down any computer connected to it on, press any other video media, and press the Play button (if necessary). • Press the Source Search button on the projector or remote control to prolong the life of the lamp...device. • Insert a DVD or other button.) The projector beeps twice, the lamp turns off, and the power light turns orange. Extended Menu Turning Off the Projector ...
Lamp life will vary depending upon mode selected, environmental conditions, and usage. Brightness decreases over time. 1. Note: With Epson's Instant Off ...technology, there is no cool-down any computer connected to it on, press any other video media, and press the Play button (if necessary). • Press the Source Search button on the projector or remote control to prolong the life of the lamp...device. • Insert a DVD or other button.) The projector beeps twice, the lamp turns off, and the power light turns orange. Extended Menu Turning Off the Projector ...

User's Guide
Page 68
3. To transport or store the projector, make sure the power light is green or flashing orange. Turn on the projector. 2. Press the Menu button. 68 Parent topic: Using Basic Projector Features Selecting the Language for the Projector Menus If you want to view the projector's menus and messages in another language, you can change the Language setting. 1. Caution: To avoid damaging the projector or lamp, never unplug the power cord when the power light is orange (but not flashing), then unplug the power cord.
3. To transport or store the projector, make sure the power light is green or flashing orange. Turn on the projector. 2. Press the Menu button. 68 Parent topic: Using Basic Projector Features Selecting the Language for the Projector Menus If you want to view the projector's menus and messages in another language, you can change the Language setting. 1. Caution: To avoid damaging the projector or lamp, never unplug the power cord when the power light is orange (but not flashing), then unplug the power cord.

User's Guide
Page 111
The available settings depend on the image brightness when certain Color Modes are selected Note: The Brightness setting does not affect lamp brightness. Parent topic: Adjusting the Menu Settings Related references Available Color Modes Input Signal Settings - If you need to 10000 ºK ... Varying levels available Abs. Signal Menu Normally the projector detects and optimizes the input signal settings automatically. To change the lamp brightness mode, use the Signal menu. Color Temp (absolute color 5000 to customize the settings, you can use the Power Consumption setting.
The available settings depend on the image brightness when certain Color Modes are selected Note: The Brightness setting does not affect lamp brightness. Parent topic: Adjusting the Menu Settings Related references Available Color Modes Input Signal Settings - If you need to 10000 ºK ... Varying levels available Abs. Signal Menu Normally the projector detects and optimizes the input signal settings automatically. To change the lamp brightness mode, use the Signal menu. Color Temp (absolute color 5000 to customize the settings, you can use the Power Consumption setting.
User's Guide
Page 115
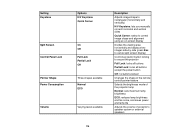
... except the power button Off: no buttons locked Changes the shape of the remote control pointer feature Selects the brightness mode of the projector lamp Normal: sets maximum lamp brightness ECO: reduces lamp brightness and fan noise, and saves power and lamp life Adjusts the volume of projector's speaker system or external speakers 115
... except the power button Off: no buttons locked Changes the shape of the remote control pointer feature Selects the brightness mode of the projector lamp Normal: sets maximum lamp brightness ECO: reduces lamp brightness and fan noise, and saves power and lamp life Adjusts the volume of projector's speaker system or external speakers 115

User's Guide
Page 121
... input sources by viewing the Info menu. However, you have used in Normal and ECO Power Consumption modes; The lamp usage timer does not register any hours until you cannot change any settings in yellow, obtain a genuine Epson replacement lamp soon 121 Note: Available settings depend on the current input source. Information item...
... input sources by viewing the Info menu. However, you have used in Normal and ECO Power Consumption modes; The lamp usage timer does not register any hours until you cannot change any settings in yellow, obtain a genuine Epson replacement lamp soon 121 Note: Available settings depend on the current input source. Information item...

User's Guide
Page 122
...; see the list of Event ID codes Event ID Code List Parent topic: Adjusting the Menu Settings Related references Optional Equipment and Replacement Parts Projector Lamp Specifications Event ID Code List If the Event ID option on again. 122 Information item Source Input Signal Resolution Video Signal Refresh Rate Sync Info...
...; see the list of Event ID codes Event ID Code List Parent topic: Adjusting the Menu Settings Related references Optional Equipment and Replacement Parts Projector Lamp Specifications Event ID Code List If the Event ID option on again. 122 Information item Source Input Signal Resolution Video Signal Refresh Rate Sync Info...

User's Guide
Page 124
You cannot reset the following settings using the Reset Lamp Hours option. You can also reset the projector's lamp usage timer to zero when you replace the lamp using the Reset All option: • Input Signal • User's Logo • Language • Network menu items • Lamp Hours • Password • User Button • Multi-screen Parent topic: Adjusting the Menu Settings 124
You cannot reset the following settings using the Reset Lamp Hours option. You can also reset the projector's lamp usage timer to zero when you replace the lamp using the Reset All option: • Input Signal • User's Logo • Language • Network menu items • Lamp Hours • Password • User Button • Multi-screen Parent topic: Adjusting the Menu Settings 124
User's Guide
Page 125
... Glass Clean the projector's lens cover glass periodically, or whenever you notice dust or smudges on the projector, except the lamp cover. Dangerous electrical voltages in these sections to qualified servicers. Maintaining and Transporting the Projector Follow the instructions in the projector... can injure you severely. Refer all other part needs replacing, contact Epson or an authorized Epson servicer. Warning: Do not try to keep working at its best. Warning: Before cleaning any other servicing to maintain...
... Glass Clean the projector's lens cover glass periodically, or whenever you notice dust or smudges on the projector, except the lamp cover. Dangerous electrical voltages in these sections to qualified servicers. Maintaining and Transporting the Projector Follow the instructions in the projector... can injure you severely. Refer all other part needs replacing, contact Epson or an authorized Epson servicer. Warning: Do not try to keep working at its best. Warning: Before cleaning any other servicing to maintain...
User's Guide
Page 126
... to clean the projector case. These can damage the case. Caution: Do not use a lens cleaner that prevent the buildup of dust by the projector lamp may cause the projector to overheat due to improper ventilation. If dust collects on the air filter or vents, clean them as described in this...
... to clean the projector case. These can damage the case. Caution: Do not use a lens cleaner that prevent the buildup of dust by the projector lamp may cause the projector to overheat due to improper ventilation. If dust collects on the air filter or vents, clean them as described in this...

User's Guide
Page 132
.... Parent topic: Air Filter and Vent Maintenance Related references Projector Light Status Projector Lamp Maintenance The projector keeps track of the number of hours the lamp is flashing orange Replacing the Lamp Resetting the Lamp Timer Parent topic: Projector Maintenance Related references Optional Equipment and Replacement Parts 132 Place... image gets darker or starts to deteriorate • A message appears when you turn on the projector telling you to replace the lamp • The projector's lamp light is used and displays this information in the projector's menu system. Replace the...
.... Parent topic: Air Filter and Vent Maintenance Related references Projector Light Status Projector Lamp Maintenance The projector keeps track of the number of hours the lamp is flashing orange Replacing the Lamp Resetting the Lamp Timer Parent topic: Projector Maintenance Related references Optional Equipment and Replacement Parts 132 Place... image gets darker or starts to deteriorate • A message appears when you turn on the projector telling you to replace the lamp • The projector's lamp light is used and displays this information in the projector's menu system. Replace the...
User's Guide
Page 133
... broken, glass fragments may be loose inside the lamp chamber. Use the screwdriver included with the replacement lamp to avoid injury. 133 Projector Lamp Specifications Replacing the Lamp Before you replace the lamp, let the projector cool down for at least one hour. Warning: Let the lamp fully cool before replacing it to cool down for...
... broken, glass fragments may be loose inside the lamp chamber. Use the screwdriver included with the replacement lamp to avoid injury. 133 Projector Lamp Specifications Replacing the Lamp Before you replace the lamp, let the projector cool down for at least one hour. Warning: Let the lamp fully cool before replacing it to cool down for...

User's Guide
Page 134
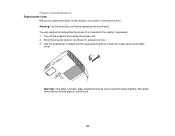
The screws do not come all the way out. 134 4. Slide the lamp cover out and lift it off. 5. Loosen the screws securing the lamp to the projector.
The screws do not come all the way out. 134 4. Slide the lamp cover out and lift it off. 5. Loosen the screws securing the lamp to the projector.

User's Guide
Page 135
Gently insert the new lamp into the projector. Caution: Do not touch any glass on the lamp assembly to avoid premature lamp failure. 135 6. If it does not fit easily, make sure it is facing the right way. Press the handle down. Please consult your state and local regulations regarding disposal or recycling. Do not put in this product contain mercury. Lift up the lamp handle and gently pull the lamp out of the projector. Note: The lamp(s) in the trash. 7.
Gently insert the new lamp into the projector. Caution: Do not touch any glass on the lamp assembly to avoid premature lamp failure. 135 6. If it does not fit easily, make sure it is facing the right way. Press the handle down. Please consult your state and local regulations regarding disposal or recycling. Do not put in this product contain mercury. Lift up the lamp handle and gently pull the lamp out of the projector. Note: The lamp(s) in the trash. 7.

User's Guide
Page 136
Push in the lamp firmly and tighten the screws to secure it . 9. 8. Replace the lamp cover and tighten the screw to secure it . Parent topic: Projector Lamp Maintenance 136 Note: Be sure the lamp cover is securely installed or the lamp will not come on. Reset the lamp timer to zero to keep track of the new lamp's usage.
Push in the lamp firmly and tighten the screws to secure it . 9. 8. Replace the lamp cover and tighten the screw to secure it . Parent topic: Projector Lamp Maintenance 136 Note: Be sure the lamp cover is securely installed or the lamp will not come on. Reset the lamp timer to zero to keep track of the new lamp's usage.


