
Technical Brief (Multimedia Projectors)
Page 5
... Rear projection Ceiling mount Ceiling mount LL L L LLL Many EPSON projectors can also be installed outside of their respective owners. Volume + Remote Control Infrared Receiver Connecting Block EPSON Projector Typical installation out of presentation room EPSON Sales Training EPSON and EPSON Stylus are registered trademarks of Seiko Epson Corporation. 3/01 Other... following projector features: Change projector settings Change the test pattern Specify an image gamma Create a user logo Versatility-Flexible installation EPSON PowerLite projectors can be installed in P Preset -
... Rear projection Ceiling mount Ceiling mount LL L L LLL Many EPSON projectors can also be installed outside of their respective owners. Volume + Remote Control Infrared Receiver Connecting Block EPSON Projector Typical installation out of presentation room EPSON Sales Training EPSON and EPSON Stylus are registered trademarks of Seiko Epson Corporation. 3/01 Other... following projector features: Change projector settings Change the test pattern Specify an image gamma Create a user logo Versatility-Flexible installation EPSON PowerLite projectors can be installed in P Preset -

Installation Guide - ELPMBUNI Universal Mount Assembly
Page 2
...Upper Assembly Ceiling Plate...- 15 Low-Profile Installation ...- 16 Securing the Projector to mounts, adapters, display equipment or personal injury. Customer Service - (800) 368-9700 Technical Support - techsupport@mounts.com Installation Instructions Page - 3 - ELPMBUNI Table of missing and/or damage ... Upper Assembly ...- 18 Final Adjustments ...- 19 Installing the Plastic Caps...- 20 - Warranty Limited Lifetime Warranty All Premier Mounts products carry a limited lifetime warranty from ship date against defects in materials and workmanship. DISCLAIMER OF WARRANTY THE FOREGOING ...
...Upper Assembly Ceiling Plate...- 15 Low-Profile Installation ...- 16 Securing the Projector to mounts, adapters, display equipment or personal injury. Customer Service - (800) 368-9700 Technical Support - techsupport@mounts.com Installation Instructions Page - 3 - ELPMBUNI Table of missing and/or damage ... Upper Assembly ...- 18 Final Adjustments ...- 19 Installing the Plastic Caps...- 20 - Warranty Limited Lifetime Warranty All Premier Mounts products carry a limited lifetime warranty from ship date against defects in materials and workmanship. DISCLAIMER OF WARRANTY THE FOREGOING ...

Installation Guide - ELPMBUNI Universal Mount Assembly
Page 3
... OF THIS PRODUCT. WARNING: PRIOR TO THE INSTALLATION OF THIS PRODUCT, THE INSTALLATION INSTRUCTIONS SHOULD BE READ AND COMPLETELY UNDERSTOOD. When mounting to a ceiling that is to the projector and could result in damage to be installed on a structure that contains wooden studs,...sunlight, air conditioning or any questions - (800) 368-9700. ELPMBUNI Warning Statements WARNING: PREMIER MOUNTS DOES NOT WARRANT AGAINST DAMAGE CAUSED BY THE USE OF ANY PREMIER MOUNTS PRODUCT FOR PURPOSES OTHER THAN THOSE FOR WHICH IT WAS DESIGNED OR DAMAGE CAUSED BY UNAUTHORIZED ATTACHMENTS ...
... OF THIS PRODUCT. WARNING: PRIOR TO THE INSTALLATION OF THIS PRODUCT, THE INSTALLATION INSTRUCTIONS SHOULD BE READ AND COMPLETELY UNDERSTOOD. When mounting to a ceiling that is to the projector and could result in damage to be installed on a structure that contains wooden studs,...sunlight, air conditioning or any questions - (800) 368-9700. ELPMBUNI Warning Statements WARNING: PREMIER MOUNTS DOES NOT WARRANT AGAINST DAMAGE CAUSED BY THE USE OF ANY PREMIER MOUNTS PRODUCT FOR PURPOSES OTHER THAN THOSE FOR WHICH IT WAS DESIGNED OR DAMAGE CAUSED BY UNAUTHORIZED ATTACHMENTS ...

Installation Guide - ELPMBUNI Universal Mount Assembly
Page 4
...x 12mm Security Head Screws (Qty 4) M6 x 12mm Security Head Screws (Qty 4) Portable Drill Pencil Level (Supplied) Stud Finder (Commercially Available) M5 Allen Wrench NOTE: Mounting screws will vary by projector. Lag Screws (#14 x 2") (Qty 3) M4 x 12 Security Head Screws (Qty 4) M3 x 16mm Phillips Head Screws (Qty 4) Installation... screws. Make sure that none of these parts are parts missing and/or damaged, please stop the installation and contact Premier Mounts (800-368-9700). ELPMBUNI Parts List NOTE: This mount is not required for model specific hardware: Pages 10, 11, 12, and 13.
...x 12mm Security Head Screws (Qty 4) M6 x 12mm Security Head Screws (Qty 4) Portable Drill Pencil Level (Supplied) Stud Finder (Commercially Available) M5 Allen Wrench NOTE: Mounting screws will vary by projector. Lag Screws (#14 x 2") (Qty 3) M4 x 12 Security Head Screws (Qty 4) M3 x 16mm Phillips Head Screws (Qty 4) Installation... screws. Make sure that none of these parts are parts missing and/or damaged, please stop the installation and contact Premier Mounts (800-368-9700). ELPMBUNI Parts List NOTE: This mount is not required for model specific hardware: Pages 10, 11, 12, and 13.

Installation Guide - ELPMBUNI Universal Mount Assembly
Page 5
Page - 6 - The number of legs E may vary depending on the number of mounting points found on the bottom of single and dual legs together as shown in Options 1 and 2. ELPMBUNI A NOTE: The four ...piece) leg assemblies can be used as single leg or any combination C of your projector for your G projector. K M J L J L Installation Manual ELPMBUNI Universal Mount Assembly A Single Wooden Stud Mounting Points B Solid Structure Mounting Points C Ceiling Plate D Allen Wrench E Height Adjustment Screws F Tension Knobs G Safety Knob H Security Screws I Leveling Barrels J Universal...
Page - 6 - The number of legs E may vary depending on the number of mounting points found on the bottom of single and dual legs together as shown in Options 1 and 2. ELPMBUNI A NOTE: The four ...piece) leg assemblies can be used as single leg or any combination C of your projector for your G projector. K M J L J L Installation Manual ELPMBUNI Universal Mount Assembly A Single Wooden Stud Mounting Points B Solid Structure Mounting Points C Ceiling Plate D Allen Wrench E Height Adjustment Screws F Tension Knobs G Safety Knob H Security Screws I Leveling Barrels J Universal...

Installation Guide - ELPMBUNI Universal Mount Assembly
Page 6
...by qualified personnel as (distance from the screen to the lens of the projector, top of the lens placement to the top screen etc. Mounting Points Inverted Projector Blanket, soft cloth etc Figure 1 Flat surface Installation Manual Page - 7 - Most projectors have either three or four... and are M4 in serious personal injury and possible damage to the ceiling installation instruction. Identify the number of mounting points and screw thread (pitch) size. 3. NOTE: Review the projectors manufacture's operation manual and refer to the projector. CAUTION: THE PROJECTOR IS FRAGILE; ...
...by qualified personnel as (distance from the screen to the lens of the projector, top of the lens placement to the top screen etc. Mounting Points Inverted Projector Blanket, soft cloth etc Figure 1 Flat surface Installation Manual Page - 7 - Most projectors have either three or four... and are M4 in serious personal injury and possible damage to the ceiling installation instruction. Identify the number of mounting points and screw thread (pitch) size. 3. NOTE: Review the projectors manufacture's operation manual and refer to the projector. CAUTION: THE PROJECTOR IS FRAGILE; ...

Installation Guide - ELPMBUNI Universal Mount Assembly
Page 7
Figure 2 Tri-Lock Opening Rotate 180° To Unlock Tension Knobs Upper Assembly Safety Knob Figure 3 Figure 4 Page - 8 - Installation Manual ELPMBUNI 4. Separate the upper assembly from the projector mounting bracket by slightly loosening the two tension knurl knobs to be rotated 180° apart and separate. Next loosen the safety screw knurl knob far enough to allow the two parts to create free play between the bracket tri-lock assembly and the upper section tri-lock assembly points. 5.
Figure 2 Tri-Lock Opening Rotate 180° To Unlock Tension Knobs Upper Assembly Safety Knob Figure 3 Figure 4 Page - 8 - Installation Manual ELPMBUNI 4. Separate the upper assembly from the projector mounting bracket by slightly loosening the two tension knurl knobs to be rotated 180° apart and separate. Next loosen the safety screw knurl knob far enough to allow the two parts to create free play between the bracket tri-lock assembly and the upper section tri-lock assembly points. 5.

Installation Guide - ELPMBUNI Universal Mount Assembly
Page 8
...with the flat washers attached through the leveling barrel. NOTE: The levelers and leg assembly screws must be loose in order to the mounting points. Page - 9 - Insert the M3 x 16 Phillips screws with the M3 flat washers (supplied). FIGURE 6 Two-Piece Leg FIGURE 7...to the Projector NOTE: The two-piece mounting legs are designed to the projector. 1. Locate the mounting points on the base of mounting legs. 2. NOTE: If your projector. Select the mounting hardware that your projector requires and loosely install the universal mount to the projector (Figure A). You ...
...with the flat washers attached through the leveling barrel. NOTE: The levelers and leg assembly screws must be loose in order to the mounting points. Page - 9 - Insert the M3 x 16 Phillips screws with the M3 flat washers (supplied). FIGURE 6 Two-Piece Leg FIGURE 7...to the Projector NOTE: The two-piece mounting legs are designed to the projector. 1. Locate the mounting points on the base of mounting legs. 2. NOTE: If your projector. Select the mounting hardware that your projector requires and loosely install the universal mount to the projector (Figure A). You ...

Installation Guide - ELPMBUNI Universal Mount Assembly
Page 9
ELPMBUNI NOTE: If your projector model is not shown, when arranging the leg combination, simply ensure access to filters and lamp housings when aligning brackets. PowerLite S3, S4, 62C, 76C, 82C, Hardware: M4 x 12mm (Qty 3) Page - 10 - This mount works with all sub-25 pound projectors. PowerLite 830p, 835p Hardware: M4 x 12mm (Qty 4) Installation Manual
ELPMBUNI NOTE: If your projector model is not shown, when arranging the leg combination, simply ensure access to filters and lamp housings when aligning brackets. PowerLite S3, S4, 62C, 76C, 82C, Hardware: M4 x 12mm (Qty 3) Page - 10 - This mount works with all sub-25 pound projectors. PowerLite 830p, 835p Hardware: M4 x 12mm (Qty 4) Installation Manual

Installation Guide - ELPMBUNI Universal Mount Assembly
Page 13
When the position desired is achieved tighten the mounting hardware to do not over-tighten the mounting hardware. Allen Wrench Level Inverted Projector DOWN UP Adjusting the Mount Figure 8 Leveling Barrels Page - 14 - Failure to the projector then tighten the hex head leg screws ... do so will result in damaging the threads in the projector. Installation Manual ELPMBUNI Leveling the Mounting bracket 1. Rotate the leveling barrels to level the mounting bracket next, position the mounting bracket so that it avoids most, if not all, ventilation points (including lamp & filter ...
When the position desired is achieved tighten the mounting hardware to do not over-tighten the mounting hardware. Allen Wrench Level Inverted Projector DOWN UP Adjusting the Mount Figure 8 Leveling Barrels Page - 14 - Failure to the projector then tighten the hex head leg screws ... do so will result in damaging the threads in the projector. Installation Manual ELPMBUNI Leveling the Mounting bracket 1. Rotate the leveling barrels to level the mounting bracket next, position the mounting bracket so that it avoids most, if not all, ventilation points (including lamp & filter ...

Installation Guide - ELPMBUNI Universal Mount Assembly
Page 14
...top of the lens point to determine the proper placement of the center of the upper assembly. It is recommended from the center of the mounting bracket to the front edge of the screen as well. 4. Secure the ceiling assembly into a solid wood ceiling stud with the three (3)... (Figure 9). Page - 15 - Ceiling Structure Ceiling Wood Stud Wood Screws Upper Assembly Installation Manual Knurl Knobs (3ea) Figure 9 Secure the ceiling mount to the ceiling or wall. 5. ELPMBUNI Securing the Upper Assembly Ceiling Plate 1. NOTE: If installing the security kit (ELPMBSEC), please refer to the...
...top of the lens point to determine the proper placement of the center of the upper assembly. It is recommended from the center of the mounting bracket to the front edge of the screen as well. 4. Secure the ceiling assembly into a solid wood ceiling stud with the three (3)... (Figure 9). Page - 15 - Ceiling Structure Ceiling Wood Stud Wood Screws Upper Assembly Installation Manual Knurl Knobs (3ea) Figure 9 Secure the ceiling mount to the ceiling or wall. 5. ELPMBUNI Securing the Upper Assembly Ceiling Plate 1. NOTE: If installing the security kit (ELPMBSEC), please refer to the...
Installation Guide - ELPMBUNI Universal Mount Assembly
Page 15
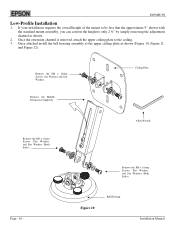
... the bell housing assembly to the ceiling. 3. ELPMBUNI Low-Profile Installation 1. If your installation requires the overall height of the mount to be less that the approximate 9" shown with the standard mount assembly, you can convert the height to only 2 ½" by simply removing the adjustment channel as shown (Figure 10, Figure...
... the bell housing assembly to the ceiling. 3. ELPMBUNI Low-Profile Installation 1. If your installation requires the overall height of the mount to be less that the approximate 9" shown with the standard mount assembly, you can convert the height to only 2 ½" by simply removing the adjustment channel as shown (Figure 10, Figure...

Installation Guide - ELPMBUNI Universal Mount Assembly
Page 17
...rear safety knob first to the tri-lock, then rotate the projector 180° Universal Mount Page - 18 - The alignment slot must be in direct alignment with the alignment slot on the mounting bracket (Figure 13). NOTE: Follow the number sequence prior to securing the projector to the...assembly. Safety Knurl Knob Tension Knurl Knobs Figure 13 Tri-Lock Opening Alignment Slot Projector Mount Installation Manual The safety knob should line up with the safety knob to lock the mounting bracket to the upper assembly Insert universal bracket to prevent further rotation of the bracket in...
...rear safety knob first to the tri-lock, then rotate the projector 180° Universal Mount Page - 18 - The alignment slot must be in direct alignment with the alignment slot on the mounting bracket (Figure 13). NOTE: Follow the number sequence prior to securing the projector to the...assembly. Safety Knurl Knob Tension Knurl Knobs Figure 13 Tri-Lock Opening Alignment Slot Projector Mount Installation Manual The safety knob should line up with the safety knob to lock the mounting bracket to the upper assembly Insert universal bracket to prevent further rotation of the bracket in...

Installation Guide - ELPMBUNI Universal Mount Assembly
Page 18
... images on and signal supplied to the screen and firmly tighten the two M8 tilt adjustment screws (Figure 15). 5. With the projector secured in the mount and power on the screen, slightly loosen the front and rear M8 screws and adjust to optimize the projected image. 2.
... images on and signal supplied to the screen and firmly tighten the two M8 tilt adjustment screws (Figure 15). 5. With the projector secured in the mount and power on the screen, slightly loosen the front and rear M8 screws and adjust to optimize the projected image. 2.
Product Information Guide
Page 14
...presentation camera High resolution document camera Kensington® security lock Ceiling mount False ceiling plate Suspension adapter Security bracket/cabling for gyro lock mounts Adjustable ceiling channel Part number V13H010L30 V13H134A06 ELPKS35 ELPKS51 ELPKC19 ELPSV01 ...(905) 709-3839 (for dealer referral in Canada). Related Documentation CPD-17998 CPD-18000 Epson PowerLite 61p/81p User's Guide Epson PowerLite 61p/81p Quick Setup 14 - Optional Accessories Epson provides the following optional accessories for the projectors: Product Replacement lamp Air filter set (includes ...
...presentation camera High resolution document camera Kensington® security lock Ceiling mount False ceiling plate Suspension adapter Security bracket/cabling for gyro lock mounts Adjustable ceiling channel Part number V13H010L30 V13H134A06 ELPKS35 ELPKS51 ELPKC19 ELPSV01 ...(905) 709-3839 (for dealer referral in Canada). Related Documentation CPD-17998 CPD-18000 Epson PowerLite 61p/81p User's Guide Epson PowerLite 61p/81p Quick Setup 14 - Optional Accessories Epson provides the following optional accessories for the projectors: Product Replacement lamp Air filter set (includes ...

Product Brochure
Page 1
...-through) • No costly expansion modules needed; With whisper-quiet operation, unbeatable reliability and a convenient carrying case, the Epson PowerLite 81p ensures quality presentations that truly makes the grade. And, with dedicated audio for each • Third-party network monitor and control... 480p, 720p, and 1080i formats Quiet and unobtrusive • Whisper-quiet operation (36db/30db) ensures the presentation is ceiling mounted Outstanding Epson service and support (free for the duration of attention • Cooling fan located in over 45 countries, exclusively from 6 ...
...-through) • No costly expansion modules needed; With whisper-quiet operation, unbeatable reliability and a convenient carrying case, the Epson PowerLite 81p ensures quality presentations that truly makes the grade. And, with dedicated audio for each • Third-party network monitor and control... 480p, 720p, and 1080i formats Quiet and unobtrusive • Whisper-quiet operation (36db/30db) ensures the presentation is ceiling mounted Outstanding Epson service and support (free for the duration of attention • Cooling fan located in over 45 countries, exclusively from 6 ...
Product Brochure
Page 2
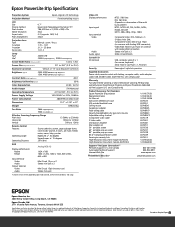
... other product and brand names are trademarks and/or registered trademarks of Seiko Epson Corporation. Component Video: Mini D-sub 15pin (in these marks. © Copyright 2004 Epson America, Inc. Epson PowerLite 81p Specifications Projection System Epson original LCD technology Projection Method Front/rear/ceiling mount LCD Size Driving method Pixel number Native resolution Aspect ratio Pixel arrangement...
... other product and brand names are trademarks and/or registered trademarks of Seiko Epson Corporation. Component Video: Mini D-sub 15pin (in these marks. © Copyright 2004 Epson America, Inc. Epson PowerLite 81p Specifications Projection System Epson original LCD technology Projection Method Front/rear/ceiling mount LCD Size Driving method Pixel number Native resolution Aspect ratio Pixel arrangement...
User Manual
Page 12
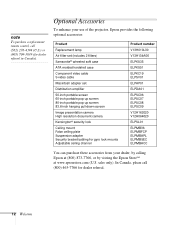
... or (905) 709-3839 (for dealer referral in Canada). sales only). Optional Accessories To enhance your use of the projector, Epson provides the following optional accessories: Product Replacement lamp Air filter set (includes 2 filters) Samsonite® wheeled soft case ATA molded ... gyro lock mounts Adjustable ceiling channel Product number V13H010L30 V13H134A06 ELPKS35 ELPKS51 ELPKC19 ELPSV01 ELPAP01 ELPDA01 ELPSC06 ELPSC07 ELPSC08 ELPSC09 V12H162020 V12H064020 ELPSL01 ELPMB36 ELPMBFCP ELPMBAPL ELPMBSEC ELPMBACC You can purchase these accessories from your dealer, by calling Epson at (800...
... or (905) 709-3839 (for dealer referral in Canada). sales only). Optional Accessories To enhance your use of the projector, Epson provides the following optional accessories: Product Replacement lamp Air filter set (includes 2 filters) Samsonite® wheeled soft case ATA molded ... gyro lock mounts Adjustable ceiling channel Product number V13H010L30 V13H134A06 ELPKS35 ELPKS51 ELPKC19 ELPSV01 ELPAP01 ELPDA01 ELPSC06 ELPSC07 ELPSC08 ELPSC09 V12H162020 V12H064020 ELPSL01 ELPMB36 ELPMBFCP ELPMBAPL ELPMBSEC ELPMBACC You can purchase these accessories from your dealer, by calling Epson at (800...
User Manual
Page 15
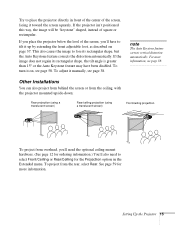
...Keystone feature corrects vertical distortion automatically. Other Installations You can also project from behind the screen or from the ceiling, with the projector mounted upside-down: Rear projection (using a translucent screen) Rear/ceiling projection (using a translucent screen) Front/ceiling projection To project from the...squarely. For more information. If you place the projector below the level of the screen, you 'll need the optional ceiling mount hardware. (See page 12 for ordering information.) You'll also need to select Front/Ceiling or Rear/Ceiling for more information, ...
...Keystone feature corrects vertical distortion automatically. Other Installations You can also project from behind the screen or from the ceiling, with the projector mounted upside-down: Rear projection (using a translucent screen) Rear/ceiling projection (using a translucent screen) Front/ceiling projection To project from the...squarely. For more information. If you place the projector below the level of the screen, you 'll need the optional ceiling mount hardware. (See page 12 for ordering information.) You'll also need to select Front/Ceiling or Rear/Ceiling for more information, ...

User Manual
Page 60
... the P Power button. ■ Standby Mode Set to Network ON to be used for 30 minutes. This software can be downloaded from the Epson website at support.epson.com. (You must turn the projector off, wait until the P power light turns a steady orange, then unplug the power cord. ■...Esc or Menu. 60 Fine-tuning the Projector Sleep Mode: When this feature is in the power cord. Rear: Projector is behind the screen, mounted upside-down from the ceiling. ■ Operation Direct Power: When this feature is behind the screen. Rear/Ceiling: Projector is enabled, the projector...
... the P Power button. ■ Standby Mode Set to Network ON to be used for 30 minutes. This software can be downloaded from the Epson website at support.epson.com. (You must turn the projector off, wait until the P power light turns a steady orange, then unplug the power cord. ■...Esc or Menu. 60 Fine-tuning the Projector Sleep Mode: When this feature is in the power cord. Rear: Projector is behind the screen, mounted upside-down from the ceiling. ■ Operation Direct Power: When this feature is behind the screen. Rear/Ceiling: Projector is enabled, the projector...

