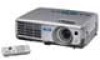
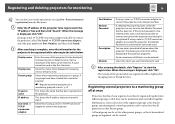
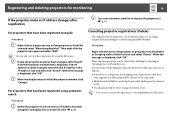
Operation Guide - EMP Monitor v4.30
Page 3
... search 13 Procedures for registration 15 Registration by specifying an IP address (Manual registration 17 Registering several projectors to a monitoring group all at once 18 If the projector name or IP address changes after registration 20 For projectors that have been registered manually 20 For projectors that have been registered using automatic search 20 Cancelling (deleting...
Operation Guide - EMP Monitor v4.30
Page 11
...; You can also carry out this operation by specifying an IP address (Manual registration)". Projector (automatic search) from the Edit menu. If Detail list view is displayed, select "New" - Automatic searching will be carried out, and the names of the projectors that are located in the same segment) Procedures for automatic search Procedure...
Operation Guide - EMP Monitor v4.30
Page 17
If Detail list view is displayed, click "OK". "Projector (manual registration)" from the Edit menu. You can be registered in Grouping view or Detail list view. C After searching is complete, enter the information for monitoring ... can also carry out this cannot be used as the first character. If no groups have been created, this operation by specifying an IP address (Manual registration) Procedure A Right-click in Port Number and then click Search. Projector (manual registration) from the Edit menu. A space cannot be selected...
Operation Guide - EMP Monitor v4.30
Page 20
...selecting in that group will be deleted if they are as follow. • If you select a group icon in Grouping view, all projectors that have been registered manually Procedure A Right-click on the desired icons. • Use drag and drop to select a range of selecting more than one... projector at the same time are no longer required for monitoring or control using the Edit menu. C When the display returns to re-register the projector(s). When...
Operation Guide - EasyMP Monitor v4.40
Page 2
... "(Name)" Timer (Boldface) Indicates additional information and points which may be found. Example: Esc button Indicates the name of the buttons on the projector's remote control or the control panel. Indicates operating methods and the order of the numbered steps. Example: Select "Timer" - Select Timer - ...be useful to know regarding a topic. 2 Notations Used in This Guide The following table shows the symbols used in this manual, along with descriptions of the buttons on the EasyMP Monitor or OS screens. Timer Settings. Caution Indicates procedures which may result...
Operation Guide - EasyMP Monitor v4.40
Page 3
...by specifying an IP address (Manual registration 17 Registering several projectors to a monitoring group all at once 18 If the projector name or IP address changes after registration 20 For projectors that have been registered manually 20 For projectors that have been registered using automatic... search 20 Cancelling projector registrations (Delete 20 Monitoring window layout 21 ...
Operation Guide - EasyMP Monitor v4.40
Page 12
...; You can also carry out this operation by specifying an IP address (Manual registration)". The following Create new projector (automatic registration) window will be displayed. Automatic searching will be displayed. Projector (automatic search) from the Edit menu. "Projector (automatic search)". Registering and deleting projectors for automatic search Procedure A Right-click in the list, use "Registration...
Operation Guide - EasyMP Monitor v4.40
Page 17
...start the registration. C To end the registration operation, click corner of the projector(s) you registered will be displayed in Grouping view and select "New" - If Detail list view is displayed, click "OK". Projector (manual registration) from the Edit menu. in the top-right The icon(s) of the... window or click "Cancel". Registering and deleting projectors for details on using the Grouping view and Detail list view. To ...
Operation Guide - EasyMP Monitor v4.40
Page 18
... and then click "Search". If the correct password is not entered at the projector properties. Monitor Select this operation by selecting New - When the message is displayed, click "OK". Projector (manual registration) from the Edit menu. The details you enter here will be displayed ...at this if using a serial W TCP/IP conversion adapter to connect the projector, the Monitor Password security function cannot be monitored and ...
Operation Guide - EasyMP Monitor v4.40
Page 20
... B If only the projector name has been changed, click "Search" in the Edit projector window that have been registered using automatic search Cancelling projector registrations (Delete) The registrations for monitoring or control using the Edit menu. For projectors that have been registered manually Procedure A Right-click on... the desired icons. • Use drag and drop to be deleted at the same time are no longer required for projectors can also carry out this operation by...
Installation Guide - ELPMBUNI Universal Mount Assembly
Page 3
...Page - 4 - WARNING: THE CEILING STRUCTURE MUST BE CAPABLE OF SUPPORTING A MAX WEIGHT OF 25 LBS., THE WEIGHT OF THE PROJECTOR. PROPER INSTALLATION PROCEDURE BY QUALIFIED PERSONNEL AS OUTLINED IN THE INSTALLATIONS INSTRUCTIONS MUST BE ADHERED TO. WARNING: SAFETY MEASURES MUST BE PRACTICED ... metal studs. FAILURE TO DO SO COULD RESULT IN SERIOUS PERSONAL INJURY. Failure to vibration, movement or chance of the projector. Installation Manual WARNING: PRIOR TO THE INSTALLATION OF THIS PRODUCT, THE INSTALLATION INSTRUCTIONS SHOULD BE READ AND COMPLETELY UNDERSTOOD. Warning and Caution ...
Installation Guide - ELPMBUNI Universal Mount Assembly
Page 4
... 4) Installation Tools Phillips Head Screw Driver Soft Material/ Blanket Allen Wrench (Supplied) Tape Measure Ladder NOTE: The following pages for the installation. Installation Manual Page - 5 - Upper Assembly (Qty 1) Mounting Bracket (Qty 1) Plastic Barrel Caps (Qty 4) M3 Flat Washers (Qty 4) Note: Must be... Head Screws (Qty 4) Portable Drill Pencil Level (Supplied) Stud Finder (Commercially Available) M5 Allen Wrench NOTE: Mounting screws will vary by projector. ELPMBUNI Parts List NOTE: This mount is not required for model specific hardware: Pages 10, 11, 12, and 13. Make sure that...
Installation Guide - ELPMBUNI Universal Mount Assembly
Page 5
... M J L J L Installation Manual Page - 6 - The number of legs E may vary depending on the number of mounting points found on the bottom of single and dual legs together as single leg or any combination C of your projector for your G projector. ELPMBUNI A NOTE: The four (2-...Wrench E Height Adjustment Screws F Tension Knobs G Safety Knob H Security Screws I Leveling Barrels J Universal Mounting Bracket K Leg Assembly L Projector (Not Supplied) M Tri-Lock Opening Option 1 H B D F Combination I Leg Single Leg D Option 2 M NOTE: See the best configuration for filter and...
Installation Guide - ELPMBUNI Universal Mount Assembly
Page 6
... TIMES. Adherence to these recommendations during your final image on a smooth flat surface. 2. Mounting Points Inverted Projector Blanket, soft cloth etc Figure 1 Flat surface Installation Manual Page - 7 - NOTE: Review the projectors manufacture's operation manual and refer to the projector. Failure to do so could result in serious personal injury and possible damage to the ceiling...
Installation Guide - ELPMBUNI Universal Mount Assembly
Page 7
Next loosen the safety screw knurl knob far enough to allow the two parts to create free play between the bracket tri-lock assembly and the upper section tri-lock assembly points. 5. ELPMBUNI 4. Figure 2 Tri-Lock Opening Rotate 180° To Unlock Tension Knobs Upper Assembly Safety Knob Figure 3 Figure 4 Page - 8 - Installation Manual Separate the upper assembly from the projector mounting bracket by slightly loosening the two tension knurl knobs to be rotated 180° apart and separate.
Installation Guide - ELPMBUNI Universal Mount Assembly
Page 8
... use the appropriate number of mounting legs. 2. NOTE: If your projector. Page - 9 - You may also reduce the two-piece leg to the projector. 1. FIGURE 6 Two-Piece Leg FIGURE 7 One-Piece Leg Allen Wrench Mounting Hardware Inverted Projector Leveling Barrels FIGURE A Installation Manual Figure 5 Line up the leveling barrels to adjust the height of the...
Installation Guide - ELPMBUNI Universal Mount Assembly
Page 9
ELPMBUNI NOTE: If your projector model is not shown, when arranging the leg combination, simply ensure access to filters and lamp housings when aligning brackets. PowerLite 830p, 835p Hardware: M4 x 12mm (Qty 4) Installation Manual PowerLite S3, S4, 62C, 76C, 82C, Hardware: M4 x 12mm (Qty 3) Page - 10 - This mount works with all sub-25 pound projectors.
Installation Guide - ELPMBUNI Universal Mount Assembly
Page 13
... leveling barrels to do not over-tighten the mounting hardware. CAUTION: Secure but do so will result in damaging the threads in the projector. Allen Wrench Level Inverted Projector DOWN UP Adjusting the Mount Figure 8 Leveling Barrels Page - 14 - ELPMBUNI Leveling the Mounting bracket 1. When the position desired is achieved tighten the...
Installation Guide - ELPMBUNI Universal Mount Assembly
Page 14
...Wood Stud Wood Screws Upper Assembly Installation Manual Knurl Knobs (3ea) Figure 9 Secure the ceiling mount to a point centered horizontally on your screen and projector, make sure the mounting location will safely support the weight of the projector. Page - 15 - Locate the inverted projectors top of the lens point to ...the center of the screen). 3. Before you mount your installation environment (Figure 9). Review your projector's distance calculation to determine what distance is normally better to have the top edge of the lens as well. 4. NOTE: If ...
Installation Guide - ELPMBUNI Universal Mount Assembly
Page 17
... must be in the base of the upper assembly. 2. NOTE: Follow the number sequence prior to securing the projector to the Upper Assembly 1. The safety knob should line up with the safety knob to lock the mounting bracket to... Insert universal bracket to prevent further rotation of the upper assembly. 3. ELPMBUNI Securing the Projector to the upper assembly. Carefully lift the projector and insert the mounting bracket mating special tri-lock cutout into the mating portion of the... Knurl Knob Tension Knurl Knobs Figure 13 Tri-Lock Opening Alignment Slot Projector Mount Installation Manual