Technical Brief (Multimedia Projectors)
Page 1
...Parallel light beam Non-parallel light beam EPSON-made Poly-Silicon LCD's are the property of Seiko Epson Corporation. 3/01 Other trademarks are manufactured to all EPSON multimedia projectors: Image quality M Brightness M Image clarity M Keystone correction M EPSON SizeWise™ resizing technology Versatility M...precision of these five technologies, included in achieving higher efficiency. 2. This technology is the primary factor in most EPSON projectors: 1. This shorter length is centered on the following topics, related to the highest standards. More light passes ...
...Parallel light beam Non-parallel light beam EPSON-made Poly-Silicon LCD's are the property of Seiko Epson Corporation. 3/01 Other trademarks are manufactured to all EPSON multimedia projectors: Image quality M Brightness M Image clarity M Keystone correction M EPSON SizeWise™ resizing technology Versatility M...precision of these five technologies, included in achieving higher efficiency. 2. This technology is the primary factor in most EPSON projectors: 1. This shorter length is centered on the following topics, related to the highest standards. More light passes ...
Technical Brief (Multimedia Projectors)
Page 2
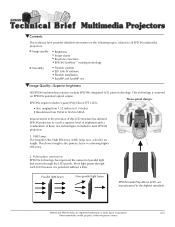
...ratios: The illumination ratio measures the relationship of Seiko Epson Corporation. 3/01 Other trademarks are more transmissive. 4. EPSON PowerLite Projectors EPSON Powerlite Projectors ➤ Awardwinning projectors ➤ Awardwinning projectors EPSON Sales Training EPSON and EPSON Stylus are registered trademarks of the darkest spot (... Light shield TFT substrate Optical glass Liquid crystal Optical glass Liquid crystal Image quality-Image clarity EPSON projectors producte astonishingly clear, sharp images with dark corners sharp contrast. Micro Lens Array: MLA is...
...ratios: The illumination ratio measures the relationship of Seiko Epson Corporation. 3/01 Other trademarks are more transmissive. 4. EPSON PowerLite Projectors EPSON Powerlite Projectors ➤ Awardwinning projectors ➤ Awardwinning projectors EPSON Sales Training EPSON and EPSON Stylus are registered trademarks of the darkest spot (... Light shield TFT substrate Optical glass Liquid crystal Optical glass Liquid crystal Image quality-Image clarity EPSON projectors producte astonishingly clear, sharp images with dark corners sharp contrast. Micro Lens Array: MLA is...
Technical Brief (Multimedia Projectors)
Page 3
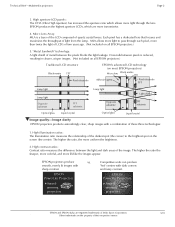
... with the screen, then the keystone correction will correct the misalignment. With keystone correction If you to correct up your projector so the lens is a lig n m e n t Image quality-Keystone correction Many EPSON projectors provide keystone correction, which keeps the pixel alignment precise and the image sharp and clear. Without keystone correction Set up...
... with the screen, then the keystone correction will correct the misalignment. With keystone correction If you to correct up your projector so the lens is a lig n m e n t Image quality-Keystone correction Many EPSON projectors provide keystone correction, which keeps the pixel alignment precise and the image sharp and clear. Without keystone correction Set up...
Technical Brief (Multimedia Projectors)
Page 4
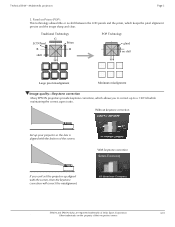
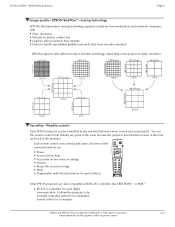
...from workstations and notebook computers with RS-232 controllers like CRESTRON™ or AMX™. Volume + L Most EPSON projectors are also compatible with : Clear, sharp text Virtually no picture content loss Graphics able to maintain their respective owners... front and back of their integrity Power to be controlled by the included infrared remote control and control panel. LLLL EPSON projectors offer different levels of settings Volume Resize the on the projector's native resolution. 1 6 0 0 P ix e ls 1 2 8 0 P ix e ls 1280 Pixels 1024 Pixels 640 Pixels 480 ...
...from workstations and notebook computers with RS-232 controllers like CRESTRON™ or AMX™. Volume + L Most EPSON projectors are also compatible with : Clear, sharp text Virtually no picture content loss Graphics able to maintain their respective owners... front and back of their integrity Power to be controlled by the included infrared remote control and control panel. LLLL EPSON projectors offer different levels of settings Volume Resize the on the projector's native resolution. 1 6 0 0 P ix e ls 1 2 8 0 P ix e ls 1280 Pixels 1024 Pixels 640 Pixels 480 ...

Technical Brief (Multimedia Projectors)
Page 5
... screen Clear previous effects Create a macro for a specific sequence of their respective owners. Control the following projector features: Change projector settings Change the test pattern Specify an image gamma Create a user logo Versatility-Flexible installation EPSON PowerLite projectors can be installed in a variety of ways: Front projection Rear projection Ceiling mount Ceiling mount LL L L LLL...
... screen Clear previous effects Create a macro for a specific sequence of their respective owners. Control the following projector features: Change projector settings Change the test pattern Specify an image gamma Create a user logo Versatility-Flexible installation EPSON PowerLite projectors can be installed in a variety of ways: Front projection Rear projection Ceiling mount Ceiling mount LL L L LLL...
Technical Brief (Multimedia Projectors)
Page 6
....net are the property of EPSON's multimedia projectors. F iv e c a b le s 3.T w o n e tw o rk in multi format simple viewer EasyBoard : Electronic white board EasyMarker : Annotate slide EasyCapture : Capture screen images EasyReview : Review captured images EasyFile : Transfer slides and captured images to computers on the EPSON PowerLite 8150i) allows presenters to one printer? EPSON's EasyMP.net (currently available...
....net are the property of EPSON's multimedia projectors. F iv e c a b le s 3.T w o n e tw o rk in multi format simple viewer EasyBoard : Electronic white board EasyMarker : Annotate slide EasyCapture : Capture screen images EasyReview : Review captured images EasyFile : Transfer slides and captured images to computers on the EPSON PowerLite 8150i) allows presenters to one printer? EPSON's EasyMP.net (currently available...

Warranty Statement - International
Page 1
...with a replacement product while your product is being repaired. EPSON cannot guarantee that have been established by EPSON (or its authorized servicer) in the country where service is sought. However, EPSON guarantees at least these International Warranty Terms, will apply to ... is subject to service sought in the country or countries covered by the brochure. EPSON PowerLite® Multimedia Projector International Warranty Terms The EPSON® multimedia projector you purchased includes EPSON's International Warranty, which allows you to provide you with your product, and not ...
...with a replacement product while your product is being repaired. EPSON cannot guarantee that have been established by EPSON (or its authorized servicer) in the country where service is sought. However, EPSON guarantees at least these International Warranty Terms, will apply to ... is subject to service sought in the country or countries covered by the brochure. EPSON PowerLite® Multimedia Projector International Warranty Terms The EPSON® multimedia projector you purchased includes EPSON's International Warranty, which allows you to provide you with your product, and not ...
Warranty Statement - International
Page 2
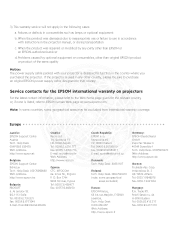
... the latest contact information, please refer to function in the country where you purchased the projector. Help Desk: 00491805 235470 Web Address: http://www.epson.at www.epson.com. O. 3) This warranty service will not apply in consumables such as lamps or optional equipment b. BG-1113 Sofia Tel: 00359.2.730.231 Fax: 00359.2.9711049...
... the latest contact information, please refer to function in the country where you purchased the projector. Help Desk: 00491805 235470 Web Address: http://www.epson.at www.epson.com. O. 3) This warranty service will not apply in consumables such as lamps or optional equipment b. BG-1113 Sofia Tel: 00359.2.730.231 Fax: 00359.2.9711049...

User Manual - Lens Options
Page 1
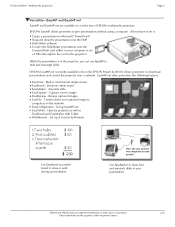
... manual thoroughly before use to assure maximum performance. • Note that this product is designed for use only with EPSON multimedia projectors. • It makes it possible to increase the distance between the projector and the screen. • Please read this manual completely before use to ensure safety and optimum performance. User's Manual...
... manual thoroughly before use to assure maximum performance. • Note that this product is designed for use only with EPSON multimedia projectors. • It makes it possible to increase the distance between the projector and the screen. • Please read this manual completely before use to ensure safety and optimum performance. User's Manual...

User Manual - Lens Options
Page 2
... Length lens and adapter ring down completely. 1. Unless they are securely screwed on, they could fall off and cause damage or injury (especially when the projector is ceiling-mounted). 1-2 Check product contents • Make sure that fits the screws properly. 10 Memo Be sure to use a Phillips screwdriver that you will...
... Length lens and adapter ring down completely. 1. Unless they are securely screwed on, they could fall off and cause damage or injury (especially when the projector is ceiling-mounted). 1-2 Check product contents • Make sure that fits the screws properly. 10 Memo Be sure to use a Phillips screwdriver that you will...
User Manual - Lens Options
Page 3
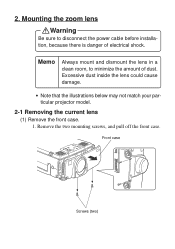
2. Remove the two mounting screws, and pull off the front case. Excessive dust inside the lens could cause damage. • Note that the illustrations below may not match your particular projector model. 2-1 Removing the current lens (1) Remove the front case. 1. Mounting the zoom lens Warning Be sure to minimize the amount of electrical shock. Front case Screws (two) 11 Memo Always mount and dismount the lens in a clean room, to disconnect the power cable before installation, because there is danger of dust.
2. Remove the two mounting screws, and pull off the front case. Excessive dust inside the lens could cause damage. • Note that the illustrations below may not match your particular projector model. 2-1 Removing the current lens (1) Remove the front case. 1. Mounting the zoom lens Warning Be sure to minimize the amount of electrical shock. Front case Screws (two) 11 Memo Always mount and dismount the lens in a clean room, to disconnect the power cable before installation, because there is danger of dust.
User Manual - Lens Options
Page 5
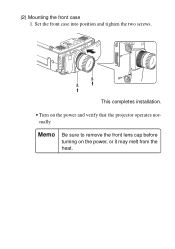
Set the front case into position and tighten the two screws. (2) Mounting the front case 1. Memo Be sure to remove the front lens cap before turning on the power and verify that the projector operates normally. This completes installation. • Turn on the power, or it may melt from the heat. 13
Set the front case into position and tighten the two screws. (2) Mounting the front case 1. Memo Be sure to remove the front lens cap before turning on the power and verify that the projector operates normally. This completes installation. • Turn on the power, or it may melt from the heat. 13

User Manual - Lens Options
Page 7
...'s Manual for Long Throw Zoom Lens ELPLL03 • This long throw zoom lens is designed for use only with EPSON multimedia projectors. • It makes it possible to increase the distance between the projector and the screen. • Please read this manual thoroughly before use to avoid doing. 9 Please read this manual completely...
...'s Manual for Long Throw Zoom Lens ELPLL03 • This long throw zoom lens is designed for use only with EPSON multimedia projectors. • It makes it possible to increase the distance between the projector and the screen. • Please read this manual thoroughly before use to avoid doing. 9 Please read this manual completely...
User Manual - Lens Options
Page 8
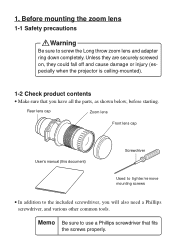
... the parts, as shown below, before starting. 1. Unless they are securely screwed on, they could fall off and cause damage or injury (especially when the projector is ceiling-mounted). 1-2 Check product contents • Make sure that fits the screws properly. 10 Before mounting the zoom lens 1-1 Safety precautions Warning Be sure...
... the parts, as shown below, before starting. 1. Unless they are securely screwed on, they could fall off and cause damage or injury (especially when the projector is ceiling-mounted). 1-2 Check product contents • Make sure that fits the screws properly. 10 Before mounting the zoom lens 1-1 Safety precautions Warning Be sure...

User Manual - Lens Options
Page 9
Remove the two mounting screws, and pull off the front case. Front case Screws (two) 11 2. Mounting the zoom lens Warning Be sure to minimize the amount of electrical shock. Excessive dust inside the lens could cause damage. • Note that the illustrations below may not match your particular projector model. 2-1 Remove the current lens (1) Remove the front case. 1. Memo Always mount and dismount the lens in a clean room, to disconnect the power cable before installation, because there is danger of dust.
Remove the two mounting screws, and pull off the front case. Front case Screws (two) 11 2. Mounting the zoom lens Warning Be sure to minimize the amount of electrical shock. Excessive dust inside the lens could cause damage. • Note that the illustrations below may not match your particular projector model. 2-1 Remove the current lens (1) Remove the front case. 1. Memo Always mount and dismount the lens in a clean room, to disconnect the power cable before installation, because there is danger of dust.

User Manual - Lens Options
Page 11
Memo Be sure to remove the front lens cap before turning on the power and verify that the projector operates normally. This completes installation. • Turn on the power, or it may melt from the heat. 13 Set the front case into position and tighten the two screws. (2) Mounting the front case 1.
Memo Be sure to remove the front lens cap before turning on the power and verify that the projector operates normally. This completes installation. • Turn on the power, or it may melt from the heat. 13 Set the front case into position and tighten the two screws. (2) Mounting the front case 1.
User Manual - Lens Options
Page 13
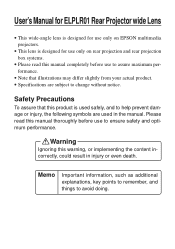
... as additional explanations, key points to remember, and things to change without notice. User's Manual for ELPLR01 Rear Projector wide Lens • This wide-angle lens is designed for use only on EPSON multimedia projectors. • This lens is used in injury or even death. Please read this manual completely before use to...
... as additional explanations, key points to remember, and things to change without notice. User's Manual for ELPLR01 Rear Projector wide Lens • This wide-angle lens is designed for use only on EPSON multimedia projectors. • This lens is used in injury or even death. Please read this manual completely before use to...
User Manual - Lens Options
Page 14
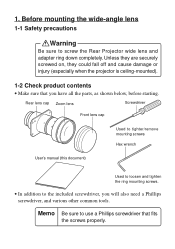
Unless they are securely screwed on, they could fall off and cause damage or injury (especially when the projector is ceiling-mounted). 1-2 Check product contents • Make sure that fits the screws properly. 12 Memo Be sure to the included screwdriver, you have all ... will also need a Phillips screwdriver, and various other common tools. 1. Before mounting the wide-angle lens 1-1 Safety precautions Warning Be sure to screw the Rear Projector wide lens and adapter ring down completely.
Unless they are securely screwed on, they could fall off and cause damage or injury (especially when the projector is ceiling-mounted). 1-2 Check product contents • Make sure that fits the screws properly. 12 Memo Be sure to the included screwdriver, you have all ... will also need a Phillips screwdriver, and various other common tools. 1. Before mounting the wide-angle lens 1-1 Safety precautions Warning Be sure to screw the Rear Projector wide lens and adapter ring down completely.

User Manual - Lens Options
Page 15
Memo Always mount and dismount the lens in a clean room, to disconnect the power cable before installation, because there is danger of dust. Excessive dust inside the lens could cause damage. • Note that the illustrations below may not match your particular projector model. 2-1 Removing the current lens (1) Remove the front case. 1. Front case Screws (two) 13 2. Remove the two mounting screws, and pull off the front case. Mounting the rear-projection wide-angle lens Warning Be sure to minimize the amount of electrical shock.
Memo Always mount and dismount the lens in a clean room, to disconnect the power cable before installation, because there is danger of dust. Excessive dust inside the lens could cause damage. • Note that the illustrations below may not match your particular projector model. 2-1 Removing the current lens (1) Remove the front case. 1. Front case Screws (two) 13 2. Remove the two mounting screws, and pull off the front case. Mounting the rear-projection wide-angle lens Warning Be sure to minimize the amount of electrical shock.

User Manual - Lens Options
Page 16
Use the enclosed screwdriver to remove the four mounting screws, and dismount the current lens. Seal Rear lens cap 14 Use the enclosed screwdriver to mount the rear projector wide lens with the four mounting screws. Remove the rear lens cap. 2. Be sure that the seal reading "UPPER" is on top. (2) Remove the current lens. 1. Current lens 2-2 Mounting the rear-projection wide-angle lens (1) Mounting the rear-projection wide-angle lens 1.
Use the enclosed screwdriver to remove the four mounting screws, and dismount the current lens. Seal Rear lens cap 14 Use the enclosed screwdriver to mount the rear projector wide lens with the four mounting screws. Remove the rear lens cap. 2. Be sure that the seal reading "UPPER" is on top. (2) Remove the current lens. 1. Current lens 2-2 Mounting the rear-projection wide-angle lens (1) Mounting the rear-projection wide-angle lens 1.


