
ESC/VP Level 21 Communication Manual
Page 1
...not utilize this user's guide. Copyright of using it. 3. I AGREE I DO NOT AGREE LICENSE AGREEMENT 1. You expressly acknowledge and agree that EPSON may not duplicate, reprint, modify or send the user's guide either in whole or in the user's guide before downloading "ESC/VP21 Command User's... Guide". Please read carefully the following "LICENSE AGREEMENT" before using the EPSON projector. Downloading the User's Guide indicates your own risk. Please read carefully "NOTICES" described in part without notice. 4.
...not utilize this user's guide. Copyright of using it. 3. I AGREE I DO NOT AGREE LICENSE AGREEMENT 1. You expressly acknowledge and agree that EPSON may not duplicate, reprint, modify or send the user's guide either in whole or in the user's guide before downloading "ESC/VP21 Command User's... Guide". Please read carefully the following "LICENSE AGREEMENT" before using the EPSON projector. Downloading the User's Guide indicates your own risk. Please read carefully "NOTICES" described in part without notice. 4.

Installation Guide - ELPMBUNI Universal Mount Assembly
Page 2
... 3 Contact Premier Mounts ...- 3 Warning Statements ...- 4 Parts List ...- 5 Installation Tools ...- 5 ELPMBUNI Universal Mount Assembly ...- 6 Projector Preparation ...- 7 Securing the Bracket to the Projector ...- 9 Leveling the Mounting bracket ...- 14 Securing the Upper Assembly Ceiling Plate...- 15 Low-Profile Installation ...- 16 Securing the... Projector to mounts, adapters, display equipment or personal injury. [email protected] Installation Instructions Page - 3 ...
... 3 Contact Premier Mounts ...- 3 Warning Statements ...- 4 Parts List ...- 5 Installation Tools ...- 5 ELPMBUNI Universal Mount Assembly ...- 6 Projector Preparation ...- 7 Securing the Bracket to the Projector ...- 9 Leveling the Mounting bracket ...- 14 Securing the Upper Assembly Ceiling Plate...- 15 Low-Profile Installation ...- 16 Securing the... Projector to mounts, adapters, display equipment or personal injury. [email protected] Installation Instructions Page - 3 ...

Installation Guide - ELPMBUNI Universal Mount Assembly
Page 3
... wooden stud must support the weight, or load, of direct heat energy. Do not install on any surface other source of the projector. WARNING: PRIOR TO THE INSTALLATION OF THIS PRODUCT, THE INSTALLATION INSTRUCTIONS SHOULD BE READ AND COMPLETELY UNDERSTOOD. Warning and Caution statements. Recommended... and reinforced metal studs. WARNING: THE CEILING STRUCTURE MUST BE CAPABLE OF SUPPORTING A MAX WEIGHT OF 25 LBS., THE WEIGHT OF THE PROJECTOR. USE PROPER SAFETY GEAR AND TOOLS FOR THE INSTALLATION PROCEDURE TO PREVENT PERSONAL INJURY. Do not install near heater, fireplace, direct sunlight, ...
... wooden stud must support the weight, or load, of direct heat energy. Do not install on any surface other source of the projector. WARNING: PRIOR TO THE INSTALLATION OF THIS PRODUCT, THE INSTALLATION INSTRUCTIONS SHOULD BE READ AND COMPLETELY UNDERSTOOD. Warning and Caution statements. Recommended... and reinforced metal studs. WARNING: THE CEILING STRUCTURE MUST BE CAPABLE OF SUPPORTING A MAX WEIGHT OF 25 LBS., THE WEIGHT OF THE PROJECTOR. USE PROPER SAFETY GEAR AND TOOLS FOR THE INSTALLATION PROCEDURE TO PREVENT PERSONAL INJURY. Do not install near heater, fireplace, direct sunlight, ...

Installation Guide - ELPMBUNI Universal Mount Assembly
Page 4
... (Qty 4) M6 x 12mm Security Head Screws (Qty 4) Portable Drill Pencil Level (Supplied) Stud Finder (Commercially Available) M5 Allen Wrench NOTE: Mounting screws will vary by projector. If there are missing and/or damaged before beginning installation. ELPMBUNI Parts List NOTE: This mount is not required for model specific hardware: Pages 10...
... (Qty 4) M6 x 12mm Security Head Screws (Qty 4) Portable Drill Pencil Level (Supplied) Stud Finder (Commercially Available) M5 Allen Wrench NOTE: Mounting screws will vary by projector. If there are missing and/or damaged before beginning installation. ELPMBUNI Parts List NOTE: This mount is not required for model specific hardware: Pages 10...

Installation Guide - ELPMBUNI Universal Mount Assembly
Page 5
...mounting points found on the bottom of single and dual legs together as single leg or any combination C of your projector for your G projector. ELPMBUNI Universal Mount Assembly A Single Wooden Stud Mounting Points B Solid Structure Mounting Points C Ceiling Plate D Allen ...Wrench E Height Adjustment Screws F Tension Knobs G Safety Knob H Security Screws I Leveling Barrels J Universal Mounting Bracket K Leg Assembly L Projector (Not Supplied) M Tri-Lock Opening Option 1 H B D F Combination I Leg Single Leg D Option 2 M NOTE: See the best configuration for filter and ...
...mounting points found on the bottom of single and dual legs together as single leg or any combination C of your projector for your G projector. ELPMBUNI Universal Mount Assembly A Single Wooden Stud Mounting Points B Solid Structure Mounting Points C Ceiling Plate D Allen ...Wrench E Height Adjustment Screws F Tension Knobs G Safety Knob H Security Screws I Leveling Barrels J Universal Mounting Bracket K Leg Assembly L Projector (Not Supplied) M Tri-Lock Opening Option 1 H B D F Combination I Leg Single Leg D Option 2 M NOTE: See the best configuration for filter and ...

Installation Guide - ELPMBUNI Universal Mount Assembly
Page 6
... the number of the lens placement to the top screen etc. CAUTION: THE PROJECTOR IS FRAGILE; NOTE: Review the projectors manufacture's operation manual and refer to . ELPMBUNI Projector Preparation WARNING: Proper installation procedure by qualified personnel as (distance from the screen to...so could result in thread size (Figure 1). Mounting Points Inverted Projector Blanket, soft cloth etc Figure 1 Flat surface Installation Manual Page - 7 - HANDLE WITH CARE AT ALL TIMES. Adherence to the projector. Most projectors have either three or four mounting points and are M4 in ...
... the number of the lens placement to the top screen etc. CAUTION: THE PROJECTOR IS FRAGILE; NOTE: Review the projectors manufacture's operation manual and refer to . ELPMBUNI Projector Preparation WARNING: Proper installation procedure by qualified personnel as (distance from the screen to...so could result in thread size (Figure 1). Mounting Points Inverted Projector Blanket, soft cloth etc Figure 1 Flat surface Installation Manual Page - 7 - HANDLE WITH CARE AT ALL TIMES. Adherence to the projector. Most projectors have either three or four mounting points and are M4 in ...

Installation Guide - ELPMBUNI Universal Mount Assembly
Page 7
Next loosen the safety screw knurl knob far enough to allow the two parts to create free play between the bracket tri-lock assembly and the upper section tri-lock assembly points. 5. Installation Manual Separate the upper assembly from the projector mounting bracket by slightly loosening the two tension knurl knobs to be rotated 180° apart and separate. Figure 2 Tri-Lock Opening Rotate 180° To Unlock Tension Knobs Upper Assembly Safety Knob Figure 3 Figure 4 Page - 8 - ELPMBUNI 4.
Next loosen the safety screw knurl knob far enough to allow the two parts to create free play between the bracket tri-lock assembly and the upper section tri-lock assembly points. 5. Installation Manual Separate the upper assembly from the projector mounting bracket by slightly loosening the two tension knurl knobs to be rotated 180° apart and separate. Figure 2 Tri-Lock Opening Rotate 180° To Unlock Tension Knobs Upper Assembly Safety Knob Figure 3 Figure 4 Page - 8 - ELPMBUNI 4.

Installation Guide - ELPMBUNI Universal Mount Assembly
Page 8
...with the flat washers attached through the leveling barrel. FIGURE 6 Two-Piece Leg FIGURE 7 One-Piece Leg Allen Wrench Mounting Hardware Inverted Projector Leveling Barrels FIGURE A Installation Manual Figure 5 Line up the leveling barrels to adjust the height of the mounting bracket. Select the ...mounting hardware that your projector requires and loosely install the universal mount to the projector (Figure A). NOTE: If your projector. NOTE: The levelers and leg assembly screws must be loose in order to the mounting...
...with the flat washers attached through the leveling barrel. FIGURE 6 Two-Piece Leg FIGURE 7 One-Piece Leg Allen Wrench Mounting Hardware Inverted Projector Leveling Barrels FIGURE A Installation Manual Figure 5 Line up the leveling barrels to adjust the height of the mounting bracket. Select the ...mounting hardware that your projector requires and loosely install the universal mount to the projector (Figure A). NOTE: If your projector. NOTE: The levelers and leg assembly screws must be loose in order to the mounting...

Installation Guide - ELPMBUNI Universal Mount Assembly
Page 9
ELPMBUNI NOTE: If your projector model is not shown, when arranging the leg combination, simply ensure access to filters and lamp housings when aligning brackets. PowerLite S3, S4, 62C, 76C, 82C, Hardware: M4 x 12mm (Qty 3) Page - 10 - PowerLite 830p, 835p Hardware: M4 x 12mm (Qty 4) Installation Manual This mount works with all sub-25 pound projectors.
ELPMBUNI NOTE: If your projector model is not shown, when arranging the leg combination, simply ensure access to filters and lamp housings when aligning brackets. PowerLite S3, S4, 62C, 76C, 82C, Hardware: M4 x 12mm (Qty 3) Page - 10 - PowerLite 830p, 835p Hardware: M4 x 12mm (Qty 4) Installation Manual This mount works with all sub-25 pound projectors.

Installation Guide - ELPMBUNI Universal Mount Assembly
Page 13
...it avoids most, if not all, ventilation points (including lamp & filter access doors). 2. Installation Manual Rotate the leveling barrels to the projector then tighten the hex head leg screws with the Allen wrench (supplied) (Figure 8 and Figure 9). CAUTION: Secure but do so ...will result in damaging the threads in the projector. Failure to do not over-tighten the mounting hardware. Allen Wrench Level Inverted Projector DOWN UP Adjusting the Mount Figure 8 Leveling Barrels Page - 14 - ELPMBUNI Leveling the Mounting bracket ...
...it avoids most, if not all, ventilation points (including lamp & filter access doors). 2. Installation Manual Rotate the leveling barrels to the projector then tighten the hex head leg screws with the Allen wrench (supplied) (Figure 8 and Figure 9). CAUTION: Secure but do so ...will result in damaging the threads in the projector. Failure to do not over-tighten the mounting hardware. Allen Wrench Level Inverted Projector DOWN UP Adjusting the Mount Figure 8 Leveling Barrels Page - 14 - ELPMBUNI Leveling the Mounting bracket ...

Installation Guide - ELPMBUNI Universal Mount Assembly
Page 14
...), please refer to the security kit installation guide before attaching the ceiling plate to determine the proper placement of the center of the projector. Ceiling Structure Ceiling Wood Stud Wood Screws Upper Assembly Installation Manual Knurl Knobs (3ea) Figure 9 Secure the ceiling mount to the edge... the front of the lens to the center of the screen). 3. Before you mount your installation environment (Figure 9). Locate the inverted projectors top of the lens point to parallel with other (commercially available) hardware depending on the screen and no higher then the top image...
...), please refer to the security kit installation guide before attaching the ceiling plate to determine the proper placement of the center of the projector. Ceiling Structure Ceiling Wood Stud Wood Screws Upper Assembly Installation Manual Knurl Knobs (3ea) Figure 9 Secure the ceiling mount to the edge... the front of the lens to the center of the screen). 3. Before you mount your installation environment (Figure 9). Locate the inverted projectors top of the lens point to parallel with other (commercially available) hardware depending on the screen and no higher then the top image...

Installation Guide - ELPMBUNI Universal Mount Assembly
Page 17
... knurl knobs until the mount becomes rigid. 5. Safety Knurl Knob Tension Knurl Knobs Figure 13 Tri-Lock Opening Alignment Slot Projector Mount Installation Manual Carefully lift the projector and insert the mounting bracket mating special tri-lock cutout into the mating portion of the bracket in the upper assembly....slot on the mounting bracket (Figure 13). Make sure the three-knurl knobs are loosened to fully expose to the tri-lock, then rotate the projector 180° Universal Mount Page - 18 - The alignment slot must be in the base of the upper assembly. 2. NOTE: Follow the number...
... knurl knobs until the mount becomes rigid. 5. Safety Knurl Knob Tension Knurl Knobs Figure 13 Tri-Lock Opening Alignment Slot Projector Mount Installation Manual Carefully lift the projector and insert the mounting bracket mating special tri-lock cutout into the mating portion of the bracket in the upper assembly....slot on the mounting bracket (Figure 13). Make sure the three-knurl knobs are loosened to fully expose to the tri-lock, then rotate the projector 180° Universal Mount Page - 18 - The alignment slot must be in the base of the upper assembly. 2. NOTE: Follow the number...

Installation Guide - ELPMBUNI Universal Mount Assembly
Page 18
... can be adjusted by slightly loosening the two 8mm height adjustment screws and raising or lowering the projector (Figure 14). 3. With the projector secured in the mount and power on the screen, slightly loosen the front and rear M8 screws and adjust to the desired angle then firmly... tighten the two M8 roll adjustment screws (Figure 16). To adjust the tilt angle of the projector, slightly loosen the side M8 screws and tilt to the desired angle to optimize the projected image. 2. Wood Stud Ceiling Allen Wrench Height Adjustable ...
... can be adjusted by slightly loosening the two 8mm height adjustment screws and raising or lowering the projector (Figure 14). 3. With the projector secured in the mount and power on the screen, slightly loosen the front and rear M8 screws and adjust to the desired angle then firmly... tighten the two M8 roll adjustment screws (Figure 16). To adjust the tilt angle of the projector, slightly loosen the side M8 screws and tilt to the desired angle to optimize the projected image. 2. Wood Stud Ceiling Allen Wrench Height Adjustable ...
Quick Start
Page 1
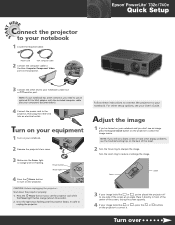
... included computer cable (see your computer's documentation). 4 Connect the power cord to the projector, then plug the other setup options, see an image, press the Source Search button on the projector to your notebook. Shut down the projector properly: 1. Epson® PowerLite® 732c/740c Quick Setup 3 Connect the other display problems, see a blank screen or...
... included computer cable (see your computer's documentation). 4 Connect the power cord to the projector, then plug the other setup options, see an image, press the Source Search button on the projector to your notebook. Shut down the projector properly: 1. Epson® PowerLite® 732c/740c Quick Setup 3 Connect the other display problems, see a blank screen or...

Quick Start
Page 2
...an external monitor. You may have an icon such as . you display on the projector is green and not flashing, and the lens cover is off Zoom in XXXXXXXXX CPD-19397 PowerLite and PrivateLine are for details. If that lets you may have to select the ...it . Allow a few seconds for adjusting the setting varies; The method for the projector to control the projector. If the Arrange option isn't available, click the Monitor icon and select a Simulscan resolution. Quick Setup Epson PowerLite 732c/740c Using the remote control 1 If this key lets you can use the...
...an external monitor. You may have an icon such as . you display on the projector is green and not flashing, and the lens cover is off Zoom in XXXXXXXXX CPD-19397 PowerLite and PrivateLine are for details. If that lets you may have to select the ...it . Allow a few seconds for adjusting the setting varies; The method for the projector to control the projector. If the Arrange option isn't available, click the Monitor icon and select a Simulscan resolution. Quick Setup Epson PowerLite 732c/740c Using the remote control 1 If this key lets you can use the...
User's Guide
Page 2
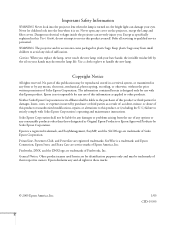
...or alterations to qualified service personnel. PrivateLine, Presenters Club, and PowerLite are trademarks of Pixelworks, Inc. SizeWise is a registered trademark, and EasyManagement, EasyMP, and the 3LCD logo are trademarks of their respective owners. Epson disclaims any consumable products other products. the bright light can ...product yourself. Refer all rights in this User's Guide, do not attempt to service this Epson product. Use a cloth or glove to avoid any cover on the projector, except the lamp and filter covers. No part of any options or any and all servicing...
...or alterations to qualified service personnel. PrivateLine, Presenters Club, and PowerLite are trademarks of Pixelworks, Inc. SizeWise is a registered trademark, and EasyManagement, EasyMP, and the 3LCD logo are trademarks of their respective owners. Epson disclaims any consumable products other products. the bright light can ...product yourself. Refer all rights in this User's Guide, do not attempt to service this Epson product. Use a cloth or glove to avoid any cover on the projector, except the lamp and filter covers. No part of any options or any and all servicing...

User's Guide
Page 3
... 8 Getting More Information 8 Registration and Warranty 9 Unpacking the Projector 10 Additional Components 10 Optional Accessories 11 Displaying and Adjusting the Image 13 Positioning the Projector 14 Projecting the Image 16 Turning On the Projector 16 Selecting the Image Source 17 Troubleshooting Display Problems 18 You... Can't Project an Image 18 The Projector and Notebook Don't Display the Same Image...
... 8 Getting More Information 8 Registration and Warranty 9 Unpacking the Projector 10 Additional Components 10 Optional Accessories 11 Displaying and Adjusting the Image 13 Positioning the Projector 14 Projecting the Image 16 Turning On the Projector 16 Selecting the Image Source 17 Troubleshooting Display Problems 18 You... Can't Project an Image 18 The Projector and Notebook Don't Display the Same Image...

User's Guide
Page 4
... Connecting a Composite Video Source 40 Connecting an S-Video Source 41 Connecting a Component Video Source 42 Connecting an RGB Video Source 43 Playing Sound Through the Projector 44 4 Contents
... Connecting a Composite Video Source 40 Connecting an S-Video Source 41 Connecting a Component Video Source 42 Connecting an RGB Video Source 43 Playing Sound Through the Projector 44 4 Contents

User's Guide
Page 5
... Features 52 Enabling Password Protection 52 Creating Your Own Startup Screen 55 Disabling the Projector's Buttons 57 Customizing Power and Operation 57 Maintaining the Projector 59 Cleaning the Lens 60 Cleaning the Projector Case 60 Cleaning the Air Filters and Vents 61 Replacing the Lamp and Air Filter... 62 Resetting the Lamp Timer 65 Transporting the Projector 66 Solving Problems 67 Using On-Screen Help 68 Checking Projector Status 69 What To Do When the Lights Flash 69 Viewing Lamp Usage and Other Information 71 Solving...
... Features 52 Enabling Password Protection 52 Creating Your Own Startup Screen 55 Disabling the Projector's Buttons 57 Customizing Power and Operation 57 Maintaining the Projector 59 Cleaning the Lens 60 Cleaning the Projector Case 60 Cleaning the Air Filters and Vents 61 Replacing the Lamp and Air Filter... 62 Resetting the Lamp Timer 65 Transporting the Projector 66 Solving Problems 67 Using On-Screen Help 68 Checking Projector Status 69 What To Do When the Lights Flash 69 Viewing Lamp Usage and Other Information 71 Solving...

User's Guide
Page 6
A Projector Installation 81 B Technical Specifications 83 General 83 Projection Lamp 84 Remote Control 84 Dimensions 84 Electrical 84 Environmental 84 Safety 85 Compatible Video Formats 85 C Notices 87 Important Safety Instructions 87 Remote Control Information 89 Declaration of Conformity 90 FCC Compliance Statement 91 Warranty 92 Index 95 6 Contents
A Projector Installation 81 B Technical Specifications 83 General 83 Projection Lamp 84 Remote Control 84 Dimensions 84 Electrical 84 Environmental 84 Safety 85 Compatible Video Formats 85 C Notices 87 Important Safety Instructions 87 Remote Control Information 89 Declaration of Conformity 90 FCC Compliance Statement 91 Warranty 92 Index 95 6 Contents


