

Installation Guide - ELPMBUNI Universal Mount Assembly
Page 5
Page - 6 - ELPMBUNI A NOTE: The four (2-piece) leg assemblies can be used as single leg or any combination C of your projector for filter and lamp access. K M J L J L Installation Manual The number of legs E may vary depending on the number of mounting points found on the bottom of single and dual legs ...
Page - 6 - ELPMBUNI A NOTE: The four (2-piece) leg assemblies can be used as single leg or any combination C of your projector for filter and lamp access. K M J L J L Installation Manual The number of legs E may vary depending on the number of mounting points found on the bottom of single and dual legs ...

Installation Guide - ELPMBUNI Universal Mount Assembly
Page 9
PowerLite S3, S4, 62C, 76C, 82C, Hardware: M4 x 12mm (Qty 3) Page - 10 - PowerLite 830p, 835p Hardware: M4 x 12mm (Qty 4) Installation Manual This mount works with all sub-25 pound projectors. ELPMBUNI NOTE: If your projector model is not shown, when arranging the leg combination, simply ensure access to filters and lamp housings when aligning brackets.
PowerLite S3, S4, 62C, 76C, 82C, Hardware: M4 x 12mm (Qty 3) Page - 10 - PowerLite 830p, 835p Hardware: M4 x 12mm (Qty 4) Installation Manual This mount works with all sub-25 pound projectors. ELPMBUNI NOTE: If your projector model is not shown, when arranging the leg combination, simply ensure access to filters and lamp housings when aligning brackets.

Installation Guide - ELPMBUNI Universal Mount Assembly
Page 13
... tighten the mounting hardware to level the mounting bracket next, position the mounting bracket so that it avoids most, if not all, ventilation points (including lamp & filter access doors). 2. Failure to do not over-tighten the mounting hardware. Rotate the leveling barrels to the projector then tighten the hex head leg...
... tighten the mounting hardware to level the mounting bracket next, position the mounting bracket so that it avoids most, if not all, ventilation points (including lamp & filter access doors). 2. Failure to do not over-tighten the mounting hardware. Rotate the leveling barrels to the projector then tighten the hex head leg...

User Replaceable Parts List
Page 1
...128 7422 128 7817 209 2601 302 2369 2092679 2105813 310050200 Order user replaceable parts from an Epson authorized parts distributor. ---- EMP Slidemaker 2 version 1.12 - Locate an Epson Authorized Service Center to order user replaceable parts by using the "Help me find..." tool ... column of the Epson Support home page. EMP NS Connection ver. 1.11 (MAC) - EMP NS Connection version 1.40 (Windows) - or ---- User Replaceable Items effective 12/01/2005 PowerLite 740c / 745c / 760c / 765c PowerLite 732c / 737c DESCRIPTION AC Power Cord (2-prong) Computer VGA cable Lamp (V13H010L32) USB ...
...128 7422 128 7817 209 2601 302 2369 2092679 2105813 310050200 Order user replaceable parts from an Epson authorized parts distributor. ---- EMP Slidemaker 2 version 1.12 - Locate an Epson Authorized Service Center to order user replaceable parts by using the "Help me find..." tool ... column of the Epson Support home page. EMP NS Connection ver. 1.11 (MAC) - EMP NS Connection version 1.40 (Windows) - or ---- User Replaceable Items effective 12/01/2005 PowerLite 740c / 745c / 760c / 765c PowerLite 732c / 737c DESCRIPTION AC Power Cord (2-prong) Computer VGA cable Lamp (V13H010L32) USB ...
User's Guide
Page 2
...glove to qualified service personnel. The information contained herein is designed only for any and all servicing to handle the new lamp. Seiko Epson Corporation shall not be liable to the purchaser of this product or unauthorized modifications, repairs, or alterations to this product...Inc. the invisible residue left by purchaser or third parties as applied to service this Epson product. Copyright Notice All rights reserved. Epson is a trademark; PrivateLine, Presenters Club, and PowerLite are trademarks of Seiko Epson Corporation. Epson disclaims any use with your eyes.
...glove to qualified service personnel. The information contained herein is designed only for any and all servicing to handle the new lamp. Seiko Epson Corporation shall not be liable to the purchaser of this product or unauthorized modifications, repairs, or alterations to this product...Inc. the invisible residue left by purchaser or third parties as applied to service this Epson product. Copyright Notice All rights reserved. Epson is a trademark; PrivateLine, Presenters Club, and PowerLite are trademarks of Seiko Epson Corporation. Epson disclaims any use with your eyes.

User's Guide
Page 5
... the Projector 59 Cleaning the Lens 60 Cleaning the Projector Case 60 Cleaning the Air Filters and Vents 61 Replacing the Lamp and Air Filter 62 Resetting the Lamp Timer 65 Transporting the Projector 66 Solving Problems 67 Using On-Screen Help 68 Checking Projector Status 69 What To Do... When the Lights Flash 69 Viewing Lamp Usage and Other Information 71 Solving Projector Operation Problems 71 Solving Problems with the Image or Sound 72 Solving Problems with the Remote Control...
... the Projector 59 Cleaning the Lens 60 Cleaning the Projector Case 60 Cleaning the Air Filters and Vents 61 Replacing the Lamp and Air Filter 62 Resetting the Lamp Timer 65 Transporting the Projector 66 Solving Problems 67 Using On-Screen Help 68 Checking Projector Status 69 What To Do... When the Lights Flash 69 Viewing Lamp Usage and Other Information 71 Solving Projector Operation Problems 71 Solving Problems with the Image or Sound 72 Solving Problems with the Remote Control...

User's Guide
Page 6
A Projector Installation 81 B Technical Specifications 83 General 83 Projection Lamp 84 Remote Control 84 Dimensions 84 Electrical 84 Environmental 84 Safety 85 Compatible Video Formats 85 C Notices 87 Important Safety Instructions 87 Remote Control Information 89 Declaration of Conformity 90 FCC Compliance Statement 91 Warranty 92 Index 95 6 Contents
A Projector Installation 81 B Technical Specifications 83 General 83 Projection Lamp 84 Remote Control 84 Dimensions 84 Electrical 84 Environmental 84 Safety 85 Compatible Video Formats 85 C Notices 87 Important Safety Instructions 87 Remote Control Information 89 Declaration of Conformity 90 FCC Compliance Statement 91 Warranty 92 Index 95 6 Contents

User's Guide
Page 11
... provide a VGA output port; For product information and to Buy." In Canada, please call 800-GO-EPSON (800-463-7766) or browse our catalog of the projector, Epson provides the following optional accessories: Product Replacement lamp Air filter replacement set (2 filters) ATA molded hardshell case Samsonite® wheeled soft case Notebook/projector soft...
... provide a VGA output port; For product information and to Buy." In Canada, please call 800-GO-EPSON (800-463-7766) or browse our catalog of the projector, Epson provides the following optional accessories: Product Replacement lamp Air filter replacement set (2 filters) ATA molded hardshell case Samsonite® wheeled soft case Notebook/projector soft...
User's Guide
Page 16
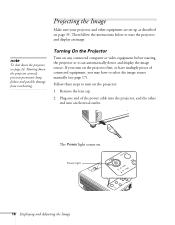
Then follow the instructions below to select the image source manually (see page 24. note To shut down the projector correctly prevents premature lamp failure and possible damage from overheating. Turning On the Projector Turn on . Remove the lens cap. 2. Power light 16 Displaying and Adjusting the Image The ...
Then follow the instructions below to select the image source manually (see page 24. note To shut down the projector correctly prevents premature lamp failure and possible damage from overheating. Turning On the Projector Turn on . Remove the lens cap. 2. Power light 16 Displaying and Adjusting the Image The ...

User's Guide
Page 17
...for use the Source buttons on each button. The projector beeps once and the Power light flashes green as a computer or DVD player). The PowerLite 740c does not support EasyMPT.M note To focus and adjust the image, see the image you want to switch between images input from different ... If you don't see page 21. You can damage your computer has found a plug-and-play monitor; warning Never look into the lens when the lamp is especially dangerous for children. This can also use . 4. 3. if so, click Cancel. 5. If you switch between devices connected to the ports ...
...for use the Source buttons on each button. The projector beeps once and the Power light flashes green as a computer or DVD player). The PowerLite 740c does not support EasyMPT.M note To focus and adjust the image, see the image you want to switch between images input from different ... If you don't see page 21. You can damage your computer has found a plug-and-play monitor; warning Never look into the lens when the lamp is especially dangerous for children. This can also use . 4. 3. if so, click Cancel. 5. If you switch between devices connected to the ports ...

User's Guide
Page 24
...to turn it has not received any other button.) 24 Displaying and Adjusting the Image See page 50 for 30 minutes. Turn off the projector lamp and enter "sleep mode" when it off the projector, press the red PPower button on the projector. The Auto button works only with computer... or projector. To turn off any effect. Correcting Computer Images If you are done using the projector's Signal menu. This extends the life of the lamp. You see page 58. If the Auto button doesn't correct the problem, you don't want to start projecting again, press the P Power button. ...
...to turn it has not received any other button.) 24 Displaying and Adjusting the Image See page 50 for 30 minutes. Turn off the projector lamp and enter "sleep mode" when it off the projector, press the red PPower button on the projector. The Auto button works only with computer... or projector. To turn off any effect. Correcting Computer Images If you are done using the projector's Signal menu. This extends the life of the lamp. You see page 58. If the Auto button doesn't correct the problem, you don't want to start projecting again, press the P Power button. ...

User's Guide
Page 25
3. The lamp is restored. 4. The projector will start up on the remote control and select the Extended menu. 2. Continuous 24-hour-a-day use . you plug in the ...
3. The lamp is restored. 4. The projector will start up on the remote control and select the Extended menu. 2. Continuous 24-hour-a-day use . you plug in the ...

User's Guide
Page 28
... than 30 seconds, the remote control stops operating to local regulations. ■ Remove the batteries if you won't be using the remote under bright fluorescent lamps or in direct sunlight, or the projector may not respond properly. Using the Remote Control Follow these tips for using the remote control: ■ Point...
... than 30 seconds, the remote control stops operating to local regulations. ■ Remove the batteries if you won't be using the remote under bright fluorescent lamps or in direct sunlight, or the projector may not respond properly. Using the Remote Control Follow these tips for using the remote control: ■ Point...

User's Guide
Page 47
... can also press the Menu button to the previous menu (or press it does not reset the Computer Input, Video Signal, User's Logo, Language, and Lamp settings. note When you want to exit the menu system). 4. After highlighting the option you select Reset All in the Reset menu, it repeatedly to...
... can also press the Menu button to the previous menu (or press it does not reset the Computer Input, Video Signal, User's Logo, Language, and Lamp settings. note When you want to exit the menu system). 4. After highlighting the option you select Reset All in the Reset menu, it repeatedly to...
User's Guide
Page 49
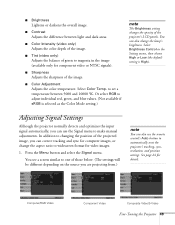
... opacity of those below. (The settings will be different depending on the source you can correct tracking and sync for computer images, or change the lamp's brightness. Computer/RGB Video Component Video Composite Video/S-Video Fine-Tuning the Projector 49 Press the Menu button and select the Signal menu. Select Brightness...
... opacity of those below. (The settings will be different depending on the source you can correct tracking and sync for computer images, or change the lamp's brightness. Computer/RGB Video Component Video Composite Video/S-Video Fine-Tuning the Projector 49 Press the Menu button and select the Signal menu. Select Brightness...

User's Guide
Page 51
... Shape Lets you choose from two levels of brightness. Fine-Tuning the Projector 51 The Low setting reduces power consumption and noise, and extends the lamp's operating life. This feature is available only when the projector is tilted upward. If you notice lines or edges looking jagged after the projector has...
... Shape Lets you choose from two levels of brightness. Fine-Tuning the Projector 51 The Low setting reduces power consumption and noise, and extends the lamp's operating life. This feature is available only when the projector is tilted upward. If you notice lines or edges looking jagged after the projector has...
User's Guide
Page 59
...the following: ■ Cleaning the lens ■ Cleaning the projector case ■ Cleaning the air filters and vents ■ Replacing the lamp and air filter ■ Transporting the projector 59 Refer all other part needs replacing, contact your dealer or a qualified servicer. 1 warning... Before you should replace are the lamp and air filter. Dangerous electrical voltages in the projector can block ventilation needed to service this product yourself, except as specifically explained ...
...the following: ■ Cleaning the lens ■ Cleaning the projector case ■ Cleaning the air filters and vents ■ Replacing the lamp and air filter ■ Transporting the projector 59 Refer all other part needs replacing, contact your dealer or a qualified servicer. 1 warning... Before you should replace are the lamp and air filter. Dangerous electrical voltages in the projector can block ventilation needed to service this product yourself, except as specifically explained ...

User's Guide
Page 62
...should be present and should replace the filters. To check how long the lamp has been in the Setting menu is set to replace the lamp and air filter: 1. Contact your projector, you get a replacement lamp for at 800-GO-EPSON (800-873-7766). When the Power light stops flashing, unplug the ...power cord. 3. Let the projector cool for your dealer or call Epson at least an hour (if it ....
...should be present and should replace the filters. To check how long the lamp has been in the Setting menu is set to replace the lamp and air filter: 1. Contact your projector, you get a replacement lamp for at 800-GO-EPSON (800-873-7766). When the Power light stops flashing, unplug the ...power cord. 3. Let the projector cool for your dealer or call Epson at least an hour (if it ....

User's Guide
Page 63
Turn the projector over. Hold the lamp as shown and pull it is facing the right way.) Maintaining the Projector 63 warning This product includes a lamp component that contains mercury (Hg). Loosen, but don't remove these screws 6. Please consult your state and local regulations regarding proper disposal and do not put in place (you don't need to remove them). Gently insert the new lamp. (If it doesn't fit easily, make sure it straight out. Loosen the two screws holding the lamp in the trash. 7. Press in on the tabs and lift up the lamp cover. 5. 4.
Turn the projector over. Hold the lamp as shown and pull it is facing the right way.) Maintaining the Projector 63 warning This product includes a lamp component that contains mercury (Hg). Loosen, but don't remove these screws 6. Please consult your state and local regulations regarding proper disposal and do not put in place (you don't need to remove them). Gently insert the new lamp. (If it doesn't fit easily, make sure it straight out. Loosen the two screws holding the lamp in the trash. 7. Press in on the tabs and lift up the lamp cover. 5. 4.

User's Guide
Page 64
Slide in the new air filter until it snaps into place. 12. Insert the two cover tabs, then press down on the cover until it . 10. Once the lamp is fully inserted, tighten its screws. 9. 8. Slide the air filter out and remove it clicks in the next section. 64 Maintaining the Projector Reset the lamp timer as described in place. 11.
Slide in the new air filter until it snaps into place. 12. Insert the two cover tabs, then press down on the cover until it . 10. Once the lamp is fully inserted, tighten its screws. 9. 8. Slide the air filter out and remove it clicks in the next section. 64 Maintaining the Projector Reset the lamp timer as described in place. 11.


