

Installation Guide - ELPMBUNI Universal Mount Assembly
Page 2
... Warranty ...- 3 Contact Premier Mounts ...- 3 Warning Statements ...- 4 Parts List ...- 5 Installation Tools ...- 5 ELPMBUNI Universal Mount Assembly ...- 6 Projector Preparation ...- 7 Securing the Bracket to the Projector ...- 9 Leveling the Mounting bracket ...- 14 Securing the Upper Assembly Ceiling Plate...- 15 Low-Profile Installation ...- 16 Securing the Projector to mounts, adapters, display equipment or personal injury. Customer Service - (800) 368-9700 Technical Support - Premier Mounts is not liable for improper installation that results in damage...
... Warranty ...- 3 Contact Premier Mounts ...- 3 Warning Statements ...- 4 Parts List ...- 5 Installation Tools ...- 5 ELPMBUNI Universal Mount Assembly ...- 6 Projector Preparation ...- 7 Securing the Bracket to the Projector ...- 9 Leveling the Mounting bracket ...- 14 Securing the Upper Assembly Ceiling Plate...- 15 Low-Profile Installation ...- 16 Securing the Projector to mounts, adapters, display equipment or personal injury. Customer Service - (800) 368-9700 Technical Support - Premier Mounts is not liable for improper installation that results in damage...

Installation Guide - ELPMBUNI Universal Mount Assembly
Page 4
... 4) Note: Must be used with all proper installation hardware and components. Lag Screws (#14 x 2") (Qty 3) M4 x 12 Security Head Screws (Qty 4) M3 x 16mm Phillips Head Screws (Qty 4) Installation Tools Phillips Head Screw Driver Soft Material/ Blanket Allen Wrench (Supplied) Tape Measure Ladder NOTE: The following pages for the installation. ELPMBUNI Parts List NOTE: This mount is not required for model specific hardware: Pages 10...
... 4) Note: Must be used with all proper installation hardware and components. Lag Screws (#14 x 2") (Qty 3) M4 x 12 Security Head Screws (Qty 4) M3 x 16mm Phillips Head Screws (Qty 4) Installation Tools Phillips Head Screw Driver Soft Material/ Blanket Allen Wrench (Supplied) Tape Measure Ladder NOTE: The following pages for the installation. ELPMBUNI Parts List NOTE: This mount is not required for model specific hardware: Pages 10...
Quick Start
Page 1
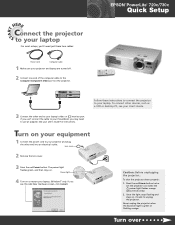
... shut the projector down properly: 1. The power light flashes green, and then stays on the projector. Never unplug the projector when the power light is green or flashing orange. Press the red Power button twice. See your PowerBook®, you see your projector and laptop are turned off. 2 Connect one end of the computer cable to the Computer/Component Video port on . Follow these two cables: Power cord Computer cable 1 Make sure your User's Guide. EPSON® PowerLite® 720c/730c Quick Setup 3 Connect...
... shut the projector down properly: 1. The power light flashes green, and then stays on the projector. Never unplug the projector when the power light is green or flashing orange. Press the red Power button twice. See your PowerBook®, you see your projector and laptop are turned off. 2 Connect one end of the computer cable to the Computer/Component Video port on . Follow these two cables: Power cord Computer cable 1 Make sure your User's Guide. EPSON® PowerLite® 720c/730c Quick Setup 3 Connect...
Quick Start
Page 2
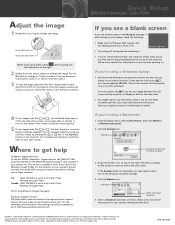
... or side of the screen, facing the screen squarely. 5 If your laptop, check the following: Make sure the power light is green and not flashing and the lens cover is positioned where you want it .) If you're using a Windows laptop: Hold down the Fn button and press the function key that lets you 're using a Macintosh®: 1. Focus adjustment Image size adjustment Note: If you display on an external monitor...
... or side of the screen, facing the screen squarely. 5 If your laptop, check the following: Make sure the power light is green and not flashing and the lens cover is positioned where you want it .) If you're using a Windows laptop: Hold down the Fn button and press the function key that lets you 're using a Macintosh®: 1. Focus adjustment Image size adjustment Note: If you display on an external monitor...
User Manual
Page 2
... ; Printed on the projector, except the lamp and filter covers. Never open any risk of SEIKO EPSON CORPORATION. Refer all rights in plastic bags. Copyright Notice All rights reserved. and PrivateLine, Presenters Club, and PowerLite are service marks; the bright light can severely injure you replace the lamp, never touch the new lamp with this publication may shorten the lamp life. Keep plastic bags away from...
... ; Printed on the projector, except the lamp and filter covers. Never open any risk of SEIKO EPSON CORPORATION. Refer all rights in plastic bags. Copyright Notice All rights reserved. and PrivateLine, Presenters Club, and PowerLite are service marks; the bright light can severely injure you replace the lamp, never touch the new lamp with this publication may shorten the lamp life. Keep plastic bags away from...
User Manual
Page 5
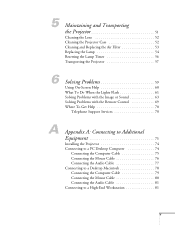
... the Projector 51 Cleaning the Lens 52 Cleaning the Projector Case 52 Cleaning and Replacing the Air Filter 53 Replacing the Lamp 54 Resetting the Lamp Timer 56 Transporting the Projector 57 6 Solving Problems 59 Using On-Screen Help 60 What To Do When the Lights Flash 61 Solving Problems with the Image or Sound 63 Solving Problems with the Remote Control 69 Where To Get Help 70 Telephone Support Services 70 A Appendix A: Connecting to Additional Equipment 73 Installing the Projector 74 Connecting to...
... the Projector 51 Cleaning the Lens 52 Cleaning the Projector Case 52 Cleaning and Replacing the Air Filter 53 Replacing the Lamp 54 Resetting the Lamp Timer 56 Transporting the Projector 57 6 Solving Problems 59 Using On-Screen Help 60 What To Do When the Lights Flash 61 Solving Problems with the Image or Sound 63 Solving Problems with the Remote Control 69 Where To Get Help 70 Telephone Support Services 70 A Appendix A: Connecting to Additional Equipment 73 Installing the Projector 74 Connecting to...

User Manual
Page 11
... (or equivalent) when you need to another location. Always use the carrying case included with the projector. Unpacking the Projector After unpacking the projector, make sure you have all the parts shown below: projector Page down Page Computer up Power S-Video/Video A/V Color Mode Mute Freeze Menu E-Zoom Enter ESC Auto remote control documentation soft carrying case power cord computer cable RCA AV cable Save all packaging in case you need...
... (or equivalent) when you need to another location. Always use the carrying case included with the projector. Unpacking the Projector After unpacking the projector, make sure you have all the parts shown below: projector Page down Page Computer up Power S-Video/Video A/V Color Mode Mute Freeze Menu E-Zoom Enter ESC Auto remote control documentation soft carrying case power cord computer cable RCA AV cable Save all packaging in case you need...

User Manual
Page 27
... other image adjustments. projector Page down Page up Power Computer S-Video/Video Color Mode Menu A/V Mute Freeze E-Zoom remote control power light The power light flashes green as described on your video source, and press the Play button on page 28. Do one of the projector or on or restart it has found a plug-and-play monitor, click Cancel.) ■ If you 're done with your image, turn it on the remote control. Press the red Power button on...
... other image adjustments. projector Page down Page up Power Computer S-Video/Video Color Mode Menu A/V Mute Freeze E-Zoom remote control power light The power light flashes green as described on your video source, and press the Play button on page 28. Do one of the projector or on or restart it has found a plug-and-play monitor, click Cancel.) ■ If you 're done with your image, turn it on the remote control. Press the red Power button on...

User Manual
Page 34
... fan shuts off , press any input signals for about forty five seconds as shown. 28 Using the Projector If you are done using a computer, shut it automatically turns off the projector lamp and enters "sleep mode." Retract the front feet as the projector cools down Page up Power Computer S-Video/Video Color Mode Menu A/V Mute Freeze E-Zoom caution To avoid damaging the projector or lamp, never unplug the power cord when the power light is green or flashing orange...
... fan shuts off , press any input signals for about forty five seconds as shown. 28 Using the Projector If you are done using a computer, shut it automatically turns off the projector lamp and enters "sleep mode." Retract the front feet as the projector cools down Page up Power Computer S-Video/Video Color Mode Menu A/V Mute Freeze E-Zoom caution To avoid damaging the projector or lamp, never unplug the power cord when the power light is green or flashing orange...

User Manual
Page 57
... projector, except the lamp and filter covers. This chapter covers the following: ■ Cleaning the lens ■ Cleaning the projector case ■ Cleaning and replacing the air filter ■ Replacing the lamp ■ Resetting the lamp timer ■ Transporting the projector Maintaining and Transporting the Projector 51 Refer all other part needs replacing, contact your projected image. You also need to qualified service personnel. Maintaining and Transporting the Projector Your projector needs little maintenance. 5 warning Before you clean any part...
... projector, except the lamp and filter covers. This chapter covers the following: ■ Cleaning the lens ■ Cleaning the projector case ■ Cleaning and replacing the air filter ■ Replacing the lamp ■ Resetting the lamp timer ■ Transporting the projector Maintaining and Transporting the Projector 51 Refer all other part needs replacing, contact your projected image. You also need to qualified service personnel. Maintaining and Transporting the Projector Your projector needs little maintenance. 5 warning Before you clean any part...

User Manual
Page 60
... how many hours the lamp has been used. Allow the projector to deteriorate. ■ The warning light is red, flashing red, or flashing orange. ■ The message LAMP REPLACE appears on the screen when the lamp comes on ). 3. It is time to replace the lamp when: ■ The projected image gets darker or starts to cool down for at (800) 873-7766 in the United States for a replacement lamp. Request part number V13H010L18. Turn off the projector, wait...
... how many hours the lamp has been used. Allow the projector to deteriorate. ■ The warning light is red, flashing red, or flashing orange. ■ The message LAMP REPLACE appears on the screen when the lamp comes on ). 3. It is time to replace the lamp when: ■ The projected image gets darker or starts to cool down for at (800) 873-7766 in the United States for a replacement lamp. Request part number V13H010L18. Turn off the projector, wait...

User Manual
Page 80
... whole screen with audio) When you connect the projector to a desktop computer, you need to select Ceiling in the projector's menu system (see page 45). This section includes instructions for three different viewing setups: front projection, ceiling mounting, or rear projection onto a semi-transparent screen. If you're ceiling-mounting the projector and you place it . If you place the projector's lens so it down to position the image on-screen. If...
... whole screen with audio) When you connect the projector to a desktop computer, you need to select Ceiling in the projector's menu system (see page 45). This section includes instructions for three different viewing setups: front projection, ceiling mounting, or rear projection onto a semi-transparent screen. If you're ceiling-mounting the projector and you place it . If you place the projector's lens so it down to position the image on-screen. If...

User Manual
Page 90
... time. Doing so may expose you purchased it, use the projector with the lens cap in place. Refer all servicing to the case. ■ Do not use the correct power cord for service. Opening or removing covers may cause damage to qualified service personnel. ■ Never push objects of any kind into the projector, or if it has been exposed to remove the lamp immediately after use...
... time. Doing so may expose you purchased it, use the projector with the lens cap in place. Refer all servicing to the case. ■ Do not use the correct power cord for service. Opening or removing covers may cause damage to qualified service personnel. ■ Never push objects of any kind into the projector, or if it has been exposed to remove the lamp immediately after use...

User Manual
Page 91
...; There is an object between the remote control IR emitter and the IR receiver on power; If the remote control still does not work correctly, you can operate the projector by remote control via a line-of-sight infrared (IR) receiver at the front and rear of the projector. replace it. ■ Dim the ambient lighting and/or turn off other equipment that emits infrared...
...; There is an object between the remote control IR emitter and the IR receiver on power; If the remote control still does not work correctly, you can operate the projector by remote control via a line-of-sight infrared (IR) receiver at the front and rear of the projector. replace it. ■ Dim the ambient lighting and/or turn off other equipment that emits infrared...
User Manual
Page 103
... connecting laptop, 14 menu, 38, 42 problems, troubleshooting, 68 turning off (using A/V Mute), 33 Auto button, 40 Auto Keystone correction, 27, 38, 45 Auto Setup setting, 40 AV cable, 15 to 18 B Bass, adjusting, 42 Battery, installing, 35 Blank screen, 22 to 24 Blurry image, 67 Brightness, 1, 91 Brightness setting, 40 C Cables, 5 to 7 Camcorder, connecting to, 15 to 17 Carrying case, 5, 7, 57 Ceiling mount, 47, 74 Cleaning air filter, 53 lens, 52 projector case, 52 Color adjusting, 47 problems, 68 Color Mode Prompt setting, 46 Color Mode setting...
... connecting laptop, 14 menu, 38, 42 problems, troubleshooting, 68 turning off (using A/V Mute), 33 Auto button, 40 Auto Keystone correction, 27, 38, 45 Auto Setup setting, 40 AV cable, 15 to 18 B Bass, adjusting, 42 Battery, installing, 35 Blank screen, 22 to 24 Blurry image, 67 Brightness, 1, 91 Brightness setting, 40 C Cables, 5 to 7 Camcorder, connecting to, 15 to 17 Carrying case, 5, 7, 57 Ceiling mount, 47, 74 Cleaning air filter, 53 lens, 52 projector case, 52 Color adjusting, 47 problems, 68 Color Mode Prompt setting, 46 Color Mode setting...
User Manual
Page 104
... focusing, 25 height, adjusting, 26 positioning, 26, 40 problems with, troubleshooting, 63 to 68 raising, 26 shape, correcting, 27, 45, 66 size and projection distance, 10, 91 size range, 91 turning off (using A/V Mute), 33 zooming, 25, 33 Installing projector, 74 K Kensington anti-theft device, 7, 11 Keystone button, 27 Keystone correction, 27, 45, 66, 91 98 Index L Lamp automatic shutoff, 28 number of hours used, 48 replacing, 54 to 55 specifications, 92 status light...
... focusing, 25 height, adjusting, 26 positioning, 26, 40 problems with, troubleshooting, 63 to 68 raising, 26 shape, correcting, 27, 45, 66 size and projection distance, 10, 91 size range, 91 turning off (using A/V Mute), 33 zooming, 25, 33 Installing projector, 74 K Kensington anti-theft device, 7, 11 Keystone button, 27 Keystone correction, 27, 45, 66, 91 98 Index L Lamp automatic shutoff, 28 number of hours used, 48 replacing, 54 to 55 specifications, 92 status light...

User Manual
Page 105
..., 4 Remote control problems, 69, 85 replacing battery, 35 specifications, 92 troubleshooting, 69, 85 using, 31 to 34 wireless mouse, using as, 34 Replacing lamp, 54 to 55 Reset All menu, 38, 49 Resetting menu options, 49 Resolution, 1, 91 S Safety instructions, 83 to 84 Screen image, see Image Screen, distance from projector, 10, 91 Screens, portable, 7 Setting menu, 38, 45 to 46 Sharpness setting, 41 Sleep mode, 28, 46 Sound adjusting tone, 42 adjusting volume, 42 problems, troubleshooting, 68 turning off (using A/V Mute), 33 see also Audio Source button...
..., 4 Remote control problems, 69, 85 replacing battery, 35 specifications, 92 troubleshooting, 69, 85 using, 31 to 34 wireless mouse, using as, 34 Replacing lamp, 54 to 55 Reset All menu, 38, 49 Resetting menu options, 49 Resolution, 1, 91 S Safety instructions, 83 to 84 Screen image, see Image Screen, distance from projector, 10, 91 Screens, portable, 7 Setting menu, 38, 45 to 46 Sharpness setting, 41 Sleep mode, 28, 46 Sound adjusting tone, 42 adjusting volume, 42 problems, troubleshooting, 68 turning off (using A/V Mute), 33 see also Audio Source button...
Product Brochure
Page 1
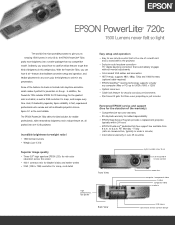
... without manual adjustments • Color-coded VGA cables and connectors • HDTV-ready, supports 480i, 480p, 720p and 1080i formats (optional cable required) • EPSON SizeWiseTM resizing technology supports virtually any computer (Mac or PC) up to UXGA (1600 x 1200) • Optical zoom lens • Cable lock feature for security conscious environments • Start Here Kit gets first time users projecting in this weight class. In addition, the PowerLite 720c includes EPSON 3-LCD...
... without manual adjustments • Color-coded VGA cables and connectors • HDTV-ready, supports 480i, 480p, 720p and 1080i formats (optional cable required) • EPSON SizeWiseTM resizing technology supports virtually any computer (Mac or PC) up to UXGA (1600 x 1200) • Optical zoom lens • Cable lock feature for security conscious environments • Start Here Kit gets first time users projecting in this weight class. In addition, the PowerLite 720c includes EPSON 3-LCD...
Product Brochure
Page 2
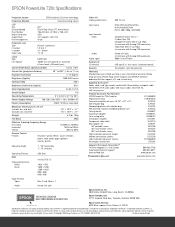
...subject to change without notice. EPSON PowerLite 720c Specifications Projection System EPSON original LCD prism technology Projection Method Front/rear/ceiling mount LCD Size Driving Method Pixel Number Native Resolution Aspect Ratio Pixel Arrangement 0.9" EPSON Poly-Silicon TFT Active Matrix 786,432 dots x3 (1024 x 768) LCDs XGA 4:3 (supports 16:9, 5:4) Stripe Projection Lens Type F-number f-number Zoom ratio Manual: zoom/focus 1.9 to 85Hz Remote Control Features Keystone, special effects, source selection, power, color mode, page up/down, volume, presets Operating Angle +/_ 30...
...subject to change without notice. EPSON PowerLite 720c Specifications Projection System EPSON original LCD prism technology Projection Method Front/rear/ceiling mount LCD Size Driving Method Pixel Number Native Resolution Aspect Ratio Pixel Arrangement 0.9" EPSON Poly-Silicon TFT Active Matrix 786,432 dots x3 (1024 x 768) LCDs XGA 4:3 (supports 16:9, 5:4) Stripe Projection Lens Type F-number f-number Zoom ratio Manual: zoom/focus 1.9 to 85Hz Remote Control Features Keystone, special effects, source selection, power, color mode, page up/down, volume, presets Operating Angle +/_ 30...

Product Support Bulletin(s)
Page 1
... sync and display the image properly to any other connected Epson projector without having to change the projector setting from Component to RGB then to Auto and exit from its contents. This will blink off and on and connected to the projector via the VGA HD15 connection to display content from the menu. This signal is displayed correctly by the projector. The projected image will have a pink cast. When connected to the projector's VGA Analog port...
... sync and display the image properly to any other connected Epson projector without having to change the projector setting from Component to RGB then to Auto and exit from its contents. This will blink off and on and connected to the projector via the VGA HD15 connection to display content from the menu. This signal is displayed correctly by the projector. The projected image will have a pink cast. When connected to the projector's VGA Analog port...


