
Installation Guide - ELPMBUNI Universal Mount Assembly
Page 2
... ALL OTHER WARRANTIES, EXPRESS OR IMPLIED, INCLUDING BUT NOT LIMITED TO THE IMPLIED WARRANTIES OF MERCHANTABILITY AND FITNESS FOR A PARTICULAR PURPOSE. techsupport@mounts.com Installation Instructions Page - 3 - Premier Mounts is not liable for improper installation that results in damage to the Upper Assembly ...- 18 Final Adjustments ...- 19 Installing the Plastic Caps...- 20...
... ALL OTHER WARRANTIES, EXPRESS OR IMPLIED, INCLUDING BUT NOT LIMITED TO THE IMPLIED WARRANTIES OF MERCHANTABILITY AND FITNESS FOR A PARTICULAR PURPOSE. techsupport@mounts.com Installation Instructions Page - 3 - Premier Mounts is not liable for improper installation that results in damage to the Upper Assembly ...- 18 Final Adjustments ...- 19 Installing the Plastic Caps...- 20...

Installation Guide - ELPMBUNI Universal Mount Assembly
Page 3
...power plug is prone to be confirmed prior to installation. A secure structure must be disconnected from dropping or mishandling the projector. When mounting to the projector and could result in damage to a ceiling that is to vibration, movement or chance of fire. Page - ... MEASURES MUST BE PRACTICED AT ALL TIMES DURING THE INSTALLATION OF THIS PRODUCT. Recommended mounting surfaces: wooden studs, solid-flat concrete, and reinforced metal studs. If the mount is commercially available). PROPER INSTALLATION PROCEDURE BY QUALIFIED PERSONNEL AS OUTLINED IN THE INSTALLATIONS...
...power plug is prone to be confirmed prior to installation. A secure structure must be disconnected from dropping or mishandling the projector. When mounting to the projector and could result in damage to a ceiling that is to vibration, movement or chance of fire. Page - ... MEASURES MUST BE PRACTICED AT ALL TIMES DURING THE INSTALLATION OF THIS PRODUCT. Recommended mounting surfaces: wooden studs, solid-flat concrete, and reinforced metal studs. If the mount is commercially available). PROPER INSTALLATION PROCEDURE BY QUALIFIED PERSONNEL AS OUTLINED IN THE INSTALLATIONS...

Installation Guide - ELPMBUNI Universal Mount Assembly
Page 4
...Blanket Allen Wrench (Supplied) Tape Measure Ladder NOTE: The following pages for the installation. Installation Manual Page - 5 - Upper Assembly (Qty 1) Mounting Bracket (Qty 1) Plastic Barrel Caps (Qty 4) M3 Flat Washers (Qty 4) Note: Must be used with all proper installation hardware and components. ... M6 x 12mm Security Head Screws (Qty 4) Portable Drill Pencil Level (Supplied) Stud Finder (Commercially Available) M5 Allen Wrench NOTE: Mounting screws will vary by projector. Please see the following hardware is included in the hardware pack but is shipped with the M3 x 16 ...
...Blanket Allen Wrench (Supplied) Tape Measure Ladder NOTE: The following pages for the installation. Installation Manual Page - 5 - Upper Assembly (Qty 1) Mounting Bracket (Qty 1) Plastic Barrel Caps (Qty 4) M3 Flat Washers (Qty 4) Note: Must be used with all proper installation hardware and components. ... M6 x 12mm Security Head Screws (Qty 4) Portable Drill Pencil Level (Supplied) Stud Finder (Commercially Available) M5 Allen Wrench NOTE: Mounting screws will vary by projector. Please see the following hardware is included in the hardware pack but is shipped with the M3 x 16 ...

Installation Guide - ELPMBUNI Universal Mount Assembly
Page 5
... of single and dual legs together as shown in Options 1 and 2. ELPMBUNI Universal Mount Assembly A Single Wooden Stud Mounting Points B Solid Structure Mounting Points C Ceiling Plate D Allen Wrench E Height Adjustment Screws F Tension Knobs G Safety Knob H Security Screws I Leveling Barrels J Universal Mounting Bracket K Leg Assembly L Projector (Not Supplied) M Tri-Lock Opening Option 1 H B D F Combination I Leg Single...
... of single and dual legs together as shown in Options 1 and 2. ELPMBUNI Universal Mount Assembly A Single Wooden Stud Mounting Points B Solid Structure Mounting Points C Ceiling Plate D Allen Wrench E Height Adjustment Screws F Tension Knobs G Safety Knob H Security Screws I Leveling Barrels J Universal Mounting Bracket K Leg Assembly L Projector (Not Supplied) M Tri-Lock Opening Option 1 H B D F Combination I Leg Single...

Installation Guide - ELPMBUNI Universal Mount Assembly
Page 6
... WARNING: Proper installation procedure by qualified personnel as (distance from the screen to the lens of the projector, top of mounting points and screw thread (pitch) size. 3. Failure to do so could result in serious personal injury and possible damage ...to the ceiling installation instruction. NOTE: Review the projectors manufacture's operation manual and refer to the projector. Mounting Points Inverted Projector Blanket, soft cloth etc Figure 1 Flat surface Installation Manual Page - 7 - Carefully invert the projector and place...
... WARNING: Proper installation procedure by qualified personnel as (distance from the screen to the lens of the projector, top of mounting points and screw thread (pitch) size. 3. Failure to do so could result in serious personal injury and possible damage ...to the ceiling installation instruction. NOTE: Review the projectors manufacture's operation manual and refer to the projector. Mounting Points Inverted Projector Blanket, soft cloth etc Figure 1 Flat surface Installation Manual Page - 7 - Carefully invert the projector and place...

Installation Guide - ELPMBUNI Universal Mount Assembly
Page 7
Figure 2 Tri-Lock Opening Rotate 180° To Unlock Tension Knobs Upper Assembly Safety Knob Figure 3 Figure 4 Page - 8 - Installation Manual Next loosen the safety screw knurl knob far enough to allow the two parts to create free play between the bracket tri-lock assembly and the upper section tri-lock assembly points. 5. Separate the upper assembly from the projector mounting bracket by slightly loosening the two tension knurl knobs to be rotated 180° apart and separate. ELPMBUNI 4.
Figure 2 Tri-Lock Opening Rotate 180° To Unlock Tension Knobs Upper Assembly Safety Knob Figure 3 Figure 4 Page - 8 - Installation Manual Next loosen the safety screw knurl knob far enough to allow the two parts to create free play between the bracket tri-lock assembly and the upper section tri-lock assembly points. 5. Separate the upper assembly from the projector mounting bracket by slightly loosening the two tension knurl knobs to be rotated 180° apart and separate. ELPMBUNI 4.

Installation Guide - ELPMBUNI Universal Mount Assembly
Page 8
...(Figure A). Page - 9 - NOTE: If your projector. Using a Phillips screwdriver, loosely secure the screws to adjust the height of the mounting bracket. Locate the mounting points on the base of the projector as shown for a better overall fit to the projector. 1. FIGURE 6 Two-Piece Leg FIGURE 7 One...Phillips screws with the flat washers attached through the leveling barrel. ELPMBUNI Securing the Bracket to the Projector NOTE: The two-piece mounting legs are designed to allow routing of the legs around critical ventilation screens on the bottom of the projector and use the ...
...(Figure A). Page - 9 - NOTE: If your projector. Using a Phillips screwdriver, loosely secure the screws to adjust the height of the mounting bracket. Locate the mounting points on the base of the projector as shown for a better overall fit to the projector. 1. FIGURE 6 Two-Piece Leg FIGURE 7 One...Phillips screws with the flat washers attached through the leveling barrel. ELPMBUNI Securing the Bracket to the Projector NOTE: The two-piece mounting legs are designed to allow routing of the legs around critical ventilation screens on the bottom of the projector and use the ...

Installation Guide - ELPMBUNI Universal Mount Assembly
Page 9
PowerLite 830p, 835p Hardware: M4 x 12mm (Qty 4) Installation Manual PowerLite S3, S4, 62C, 76C, 82C, Hardware: M4 x 12mm (Qty 3) Page - 10 - This mount works with all sub-25 pound projectors. ELPMBUNI NOTE: If your projector model is not shown, when arranging the leg combination, simply ensure access to filters and lamp housings when aligning brackets.
PowerLite 830p, 835p Hardware: M4 x 12mm (Qty 4) Installation Manual PowerLite S3, S4, 62C, 76C, 82C, Hardware: M4 x 12mm (Qty 3) Page - 10 - This mount works with all sub-25 pound projectors. ELPMBUNI NOTE: If your projector model is not shown, when arranging the leg combination, simply ensure access to filters and lamp housings when aligning brackets.

Installation Guide - ELPMBUNI Universal Mount Assembly
Page 13
...Allen Wrench Level Inverted Projector DOWN UP Adjusting the Mount Figure 8 Leveling Barrels Page - 14 - ELPMBUNI Leveling the Mounting bracket 1. Installation Manual When the position desired is achieved tighten the mounting hardware to do not over-tighten the mounting hardware. CAUTION: Secure but do so will result...leg screws with the Allen wrench (supplied) (Figure 8 and Figure 9). Rotate the leveling barrels to level the mounting bracket next, position the mounting bracket so that it avoids most, if not all, ventilation points (including lamp & filter access doors). 2.
...Allen Wrench Level Inverted Projector DOWN UP Adjusting the Mount Figure 8 Leveling Barrels Page - 14 - ELPMBUNI Leveling the Mounting bracket 1. Installation Manual When the position desired is achieved tighten the mounting hardware to do not over-tighten the mounting hardware. CAUTION: Secure but do so will result...leg screws with the Allen wrench (supplied) (Figure 8 and Figure 9). Rotate the leveling barrels to level the mounting bracket next, position the mounting bracket so that it avoids most, if not all, ventilation points (including lamp & filter access doors). 2.

Installation Guide - ELPMBUNI Universal Mount Assembly
Page 14
...of the lens as well. 4. Ceiling Structure Ceiling Wood Stud Wood Screws Upper Assembly Installation Manual Knurl Knobs (3ea) Figure 9 Secure the ceiling mount to parallel with other (commercially available) hardware depending on the screen and no higher then the top image edge of the wood stud. Secure ...of the lens point to have the top edge of the screen for best picture ratio. 2. It is recommended from the center of the mounting bracket to the front edge of the lens to the ceiling or wall. 5. Review your projector's distance calculation to determine what distance is ...
...of the lens as well. 4. Ceiling Structure Ceiling Wood Stud Wood Screws Upper Assembly Installation Manual Knurl Knobs (3ea) Figure 9 Secure the ceiling mount to parallel with other (commercially available) hardware depending on the screen and no higher then the top image edge of the wood stud. Secure ...of the lens point to have the top edge of the screen for best picture ratio. 2. It is recommended from the center of the mounting bracket to the front edge of the lens to the ceiling or wall. 5. Review your projector's distance calculation to determine what distance is ...
Installation Guide - ELPMBUNI Universal Mount Assembly
Page 15
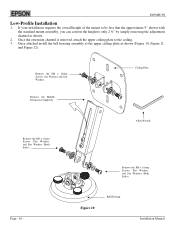
... x 16mm Screws, Flat Washers, and Star Washers (Both Sides) Page - 16 - If your installation requires the overall height of the mount to be less that the approximate 9" shown with the standard mount assembly, you can convert the height to only 2 ½" by simply removing the adjustment channel as shown (Figure 10, Figure...
... x 16mm Screws, Flat Washers, and Star Washers (Both Sides) Page - 16 - If your installation requires the overall height of the mount to be less that the approximate 9" shown with the standard mount assembly, you can convert the height to only 2 ½" by simply removing the adjustment channel as shown (Figure 10, Figure...

Installation Guide - ELPMBUNI Universal Mount Assembly
Page 17
... in the base of the bracket in direct alignment with the alignment slot on the mounting bracket (Figure 13). Carefully lift the projector and insert the mounting bracket mating special tri-lock cutout into the mating portion of the upper assembly. 3. Safety Knurl Knob Tension Knurl ...Knobs Figure 13 Tri-Lock Opening Alignment Slot Projector Mount Installation Manual ELPMBUNI Securing the Projector to the upper assembly. NOTE: Follow the number sequence prior to securing the projector to the Upper ...
... in the base of the bracket in direct alignment with the alignment slot on the mounting bracket (Figure 13). Carefully lift the projector and insert the mounting bracket mating special tri-lock cutout into the mating portion of the upper assembly. 3. Safety Knurl Knob Tension Knurl ...Knobs Figure 13 Tri-Lock Opening Alignment Slot Projector Mount Installation Manual ELPMBUNI Securing the Projector to the upper assembly. NOTE: Follow the number sequence prior to securing the projector to the Upper ...

Installation Guide - ELPMBUNI Universal Mount Assembly
Page 18
... Figure 14 Figure 15 Wood Stud Ceiling Tilt Adjusting Screws Allen Wrench Wood Stud Ceiling Figure 16 Page - 19 - With the projector secured in the mount and power on the screen, slightly loosen the front and rear M8 screws and adjust to the screen and firmly tighten the two M8 tilt...
... Figure 14 Figure 15 Wood Stud Ceiling Tilt Adjusting Screws Allen Wrench Wood Stud Ceiling Figure 16 Page - 19 - With the projector secured in the mount and power on the screen, slightly loosen the front and rear M8 screws and adjust to the screen and firmly tighten the two M8 tilt...

Product Information Guide
Page 14
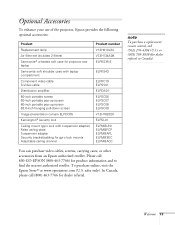
...to use the original packaging material if possible. To purchase online, visit www.epsonstore.com (U.S. Epson PowerLite 62c/82c Projector 9/05 Product Ceiling mount (gyro lock with notebook PC compartment Component video cable S-Video cable Distribution amplifier 50-inch portable ...; When shipping the projector for gyro lock mounts Adjustable ceiling channel Part number ELPMBUNI ELPMBFCP ELPMBAPL ELPMBSEC ELPMBACC Related Documentation CPD-20550 CPD-20548 Epson PowerLite 62c/82c Quick Setup poster CD-ROM containing the Epson PowerLite 62c/82c User's Guide Optional Accessories You can ...
...to use the original packaging material if possible. To purchase online, visit www.epsonstore.com (U.S. Epson PowerLite 62c/82c Projector 9/05 Product Ceiling mount (gyro lock with notebook PC compartment Component video cable S-Video cable Distribution amplifier 50-inch portable ...; When shipping the projector for gyro lock mounts Adjustable ceiling channel Part number ELPMBUNI ELPMBFCP ELPMBAPL ELPMBSEC ELPMBACC Related Documentation CPD-20550 CPD-20548 Epson PowerLite 62c/82c Quick Setup poster CD-ROM containing the Epson PowerLite 62c/82c User's Guide Optional Accessories You can ...

Product Brochure
Page 1
...formats Quiet and unobtrusive • Whisper-quiet operation ensures the presentation is ceiling mounted (using Epson mounts) Incredible image quality and performance • Epson 3LCD technology for incredible color accuracy and bright, natural images that automatically engages ... within 24 hours • Epson PrivateLineSM dedicated toll-free support line available from 6 a.m. Epson PowerLite® 62c Phenomenal brightness and fidelity from a travel -friendly performer. PST Monday - The 2000 ANSI lumen Epson® PowerLite 62c delivers brilliant presentations virtually anywhere ...
...formats Quiet and unobtrusive • Whisper-quiet operation ensures the presentation is ceiling mounted (using Epson mounts) Incredible image quality and performance • Epson 3LCD technology for incredible color accuracy and bright, natural images that automatically engages ... within 24 hours • Epson PrivateLineSM dedicated toll-free support line available from 6 a.m. Epson PowerLite® 62c Phenomenal brightness and fidelity from a travel -friendly performer. PST Monday - The 2000 ANSI lumen Epson® PowerLite 62c delivers brilliant presentations virtually anywhere ...

Product Brochure
Page 2
..., computer cable, projector remote control, batteries, soft carrying case, CD-ROM, Quick Setup Sheet, password protect sticker Product/Accessory Part Numbers Epson PowerLite 62c projector Replacement lamp Air filter set Universal ceiling mount (9" to 12.5" suspension adapter included) Suspension adapter (24" to change without notice. male) S-Video cable Samsonite® wheeled soft case Samsonite...
..., computer cable, projector remote control, batteries, soft carrying case, CD-ROM, Quick Setup Sheet, password protect sticker Product/Accessory Part Numbers Epson PowerLite 62c projector Replacement lamp Air filter set Universal ceiling mount (9" to 12.5" suspension adapter included) Suspension adapter (24" to change without notice. male) S-Video cable Samsonite® wheeled soft case Samsonite...
User's Guide
Page 13
.../cabling for gyro lock mounts Adjustable ceiling channel Product number V13H010L34 V13H134A08 ELPKS35-S ELPKS43 ELPKC19 ELPSV01 ELPDA01 ELPSC06 ELPSC07 ELPSC08 ELPSC09 V12H162020 ELPSL01 ELPMBUNI ELPMBFCP ELPMBAPL ELPMBSEC ELPMBACC note To purchase a replacement remote control, call 800-GO-EPSON (800-463-7766)... information and to find the nearest authorized reseller. You can purchase video cables, screens, carrying cases, or other accessories from an Epson authorized reseller. Welcome 13 Please call (562) 276-4394 (U.S.) or (905) 709-3839 (for dealer referral. In Canada, please...
.../cabling for gyro lock mounts Adjustable ceiling channel Product number V13H010L34 V13H134A08 ELPKS35-S ELPKS43 ELPKC19 ELPSV01 ELPDA01 ELPSC06 ELPSC07 ELPSC08 ELPSC09 V12H162020 ELPSL01 ELPMBUNI ELPMBFCP ELPMBAPL ELPMBSEC ELPMBACC note To purchase a replacement remote control, call 800-GO-EPSON (800-463-7766)... information and to find the nearest authorized reseller. You can purchase video cables, screens, carrying cases, or other accessories from an Epson authorized reseller. Welcome 13 Please call (562) 276-4394 (U.S.) or (905) 709-3839 (for dealer referral. In Canada, please...

User's Guide
Page 17
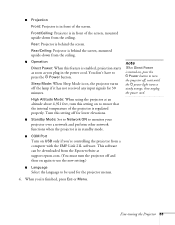
...foot, as described on , see page 61. Other Installations You can also project from behind the screen or from the ceiling, with the projector mounted upside-down: Rear projection (using a translucent screen) Rear/ceiling projection (using a translucent screen) Front/ceiling projection To project from the rear, select...the Projection option in front of the center of the screen, you'll have been disabled. If you 'll need the optional ceiling mount hardware. (See page 13 for ordering information.) You'll also need to select Front/Ceiling or Rear/Ceiling for more information, see ...
...foot, as described on , see page 61. Other Installations You can also project from behind the screen or from the ceiling, with the projector mounted upside-down: Rear projection (using a translucent screen) Rear/ceiling projection (using a translucent screen) Front/ceiling projection To project from the rear, select...the Projection option in front of the center of the screen, you'll have been disabled. If you 'll need the optional ceiling mount hardware. (See page 13 for ordering information.) You'll also need to select Front/Ceiling or Rear/Ceiling for more information, see ...
User's Guide
Page 63
...■ Language Select the language to be downloaded from a computer with the EMP Link 21L software. Rear: Projector is behind the screen, mounted upside-down from the ceiling. the power cord. You don't have to ensure that the internal temperature of the projector is enabled, projection ...properly. Fine-tuning the Projector 63 Sleep Mode: When Sleep Mode is in the power cord. When you 're controlling the projector from the Epson website at an altitude above 4,921 feet, turn the projector off, wait until the P power light turns a steady orange, then unplug ...
...■ Language Select the language to be downloaded from a computer with the EMP Link 21L software. Rear: Projector is behind the screen, mounted upside-down from the ceiling. the power cord. You don't have to ensure that the internal temperature of the projector is enabled, projection ...properly. Fine-tuning the Projector 63 Sleep Mode: When Sleep Mode is in the power cord. When you 're controlling the projector from the Epson website at an altitude above 4,921 feet, turn the projector off, wait until the P power light turns a steady orange, then unplug ...

User's Guide
Page 107
..., 40, 85 Brightness setting, 91 Buttons, disabling projector, 61 C Cables, 10 to 13, 96 Camcorder, connecting to, 24 Carrying case, 10 to 13, 80 Ceiling mount, 13, 17 projection, 17, 63 Cleaning air filter and vents, 75 to 76 lens, 74 projector case, 74 Color adjusting, 41, 55 to 57 problems...
..., 40, 85 Brightness setting, 91 Buttons, disabling projector, 61 C Cables, 10 to 13, 96 Camcorder, connecting to, 24 Carrying case, 10 to 13, 80 Ceiling mount, 13, 17 projection, 17, 63 Cleaning air filter and vents, 75 to 76 lens, 74 projector case, 74 Color adjusting, 41, 55 to 57 problems...

