Installation Guide
Page 3
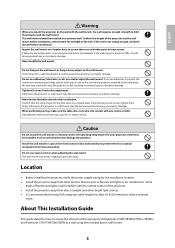
...loose screws, tighten them firmly. About This Installation Guide This guide describes how to mount the ultra-short-throw projectors BrightLink 575Wi/585Wi/575Wi+/585Wi+ and PowerLite 570/575W/580/585W to install or adjust the wall mount. Do not use adhesives, lubricants, or oils to a wall using ... injury or property damage. Handling the cable incorrectly may damage the projector. If you find any broken parts, stop using the included Epson wall mount. 3 If the wall mount or projector falls, it could cause personal injury or property damage. Never modify the wall mount...
...loose screws, tighten them firmly. About This Installation Guide This guide describes how to mount the ultra-short-throw projectors BrightLink 575Wi/585Wi/575Wi+/585Wi+ and PowerLite 570/575W/580/585W to install or adjust the wall mount. Do not use adhesives, lubricants, or oils to a wall using ... injury or property damage. Handling the cable incorrectly may damage the projector. If you find any broken parts, stop using the included Epson wall mount. 3 If the wall mount or projector falls, it could cause personal injury or property damage. Never modify the wall mount...
Installation Guide
Page 9
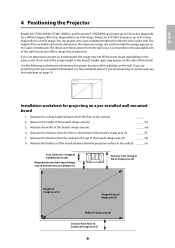
... up to 100 inches diagonally for a WXGA image or 88 inches diagonally for an XGA image. If you are projecting on the wall or whiteboard. PowerLite 570/580 can project up to 93 inches diagonally for projecting on the sides of the board's image area (f ). _____ (f ) 5. Measure the distance... from floor to the bottom of the board. English 4 Positioning the Projector BrightLink 575Wi/585Wi/575Wi+/585Wi+ and PowerLite 575W/585W can project onto a pre-installed whiteboard or directly onto a plain wall.
... up to 100 inches diagonally for a WXGA image or 88 inches diagonally for an XGA image. If you are projecting on the wall or whiteboard. PowerLite 570/580 can project up to 93 inches diagonally for projecting on the sides of the board's image area (f ). _____ (f ) 5. Measure the distance... from floor to the bottom of the board. English 4 Positioning the Projector BrightLink 575Wi/585Wi/575Wi+/585Wi+ and PowerLite 575W/585W can project onto a pre-installed whiteboard or directly onto a plain wall.
Installation Guide
Page 13
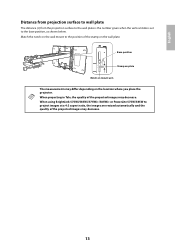
When using BrightLink 575Wi/585Wi/575Wi+/585Wi+ or PowerLite 575W/585W to project images at a 4:3 aspect ratio, the images are resized automatically and the quality of the projected images may differ depending on the location ...
When using BrightLink 575Wi/585Wi/575Wi+/585Wi+ or PowerLite 575W/585W to project images at a 4:3 aspect ratio, the images are resized automatically and the quality of the projected images may differ depending on the location ...
Installation Guide
Page 14
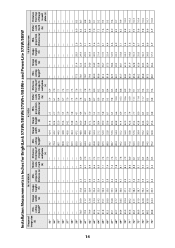
....1 66.2 37.3 6.9 6.9 10.8 Slider projection scale distance (a) mark (b) Distance from top of image to wall plate (c) Min. Installation Measurements in Inches for BrightLink 575Wi/585Wi/575Wi+/585Wi+ and PowerLite 575W/585W 14 Diagonal image size (S) Min. ceiling height* Image width (w) 16:9 Widescreen Image height (h) Min. Slider projection scale distance (a) mark (b) Distance from top of...
....1 66.2 37.3 6.9 6.9 10.8 Slider projection scale distance (a) mark (b) Distance from top of image to wall plate (c) Min. Installation Measurements in Inches for BrightLink 575Wi/585Wi/575Wi+/585Wi+ and PowerLite 575W/585W 14 Diagonal image size (S) Min. ceiling height* Image width (w) 16:9 Widescreen Image height (h) Min. Slider projection scale distance (a) mark (b) Distance from top of...
Installation Guide
Page 18
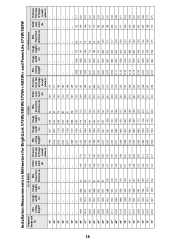
... height (h) Min. ceiling height* Image width (w) 16:9 Widescreen Image height (h) Min. ceiling height* Image width (w) 4:3 XGA Image height (h) Min. Installation Measurements in Millimeters for BrightLink 575Wi/585Wi/575Wi+/585Wi+ and PowerLite 575W/585W 18 Diagonal image size (S) Min. projection distance (a) Slider scale mark (b) Distance from top of image to wall plate (c) Min.
... height (h) Min. ceiling height* Image width (w) 16:9 Widescreen Image height (h) Min. ceiling height* Image width (w) 4:3 XGA Image height (h) Min. Installation Measurements in Millimeters for BrightLink 575Wi/585Wi/575Wi+/585Wi+ and PowerLite 575W/585W 18 Diagonal image size (S) Min. projection distance (a) Slider scale mark (b) Distance from top of image to wall plate (c) Min.

Installation Guide
Page 34
Using the Remote Control Using the Control Panel 34 When using the BrightLink 575Wi/585Wi/575Wi+/585Wi+ and PowerLite 570/575W/580/585W, follow the steps below to the projected image. A Turn on the control panel. Do not make adjustments with the Quick Corner or Keystone ...
Using the Remote Control Using the Control Panel 34 When using the BrightLink 575Wi/585Wi/575Wi+/585Wi+ and PowerLite 570/575W/580/585W, follow the steps below to the projected image. A Turn on the control panel. Do not make adjustments with the Quick Corner or Keystone ...
Installation Guide
Page 35
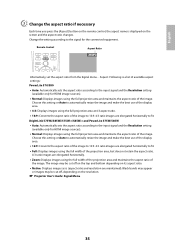
... , depending on the resolution. Remote Control Aspect Ratio Normal Alternatively, set the aspect ratio from the Signal menu - BrightLink 575Wi/585Wi/575Wi+/585Wi+ and PowerLite 575W/585W • Auto: Automatically sets the aspect ratio according to the input signal and the Resolution setting (available only for ..., the aspect name is displayed on its aspect ratio. • Native: Displays images as is a list of available aspect settings: PowerLite 570/580 • Auto: Automatically sets the aspect ratio according to the input signal and the Resolution setting (available only for HDMI ...
... , depending on the resolution. Remote Control Aspect Ratio Normal Alternatively, set the aspect ratio from the Signal menu - BrightLink 575Wi/585Wi/575Wi+/585Wi+ and PowerLite 575W/585W • Auto: Automatically sets the aspect ratio according to the input signal and the Resolution setting (available only for ..., the aspect name is displayed on its aspect ratio. • Native: Displays images as is a list of available aspect settings: PowerLite 570/580 • Auto: Automatically sets the aspect ratio according to the input signal and the Resolution setting (available only for HDMI ...

