Operation Guide - EasyMP Monitor v4.53
Page 2
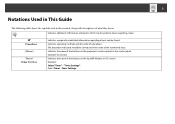
... the EasyMP Monitor or OS screens. Timer Settings. Select Timer - Indicates operating methods and the order of operations. 2 Notations Used in This Guide The following table shows the symbols used in the order of the numbered steps.
... the EasyMP Monitor or OS screens. Timer Settings. Select Timer - Indicates operating methods and the order of operations. 2 Notations Used in This Guide The following table shows the symbols used in the order of the numbered steps.
Operation Guide - EasyMP Monitor v4.53
Page 13
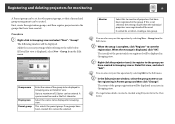
The following table. This cannot be displayed. Display name Display icon Parent group Projector name IP address Use Serial W TCP/IP conversion adaptor. A space cannot be selected when ...
The following table. This cannot be displayed. Display name Display icon Parent group Projector name IP address Use Serial W TCP/IP conversion adaptor. A space cannot be selected when ...

Operation Guide - EasyMP Monitor v4.53
Page 16
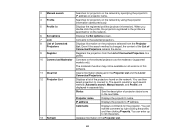
.... Port Number Monitor Password Description Monitor Enter the name of the projector(s) to be used as the first character. This cannot be displayed. The following table. If a Monitor Password has been set . If no groups have been created, this when you enter here will be selected when registering projectors using automatic...
.... Port Number Monitor Password Description Monitor Enter the name of the projector(s) to be used as the first character. This cannot be displayed. The following table. If a Monitor Password has been set . If no groups have been created, this when you enter here will be selected when registering projectors using automatic...
Operation Guide - EasyMP Monitor v4.53
Page 18
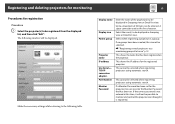
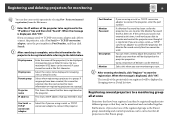
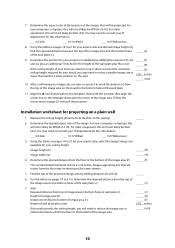
... click "Search". D After entering the details, click "Register" to start the registration. If you are using a serial W TCP/IP conversion adapter and cable to the table below. C After searching is complete, enter the information for the projector to be possible to monitor and control the projector even though it will not...
... click "Search". D After entering the details, click "Register" to start the registration. If you are using a serial W TCP/IP conversion adapter and cable to the table below. C After searching is complete, enter the information for the projector to be possible to monitor and control the projector even though it will not...
Operation Guide - EasyMP Monitor v4.53
Page 19
... complete, click "Register" to monitor all projectors that a hierarchical group arrangement can be created. D In the Edit projector window, select the group name to the table below.
... complete, click "Register" to monitor all projectors that a hierarchical group arrangement can be created. D In the Edit projector window, select the group name to the table below.

Operation Guide - EasyMP Monitor v4.53
Page 35
..., use this button to the D4 port. Switches the input source to the Computer1 port or Computer port. Using the control functions 35 The following table shows the meanings of the above ports or functions. Switch source Computer1 Switch source Computer 2 Switch source BNC Switch source S-Video Switch source Video (RCA...
..., use this button to the D4 port. Switches the input source to the Computer1 port or Computer port. Using the control functions 35 The following table shows the meanings of the above ports or functions. Switch source Computer1 Switch source Computer 2 Switch source BNC Switch source S-Video Switch source Video (RCA...

Operation Guide - EasyMP Monitor v4.53
Page 39
...'s Guide for more information. • On some projectors, the mail notification function can be entered. Up to use the mail notification function. Up to the table below. Make the necessary settings while referring to a maximum of 255 bytes can be registered and messages can monitor the projector even when it experiences...
...'s Guide for more information. • On some projectors, the mail notification function can be entered. Up to use the mail notification function. Up to the table below. Make the necessary settings while referring to a maximum of 255 bytes can be registered and messages can monitor the projector even when it experiences...

Operation Guide - EasyMP Monitor v4.53
Page 41
... Body Details shown [Display name displayed in Grouping view or Detail list view] Projector status notification has entered the following status. (Please see the next table) An e-mail notifying the operator of a problem/warning/status is issued 41 An e-mail notifying the operator of a problem/warning/status is issued If the...
... Body Details shown [Display name displayed in Grouping view or Detail list view] Projector status notification has entered the following status. (Please see the next table) An e-mail notifying the operator of a problem/warning/status is issued 41 An e-mail notifying the operator of a problem/warning/status is issued If the...
Operation Guide - EasyMP Multi PC Projection
Page 63
... List. IP address Displays the projector's IP address. You can then select projectors to connect to 32 characters. 13 Refresh Updates information in the next table. The moderator function may not be available on all versions of projector status icons in the Projector List. 63 Status See the description of this...
... List. IP address Displays the projector's IP address. You can then select projectors to connect to 32 characters. 13 Refresh Updates information in the next table. The moderator function may not be available on all versions of projector status icons in the Projector List. 63 Status See the description of this...

Operation Guide - EasyMP Multi PC Projection
Page 64
.... You can connect to search for the projector. 14 Manual search box When using Manual search or Profile search. Not available. Currently in the following table. Available.
.... You can connect to search for the projector. 14 Manual search box When using Manual search or Profile search. Not available. Currently in the following table. Available.
Installation Guide
Page 10
...image area (h) Distance from floor to the bottom holes of the image area (f). Using the tables on pages 14 to 21 for your board, you will most likely be XGA (4:3). Using the tables on pages 14 to 21 for your aspect ratio, select the largest image size available for.... ___ 4:3 XGA ___ 16:10 WXGA ___ 16:9 Widescreen 8. Images appearing less than 28 inches from the floor to the ceiling). _____ 2. Use the tables on a plain wall 1. Determine the position for your ceiling height. You may need to the bottom holes of the image area. _____ (c) _____ (h) _____...
...image area (h) Distance from floor to the bottom holes of the image area (f). Using the tables on pages 14 to 21 for your board, you will most likely be XGA (4:3). Using the tables on pages 14 to 21 for your aspect ratio, select the largest image size available for.... ___ 4:3 XGA ___ 16:10 WXGA ___ 16:9 Widescreen 8. Images appearing less than 28 inches from the floor to the ceiling). _____ 2. Use the tables on a plain wall 1. Determine the position for your ceiling height. You may need to the bottom holes of the image area. _____ (c) _____ (h) _____...

Installation Guide
Page 11
English 10 in the tables on the following pages is 2.5 to 12.2 inches (62 to install the projector. The recommended range for all supported image sizes. The minimum ceiling height ... template sheet with the (c) mark, then align the center line on the following pages to determine the projection distance and placement of image area (f) 8. The tables on the following pages provide installation information for projection distance (a) as shown on the template sheet with the center of the wall plate. 9.
English 10 in the tables on the following pages is 2.5 to 12.2 inches (62 to install the projector. The recommended range for all supported image sizes. The minimum ceiling height ... template sheet with the (c) mark, then align the center line on the following pages to determine the projection distance and placement of image area (f) 8. The tables on the following pages provide installation information for projection distance (a) as shown on the template sheet with the center of the wall plate. 9.
Installation Guide
Page 22
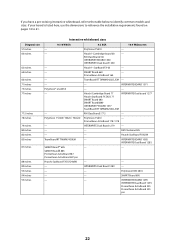
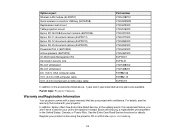
If you have a pre-existing interactive whiteboard, refer to the table below to 21. Hitachi® Cambridge board 60 - Hitachi® StarBoard FX-63 - - INTERWRITE BOARD 1071 PolyVision® eno2650 - - - RM Classboard 85 - - Hitachi StarBoard FX-...
If you have a pre-existing interactive whiteboard, refer to the table below to 21. Hitachi® Cambridge board 60 - Hitachi® StarBoard FX-63 - - INTERWRITE BOARD 1071 PolyVision® eno2650 - - - RM Classboard 85 - - Hitachi StarBoard FX-...
Installation Guide
Page 26
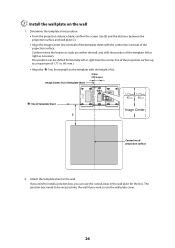
... the template sheet to use the cutout areas in the wall plate for the box. Determine the template sheet position. • From the projection distance table, confirm the screen size (S) and the distance between the projection surface and wall plate (c). • Align the Image Center line (vertical) of the template sheet...
... the template sheet to use the cutout areas in the wall plate for the box. Determine the template sheet position. • From the projection distance table, confirm the screen size (S) and the distance between the projection surface and wall plate (c). • Align the Image Center line (vertical) of the template sheet...
Installation Guide
Page 28
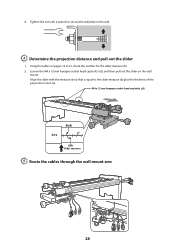
Loosen the M4 x 12 mm hexagon socket head cap bolts (x2), and then pull out the slider on pages 14 to 21, check the number for the slider measure (b). 2. Tighten the nut with the measure (b+x) that is equal to the wall. Align the slider with a wrench to secure the wall plate to the slider measure (b) plus the thickness of the projection screen (x). Using the tables on the wall mount. 8. D Determine the projection distance and pull out the slider 1. M4 x 12 mm hexagon socket head cap bolts (x2) Slider measure E Route the cables through the wall mount arm 28
Loosen the M4 x 12 mm hexagon socket head cap bolts (x2), and then pull out the slider on pages 14 to 21, check the number for the slider measure (b). 2. Tighten the nut with the measure (b+x) that is equal to the wall. Align the slider with a wrench to secure the wall plate to the slider measure (b) plus the thickness of the projection screen (x). Using the tables on the wall mount. 8. D Determine the projection distance and pull out the slider 1. M4 x 12 mm hexagon socket head cap bolts (x2) Slider measure E Route the cables through the wall mount arm 28
User Manual
Page 14
... (ELPAP07) Quick wireless connection USB key (ELPAP08) Replacement wall mount Table projection mount Epson DC-06 USB document camera (ELPDC06) Epson DC-11 document camera (ELPDC11) Epson DC-12 document camera (ELPDC12) Epson DC-20 document camera (ELPDC20) PowerLite Pilot 2 (ELPCB02) Active speakers (ELPSP02) On Wall Cable Management ...unlikely event of an equipment failure, you won't have to wait for details. Register your projector. In addition, Epson offers free Extra Care Road Service. Instead, Epson will ship you project with your product online using the projector CD or at this site...
... (ELPAP07) Quick wireless connection USB key (ELPAP08) Replacement wall mount Table projection mount Epson DC-06 USB document camera (ELPDC06) Epson DC-11 document camera (ELPDC11) Epson DC-12 document camera (ELPDC12) Epson DC-20 document camera (ELPDC20) PowerLite Pilot 2 (ELPCB02) Active speakers (ELPSP02) On Wall Cable Management ...unlikely event of an equipment failure, you won't have to wait for details. Register your projector. In addition, Epson offers free Extra Care Road Service. Instead, Epson will ship you project with your product online using the projector CD or at this site...
User Manual
Page 25
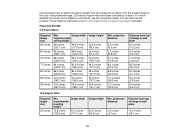
PowerLite 570/580 4:3 Aspect Ratio Diagonal image size 56 inches 60 inches 70 inches ...may have been rounded up or down.) For more detailed information and installation instructions, see the Installation Guide. Use the tables here to determine approximately how far to place the projector from top of image to wall plate 6.0 inches (15.2...) 16:9 Aspect Ratio Diagonal image size 52 inches Min. You can also use the projector Throw Distance Calculator at epson.com/support (U.S.) or epson.ca/support (Canada). Image width recommended ceiling height 80 inches (202.1 cm) 44.8 inches (113.9 cm) ...
PowerLite 570/580 4:3 Aspect Ratio Diagonal image size 56 inches 60 inches 70 inches ...may have been rounded up or down.) For more detailed information and installation instructions, see the Installation Guide. Use the tables here to determine approximately how far to place the projector from top of image to wall plate 6.0 inches (15.2...) 16:9 Aspect Ratio Diagonal image size 52 inches Min. You can also use the projector Throw Distance Calculator at epson.com/support (U.S.) or epson.ca/support (Canada). Image width recommended ceiling height 80 inches (202.1 cm) 44.8 inches (113.9 cm) ...
User Manual
Page 85
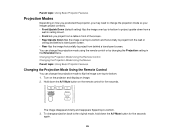
... upside-down from a wall or ceiling mount. • Front lets you project from behind a translucent screen. • Rear flips the image horizontally to project from a table in the Extended menu. Hold down the A/V Mute button for five seconds. Changing the Projection Mode Using the Remote Control Changing the Projection Mode Using...
... upside-down from a wall or ceiling mount. • Front lets you project from behind a translucent screen. • Rear flips the image horizontally to project from a table in the Extended menu. Hold down the A/V Mute button for five seconds. Changing the Projection Mode Using the Remote Control Changing the Projection Mode Using...
User Manual
Page 149
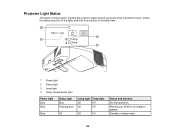
Wait for a solution in the table here. 1 Power light 2 Status light 3 Lamp light 4 Temp (temperature) light Power light Blue Blue Status light Blue Flashing blue Lamp light Temp light Off Off Off Off Blue Off Off Off Status and solution Normal operation. Standby or sleep mode. 149 Warming up. Check the status and color of the lights and look for an image to appear. Projector Light Status The lights on the projector indicate the projector status and let you know when a problem occurs.
Wait for a solution in the table here. 1 Power light 2 Status light 3 Lamp light 4 Temp (temperature) light Power light Blue Blue Status light Blue Flashing blue Lamp light Temp light Off Off Off Off Blue Off Off Off Status and solution Normal operation. Standby or sleep mode. 149 Warming up. Check the status and color of the lights and look for an image to appear. Projector Light Status The lights on the projector indicate the projector status and let you know when a problem occurs.
User Manual
Page 151
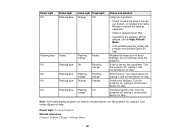
...: If the lights display a pattern not listed in the table above, turn on High Altitude Mode. • If the problem persists, unplug the projector and contact Epson for help . Internal projector error. Turn the projector off, unplug it, and contact Epson for help . A fan or sensor has a problem. ... out, broken, or installed incorrectly. Do not continue using the projector. Settings Menu 151 Turn the projector off , unplug it , and contact Epson for help . Reseat or replace the lamp as necessary. • Clean or replace the air filter. • If operating the projector at ...
...: If the lights display a pattern not listed in the table above, turn on High Altitude Mode. • If the problem persists, unplug the projector and contact Epson for help . Internal projector error. Turn the projector off, unplug it, and contact Epson for help . A fan or sensor has a problem. ... out, broken, or installed incorrectly. Do not continue using the projector. Settings Menu 151 Turn the projector off , unplug it , and contact Epson for help . Reseat or replace the lamp as necessary. • Clean or replace the air filter. • If operating the projector at ...