
User Replaceable Parts List
Page 1
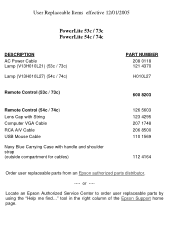
... the right column of the Epson Support home page. User Replaceable Items effective 12/01/2005 PowerLite 53c / 73c PowerLite 54c / 74c DESCRIPTION AC Power Cable Lamp (V13H010L21) (53c / 73c) Lamp (V13H010L27) (54c / 74c) PART NUMBER 208 0118 121 4370 H010L27 Remote Control (53c / 73c) Remote Control (54c / 74c) Lens Cap with String Computer VGA Cable RCA A/V Cable USB Mouse Cable Navy Blue Carrying Case with handle and shoulder strap (outside compartment for cables) 600 8203 126 5603...
... the right column of the Epson Support home page. User Replaceable Items effective 12/01/2005 PowerLite 53c / 73c PowerLite 54c / 74c DESCRIPTION AC Power Cable Lamp (V13H010L21) (53c / 73c) Lamp (V13H010L27) (54c / 74c) PART NUMBER 208 0118 121 4370 H010L27 Remote Control (53c / 73c) Remote Control (54c / 74c) Lens Cap with String Computer VGA Cable RCA A/V Cable USB Mouse Cable Navy Blue Carrying Case with handle and shoulder strap (outside compartment for cables) 600 8203 126 5603...
Product Brochure
Page 1
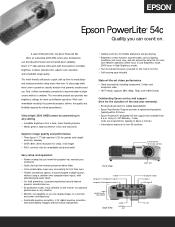
... more cost-effective operation (3000 hours in Low Brightness mode, 2000 hours in High Brightness mode) • Fast shut-down time puts you can display images on a monitor and screen simultaneously • Automatic keystone correction: ±15˚ digital keystone correction that prevents unauthorized use • Six projection modes, easily selected via the remote, for more cost effective operation. Epson 0.7" high-aperture LCDs work with accompanying audio input) • For theft prevention, a password-protected security feature...
... more cost-effective operation (3000 hours in Low Brightness mode, 2000 hours in High Brightness mode) • Fast shut-down time puts you can display images on a monitor and screen simultaneously • Automatic keystone correction: ±15˚ digital keystone correction that prevents unauthorized use • Six projection modes, easily selected via the remote, for more cost effective operation. Epson 0.7" high-aperture LCDs work with accompanying audio input) • For theft prevention, a password-protected security feature...
Product Brochure
Page 2
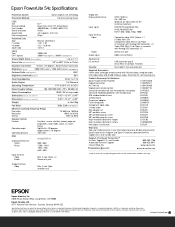
...Power cable, card type remote control with Analog RGB connector) x 2; Epson PowerLite 54c Specifications Projection System Epson original LCD technology Projection Method Front/rear/ceiling mount LCDs Size Driving method Pixel number Native resolution Aspect ratio Pixel arrangement 0.7" Epson Poly-silicon TFT Active Matrix 480,000 dots x 3 (800 x 600) LCDs SVGA 4:3 (supports 16:9, 5:4) Stripe Projection Lens Type F-number f-number Zoom ratio Manual: zoom/focus 1.70 - 1.87 21.3 - 25.6mm 1.0:1.2 Lamp Type Life* (typical) 200W UHE 2000H (High Brightness), 3000H (Low Brightness) Screen...
...Power cable, card type remote control with Analog RGB connector) x 2; Epson PowerLite 54c Specifications Projection System Epson original LCD technology Projection Method Front/rear/ceiling mount LCDs Size Driving method Pixel number Native resolution Aspect ratio Pixel arrangement 0.7" Epson Poly-silicon TFT Active Matrix 480,000 dots x 3 (800 x 600) LCDs SVGA 4:3 (supports 16:9, 5:4) Stripe Projection Lens Type F-number f-number Zoom ratio Manual: zoom/focus 1.70 - 1.87 21.3 - 25.6mm 1.0:1.2 Lamp Type Life* (typical) 200W UHE 2000H (High Brightness), 3000H (Low Brightness) Screen...
Product Support Bulletin(s)
Page 1
... Blue Screen - Problem: When attempting to use the Elmo HV-110XG Document Camera connected via the VGA computer cable, access the Computer1/Computer2 setting in the projector menu system and select the Component setting within the appropriate connection. This will now allow the Elmo HV-110XG Document Camera and projector to sync and the projector to display the image of 1 The projected image will have a pink cast. No Signal message. When switching...
... Blue Screen - Problem: When attempting to use the Elmo HV-110XG Document Camera connected via the VGA computer cable, access the Computer1/Computer2 setting in the projector menu system and select the Component setting within the appropriate connection. This will now allow the Elmo HV-110XG Document Camera and projector to sync and the projector to display the image of 1 The projected image will have a pink cast. No Signal message. When switching...
Quick Start
Page 1
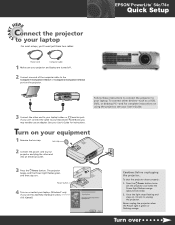
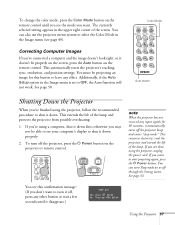
... Power button twice. To shut the projector down properly: 1. Never unplug the projector when the Power light is green or flashing orange. Follow these two cables: EPSON® PowerLite® 54c/74c Quick Setup TART S Power cord Computer cable 1 Make sure your projector and laptop are turned off. 2 Connect one end of the computer cable to the Computer1/Component Video1 or Computer2/Component Video2 port on your equipment 1 Remove the lens cap. If you can't connect the cable...
... Power button twice. To shut the projector down properly: 1. Never unplug the projector when the Power light is green or flashing orange. Follow these two cables: EPSON® PowerLite® 54c/74c Quick Setup TART S Power cord Computer cable 1 Make sure your projector and laptop are turned off. 2 Connect one end of the computer cable to the Computer1/Component Video1 or Computer2/Component Video2 port on your equipment 1 Remove the lens cap. If you can't connect the cable...
Quick Start
Page 2
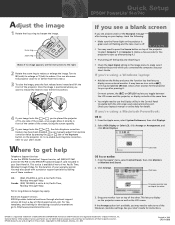
... for the duration of their respective owners. Allow a few seconds for the projector to sync up after pressing it.) Try turning off . Quick Setup EPSON® PowerLite® 54c/74c Adjust the image 1 Rotate the focus ring to use the EPSON PrivateLine® Support service, call (800) 637-7661 and enter the PIN on the EPSON PrivateLine Support card included in your User's Guide. Electronic Support Services EPSON provides technical assistance through Friday...
... for the duration of their respective owners. Allow a few seconds for the projector to sync up after pressing it.) Try turning off . Quick Setup EPSON® PowerLite® 54c/74c Adjust the image 1 Rotate the focus ring to use the EPSON PrivateLine® Support service, call (800) 637-7661 and enter the PIN on the EPSON PrivateLine Support card included in your User's Guide. Electronic Support Services EPSON provides technical assistance through Friday...
User Manual
Page 2
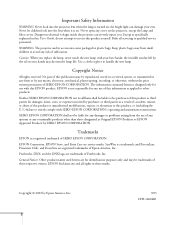
... PrivateLine, Presenters Club, and PowerLite are service marks; Dangerous electrical voltages inside the projector can damage your eyes. Trademarks EPSON is a trademark; Copyright © 2003 by the oil on the projector, except the lamp and filter covers. Important Safety Information WARNING: Never look into the projector lens when the lamp is turned on; General Notice: Other product names used herein are trademarks of this...
... PrivateLine, Presenters Club, and PowerLite are service marks; Dangerous electrical voltages inside the projector can damage your eyes. Trademarks EPSON is a trademark; Copyright © 2003 by the oil on the projector, except the lamp and filter covers. Important Safety Information WARNING: Never look into the projector lens when the lamp is turned on; General Notice: Other product names used herein are trademarks of this...
User Manual
Page 4
... Color Mode 36 Correcting Computer Images 37 Shutting Down the Projector 37 Using the Remote Control 39 Removing the Battery Tape 40 Storing the Remote Control 40 Controlling the Picture and Sound 41 Switching Between Picture Sources 41 Turning Off the Picture and Sound 42 Stopping Action 42 Zooming Your Image 42 Using the Remote Control as a Wireless Mouse 43 Replacing the Battery 44 Fine-tuning the Projector 45 Using the Projector's Menu System 46 Changing Menu Settings 47 Adjusting the Image 48 Adjusting the Sound 51 Customizing Projector...
... Color Mode 36 Correcting Computer Images 37 Shutting Down the Projector 37 Using the Remote Control 39 Removing the Battery Tape 40 Storing the Remote Control 40 Controlling the Picture and Sound 41 Switching Between Picture Sources 41 Turning Off the Picture and Sound 42 Stopping Action 42 Zooming Your Image 42 Using the Remote Control as a Wireless Mouse 43 Replacing the Battery 44 Fine-tuning the Projector 45 Using the Projector's Menu System 46 Changing Menu Settings 47 Adjusting the Image 48 Adjusting the Sound 51 Customizing Projector...
User Manual
Page 5
... Lens 64 Cleaning the Projector Case 64 Cleaning and Replacing the Air Filter 65 Replacing the Lamp 67 Resetting the Lamp Timer 69 Transporting the Projector 70 Solving Problems 71 Using On-Screen Help 72 What To Do When the Lights Flash 73 Solving Problems with the Image or Sound 75 Solving Password Problems 82 Solving Problems with the Remote Control 82 Where To Get Help 83 Telephone Support Services 84 Appendix A: Technical Specifications 85 Appendix B: Notices 91 Important Safety Instructions 91 Remote Control...
... Lens 64 Cleaning the Projector Case 64 Cleaning and Replacing the Air Filter 65 Replacing the Lamp 67 Resetting the Lamp Timer 69 Transporting the Projector 70 Solving Problems 71 Using On-Screen Help 72 What To Do When the Lights Flash 73 Solving Problems with the Image or Sound 75 Solving Password Problems 82 Solving Problems with the Remote Control 82 Where To Get Help 83 Telephone Support Services 84 Appendix A: Technical Specifications 85 Appendix B: Notices 91 Important Safety Instructions 91 Remote Control...
User Manual
Page 28
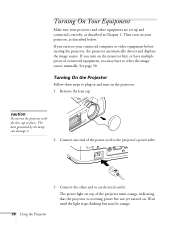
... turn on your connected computer or video equipment before starting the projector, the projector automatically detects and displays the image source. The power light on top of connected equipment, you turn on . caution Do not use the projector with the lens cap in Chapter 1. Connect the other equipment are set up and connected correctly, as described below. See page 30. Wait until the light stops flashing but not yet turned on the projector: 1. Turning...
... turn on your connected computer or video equipment before starting the projector, the projector automatically detects and displays the image source. The power light on top of connected equipment, you turn on . caution Do not use the projector with the lens cap in Chapter 1. Connect the other equipment are set up and connected correctly, as described below. See page 30. Wait until the light stops flashing but not yet turned on the projector: 1. Turning...

User Manual
Page 29
... 're projecting a video, press the Source button on top of the projector to enter a password, see page 33. Using the Projector 29 If not, you 're using the remote control for children. Shutting down Page up . The lamp comes on page 40. To focus and adjust the image, see page 60. Projector Remote control The projector beeps and the power light flashes green as described on in about 30 seconds and the power light stays green. ■...
... 're projecting a video, press the Source button on top of the projector to enter a password, see page 33. Using the Projector 29 If not, you 're using the remote control for children. Shutting down Page up . The lamp comes on page 40. To focus and adjust the image, see page 60. Projector Remote control The projector beeps and the power light flashes green as described on in about 30 seconds and the power light stays green. ■...
User Manual
Page 37
... . To change the color mode, press the Color Mode button on the remote control. If you want to OFF, the Auto function will not work. Additionally, if the Auto Setup option in the Image menu is set to turn off the projector, press the P Power button on or off , press any input signals for this confirmation message: (If you want to have any effect. This automatically resets the projector's tracking, sync, resolution, and position settings. See page...
... . To change the color mode, press the Color Mode button on the remote control. If you want to OFF, the Auto function will not work. Additionally, if the Auto Setup option in the Image menu is set to turn off the projector, press the P Power button on or off , press any input signals for this confirmation message: (If you want to have any effect. This automatically resets the projector's tracking, sync, resolution, and position settings. See page...
User Manual
Page 54
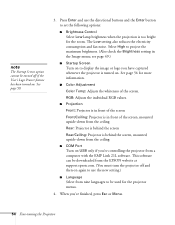
... the screen Front/Ceiling: Projector is in the Image menu; Select High to use the directional buttons and the Enter button to set the following options: ■ Brightness Control Select Low lamp brightness when the projection is too bright for more information. ■ Color Adjustment Color Temp: Adjusts the whiteness of the screen, mounted upside-down from the ceiling ■ COM Port Turn on . This software can be downloaded from the EPSON website at support.epson.com. (You must turn the projector...
... the screen Front/Ceiling: Projector is in the Image menu; Select High to use the directional buttons and the Enter button to set the following options: ■ Brightness Control Select Low lamp brightness when the projection is too bright for more information. ■ Color Adjustment Color Temp: Adjusts the whiteness of the screen, mounted upside-down from the ceiling ■ COM Port Turn on . This software can be downloaded from the EPSON website at support.epson.com. (You must turn the projector...
User Manual
Page 58
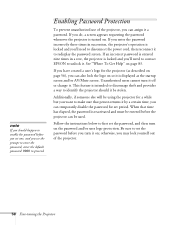
... the projector (as the startup screen and/or AV/Mute screen. Unauthorized users cannot turn it on; Additionally, if someone else will be using the projector for set the password before you turn it off or change it. Follow the instructions below to first set one, and you see the prompt to enter the password, enter the default password: 0000 to proceed. otherwise, you may lock yourself...
... the projector (as the startup screen and/or AV/Mute screen. Unauthorized users cannot turn it on; Additionally, if someone else will be using the projector for set the password before you turn it off or change it. Follow the instructions below to first set one, and you see the prompt to enter the password, enter the default password: 0000 to proceed. otherwise, you may lock yourself...
User Manual
Page 60
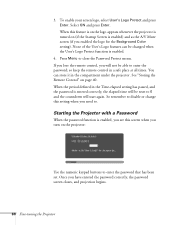
... projector: Use the numeric keypad buttons to enter the password; When the period defined in a safe place at all times. so keep the remote control in the Time-elapsed setting has passed, and the password is enabled. 4. So remember to close the Password Protect menu. 3. You can be reset to . Starting the Projector with a Password When the password function is enabled, you see this screen when you will be changed...
... projector: Use the numeric keypad buttons to enter the password; When the period defined in a safe place at all times. so keep the remote control in the Time-elapsed setting has passed, and the password is enabled. 4. So remember to close the Password Protect menu. 3. You can be reset to . Starting the Projector with a Password When the password function is enabled, you see this screen when you will be changed...
User Manual
Page 74
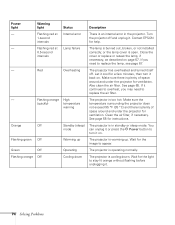
... the projector. Orange Off Standby (sleep) mode The projector is an internal error in standby or sleep mode. Flashing red at Lamp failure The lamp is open. See page 65 for help. - Wait for a few minutes, then turn it back on page 67. Let it cool for the light to appear. Power light Warning light Status Description - Turn 1-second the projector off . or the lamp cover is burned out, broken, or not installed 0.5-second correctly; Also clean the air filter...
... the projector. Orange Off Standby (sleep) mode The projector is an internal error in standby or sleep mode. Flashing red at Lamp failure The lamp is open. See page 65 for help. - Wait for a few minutes, then turn it back on page 67. Let it cool for the light to appear. Power light Warning light Status Description - Turn 1-second the projector off . or the lamp cover is burned out, broken, or not installed 0.5-second correctly; Also clean the air filter...
User Manual
Page 80
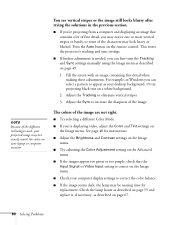
... Tracking and Sync settings manually using the Image menu as your desktop background. The colors of the image are not right. ■ Try selecting a different Color Mode. ■ If you 're projecting from a computer and displaying an image that the Input Signal or Video Input setting is needed, you can select a pattern to eliminate vertical stripes. 3. Or try projecting black text on page 67. 80 Solving Problems Check the lamp hours as described...
... Tracking and Sync settings manually using the Image menu as your desktop background. The colors of the image are not right. ■ Try selecting a different Color Mode. ■ If you 're projecting from a computer and displaying an image that the Input Signal or Video Input setting is needed, you can select a pattern to eliminate vertical stripes. 3. Or try projecting black text on page 67. 80 Solving Problems Check the lamp hours as described...
User Manual
Page 100
... size and projection distance, 14 to 15, 85 turning off, 42 zooming, 33, 42 to 43 Input Signal setting, 50 Input signal, selecting, 26, 30 K Kensington anti-theft device, 12 Keystone correction, 35, 52, 78, 85 L Lamp automatic shutoff, 37 brightness, 7, 54, 67, 75, 85 number of hours used, 55, 67, 69 replacing, 67 to 70 specifications, 86 status light, 73 to 74 timer, resetting, 69 to 70 Language setting, 54, 72 Laptop...
... size and projection distance, 14 to 15, 85 turning off, 42 zooming, 33, 42 to 43 Input Signal setting, 50 Input signal, selecting, 26, 30 K Kensington anti-theft device, 12 Keystone correction, 35, 52, 78, 85 L Lamp automatic shutoff, 37 brightness, 7, 54, 67, 75, 85 number of hours used, 55, 67, 69 replacing, 67 to 70 specifications, 86 status light, 73 to 74 timer, resetting, 69 to 70 Language setting, 54, 72 Laptop...
User Manual
Page 101
... Picture source, selecting, 18, 30, 41 Pin assignments, connector, 90 Position setting, 49 Positioning image, 34, 49 projector, 14 to 15 Power button, 29, 37 consumption, 86 light, 28, 73 to 74 saving, 37, 53 supply, 86 PowerBook, connecting to, 16 to 18 Presentation color mode, 36, 49 Presenters Online, 9, 83 PrivateLine Support, 9, 84 Problems color, 80 image, 75 to 80 password, 82 remote control, 82, 93 sound, 81 USB, 83 Projection lamp...
... Picture source, selecting, 18, 30, 41 Pin assignments, connector, 90 Position setting, 49 Positioning image, 34, 49 projector, 14 to 15 Power button, 29, 37 consumption, 86 light, 28, 73 to 74 saving, 37, 53 supply, 86 PowerBook, connecting to, 16 to 18 Presentation color mode, 36, 49 Presenters Online, 9, 83 PrivateLine Support, 9, 84 Problems color, 80 image, 75 to 80 password, 82 remote control, 82, 93 sound, 81 USB, 83 Projection lamp...

User Manual
Page 102
..., 60 using, 39 to 43 wireless mouse, using as, 43 Replacing air filter, 65 to 66 lamp, 67 to 70 102 Index Request code, password, 61 Reset All menu, 46, 61 Resetting menu options, 61 Resolution, 7, 21, 85 S Safety instructions, 91 to 92 Screen logo, see User's Logo Screen, distance from projector, 14 to 15, 85 Screens, portable, 12 Setting a password, 59 Setting menu, 46, 52 to 53 Sharpness setting, 49 Sleep mode, 37, 53 Sound, see Audio Source button, 29...
..., 60 using, 39 to 43 wireless mouse, using as, 43 Replacing air filter, 65 to 66 lamp, 67 to 70 102 Index Request code, password, 61 Reset All menu, 46, 61 Resetting menu options, 61 Resolution, 7, 21, 85 S Safety instructions, 91 to 92 Screen logo, see User's Logo Screen, distance from projector, 14 to 15, 85 Screens, portable, 12 Setting a password, 59 Setting menu, 46, 52 to 53 Sharpness setting, 49 Sleep mode, 37, 53 Sound, see Audio Source button, 29...


