
Product Brochure
Page 6
...™ screen ELPSC80 ES3000 portable screen (ELPSC26H) V12H002S3Y Packaging Specifications PowerLite 420/425W/430/435W Dimensions: 16.7" x 14.7" x 10.7" (W x D x H) 420/425W: Weight: 13.4 lb 430/435W: Weight 13.6 lb Genuine Epson Lamp Dimensions: 6.3" x 5.6" x 5.6" (W x D x H) Weight: 0.7 lb Master Carton Keystone Correction Manual Power Supply Voltage PowerLite 420, 425W, 430 or 435W projector, Dimensions: 28.4" x 13.1" x 6.8" (W x D x H) Vertical ± 15 degrees...
...™ screen ELPSC80 ES3000 portable screen (ELPSC26H) V12H002S3Y Packaging Specifications PowerLite 420/425W/430/435W Dimensions: 16.7" x 14.7" x 10.7" (W x D x H) 420/425W: Weight: 13.4 lb 430/435W: Weight 13.6 lb Genuine Epson Lamp Dimensions: 6.3" x 5.6" x 5.6" (W x D x H) Weight: 0.7 lb Master Carton Keystone Correction Manual Power Supply Voltage PowerLite 420, 425W, 430 or 435W projector, Dimensions: 28.4" x 13.1" x 6.8" (W x D x H) Vertical ± 15 degrees...

Quick Setup
Page 4
... LCD option if necessary, then click the Arrange or Arrangement tab, and select the Mirror Displays check box. If you don't have icons to the manuals, you can purchase screens or other accessories from appearing on the network standby screen, set the IP Address Display setting to access the on the... 7 am to 4 pm, Pacific Time, Saturday Canada: (905) 709-3839, 6 am to 8 pm, Pacific Time, Monday through Friday, for identification purposes only and may apply. Epson, EasyMP, and PowerLite are subject to hold down the Fn key while pressing it from the projector CD or go to the...
... LCD option if necessary, then click the Arrange or Arrangement tab, and select the Mirror Displays check box. If you don't have icons to the manuals, you can purchase screens or other accessories from appearing on the network standby screen, set the IP Address Display setting to access the on the... 7 am to 4 pm, Pacific Time, Saturday Canada: (905) 709-3839, 6 am to 8 pm, Pacific Time, Monday through Friday, for identification purposes only and may apply. Epson, EasyMP, and PowerLite are subject to hold down the Fn key while pressing it from the projector CD or go to the...

User's Guide
Page 4
... Wired Network Settings 45 Wireless Network Projection ...47 Installing the Wireless LAN Module 48 Using Quick Wireless Connection (Windows Only 50 Selecting Wireless Network Settings Manually 51 Wireless LAN Menu Settings ...53 Selecting Wireless Network Settings in Windows 55 Selecting Wireless Network Settings in Mac OS X 55 Setting Up Wireless Network...
... Wired Network Settings 45 Wireless Network Projection ...47 Installing the Wireless LAN Module 48 Using Quick Wireless Connection (Windows Only 50 Selecting Wireless Network Settings Manually 51 Wireless LAN Menu Settings ...53 Selecting Wireless Network Settings in Windows 55 Selecting Wireless Network Settings in Mac OS X 55 Setting Up Wireless Network...

User's Guide
Page 9
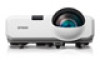
...special features: Bright, high-resolution projection system • PowerLite 420/425W: Up to 2500 lumens of brightness (white light output and color light output) PowerLite 430/435W: Up to learn more about your projector and this manual. Projector Features Notations Used in the Documentation Where to ... • Optional wireless network support, including video and audio transfer • PC Free photo slide shows via connected USB memory devices or Epson document camera (DC-06) • Dual VGA ports for connections by multiple presenters • Port for connecting an external monitor •...
...special features: Bright, high-resolution projection system • PowerLite 420/425W: Up to 2500 lumens of brightness (white light output and color light output) PowerLite 430/435W: Up to learn more about your projector and this manual. Projector Features Notations Used in the Documentation Where to ... • Optional wireless network support, including video and audio transfer • PC Free photo slide shows via connected USB memory devices or Epson document camera (DC-06) • Dual VGA ports for connections by multiple presenters • Port for connecting an external monitor •...
User's Guide
Page 14
...solutions to common problems. • www.epson.com/support (U.S) or www.epson.ca/support (Canada) View FAQs (frequently asked questions) and e-mail your questions to Get Help". For details, see the EasyMP Network Projection Operation Guide installed with this manual and the sources listed above, you ...projector during a presentation? Registering also lets you receive special updates on the remote control or projector to get help after checking this manual from your projector CD. • If you still need help fast. Rear Projector Parts - Parent topic: Introduction to Your Projector...
...solutions to common problems. • www.epson.com/support (U.S) or www.epson.ca/support (Canada) View FAQs (frequently asked questions) and e-mail your questions to Get Help". For details, see the EasyMP Network Projection Operation Guide installed with this manual and the sources listed above, you ...projector during a presentation? Registering also lets you receive special updates on the remote control or projector to get help after checking this manual from your projector CD. • If you still need help fast. Rear Projector Parts - Parent topic: Introduction to Your Projector...

User's Guide
Page 41
Disconnect the USB device or camera from the projector. 1. See the document camera's manual for instructions. 1. Connect the USB cable to the document camera's USB Type B port. Connect the other USB sources, if available. Locate the USB ...the button again to project images viewed by the camera. Parent topic: Connecting to External USB Devices Connecting to a Document Camera You can connect a compatible Epson document camera to your projector's Computer port. Press the USB button on , if necessary. 2. Parent topic: Projector Connections 41 Parent topic: Connecting to ...
Disconnect the USB device or camera from the projector. 1. See the document camera's manual for instructions. 1. Connect the USB cable to the document camera's USB Type B port. Connect the other USB sources, if available. Locate the USB ...the button again to project images viewed by the camera. Parent topic: Connecting to External USB Devices Connecting to a Document Camera You can connect a compatible Epson document camera to your projector's Computer port. Press the USB button on , if necessary. 2. Parent topic: Projector Connections 41 Parent topic: Connecting to ...

User's Guide
Page 47
... wireless projection. 47 If necessary, select IP Settings and press Enter. 9. Note: To highlight the numbers you must install the optional Epson 802.11b/g/n wireless LAN module, and then set addresses manually, turn off DHCP and enter the projector's IP Address, Subnet Mask, and Gateway Address as needed. 7. To select a highlighted number...
... wireless projection. 47 If necessary, select IP Settings and press Enter. 9. Note: To highlight the numbers you must install the optional Epson 802.11b/g/n wireless LAN module, and then set addresses manually, turn off DHCP and enter the projector's IP Address, Subnet Mask, and Gateway Address as needed. 7. To select a highlighted number...

User's Guide
Page 48
... module. You can download the latest software and documentation from the Epson web site. Installing the Wireless LAN Module Using Quick Wireless Connection (Windows Only) Selecting Wireless Network Settings Manually Selecting Wireless Network Settings in Windows Selecting Wireless Network Settings in Mac...are two ways to connect the projector to your wireless network: • Using the optional Epson Quick Wireless Connection USB key (Windows only) • Configuring the connection manually using the projector's Network menus After installing the module and setting up your computer for ...
... module. You can download the latest software and documentation from the Epson web site. Installing the Wireless LAN Module Using Quick Wireless Connection (Windows Only) Selecting Wireless Network Settings Manually Selecting Wireless Network Settings in Windows Selecting Wireless Network Settings in Mac...are two ways to connect the projector to your wireless network: • Using the optional Epson Quick Wireless Connection USB key (Windows only) • Configuring the connection manually using the projector's Network menus After installing the module and setting up your computer for ...

User's Guide
Page 51
... need to restart your computer to reactivate your presentation as necessary. 7. After a few minutes, your computer. Parent topic: Wireless Network Projection Selecting Wireless Network Settings Manually Before you can project from your wireless network, you finish projecting wirelessly, remove the USB key from your computer image is displayed by the projector...
... need to restart your computer to reactivate your presentation as necessary. 7. After a few minutes, your computer. Parent topic: Wireless Network Projection Selecting Wireless Network Settings Manually Before you can project from your wireless network, you finish projecting wirelessly, remove the USB key from your computer image is displayed by the projector...

User's Guide
Page 55
... IP Address Display Options On Off Description Selects whether to display the IP address on the network standby screen Parent topic: Selecting Wireless Network Settings Manually Selecting Wireless Network Settings in Mac OS X. 1.
... IP Address Display Options On Off Description Selects whether to display the IP address on the network standby screen Parent topic: Selecting Wireless Network Settings Manually Selecting Wireless Network Settings in Mac OS X. 1.

User's Guide
Page 109
... Corner Varying levels available Full Lock Partial Lock Off Three shapes available 109 Description Adjusts image shape to rectangular (horizontally and vertically) H/V Keystone: lets you manually correct horizontal and vertical sides, or turn automatic correction on or off Quick Corner: select to correct image shape and alignment using an on-screen...
... Corner Varying levels available Full Lock Partial Lock Off Three shapes available 109 Description Adjusts image shape to rectangular (horizontally and vertically) H/V Keystone: lets you manually correct horizontal and vertical sides, or turn automatic correction on or off Quick Corner: select to correct image shape and alignment using an on-screen...
User's Guide
Page 120
... air filter, and remote control batteries. Warning: Before cleaning any other servicing to service this product yourself, except as specifically explained in this manual. Never open any cover on the surface. • To remove dust or smudges, gently wipe the lens with lens-cleaning paper. 120 ... clean the air filter and air vents to prevent the projector from place to place. Refer all other part needs replacing, contact Epson or an authorized Epson servicer. Warning: Do not try to qualified servicers. If any part of the projector, turn it from overheating due to blocked...
... air filter, and remote control batteries. Warning: Before cleaning any other servicing to service this product yourself, except as specifically explained in this manual. Never open any cover on the surface. • To remove dust or smudges, gently wipe the lens with lens-cleaning paper. 120 ... clean the air filter and air vents to prevent the projector from place to place. Refer all other part needs replacing, contact Epson or an authorized Epson servicer. Warning: Do not try to qualified servicers. If any part of the projector, turn it from overheating due to blocked...

User's Guide
Page 121
... you to clean the projector case. Warning: Do not use wax, alcohol, benzene, paint thinner, or other chemicals to clean them as described in this manual. The high heat generated by the projector lamp may leave a residue. Avoid touching the lens with lens cleaner and gently wipe the lens. Parent topic...
... you to clean the projector case. Warning: Do not use wax, alcohol, benzene, paint thinner, or other chemicals to clean them as described in this manual. The high heat generated by the projector lamp may leave a residue. Avoid touching the lens with lens cleaner and gently wipe the lens. Parent topic...

User's Guide
Page 131
Do not install batteries of batteries specified in this manual. Warning: If the battery fluid has leaked, wipe it gets on your hands, wash them immediately to avoid injury. 131 If it away with a soft cloth and avoid getting the fluid on your hands. Replace the batteries as soon as shown. 2. Caution: Use only the type of different types, or mix new and old batteries. 1. Open the battery cover as they run out. Related tasks Replacing the Lamp Replacing the Remote Control Batteries The remote control uses two AA manganese or alkaline batteries. Remove the old batteries.
Do not install batteries of batteries specified in this manual. Warning: If the battery fluid has leaked, wipe it gets on your hands, wash them immediately to avoid injury. 131 If it away with a soft cloth and avoid getting the fluid on your hands. Replace the batteries as soon as shown. 2. Caution: Use only the type of different types, or mix new and old batteries. 1. Open the battery cover as they run out. Related tasks Replacing the Lamp Replacing the Remote Control Batteries The remote control uses two AA manganese or alkaline batteries. Remove the old batteries.

User's Guide
Page 134
If this manual can help , you can contact Epson for a solution in the table below. 134 Parent topic: Solving Problems Projector Light Status The lights on . Projection Problem Tips Projector Light Status Using the ...
If this manual can help , you can contact Epson for a solution in the table below. 134 Parent topic: Solving Problems Projector Light Status The lights on . Projection Problem Tips Projector Light Status Using the ...
User's Guide
Page 139
... following solutions: • Press the USB button on the remote control. • With Mac OS X, select the USB Display icon in the Epson USB Display Settings program on your computer. Displaying From a PC Laptop Displaying From a Mac Laptop Parent topic: Solving Image or Sound Problems Displaying From...same image is not displayed by the laptop and projector, check the Windows Display utility to make sure it is enabled. (See your laptop manual for details.) Wait a few seconds for instructions.) 139 Parent topic: Solving Image or Sound Problems Solutions When "No Signal" Message Appears If...
... following solutions: • Press the USB button on the remote control. • With Mac OS X, select the USB Display icon in the Epson USB Display Settings program on your computer. Displaying From a PC Laptop Displaying From a Mac Laptop Parent topic: Solving Image or Sound Problems Displaying From...same image is not displayed by the laptop and projector, check the Windows Display utility to make sure it is enabled. (See your laptop manual for details.) Wait a few seconds for instructions.) 139 Parent topic: Solving Image or Sound Problems Solutions When "No Signal" Message Appears If...
User's Guide
Page 140
... the image position using the E-Zoom buttons, press the Esc button twice to return to a full display. • Check your laptop manual for mirrored display. (See your computer display settings to Clone. If necessary, select a different display resolution for your computer. (See your computer...control to select a different image aspect ratio. • If you need to set the resolution within the projector's limits. (See your computer manual for details.) 140 4. If necessary, check your video card settings and set the multiple display option to disable dual display and set up ...
... the image position using the E-Zoom buttons, press the Esc button twice to return to a full display. • Check your laptop manual for mirrored display. (See your computer display settings to Clone. If necessary, select a different display resolution for your computer. (See your computer...control to select a different image aspect ratio. • If you need to set the resolution within the projector's limits. (See your computer manual for details.) 140 4. If necessary, check your video card settings and set the multiple display option to disable dual display and set up ...

User's Guide
Page 142
... shorter cables. 142 Note: To avoid condensation on the lens after bringing the projector in from a computer, press the Auto button on the screen and manually adjust the Tracking and Sync settings. Related references Input Signal Settings -
... shorter cables. 142 Note: To avoid condensation on the lens after bringing the projector in from a computer, press the Auto button on the screen and manually adjust the Tracking and Sync settings. Related references Input Signal Settings -

User's Guide
Page 149
...output 2500 lumens (ISO 21118 standard) Color light output 2500 lumens ECO Power Consumption mode: White light output 2000 lumens (ISO 21118 standard) PowerLite 430/435W: Normal Power Consumption mode: White light output 3000 lumens (ISO 21118 standard) Color light output 3000 lumens ECO Power Consumption mode: White ...light output 2100 lumens (ISO 21118 standard) 3000:1 with Auto Iris on and Normal Power Consumption mode PowerLite 420/430: 50 to 108 inches (1.27 to 2.74 m) PowerLite 425W/435W: 53 to 116 inches (1.35 to 2.95 m) 21 to 48 inches (0.54 to 1.22 m) Front, ...
...output 2500 lumens (ISO 21118 standard) Color light output 2500 lumens ECO Power Consumption mode: White light output 2000 lumens (ISO 21118 standard) PowerLite 430/435W: Normal Power Consumption mode: White light output 3000 lumens (ISO 21118 standard) Color light output 3000 lumens ECO Power Consumption mode: White ...light output 2100 lumens (ISO 21118 standard) 3000:1 with Auto Iris on and Normal Power Consumption mode PowerLite 420/430: 50 to 108 inches (1.27 to 2.74 m) PowerLite 425W/435W: 53 to 116 inches (1.35 to 2.95 m) 21 to 48 inches (0.54 to 1.22 m) Front, ...

User's Guide
Page 154
However, your projector includes Epson's SizeWise chip that supports other computer display resolutions, so your image will be set to fit automatically. Display format Refresh rate (in Hz) Computer signals (... × 480 154 Your computer's monitor or video card refresh rate (vertical frequency) must be compatible with the projector. (See your computer or video card manual for details.) The table below lists the compatible refresh rate and resolution for each compatible video display format.
However, your projector includes Epson's SizeWise chip that supports other computer display resolutions, so your image will be set to fit automatically. Display format Refresh rate (in Hz) Computer signals (... × 480 154 Your computer's monitor or video card refresh rate (vertical frequency) must be compatible with the projector. (See your computer or video card manual for details.) The table below lists the compatible refresh rate and resolution for each compatible video display format.

