Operation Guide - EasyMP Monitor v4.50
Page 2
... should be found. Example: Select "Timer" - q Indicates additional information and points which may be useful to know regarding a topic can be carried out in this manual, along with descriptions of operations. s Procedure [ (Name) ] "(Name)" Timer (Boldface) Indicates a page where detailed information regarding a topic. Indicates the name of the numbered steps. "Timer...
... should be found. Example: Select "Timer" - q Indicates additional information and points which may be useful to know regarding a topic can be carried out in this manual, along with descriptions of operations. s Procedure [ (Name) ] "(Name)" Timer (Boldface) Indicates a page where detailed information regarding a topic. Indicates the name of the numbered steps. "Timer...
Operation Guide - EasyMP Monitor v4.50
Page 3
...an automatic search and registration . 13 Procedures for automatic search 13 Procedures for registration 15 Registration by specifying an IP address (Manual registration 16 Registering several projectors to a monitoring group all at once 17 If the projector name or IP address changes after ...registration 19 For projectors that have been registered manually 19 For projectors that have been registered using automatic search 19 Cancelling projector registrations (Delete 19 Monitoring window layout 20 Types of...
...an automatic search and registration . 13 Procedures for automatic search 13 Procedures for registration 15 Registration by specifying an IP address (Manual registration 16 Registering several projectors to a monitoring group all at once 17 If the projector name or IP address changes after ...registration 19 For projectors that have been registered manually 19 For projectors that have been registered using automatic search 19 Cancelling projector registrations (Delete 19 Monitoring window layout 20 Types of...

Operation Guide - EasyMP Monitor v4.50
Page 6
... computer. You can select groups of projectors or a single projector that you carry out operations such as checking the status of multiple EPSON projectors that are connected to a network and controlling the projectors from the projectors that are interested in, and then check the cumulative ... with a projector that has been registered. • Sending messages to registered projectors You can send JPEG files to download the software and manual, visit www.epson.com, select your location, and select your product. Tasks that can be done using EasyMP Monitor 6 Tasks that can be done using ...
... computer. You can select groups of projectors or a single projector that you carry out operations such as checking the status of multiple EPSON projectors that are connected to a network and controlling the projectors from the projectors that are interested in, and then check the cumulative ... with a projector that has been registered. • Sending messages to registered projectors You can send JPEG files to download the software and manual, visit www.epson.com, select your location, and select your product. Tasks that can be done using EasyMP Monitor 6 Tasks that can be done using ...
Operation Guide - EasyMP Monitor v4.50
Page 8
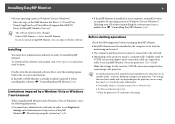
...monitoring and control. • The computer and the projectors must have administrator authority in "C:\Users\(User Name)\AppData\Local\VirtualStore\Program Files\EPSON Projector\EasyMP Monitor Ver.x.xx". Installing EasyMP Monitor 8 • If your operating system is Windows Vista or Windows 7 Place the... adapter before you are in order to the network. • Depending on -screen instructions. To download the software and manual, visit www.epson.com and select your OS without uninstalling the software may cause a malfunction. If EasyMP or EMP Monitor is already installed,...
...monitoring and control. • The computer and the projectors must have administrator authority in "C:\Users\(User Name)\AppData\Local\VirtualStore\Program Files\EPSON Projector\EasyMP Monitor Ver.x.xx". Installing EasyMP Monitor 8 • If your operating system is Windows Vista or Windows 7 Place the... adapter before you are in order to the network. • Depending on -screen instructions. To download the software and manual, visit www.epson.com and select your OS without uninstalling the software may cause a malfunction. If EasyMP or EMP Monitor is already installed,...
Operation Guide - EasyMP Monitor v4.50
Page 11
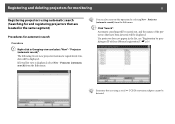
... monitoring 11 Registering projectors using a serial W TCP/IP conversion adapter cannot be displayed. q You can also carry out this operation by specifying an IP address (Manual registration)". The following Create new projector (automatic registration) window will be detected. Projector (automatic search) from the Edit menu. Registering and deleting projectors for automatic...
... monitoring 11 Registering projectors using a serial W TCP/IP conversion adapter cannot be displayed. q You can also carry out this operation by specifying an IP address (Manual registration)". The following Create new projector (automatic registration) window will be detected. Projector (automatic search) from the Edit menu. Registering and deleting projectors for automatic...

Operation Guide - EasyMP Monitor v4.50
Page 16
"Projector (manual registration)". Projector (manual registration) from the Edit menu. in the top-right The icon(s) of the window or click "Cancel". To continue registering other projector(s), repeat Steps 1 and 2. ... the registration operation, click corner of the projector(s) you registered will be displayed in Grouping view and select "New" - Registration by specifying an IP address (Manual registration) Procedure A Right-click in Grouping view or Detail list view. If Detail list view is displayed, click "OK". Refer to s "Monitoring window layout" p.20...
"Projector (manual registration)". Projector (manual registration) from the Edit menu. in the top-right The icon(s) of the window or click "Cancel". To continue registering other projector(s), repeat Steps 1 and 2. ... the registration operation, click corner of the projector(s) you registered will be displayed in Grouping view and select "New" - Registration by specifying an IP address (Manual registration) Procedure A Right-click in Grouping view or Detail list view. If Detail list view is displayed, click "OK". Refer to s "Monitoring window layout" p.20...
Operation Guide - EasyMP Monitor v4.50
Page 17
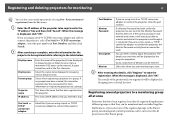
... the "IP address" box and then click "Search". Description You can be entered. Up to be displayed in Port Number, and then click Search. Projector (manual registration) from the Edit menu. Enter the name of the registered groups as the first character. Select the icon(s) to be possible to be registered...
... the "IP address" box and then click "Search". Description You can be entered. Up to be displayed in Port Number, and then click Search. Projector (manual registration) from the Edit menu. Enter the name of the registered groups as the first character. Select the icon(s) to be possible to be registered...
Operation Guide - EasyMP Monitor v4.50
Page 19
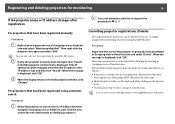
... the projector name or IP address changes after registration B Carry out automatic search to re-register the projector(s).s p.11 For projectors that have been registered manually Procedure A Right-click on a projector icon in the "IP address" box and then click "Search". If the IP address has been changed in the Edit...
... the projector name or IP address changes after registration B Carry out automatic search to re-register the projector(s).s p.11 For projectors that have been registered manually Procedure A Right-click on a projector icon in the "IP address" box and then click "Search". If the IP address has been changed in the Edit...

User's Guide - Message Broadcasting
Page 1
... you install the Message Broadcasting plug-in, make sure the Standby Mode setting in JPEG format. check www.epson.com/support if necessary. You can send messages manually, or use the plug-in to send messages or announcements to have messages sent automatically. Getting Started Before ... in EasyMP Monitor. Administrators can use the Timer function in EasyMP Monitor to one or more projectors or all the projectors on the Epson website for downloading and installing. Follow the instructions on the network. Message Broadcasting Message Broadcasting is a plug-in for an image is...
... you install the Message Broadcasting plug-in, make sure the Standby Mode setting in JPEG format. check www.epson.com/support if necessary. You can send messages manually, or use the plug-in to send messages or announcements to have messages sent automatically. Getting Started Before ... in EasyMP Monitor. Administrators can use the Timer function in EasyMP Monitor to one or more projectors or all the projectors on the Epson website for downloading and installing. Follow the instructions on the network. Message Broadcasting Message Broadcasting is a plug-in for an image is...
User's Guide - Message Broadcasting
Page 2
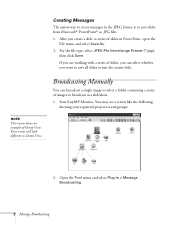
If you are working with a series of Group View. Broadcasting Manually You can select whether you want to save slides from Microsoft® PowerPoint® as a slideshow. 1. Open the Tool menu and select Plug-in Detail ...
If you are working with a series of Group View. Broadcasting Manually You can select whether you want to save slides from Microsoft® PowerPoint® as a slideshow. 1. Open the Tool menu and select Plug-in Detail ...
Quick Reference
Page 2
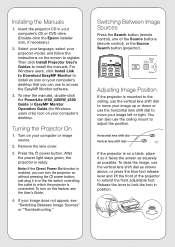
...the projector is on your computer's CD or DVD drive. (Double-click the Epson installer icon, if necessary.) 2. To raise the image, use the vertical lens shift dial as possible. To view the manuals, double-click the PowerLite 4100_4200W_4300 Guide or EasyMP Monitor Operation Guide (for Windows users only) icon on ... is connected. Release the lever to which the projector is mounted to the ceiling, use the horizontal lens shift dial to install the manuals. just plug it faces the screen as squarely as shown above, or press the blue foot release lever and lift the front of ...
...the projector is on your computer's CD or DVD drive. (Double-click the Epson installer icon, if necessary.) 2. To raise the image, use the vertical lens shift dial as possible. To view the manuals, double-click the PowerLite 4100_4200W_4300 Guide or EasyMP Monitor Operation Guide (for Windows users only) icon on ... is connected. Release the lever to which the projector is mounted to the ceiling, use the horizontal lens shift dial to install the manuals. just plug it faces the screen as squarely as shown above, or press the blue foot release lever and lift the front of ...

User's Guide
Page 7
Welcome The PowerLite® 4100/4200W/4300 is an easy-to lock the projector buttons, a security cable attachment (cable not included), a slot..., wide-screen view 7 You can connect it to 4500 lumens (PowerLite 4100/4200W) or 5200 lumens (PowerLite 4300) of computers and video sources. - Your projector offers these easy setup, control, and security features: ■ Manual horizontal and vertical lens shift ■ Centered lens design ■ ... ability to -use, lightweight projector. It offers up to a wide range of brightness, and provides a native XGA (PowerLite 4100 and 4300) or WXGA...
Welcome The PowerLite® 4100/4200W/4300 is an easy-to lock the projector buttons, a security cable attachment (cable not included), a slot..., wide-screen view 7 You can connect it to 4500 lumens (PowerLite 4100/4200W) or 5200 lumens (PowerLite 4300) of computers and video sources. - Your projector offers these easy setup, control, and security features: ■ Manual horizontal and vertical lens shift ■ Centered lens design ■ ... ability to -use, lightweight projector. It offers up to a wide range of brightness, and provides a native XGA (PowerLite 4100 and 4300) or WXGA...
User's Guide
Page 8
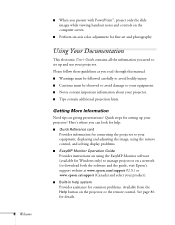
... (available for Windows only) to manage projectors on a network (to download both the software and the guide, visit Epson's support website at www.epson.com/support (U.S.) or www.epson.ca/support (Canada) and select your product). ■ Built-in help system Provides assistance for setting up and use...controls on the computer screen ■ Perform six-axis color adjustment for details. Please follow these guidelines as you read through this manual: ■ Warnings must be followed carefully to avoid bodily injury. ■ Cautions must be observed to avoid damage to set up your ...
... (available for Windows only) to manage projectors on a network (to download both the software and the guide, visit Epson's support website at www.epson.com/support (U.S.) or www.epson.ca/support (Canada) and select your product). ■ Built-in help system Provides assistance for setting up and use...controls on the computer screen ■ Perform six-axis color adjustment for details. Please follow these guidelines as you read through this manual: ■ Warnings must be followed carefully to avoid bodily injury. ■ Cautions must be observed to avoid damage to set up your ...

User's Guide
Page 12
... to send the projector to ship the projector. Power cord VGA computer cable Interface label stickers Save all these parts: Projector and lens cap PDF manuals and registration CD-ROM Lens theft deterrent screw Remote control and 2 AA batteries Password Protected sticker note If you are moving the projector by hand...
... to send the projector to ship the projector. Power cord VGA computer cable Interface label stickers Save all these parts: Projector and lens cap PDF manuals and registration CD-ROM Lens theft deterrent screw Remote control and 2 AA batteries Password Protected sticker note If you are moving the projector by hand...
User's Guide
Page 23
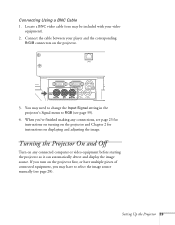
... the cable between your video equipment). 2. You may need to change the Input Signal setting in the projector's Signal menu to select the image source manually (see page 59). 4. Setting Up the Projector 23 Locate a BNC video cable (one may have to RGB (see page 28). When you've finished making...
... the cable between your video equipment). 2. You may need to change the Input Signal setting in the projector's Signal menu to select the image source manually (see page 59). 4. Setting Up the Projector 23 Locate a BNC video cable (one may have to RGB (see page 28). When you've finished making...
User's Guide
Page 31
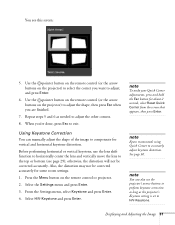
Repeat steps 5 and 6 as the projector's Keystone setting is set to H/V-Keystone. otherwise, the distortion will not be corrected accurately for some zoom settings. 1. note Epson recommends using Quick Corner to compensate for about 2 seconds, select Reset Quick Corner from the screen that appears, then press Enter. When you are finished. 7. ... 're done, press Esc to adjust, and press Enter. 6. You see page 29); From the Settings menu, select Keystone and press Enter. 4. note You can manually adjust the shape of the image to accurately adjust keystone distortion.
Repeat steps 5 and 6 as the projector's Keystone setting is set to H/V-Keystone. otherwise, the distortion will not be corrected accurately for some zoom settings. 1. note Epson recommends using Quick Corner to compensate for about 2 seconds, select Reset Quick Corner from the screen that appears, then press Enter. When you are finished. 7. ... 're done, press Esc to adjust, and press Enter. 6. You see page 29); From the Settings menu, select Keystone and press Enter. 4. note You can manually adjust the shape of the image to accurately adjust keystone distortion.
User's Guide
Page 33
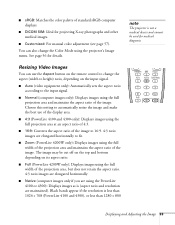
See page 56 for projecting X-ray photographs and other medical images. ■ Customized: For manual color adjustment (see page 57). Choose this setting to automatically resize the image and make the best use the Aspect button on the remote ...the projection area, but does not retain the aspect ratio. 4:3 ratio images are elongated horizontally. ■ Native (computer images only if you are using the PowerLite 4100 or 4300): Displays images as is (aspect ratio and resolution are elongated horizontally to the input signal. ■ Normal (computer images only): Displays images using...
See page 56 for projecting X-ray photographs and other medical images. ■ Customized: For manual color adjustment (see page 57). Choose this setting to automatically resize the image and make the best use the Aspect button on the remote ...the projection area, but does not retain the aspect ratio. 4:3 ratio images are elongated horizontally. ■ Native (computer images only if you are using the PowerLite 4100 or 4300): Displays images as is (aspect ratio and resolution are elongated horizontally to the input signal. ■ Normal (computer images only): Displays images using...
User's Guide
Page 58
Use the pointer button to one of the color. 5. Repeat steps 4 and 5 for each color axis you can use the Signal menu to make manual adjustments. Hue changes the balance of color, and saturation changes the strength of those below. (The settings will be different depending on the screen. In ...
Use the pointer button to one of the color. 5. Repeat steps 4 and 5 for each color axis you can use the Signal menu to make manual adjustments. Hue changes the balance of color, and saturation changes the strength of those below. (The settings will be different depending on the screen. In ...
User's Guide
Page 59
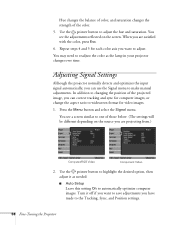
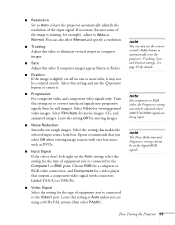
... The Noise Reduction and Progressive settings cannot be set for details. Select Video for moving images. ■ Noise Reduction Smooths out rough images. Epson recommends that outputs a component video signal (with very low noise, such as DVDs. ■ Input Signal If the colors don't look best... RGB for a computer or RGB-video connection, and Component for a video player that you are being input. note You can also select Manual and specify a resolution. ■ Tracking Adjust this value to have the projector automatically identify the resolution of the image is slightly cut off...
... The Noise Reduction and Progressive settings cannot be set for details. Select Video for moving images. ■ Noise Reduction Smooths out rough images. Epson recommends that outputs a component video signal (with very low noise, such as DVDs. ■ Input Signal If the colors don't look best... RGB for a computer or RGB-video connection, and Component for a video player that you are being input. note You can also select Manual and specify a resolution. ■ Tracking Adjust this value to have the projector automatically identify the resolution of the image is slightly cut off...

User's Guide
Page 91
...'s settings. The message Not Supported is displayed. ■ Make sure the correct input signal is selected in menu bar. Solving Problems 91 See your notebook's manual or online help for details. Other Mac OS X users: Make sure the VGA Display or Color LCD dialog box is selected, click the Arrangement or...
...'s settings. The message Not Supported is displayed. ■ Make sure the correct input signal is selected in menu bar. Solving Problems 91 See your notebook's manual or online help for details. Other Mac OS X users: Make sure the VGA Display or Color LCD dialog box is selected, click the Arrangement or...

