User's Guide
Page 6
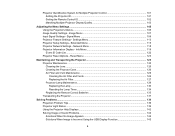
Settings Menu 113 Projector Setup Settings - Network Menu 118 Projector Information Display - Extended Menu 115 Projector Network Settings - Image Menu 107 Input Signal Settings - Info Menu 119 Event ID Code List...122 Projector Reset Options - Reset Menu 123 Maintaining and Transporting the Projector 125 Projector Maintenance ...125 ...
Settings Menu 113 Projector Setup Settings - Network Menu 118 Projector Information Display - Extended Menu 115 Projector Network Settings - Image Menu 107 Input Signal Settings - Info Menu 119 Event ID Code List...122 Projector Reset Options - Reset Menu 123 Maintaining and Transporting the Projector 125 Projector Maintenance ...125 ...
User's Guide
Page 32
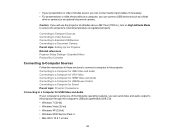
... for Sound Parent topic: Projector Connections Connecting to a Computer for USB Video and Audio If your presentation or video includes sound, you can connect audio input cables, if necessary. • For presentations or slide shows without a computer, you can send video and audio output to the projector through the computer's USB...
... for Sound Parent topic: Projector Connections Connecting to a Computer for USB Video and Audio If your presentation or video includes sound, you can connect audio input cables, if necessary. • For presentations or slide shows without a computer, you can send video and audio output to the projector through the computer's USB...

User's Guide
Page 37
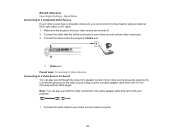
... to Video Sources Connecting to a Component-to-VGA Video Source If your video source has component video ports, you are using a component-to change the Input Signal setting in the projector's Signal menu. Connect the component connectors to your component video cable. 3. If you can connect it to the projector using...
... to Video Sources Connecting to a Component-to-VGA Video Source If your video source has component video ports, you are using a component-to change the Input Signal setting in the projector's Signal menu. Connect the component connectors to your component video cable. 3. If you can connect it to the projector using...
User's Guide
Page 38
...-out ports. 38 Connect the projector to the projector using a stereo mini-jack adapter cable (with your video source has audio output ports. Related references Input Signal Settings - Signal Menu Connecting to a Video Source for Sound You can connect it to the video source using an optional RCA-style video or...
...-out ports. 38 Connect the projector to the projector using a stereo mini-jack adapter cable (with your video source has audio output ports. Related references Input Signal Settings - Signal Menu Connecting to a Video Source for Sound You can connect it to the video source using an optional RCA-style video or...
User's Guide
Page 55
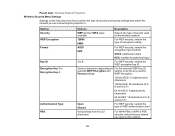
... the wireless network 128Bit 64Bit For WEP security, selects the type of encryption coding ASCII HEX For WEP security, selects the encryption input method: ASCII: enables text input HEX: enables hexadecimal input 1 to 4 For WEP security, selects the WEP encryption key ID Various characters depending on For the selected WEP Key ID selected...
... the wireless network 128Bit 64Bit For WEP security, selects the type of encryption coding ASCII HEX For WEP security, selects the encryption input method: ASCII: enables text input HEX: enables hexadecimal input 1 to 4 For WEP security, selects the WEP encryption key ID Various characters depending on For the selected WEP Key ID selected...
User's Guide
Page 81
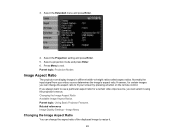
3. Select a projection mode and press Enter. 6. Normally the input signal from your screen by pressing a button on the remote control. Select the Projection setting and press Enter. 5. If you always want to use a particular .... Parent topic: Projection Modes Image Aspect Ratio The projector can change the aspect ratio to resize it using the projector's menus. However, for a certain video input source, you can select it . 81 Select the Extended menu and press Enter. 4. Changing the Image Aspect Ratio Available Image Aspect Ratios Parent topic: Using...
3. Select a projection mode and press Enter. 6. Normally the input signal from your screen by pressing a button on the remote control. Select the Projection setting and press Enter. 5. If you always want to use a particular .... Parent topic: Projection Modes Image Aspect Ratio The projector can change the aspect ratio to resize it using the projector's menus. However, for a certain video input source, you can select it . 81 Select the Extended menu and press Enter. 4. Changing the Image Aspect Ratio Available Image Aspect Ratios Parent topic: Using...
User's Guide
Page 82
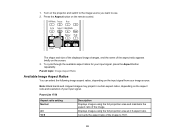
...depending on the remote control. Press the Aspect button on the input signal from your image source. Displays images using the full projection area and maintains the aspect ratio of your... input signal, press the Aspect button repeatedly. Note: Black bands and cropped images may project... displayed image changes, and the name of the image to use. 2. 1. PowerLite 1750 Aspect ratio setting Normal 4:3 16:9 Description Displays images using the full projection area at 4:3 aspect ratio.
...depending on the remote control. Press the Aspect button on the input signal from your image source. Displays images using the full projection area and maintains the aspect ratio of your... input signal, press the Aspect button repeatedly. Note: Black bands and cropped images may project... displayed image changes, and the name of the image to use. 2. 1. PowerLite 1750 Aspect ratio setting Normal 4:3 16:9 Description Displays images using the full projection area at 4:3 aspect ratio.
User's Guide
Page 83
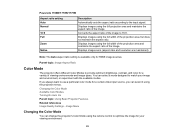
... Menu Changing the Color Mode You can change the projector's Color Mode using the remote control to optimize the image for a certain video input source, you always want to use a particular color mode for your image and environment, or experiment with the available modes. Displays images ...image. You can select it using the full width of the image to the input signal. If you can select a mode designed to provide optimum brightness, contrast, and color for HDMI image sources. PowerLite 1760W/1770W/1775W Aspect ratio setting Auto Normal 16:9 Full Zoom Native Description ...
... Menu Changing the Color Mode You can change the projector's Color Mode using the remote control to optimize the image for a certain video input source, you always want to use a particular color mode for your image and environment, or experiment with the available modes. Displays images ...image. You can select it using the full width of the image to the input signal. If you can select a mode designed to provide optimum brightness, contrast, and color for HDMI image sources. PowerLite 1760W/1770W/1775W Aspect ratio setting Auto Normal 16:9 Full Zoom Native Description ...

User's Guide
Page 84
...colors accordingly) 84 Parent topic: Color Mode Available Color Modes You can set the projector to use these Color Modes, depending on the input source you are using: Color Mode Presentation Dynamic Theatre Sports sRGB Blackboard Description Best for color presentations in a bright room Best for projecting ...Best for movies projected in a dark room Best for television images in a bright room Best for standard sRGB computer displays Best for your input signal, press the Color Mode button repeatedly. 1. The image quality changes and the name of the Color Mode appears briefly on the ...
...colors accordingly) 84 Parent topic: Color Mode Available Color Modes You can set the projector to use these Color Modes, depending on the input source you are using: Color Mode Presentation Dynamic Theatre Sports sRGB Blackboard Description Best for color presentations in a bright room Best for projecting ...Best for movies projected in a dark room Best for television images in a bright room Best for standard sRGB computer displays Best for your input signal, press the Color Mode button repeatedly. 1. The image quality changes and the name of the Color Mode appears briefly on the ...
User's Guide
Page 86
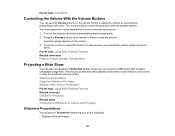
... adjust the volume as necessary to lower or raise the volume. You must adjust the volume separately for an input source, you can set the volume to a specific level for each connected input source. 1. Parent topic: Using Basic Projector Features Related references Projector Feature Settings - Slideshow Presentations Supported Slideshow File Types Starting...
... adjust the volume as necessary to lower or raise the volume. You must adjust the volume separately for an input source, you can set the volume to a specific level for each connected input source. 1. Parent topic: Using Basic Projector Features Related references Projector Feature Settings - Slideshow Presentations Supported Slideshow File Types Starting...

User's Guide
Page 88
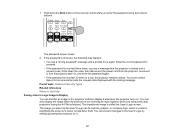
... commands to start your device, press the arrow buttons to highlight the folder and press the Enter button. 3. Note: You can switch to the USB input source and start your slide show or presentation: • To display an individual image, press the arrow buttons to highlight the image and press Enter...
... commands to start your device, press the arrow buttons to highlight the folder and press the Enter button. 3. Note: You can switch to the USB input source and start your slide show or presentation: • To display an individual image, press the arrow buttons to highlight the image and press Enter...
User's Guide
Page 97
...the projector is useful in a row, the projector remains locked. You can be a photo, graphic, or company logo, which is not receiving an input signal or when you see a "wrong password" message and a prompt to help deter theft. Hold down the code, then disconnect the power cord ...password is incorrect, the following may happen: • You see a message that the projector is called the User's Logo screen. You must contact Epson for it whenever the projector turns on , and enter the password again. • If the password is incorrect three times, you temporarily stop projection...
...the projector is useful in a row, the projector remains locked. You can be a photo, graphic, or company logo, which is not receiving an input signal or when you see a "wrong password" message and a prompt to help deter theft. Hold down the code, then disconnect the power cord ...password is incorrect, the following may happen: • You see a message that the projector is called the User's Logo screen. You must contact Epson for it whenever the projector turns on , and enter the password again. • If the password is incorrect three times, you temporarily stop projection...

User's Guide
Page 99
... whenever you want to exit the message screen. 10. do not use the projector, its remote control, or any connected equipment until it is no input signal, select Display Background and set it to Logo. • To display it whenever you turn the projector on, select Startup Screen and set it...
... whenever you want to exit the message screen. 10. do not use the projector, its remote control, or any connected equipment until it is no input signal, select Display Background and set it to Logo. • To display it whenever you turn the projector on, select Startup Screen and set it...

User's Guide
Page 105
... Setup Settings - Extended Menu Projector Network Settings - Info Menu Projector Reset Options - Note: The Network menu does not appear on the screen. 105 Image Menu Input Signal Settings - The projector displays the menus on non-network projector models. Adjusting the Menu Settings Follow the instructions in these sections to adjust the...
... Setup Settings - Extended Menu Projector Network Settings - Info Menu Projector Reset Options - Note: The Network menu does not appear on the screen. 105 Image Menu Input Signal Settings - The projector displays the menus on non-network projector models. Adjusting the Menu Settings Follow the instructions in these sections to adjust the...

User's Guide
Page 107
... 107 To return all the menu settings to exit the menu system. The settings for the input source you are displayed on the left. Press Esc or Menu to their default values, select Reset. 7. Press the up or down arrow buttons to ... Quality Settings - The available settings depend on the bottom of your image for each menu are currently using the buttons listed on the currently selected input source. 2. Press the up or down arrow button to move through the menus listed on the right. Change the settings using . Note: The available settings...
... 107 To return all the menu settings to exit the menu system. The settings for the input source you are displayed on the left. Press Esc or Menu to their default values, select Reset. 7. Press the up or down arrow buttons to ... Quality Settings - The available settings depend on the bottom of your image for each menu are currently using the buttons listed on the currently selected input source. 2. Press the up or down arrow button to move through the menus listed on the right. Change the settings using . Note: The available settings...
User's Guide
Page 108
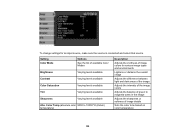
... the intensity of the image colors Adjusts the balance of green to 10000 ºK (Kelvin) temperature) Description Adjusts the vividness of image colors for an input source, make sure the source is connected and select that source.
... the intensity of the image colors Adjusts the balance of green to 10000 ºK (Kelvin) temperature) Description Adjusts the vividness of image colors for an input source, make sure the source is connected and select that source.

User's Guide
Page 109
...red, green, and blue hues in the image; Signal Menu Normally the projector detects and optimizes the input signal settings automatically. Parent topic: Adjusting the Menu Settings Related references Available Color Modes Input Signal Settings - Setting Color Adjustment Auto Iris Options Slider bars for Customized Color Mode, also adjusts cyan,... Note: The Brightness setting does not affect lamp brightness. To change the lamp brightness mode, use the Signal menu. Computer/RGB video input source 109 If you need to customize the settings, you can use the Power Consumption setting.
...red, green, and blue hues in the image; Signal Menu Normally the projector detects and optimizes the input signal settings automatically. Parent topic: Adjusting the Menu Settings Related references Available Color Modes Input Signal Settings - Setting Color Adjustment Auto Iris Options Slider bars for Customized Color Mode, also adjusts cyan,... Note: The Brightness setting does not affect lamp brightness. To change the lamp brightness mode, use the Signal menu. Computer/RGB video input source 109 If you need to customize the settings, you can use the Power Consumption setting.

User's Guide
Page 111
... (1 and 2) Various resolutions Varying levels available Varying levels available Description Automatically optimizes computer image quality (when On) Sets the input signal resolution if not detected automatically using the Auto option. Adjusts signal to eliminate vertical stripes in computer images Adjusts signal to... eliminate fuzziness or flickering in computer images 111 To change settings for an input source, make sure the source is connected and select that source. Note: You can restore the default settings of the Position...
... (1 and 2) Various resolutions Varying levels available Varying levels available Description Automatically optimizes computer image quality (when On) Sets the input signal resolution if not detected automatically using the Auto option. Adjusts signal to eliminate vertical stripes in computer images Adjusts signal to... eliminate fuzziness or flickering in computer images 111 To change settings for an input source, make sure the source is connected and select that source. Note: You can restore the default settings of the Position...

User's Guide
Page 112
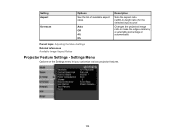
Setting Position Progressive Noise Reduction HDMI Video Range (PowerLite 1760W/1770W/1775W) Input Signal Video Signal Options Up, down, left, right Off Video Film/Auto Off NR1 NR2 Normal Expanded Auto Auto RGB Component Auto Various video standards ..., and animation Reduces flickering in analog images in two levels Sets the video range to match the setting of the device connected to the HDMI input port Specifies the signal type from input sources connected to computer ports Auto: detects signals automatically RGB: corrects color for computer/RGB video...
Setting Position Progressive Noise Reduction HDMI Video Range (PowerLite 1760W/1770W/1775W) Input Signal Video Signal Options Up, down, left, right Off Video Film/Auto Off NR1 NR2 Normal Expanded Auto Auto RGB Component Auto Various video standards ..., and animation Reduces flickering in analog images in two levels Sets the video range to match the setting of the device connected to the HDMI input port Specifies the signal type from input sources connected to computer ports Auto: detects signals automatically RGB: corrects color for computer/RGB video...
User's Guide
Page 113
Settings Menu Options on the Settings menu let you customize various projector features. 113 Setting Aspect Overscan Options See the list of available aspect ratios Auto Off 4% 8% Description Sets the aspect ratio (width-to-height ratio) for the selected input source Changes the projected image ratio to make the edges visible by a selectable percentage or automatically Parent topic: Adjusting the Menu Settings Related references Available Image Aspect Ratios Projector Feature Settings -
Settings Menu Options on the Settings menu let you customize various projector features. 113 Setting Aspect Overscan Options See the list of available aspect ratios Auto Off 4% 8% Description Sets the aspect ratio (width-to-height ratio) for the selected input source Changes the projected image ratio to make the edges visible by a selectable percentage or automatically Parent topic: Adjusting the Menu Settings Related references Available Image Aspect Ratios Projector Feature Settings -


