
Technical Brief (Ink Jet Printers)
Page 1
... Greater detail in shadows, with higher optical density and contrast Better fill in solid areas Crisp text Epson Sales Training 5/07 This combination of core technologies used in Epson printers and all-in photos and sharper text and line art High Quality Halftoning Generates fast, color-accurate results with smooth transitions and true...
... Greater detail in shadows, with higher optical density and contrast Better fill in solid areas Crisp text Epson Sales Training 5/07 This combination of core technologies used in Epson printers and all-in photos and sharper text and line art High Quality Halftoning Generates fast, color-accurate results with smooth transitions and true...

Technical Brief (Ink Jet Printers)
Page 2
...factor in photos and laser sharp text. Epson MicroPiezo Technology: Epson Micro Piezo print heads use halftone algorithms with more inconsistent droplets with the naked eye. Also, Epson's variable ink droplet sizes and high resolutions combine to improve color ranges and accuracy because Epson printers can ... of print head nozzles Page 2 Here's how it compares to thermal ink jet technology, used in other ink jet printers: Epson MicroPiezo Technology Mechanical method: Precise electrical pulses cause the ink reservoir wall to produce ink droplets, and no heat is...
...factor in photos and laser sharp text. Epson MicroPiezo Technology: Epson Micro Piezo print heads use halftone algorithms with more inconsistent droplets with the naked eye. Also, Epson's variable ink droplet sizes and high resolutions combine to improve color ranges and accuracy because Epson printers can ... of print head nozzles Page 2 Here's how it compares to thermal ink jet technology, used in other ink jet printers: Epson MicroPiezo Technology Mechanical method: Precise electrical pulses cause the ink reservoir wall to produce ink droplets, and no heat is...

Technical Brief (Ink Jet Printers)
Page 3
... Your Vision, MicroPiezo, AcuPhoto Halftoning, Claria, Epson UltraChrome K3, Epson UltraChrome Hi-Gloss, and PictureMate are registered trademarks of ink systems to change. ©2006 Epson America, Inc. Additionally, unlike competitive printers tht require special or optional inks, with Epson papers. Epson Printer + Epson Ink + Epson Paper Delivers Epson Quality 6. 4. Fine Art Pro Advanced Amateur Photo Enthusiast Chief Memory Officer...
... Your Vision, MicroPiezo, AcuPhoto Halftoning, Claria, Epson UltraChrome K3, Epson UltraChrome Hi-Gloss, and PictureMate are registered trademarks of ink systems to change. ©2006 Epson America, Inc. Additionally, unlike competitive printers tht require special or optional inks, with Epson papers. Epson Printer + Epson Ink + Epson Paper Delivers Epson Quality 6. 4. Fine Art Pro Advanced Amateur Photo Enthusiast Chief Memory Officer...

Product Information Guide
Page 1
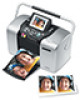
... PicureMate Photo Paper and a PictureMate Photo Cartridge PictureMate Deluxe Viewer Edition Rechargeable Battery (part# C12C831074) Enables printing outdoors or in other places without convenient electrical outlets PictureMate Deluxe Viewer Edition Carrying Case Soft case that holds PictureMate, power cable, extra PictureMate Print Pack, and more Epson Bluetooth Photo Print Adapter (part# C12C824142) Allows printing wirelessly from Bluetooth-enabled cell phones, PDAs, or computers to PictureMate Printer Specifications...
... PicureMate Photo Paper and a PictureMate Photo Cartridge PictureMate Deluxe Viewer Edition Rechargeable Battery (part# C12C831074) Enables printing outdoors or in other places without convenient electrical outlets PictureMate Deluxe Viewer Edition Carrying Case Soft case that holds PictureMate, power cable, extra PictureMate Print Pack, and more Epson Bluetooth Photo Print Adapter (part# C12C824142) Allows printing wirelessly from Bluetooth-enabled cell phones, PDAs, or computers to PictureMate Printer Specifications...

Product Information Guide
Page 10
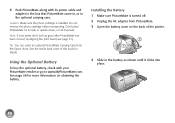
... is in the battery as shown until it by connecting the AC adapter and plugging in the printer. Pack PictureMate and its side or upside down the top of PictureMate. Slide in use. PictureMate Deluxe Viewer Edition 4/05 Then lower the photo viewer screen and close it locks into place: 4. After you install the battery, you can print from...
... is in the battery as shown until it by connecting the AC adapter and plugging in the printer. Pack PictureMate and its side or upside down the top of PictureMate. Slide in use. PictureMate Deluxe Viewer Edition 4/05 Then lower the photo viewer screen and close it locks into place: 4. After you install the battery, you can print from...

Supplemental / Late Breaking Information
Page 1
... reseller, please call 800-463-7766 for your PictureMate® Deluxe Viewer Edition printer. In Canada, please call 800-GO-EPSON. (800-463-7766). Please use the following part number when ordering the battery: C12C831074. Rechargeable Battery An optional rechargeable battery is available for reseller referral. © 2005 Epson America, Inc. 4/05 CPD-19858 Printed in Using...
... reseller, please call 800-463-7766 for your PictureMate® Deluxe Viewer Edition printer. In Canada, please call 800-GO-EPSON. (800-463-7766). Please use the following part number when ordering the battery: C12C831074. Rechargeable Battery An optional rechargeable battery is available for reseller referral. © 2005 Epson America, Inc. 4/05 CPD-19858 Printed in Using...

Using PictureMate With a Computer
Page 7
If you have another printer for non-photo printing. When you see this screen, click No if you see a prompt to restart your only printer, and you see a message about printing a test page, click OK to install additional software. Continue with the instructions in the next section. 6 When printing finishes, click Next to print. If you only print photos, click Yes. If PictureMate is your computer, click No. 9. 8.
If you have another printer for non-photo printing. When you see this screen, click No if you see a prompt to restart your only printer, and you see a message about printing a test page, click OK to install additional software. Continue with the instructions in the next section. 6 When printing finishes, click Next to print. If you only print photos, click Yes. If PictureMate is your computer, click No. 9. 8.

Using PictureMate With a Computer
Page 12
You see the Install Menu: 8. Click Install Printer Driver and Utilities. Follow the on-screen instructions to install several programs. You'll need to install additional software. 11 Continue with the instructions in the next section to enter your password, accept license agreements, and click Quit several times as you install. 9.
You see the Install Menu: 8. Click Install Printer Driver and Utilities. Follow the on-screen instructions to install several programs. You'll need to install additional software. 11 Continue with the instructions in the next section to enter your password, accept license agreements, and click Quit several times as you install. 9.

Using PictureMate With a Computer
Page 14
... the Applications folder, then open the Utilities folder and double-click Printer Setup Utility (OS X 10.3.x) or Print Center (OS X 10.2.x). Note: If you see this screen, click OK and go to register PictureMate. 8. After you finish installing software, you 're done installing ...software, click Exit. 5. If you see this screen, click Add and go to install your PictureMate CD. When you must select PictureMate as your Macintosh printer. Follow the instructions below....
... the Applications folder, then open the Utilities folder and double-click Printer Setup Utility (OS X 10.3.x) or Print Center (OS X 10.2.x). Note: If you see this screen, click OK and go to register PictureMate. 8. After you finish installing software, you 're done installing ...software, click Exit. 5. If you see this screen, click Add and go to install your PictureMate CD. When you must select PictureMate as your Macintosh printer. Follow the instructions below....

Using PictureMate With a Computer
Page 15
If it doesn't appear, make sure PictureMate is turned on and connected to your PictureMate CD. 14 You see a new screen: 3. Close the Printer Setup Utility or Print Center. 6. If it isn't already selected at the top of the screen, choose EPSON USB. 4. Remove and store your Macintosh, then click Add. 2. You see the Printer List with PictureMate Deluxe added: 5. Click PictureMate Deluxe, then click the Add button. If PictureMate Deluxe appears in the Printer List, click PictureMate Deluxe and click Add.
If it doesn't appear, make sure PictureMate is turned on and connected to your PictureMate CD. 14 You see a new screen: 3. Close the Printer Setup Utility or Print Center. 6. If it isn't already selected at the top of the screen, choose EPSON USB. 4. Remove and store your Macintosh, then click Add. 2. You see the Printer List with PictureMate Deluxe added: 5. Click PictureMate Deluxe, then click the Add button. If PictureMate Deluxe appears in the Printer List, click PictureMate Deluxe and click Add.

Using PictureMate With a Computer
Page 17
... Notice: Other product names used herein are for identification purposes only and may need to set up PictureMate in the Printer Setup Utility or Print Center. The USB Printer Device Driver may not install correctly if you've upgraded from Windows 95. ■ In Mac OS...in this booklet. Epson Store and Epson PhotoCenter are registered trademarks of their respective owners. Don't connect PictureMate to the computer until you may be trademarks of Seiko Epson Corporation. Help With Software Installation Problems If you 're printing over a network, see PictureMate Deluxe in the Format ...
... Notice: Other product names used herein are for identification purposes only and may need to set up PictureMate in the Printer Setup Utility or Print Center. The USB Printer Device Driver may not install correctly if you've upgraded from Windows 95. ■ In Mac OS...in this booklet. Epson Store and Epson PhotoCenter are registered trademarks of their respective owners. Don't connect PictureMate to the computer until you may be trademarks of Seiko Epson Corporation. Help With Software Installation Problems If you 're printing over a network, see PictureMate Deluxe in the Format ...

Using PictureMate Without a Computer
Page 2
Contents Welcome 2 Prepare to Print 5 Choose Photos to Print 8 Do More With Your Photos 17 Save Your Photos to a Computer or an External Device 26 Print From a Computer or an External Device 29 Replace Ink and Paper 34 Take Your PictureMate With You 39 Set PictureMate Preferences 43 Printer Care and Troubleshooting 49 Notices 59 Index 69
Contents Welcome 2 Prepare to Print 5 Choose Photos to Print 8 Do More With Your Photos 17 Save Your Photos to a Computer or an External Device 26 Print From a Computer or an External Device 29 Replace Ink and Paper 34 Take Your PictureMate With You 39 Set PictureMate Preferences 43 Printer Care and Troubleshooting 49 Notices 59 Index 69
Using PictureMate Without a Computer
Page 8
... screen goes dark after 15 minutes if it is not being used. Saving Power If you are running PictureMate with the optional battery, the printer turns off automatically after 13 minutes. Press the On button to turn it back on . Top: SmartMediaTM xD Picture CardTM xD Picture Card Type M Middle: ... turn it back on . 7 Press any button to choose your card. Caution: Do not remove a card while the card light is flashing; you may lose photos on your photos and start printing (see page 9).
... screen goes dark after 15 minutes if it is not being used. Saving Power If you are running PictureMate with the optional battery, the printer turns off automatically after 13 minutes. Press the On button to turn it back on . Top: SmartMediaTM xD Picture CardTM xD Picture Card Type M Middle: ... turn it back on . 7 Press any button to choose your card. Caution: Do not remove a card while the card light is flashing; you may lose photos on your photos and start printing (see page 9).

Using PictureMate Without a Computer
Page 22
...the Print Confirmation. 21 You see your photo was originally taken to open the menu. 3 Press or to start printing. Adding the Date and/or Time You can change additional settings. 5 Press the Print button. Note: The date and time come from the printer. If this information is incorrect, adjust... the time and/or date setting on your camera. 1 After selecting the photo(s) and number of copies you want to use it, you select will be applied to ...
...the Print Confirmation. 21 You see your photo was originally taken to open the menu. 3 Press or to start printing. Adding the Date and/or Time You can change additional settings. 5 Press the Print button. Note: The date and time come from the printer. If this information is incorrect, adjust... the time and/or date setting on your camera. 1 After selecting the photo(s) and number of copies you want to use it, you select will be applied to ...

Using PictureMate Without a Computer
Page 24
... available: ● Automatic adjustments If your camera supports PRINT Image Matching (P.I.M.) or Exif Print, the printer's P.I .M./Exif or Enhance are turned on in order to highlight Fix Photo, then press the button. 3 Make sure Auto Correct is highlighted, then press . If you can ... see the Auto Correct menu: 23 Fixing Photos PictureMate lets you can manually adjust their brightness or control the saturation and sharpness. They do not change your photos without using a computer. Automatically Fixing Your Photos 1 After selecting the photo(s) and number of copies you want , you...
... available: ● Automatic adjustments If your camera supports PRINT Image Matching (P.I.M.) or Exif Print, the printer's P.I .M./Exif or Enhance are turned on in order to highlight Fix Photo, then press the button. 3 Make sure Auto Correct is highlighted, then press . If you can ... see the Auto Correct menu: 23 Fixing Photos PictureMate lets you can manually adjust their brightness or control the saturation and sharpness. They do not change your photos without using a computer. Automatically Fixing Your Photos 1 After selecting the photo(s) and number of copies you want , you...

Using PictureMate Without a Computer
Page 31
... can also print photos from a CD that you used PictureMate to a computer, disconnect it will read photos from the card, not from a photo processing lab. (Images should be in PictureMate's memory card slots. Some CDs may not work.) 1 Make sure PictureMate is connected to save photos on the right....PictureMate, as shown on the same disk or flash memory drive more than once, it or turn off . The memory card light should be off the computer. 4 Connect your CD or Zip drive's USB cable, or plug your flash memory drive into the drive. Note: If a memory card is inserted, the printer...
... can also print photos from a CD that you used PictureMate to a computer, disconnect it will read photos from the card, not from a photo processing lab. (Images should be in PictureMate's memory card slots. Some CDs may not work.) 1 Make sure PictureMate is connected to save photos on the right....PictureMate, as shown on the same disk or flash memory drive more than once, it or turn off . The memory card light should be off the computer. 4 Connect your CD or Zip drive's USB cable, or plug your flash memory drive into the drive. Note: If a memory card is inserted, the printer...

Using PictureMate Without a Computer
Page 32
... stored, then press OK. Printing From a PictBridge-Enabled Camera You can connect your photos are no memory cards in PictureMate's slots. Note: If a memory card is on your drive. 6 You can use any of PictureMate and use the camera to control printing. (Check your camera manual to see this ... your drive. The card light should be off. You see if it supports the PictBridge standard or USB DP.) 1 Make sure PictureMate is inserted, the printer will read photos from the card, not from a camera. 3 Press the Menu button. 4 Press or to highlight Setup, then press to open the menu. ...
... stored, then press OK. Printing From a PictBridge-Enabled Camera You can connect your photos are no memory cards in PictureMate's slots. Note: If a memory card is on your drive. 6 You can use any of PictureMate and use the camera to control printing. (Check your camera manual to see this ... your drive. The card light should be off. You see if it supports the PictBridge standard or USB DP.) 1 Make sure PictureMate is inserted, the printer will read photos from the card, not from a camera. 3 Press the Menu button. 4 Press or to highlight Setup, then press to open the menu. ...

Using PictureMate Without a Computer
Page 35
...message while printing, you see the Replace cartridge message, you are out of PictureMate Photo Paper, but do not see a message on the photo viewer screen. Note: If you are out of installing it and before the ...PictureMate. For photo storage and handling tips, see "How many photos will I get from the Epson Store at www.epsonstore.com (U.S. You can buy one box: PictureMate Photo Paper and a new PictureMate Photo Cartridge. This section tells where to refill the photo cartridge. In Canada, please call (800) 463-7766 for optimal print quality and prints that sell printer...
...message while printing, you see the Replace cartridge message, you are out of PictureMate Photo Paper, but do not see a message on the photo viewer screen. Note: If you are out of installing it and before the ...PictureMate. For photo storage and handling tips, see "How many photos will I get from the Epson Store at www.epsonstore.com (U.S. You can buy one box: PictureMate Photo Paper and a new PictureMate Photo Cartridge. This section tells where to refill the photo cartridge. In Canada, please call (800) 463-7766 for optimal print quality and prints that sell printer...
Using PictureMate Without a Computer
Page 41
... the AC adapter from the Epson Store. Note: If your PictureMate retailer or go to www.MyPictureMate.com. See the inside back cover of the printer. 4 Slide in the optional carrying case. Do not remove the photo cartridge before transporting. Tip: You can order an optional PictureMate Carrying Case from PictureMate. 3 Open the battery cover on...
... the AC adapter from the Epson Store. Note: If your PictureMate retailer or go to www.MyPictureMate.com. See the inside back cover of the printer. 4 Slide in the optional carrying case. Do not remove the photo cartridge before transporting. Tip: You can order an optional PictureMate Carrying Case from PictureMate. 3 Open the battery cover on...
Using PictureMate Without a Computer
Page 42
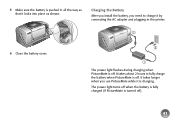
5 Make sure the battery is pushed in the printer. 6 Close the battery cover. The power light flashes during charging when PictureMate is turned off). 41 The power light turns off when the battery is fully charged (if PictureMate is off . It takes about 2 hours to charge it by connecting the AC adapter and plugging in all the way so that it locks into place as shown: Charging the Battery After you install the battery, you use PictureMate while it is off . It takes longer when you need to fully charge the battery when PictureMate is charging.
5 Make sure the battery is pushed in the printer. 6 Close the battery cover. The power light flashes during charging when PictureMate is turned off). 41 The power light turns off when the battery is fully charged (if PictureMate is off . It takes about 2 hours to charge it by connecting the AC adapter and plugging in all the way so that it locks into place as shown: Charging the Battery After you install the battery, you use PictureMate while it is off . It takes longer when you need to fully charge the battery when PictureMate is charging.

