Users Guide
Page 3
...Important Note 8 Important Safety Instructions 8 Setting up the Product 8 Choosing a Place for the Product 9 Using the Product 10 Handling Ink Cartridges 10 Notice for CD/DVD/BD Discs 11 Concerning Incidental Loss Arising out of Use of this Product 12 About Usage Limitation 12 WARNING ... Product 19 Setting for Notification of Job Completion 20 Overview of Applications 21 EPSON Total Disc Maker 21 EPSON Total Disc Monitor 21 EPSON Total Disc Setup 21 Using EPSON Total Disc Maker 21 Starting EPSON Total Disc Maker 21 Getting Information through Online Help 22 Overview of Printer...
...Important Note 8 Important Safety Instructions 8 Setting up the Product 8 Choosing a Place for the Product 9 Using the Product 10 Handling Ink Cartridges 10 Notice for CD/DVD/BD Discs 11 Concerning Incidental Loss Arising out of Use of this Product 12 About Usage Limitation 12 WARNING ... Product 19 Setting for Notification of Job Completion 20 Overview of Applications 21 EPSON Total Disc Maker 21 EPSON Total Disc Monitor 21 EPSON Total Disc Setup 21 Using EPSON Total Disc Maker 21 Starting EPSON Total Disc Maker 21 Getting Information through Online Help 22 Overview of Printer...

Users Guide
Page 5
Canceling Publishing 87 Priority Publishing 88 Chapter 3 Replacing Ink Cartridges Checking the Ink Cartridge Status 89 Precautions on Ink Cartridge Replacement 90 Replacing an Ink Cartridge 91 Chapter 4 Maintaining Your Product Checking the Print Head Nozzles 95 Using the Nozzle Check Utility 95 Cleaning... the Drive 103 Transporting Your Product 104 Chapter 5 Troubleshooting Diagnosing the Problem 107 Error Indicators 107 EPSON Total Disc Monitor 114 Checking Product Status 114 Using EPSON Total Disc Monitor 114 Disc or the Disc Tray Does Not Feed Correctly 116 Disc Does Not ...
Canceling Publishing 87 Priority Publishing 88 Chapter 3 Replacing Ink Cartridges Checking the Ink Cartridge Status 89 Precautions on Ink Cartridge Replacement 90 Replacing an Ink Cartridge 91 Chapter 4 Maintaining Your Product Checking the Print Head Nozzles 95 Using the Nozzle Check Utility 95 Cleaning... the Drive 103 Transporting Your Product 104 Chapter 5 Troubleshooting Diagnosing the Problem 107 Error Indicators 107 EPSON Total Disc Monitor 114 Checking Product Status 114 Using EPSON Total Disc Monitor 114 Disc or the Disc Tray Does Not Feed Correctly 116 Disc Does Not ...
Users Guide
Page 6
... On and then Went Out 125 Only the Power Light is On 125 The Ink Light is Flashing or is On after you Replace the Cartridge 125 Software Cannot be Installed 125 Maintenance Box Nearly Full Message is Displayed by the Software 126 Disc Cannot be Published 126 Disc Information Cannot... when You Click "Safely Remove Hardware" Icon. . . 126 The Product is not Recognized 127 Appendix A Where To Get Help Contacting Customer Support 128 Before Contacting Epson 128 Help for Users in the United States and Canada 128 Help for Users in the Europe (EMEA 129 Help for Users in Australia 129...
... On and then Went Out 125 Only the Power Light is On 125 The Ink Light is Flashing or is On after you Replace the Cartridge 125 Software Cannot be Installed 125 Maintenance Box Nearly Full Message is Displayed by the Software 126 Disc Cannot be Published 126 Disc Information Cannot... when You Click "Safely Remove Hardware" Icon. . . 126 The Product is not Recognized 127 Appendix A Where To Get Help Contacting Customer Support 128 Before Contacting Epson 128 Help for Users in the United States and Canada 128 Help for Users in the Europe (EMEA 129 Help for Users in Australia 129...

Users Guide
Page 10
...the Windows sharing setting. this button is pressed, the power light flashes. Using the Product Observe the following when handling the ink cartridges: ❏ Keep ink cartridges out of the reach of the product. ❏ Do not place any harm to add or remove discs. Doing so may ... Do not insert objects in the product. ❏ Take care not to the outlet until the power light stops flashing. ❏ Leave the ink cartridges installed. Also, for safety reasons, do not put your fingers when closing the disc cover. ❏ The product uses galvanized sheet metal, and this...
...the Windows sharing setting. this button is pressed, the power light flashes. Using the Product Observe the following when handling the ink cartridges: ❏ Keep ink cartridges out of the reach of the product. ❏ Do not place any harm to add or remove discs. Doing so may ... Do not insert objects in the product. ❏ Take care not to the outlet until the power light stops flashing. ❏ Leave the ink cartridges installed. Also, for safety reasons, do not put your fingers when closing the disc cover. ❏ The product uses galvanized sheet metal, and this...

Users Guide
Page 11
... of static or electrical noise -Incorrect usage -Malfunction or repair -Damage due to natural disaster Epson does not hold any responsibility for at room temperature for lost in the product not functioning properly. However, each time the cartridge is consumed because the product automatically performs a reliability check. ❏ Do not place ink...
... of static or electrical noise -Incorrect usage -Malfunction or repair -Damage due to natural disaster Epson does not hold any responsibility for at room temperature for lost in the product not functioning properly. However, each time the cartridge is consumed because the product automatically performs a reliability check. ❏ Do not place ink...
Users Guide
Page 32
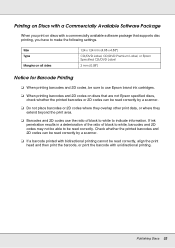
... 2D codes where they overlap other print data, or where they extend beyond the print area. ❏ Barcodes and 2D codes use Epson brand ink cartridges. ❏ When printing barcodes and 2D codes on discs that supports disc printing, you print on discs with a commercially available software... package that are not Epson specified discs, check whether the printed barcodes or 2D codes can be read correctly. Printing on Discs with a ...
... 2D codes where they overlap other print data, or where they extend beyond the print area. ❏ Barcodes and 2D codes use Epson brand ink cartridges. ❏ When printing barcodes and 2D codes on discs that supports disc printing, you print on discs with a commercially available software... package that are not Epson specified discs, check whether the printed barcodes or 2D codes can be read correctly. Printing on Discs with a ...

Users Guide
Page 45
Also, do not put your job before opening it. ❏ Do not open the ink cartridge cover or maintenance box cover while running a job, and the job will sound if you to add or remove discs. Closing the disc cover automatically ...
Also, do not put your job before opening it. ❏ Do not open the ink cartridge cover or maintenance box cover while running a job, and the job will sound if you to add or remove discs. Closing the disc cover automatically ...

Users Guide
Page 59
... arm is recommended to write with DVD±R DL and BD-R DL, it is still moving. ❏ Beep will sound if you open the ink cartridge cover or maintenance box cover while running a job, and the job will pause. Closing the disc cover automatically resumes the job. ❏ Do not operate...
... arm is recommended to write with DVD±R DL and BD-R DL, it is still moving. ❏ Beep will sound if you open the ink cartridge cover or maintenance box cover while running a job, and the job will pause. Closing the disc cover automatically resumes the job. ❏ Do not operate...

Users Guide
Page 73
... not put your job before opening it is beeping, as arm is beeping, as the arm may be damaged. ❏ If you open the ink cartridge cover or maintenance box cover while running a job, and the job will pause. Note: If Windows shuts down while processing a job, the job may affect...
... not put your job before opening it is beeping, as arm is beeping, as the arm may be damaged. ❏ If you open the ink cartridge cover or maintenance box cover while running a job, and the job will pause. Note: If Windows shuts down while processing a job, the job may affect...

Users Guide
Page 83
... automatically resumes the job. ❏ Do not operate the stacker while the unit is still moving. ❏ Beep will sound if you open the ink cartridge cover or maintenance box cover while running a job, and the job will be damaged. ❏ If you to open the disc cover, pause or cancel...
... automatically resumes the job. ❏ Do not operate the stacker while the unit is still moving. ❏ Beep will sound if you open the ink cartridge cover or maintenance box cover while running a job, and the job will be damaged. ❏ If you to open the disc cover, pause or cancel...

Users Guide
Page 89
... automatically when you start a job. Note: If any such ink cartridge with the product model, or improperly installed, EPSON Total Disc Monitor will not display an accurate calculation of the ink cartridge status. Chapter 3 Replacing Ink Cartridges Checking the Ink Cartridge Status Note: ❏ Epson cannot guarantee the quality or reliability of ink not made by...
... automatically when you start a job. Note: If any such ink cartridge with the product model, or improperly installed, EPSON Total Disc Monitor will not display an accurate calculation of the ink cartridge status. Chapter 3 Replacing Ink Cartridges Checking the Ink Cartridge Status Note: ❏ Epson cannot guarantee the quality or reliability of ink not made by...

Users Guide
Page 90
...and water. However, careful handling is designed to replace it in the product. ❏ Use ink cartridges within six months after a thorough flushing, see a doctor immediately. ❏ Epson recommends the use of non-genuine ink may cause damage that monitors the amount of ink used when reinserted... are ready to contain any excess ink that is not covered by each time cartridges are removed and reinserted. Replacing Ink Cartridges 90 Ink cartridges with an IC chip that is not covered by Epson's warranties, and under certain circumstances, may dry out. The product does not...
...and water. However, careful handling is designed to replace it in the product. ❏ Use ink cartridges within six months after a thorough flushing, see a doctor immediately. ❏ Epson recommends the use of non-genuine ink may cause damage that monitors the amount of ink used when reinserted... are ready to contain any excess ink that is not covered by each time cartridges are removed and reinserted. Replacing Ink Cartridges 90 Ink cartridges with an IC chip that is not covered by Epson's warranties, and under certain circumstances, may dry out. The product does not...

Users Guide
Page 91
... status of the product is on page 114. Remove the cartridge, wipe the circuit board with a soft cloth and install it again. ❏ Color adjustment of each ink cartridge, see the following section: & See "Using EPSON Total Disc Monitor" on . ❏ When moving or transporting... the product after installing ink cartridges, move or transport with ink cartridges installed. If it is automatically covered to prevent ink ...
... status of the product is on page 114. Remove the cartridge, wipe the circuit board with a soft cloth and install it again. ❏ Color adjustment of each ink cartridge, see the following section: & See "Using EPSON Total Disc Monitor" on . ❏ When moving or transporting... the product after installing ink cartridges, move or transport with ink cartridges installed. If it is automatically covered to prevent ink ...

Users Guide
Page 92
... to take. Make sure that the Power light is low. The ink cartridge has reached its replacement time. Replace the used ink cartridge with another. Replacing Ink Cartridges 92 Open the ink cartridge cover. Otherwise, ink may squirt. This table describes the status of the... light magenta ink cartridge, but not flashing. 2. Note: Wait for all the cartridges. 1. Lights Action Ink is on To replace an ink cartridge, follow the steps below. Obtain a replacement ink cartridge. c Caution: Do not remove the cartridge from the product until you need to...
... to take. Make sure that the Power light is low. The ink cartridge has reached its replacement time. Replace the used ink cartridge with another. Replacing Ink Cartridges 92 Open the ink cartridge cover. Otherwise, ink may squirt. This table describes the status of the... light magenta ink cartridge, but not flashing. 2. Note: Wait for all the cartridges. 1. Lights Action Ink is on To replace an ink cartridge, follow the steps below. Obtain a replacement ink cartridge. c Caution: Do not remove the cartridge from the product until you need to...

Users Guide
Page 93
... head may cause erratic product behavior. Replacing Ink Cartridges 93 c Caution: ❏ Do not touch the green IC chip on the side of it properly. 5. Dispose of the cartridge. If the cartridge is not covered by Epson's warranties, and under certain circumstances, may dry ...out and be unable to print. ❏ Do not refill the ink cartridge. 3. Remove the new ink cartridge from the package. Carefully pull the used cartridge so the cartridge pops out ...
... head may cause erratic product behavior. Replacing Ink Cartridges 93 c Caution: ❏ Do not touch the green IC chip on the side of it properly. 5. Dispose of the cartridge. If the cartridge is not covered by Epson's warranties, and under certain circumstances, may dry ...out and be unable to print. ❏ Do not refill the ink cartridge. 3. Remove the new ink cartridge from the package. Carefully pull the used cartridge so the cartridge pops out ...

Users Guide
Page 94
Place the new ink cartridge into place. 7. Replacing Ink Cartridges 94 6. When you are finished replacing cartridges, close the ink cartridge cover. Then push the ink cartridge until it clicks into the slot.
Place the new ink cartridge into place. 7. Replacing Ink Cartridges 94 6. When you are finished replacing cartridges, close the ink cartridge cover. Then push the ink cartridge until it clicks into the slot.

Users Guide
Page 96
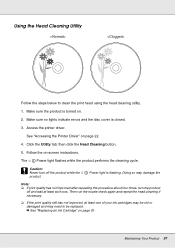
...print quality declines; c Caution: ❏ Do not open the ink cartridge cover while cleaning print head. Print head cleaning stops if the ink cartridge cover is low you may be cleaned. If any segment of ink cartridge life. Cleaning the Print Head If you find that the printout is ...incorrect or missing. ❏ Use the nozzle check utility first to solve these problems by using the buttons. Replace the appropriate ink cartridge first. This saves ink. ❏ ...
...print quality declines; c Caution: ❏ Do not open the ink cartridge cover while cleaning print head. Print head cleaning stops if the ink cartridge cover is low you may be cleaned. If any segment of ink cartridge life. Cleaning the Print Head If you find that the printout is ...incorrect or missing. ❏ Use the nozzle check utility first to solve these problems by using the buttons. Replace the appropriate ink cartridge first. This saves ink. ❏ ...
Users Guide
Page 97
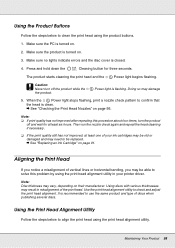
... Note: ❏ If print quality has not improved after repeating this procedure about four times, turn off and wait at least one of your ink cartridges may be replaced. & See "Replacing an Ink Cartridge" on page 91. The Power light flashes while the product performs the cleaning cycle.
... Note: ❏ If print quality has not improved after repeating this procedure about four times, turn off and wait at least one of your ink cartridges may be replaced. & See "Replacing an Ink Cartridge" on page 91. The Power light flashes while the product performs the cleaning cycle.
Users Guide
Page 98
... alignment utility. Use the print head alignment utility to align the print head using the print head alignment utility in your ink cartridges may be replaced. & See "Replacing an Ink Cartridge" on their manufacturer. Maintaining Your Product 98 Make sure no lights indicate errors and the disc cover is turned on . 2. Make...
... alignment utility. Use the print head alignment utility to align the print head using the print head alignment utility in your ink cartridges may be replaced. & See "Replacing an Ink Cartridge" on their manufacturer. Maintaining Your Product 98 Make sure no lights indicate errors and the disc cover is turned on . 2. Make...

Users Guide
Page 105
...tape from the product before using the original box and packing materials in the original box. Disconnect the interface cable. 3. then close the ink cartridge cover. 6. Remove all discs from printing. ❏ Leave the maintenance box installed. Attach the protective materials to both sides of the exclusive ...order to protect the product from shock. ❏ Be sure to remove the two drives before transporting. Otherwise, the drives and the PP-100II may cause ink leakage. Turn off the product and unplug its power cord. 2. Secure the ink cartridges with tape. 7.
...tape from the product before using the original box and packing materials in the original box. Disconnect the interface cable. 3. then close the ink cartridge cover. 6. Remove all discs from printing. ❏ Leave the maintenance box installed. Attach the protective materials to both sides of the exclusive ...order to protect the product from shock. ❏ Be sure to remove the two drives before transporting. Otherwise, the drives and the PP-100II may cause ink leakage. Turn off the product and unplug its power cord. 2. Secure the ink cartridges with tape. 7.


