Basics
Page 2
...as a result of accident, misuse, or abuse of this Epson product. Trademarks Epson and Photo Fine are for damages, losses, costs, or expenses incurred by the purchaser or third parties as Original Epson Products or Epson Approved Products by any consumable products other equipment. SD is subject...QuickTime and the QuickTime logo are trademarks or registered trademarks of Apple, Inc., used herein are registered trademarks, Multimedia Storage Viewer is a trademark, and Epson Exceed Your Vision is a registered logomark of SD Card. Copyright Notice All rights reserved. No part of this...
...as a result of accident, misuse, or abuse of this Epson product. Trademarks Epson and Photo Fine are for damages, losses, costs, or expenses incurred by the purchaser or third parties as Original Epson Products or Epson Approved Products by any consumable products other equipment. SD is subject...QuickTime and the QuickTime logo are trademarks or registered trademarks of Apple, Inc., used herein are registered trademarks, Multimedia Storage Viewer is a trademark, and Epson Exceed Your Vision is a registered logomark of SD Card. Copyright Notice All rights reserved. No part of this...

Basics
Page 3
Contents Introduction 5 About Your Software and User's Guide 6 Getting Started 7 Unpacking Your P-6000/P-7000 7 Installing the Battery 8 Charging the Battery 9 Turning the Viewer On and Off 10 Setting the Language, Date, and Time 11 Installing Your Software and User's Guide 13 Using Memory Cards 17 Inserting and Removing Memory Cards 17 Copying Files from a Memory Card 21 Supported File Formats 26 Viewing Photos and Videos 27 Viewing Photos 27 Rating Photos 30 Creating a Slide Show 31 Playing Videos 32 Showing Photos and Videos on a TV 34 3
Contents Introduction 5 About Your Software and User's Guide 6 Getting Started 7 Unpacking Your P-6000/P-7000 7 Installing the Battery 8 Charging the Battery 9 Turning the Viewer On and Off 10 Setting the Language, Date, and Time 11 Installing Your Software and User's Guide 13 Using Memory Cards 17 Inserting and Removing Memory Cards 17 Copying Files from a Memory Card 21 Supported File Formats 26 Viewing Photos and Videos 27 Viewing Photos 27 Rating Photos 30 Creating a Slide Show 31 Playing Videos 32 Showing Photos and Videos on a TV 34 3

Basics
Page 4
... USB Devices 36 Connecting a USB Device 37 Copying Files to the Viewer 38 Copying Files to a USB Device 39 Playing Music 43 Copying Music Files from Your Computer 43 Playing Audio Files 45 Managing Your Files 49 ... 56 Viewing Problems 57 Replacing the Battery 58 Where To Get Help 58 Appendix 60 Important Safety Instructions 60 Responsible Use of Copyrighted Materials 62 Epson America, Inc. Limited Warranty 65 Index 69 4
... USB Devices 36 Connecting a USB Device 37 Copying Files to the Viewer 38 Copying Files to a USB Device 39 Playing Music 43 Copying Music Files from Your Computer 43 Playing Audio Files 45 Managing Your Files 49 ... 56 Viewing Problems 57 Replacing the Battery 58 Where To Get Help 58 Appendix 60 Important Safety Instructions 60 Responsible Use of Copyrighted Materials 62 Epson America, Inc. Limited Warranty 65 Index 69 4
Basics
Page 5
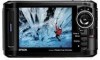
Its features include: ◗ Large, high-quality 4-inch LCD with Photo Fine® Premia technology and true Adobe® RGB ◗ Support for JPEG files and RAW files from select digital SLR cameras ◗ MP3 and ... printing to PictBridge™ printers (see the on-screen User's Guide for instructions) ◗ Video output to display pictures on a TV or projector 5 Introduction Your Epson P-6000/P-7000 Multimedia Storage Viewer™ lets you enjoy photos, videos, and music wherever you go.
Its features include: ◗ Large, high-quality 4-inch LCD with Photo Fine® Premia technology and true Adobe® RGB ◗ Support for JPEG files and RAW files from select digital SLR cameras ◗ MP3 and ... printing to PictBridge™ printers (see the on-screen User's Guide for instructions) ◗ Video output to display pictures on a TV or projector 5 Introduction Your Epson P-6000/P-7000 Multimedia Storage Viewer™ lets you enjoy photos, videos, and music wherever you go.
Basics
Page 6
...'s Guide The following software is included on your P-6000/ P-7000 Multimedia Storage Viewer: ◗ Epson Link2 software to transfer photos, videos, and music back and forth between your computer and viewer ◗ Epson USB Display plug-in to display images from Adobe Photoshop® applications on the viewer to maintain color accuracy when editing your images ◗...
...'s Guide The following software is included on your P-6000/ P-7000 Multimedia Storage Viewer: ◗ Epson Link2 software to transfer photos, videos, and music back and forth between your computer and viewer ◗ Epson USB Display plug-in to display images from Adobe Photoshop® applications on the viewer to maintain color accuracy when editing your images ◗...

Basics
Page 9
...power cord to charge the battery when the viewer is not in the upper-right corner of the screen when the viewer is about 3.5 hours to the adapter and plug it into the viewer. It takes about half full. Turn off the viewer before disconnecting the adapter. Battery is low. ...Battery power is on . Battery power is charging. 9 Charge light The Charge light turns on : Battery is displayed in use the viewer without the battery installed. Caution: Do not use . The battery status is fully charged. Charging the Battery Plug the AC adapter into an electrical outlet...
...power cord to charge the battery when the viewer is not in the upper-right corner of the screen when the viewer is about 3.5 hours to the adapter and plug it into the viewer. It takes about half full. Turn off the viewer before disconnecting the adapter. Battery is low. ...Battery power is on . Battery power is charging. 9 Charge light The Charge light turns on : Battery is displayed in use the viewer without the battery installed. Caution: Do not use . The battery status is fully charged. Charging the Battery Plug the AC adapter into an electrical outlet...

Basics
Page 10
If the viewer is idle for 10 minutes, it . Turning the Viewer On and Off To turn on -screen User's Guide if you see the message Shutting Down. Then turn off the viewer, make sure the memory card access light is in sleep mode, press any button to change this setting. 10 Note: If the viewer is off as described above. See the on the viewer, slide the power switch down and hold it until you want to wake it off (see page 18), then slide the power switch down and release it shuts off automatically to save battery power. Turning Off the Viewer To turn it .
If the viewer is idle for 10 minutes, it . Turning the Viewer On and Off To turn on -screen User's Guide if you see the message Shutting Down. Then turn off the viewer, make sure the memory card access light is in sleep mode, press any button to change this setting. 10 Note: If the viewer is off as described above. See the on the viewer, slide the power switch down and hold it until you want to wake it off (see page 18), then slide the power switch down and release it shuts off automatically to save battery power. Turning Off the Viewer To turn it .

Basics
Page 11
You see the Language setting screen: 1 Press OK to select English. Setting the Language, Date, and Time When you turn on the viewer the first time, you see the Date and Time screen: 11 You see a message about setting the date. 2 Press OK.
You see the Language setting screen: 1 Press OK to select English. Setting the Language, Date, and Time When you turn on the viewer the first time, you see the Date and Time screen: 11 You see a message about setting the date. 2 Press OK.

Basics
Page 12
If you want to change the settings at any time, select Settings on the viewer, the Date and Time screen will be displayed. The next time you remove the battery, the date and time settings will be erased after about one day. 3 Press right or left on the 4-way ring to highlight a setting to 4-way ring change. 4 Press up or down to change the setting. 5 When you're done changing the date and time, highlight Complete and press OK. You see the Home screen: Note: If you turn on the Home screen, then select Date and Time. 12
If you want to change the settings at any time, select Settings on the viewer, the Date and Time screen will be displayed. The next time you remove the battery, the date and time settings will be erased after about one day. 3 Press right or left on the 4-way ring to highlight a setting to 4-way ring change. 4 Press up or down to change the setting. 5 When you're done changing the date and time, highlight Complete and press OK. You see the Home screen: Note: If you turn on the Home screen, then select Date and Time. 12

Basics
Page 13
... your computer. 13 Note: During the installation process you may need to install the Epson Link2 software. Installing Your Software and User's Guide To transfer files between your computer and viewer, convert video and audio files, and create music playlists, you need to enter your ...administrator name and password. 1 Connect the AC adapter to your viewer (see page 9). 2 Turn on using the viewer, safety instructions, and other information. To use the viewer to display images from Adobe Photoshop applications to maintain color accuracy when editing your images,...
... your computer. 13 Note: During the installation process you may need to install the Epson Link2 software. Installing Your Software and User's Guide To transfer files between your computer and viewer, convert video and audio files, and create music playlists, you need to enter your ...administrator name and password. 1 Connect the AC adapter to your viewer (see page 9). 2 Turn on using the viewer, safety instructions, and other information. To use the viewer to display images from Adobe Photoshop applications to maintain color accuracy when editing your images,...

Basics
Page 14
The viewer LCD screen turns off and your computer recognizes the viewer as a removable drive. 5 Open the P-6000 or P-7000 drive on your computer: ◗ Windows: Click or Start, click Computer or My Computer, then double-click the P-6000 or P-7000 icon. ◗ Macintosh: Double-click the P-6000 or P-7000 icon on the Home screen, then press the button to connect to your computer. Larger end Smaller end 4 Make sure the viewer is on the Desktop. 14 3 Use the included USB cable to connect the viewer to your computer.
The viewer LCD screen turns off and your computer recognizes the viewer as a removable drive. 5 Open the P-6000 or P-7000 drive on your computer: ◗ Windows: Click or Start, click Computer or My Computer, then double-click the P-6000 or P-7000 icon. ◗ Macintosh: Double-click the P-6000 or P-7000 icon on the Home screen, then press the button to connect to your computer. Larger end Smaller end 4 Make sure the viewer is on the Desktop. 14 3 Use the included USB cable to connect the viewer to your computer.

Basics
Page 16
You can download Adobe Reader at www.adobe.com. You need to reinstall it on your computer, in case you need to have Adobe Reader® or Acrobat® installed on your system to view the guide. Note: To view the User's Guide, double-click its icon on your desktop. Do not remove the software from the viewer after installing it . 16
You can download Adobe Reader at www.adobe.com. You need to reinstall it on your computer, in case you need to have Adobe Reader® or Acrobat® installed on your system to view the guide. Note: To view the User's Guide, double-click its icon on your desktop. Do not remove the software from the viewer after installing it . 16

Basics
Page 18
... Insert the memory card into the slot. 18 Memory card access light If you insert memory cards in the correct orientation, or the card and viewer may be lost or damaged. Do not put the card into the adapter and insert the adapter into the slot with the label facing forward... are using a CompactFlash adapter, put labels or stickers on memory cards. The sticker may peel off, preventing the card from being ejected and damaging the viewer.
... Insert the memory card into the slot. 18 Memory card access light If you insert memory cards in the correct orientation, or the card and viewer may be lost or damaged. Do not put the card into the adapter and insert the adapter into the slot with the label facing forward... are using a CompactFlash adapter, put labels or stickers on memory cards. The sticker may peel off, preventing the card from being ejected and damaging the viewer.

Basics
Page 19
Note: If you are using a CompactFlash adapter, remove the adapter from the CF Card slot, first make sure the memory card access light is not sticking out, press it once to pop it out, then press it again to eject the card. To remove a card from the viewer; do not remove only the memory card. 19 If the button is off. Then press the eject button and pull out the card.
Note: If you are using a CompactFlash adapter, remove the adapter from the CF Card slot, first make sure the memory card access light is not sticking out, press it once to pop it out, then press it again to eject the card. To remove a card from the viewer; do not remove only the memory card. 19 If the button is off. Then press the eject button and pull out the card.

Basics
Page 20
Using the SD Card Slot Insert an SD, SD HC, MultiMediaCard, or MMCplus card into the viewer. Memory card access light To remove a card from the SD Card slot, first make sure the memory card access light is off. When the card pops out, pull it fully into the slot as shown below. Then press in on the top of the slot. 20 Insert it out of the card.
Using the SD Card Slot Insert an SD, SD HC, MultiMediaCard, or MMCplus card into the viewer. Memory card access light To remove a card from the SD Card slot, first make sure the memory card access light is off. When the card pops out, pull it fully into the slot as shown below. Then press in on the top of the slot. 20 Insert it out of the card.

Basics
Page 21
Copying All files 1 If the Memory Card menu doesn't open automatically, use the 4-way ring or jog dial to highlight Memory Card on the viewer. Copying Files from a Memory Card After you insert a memory card (as described on page 18 or 20), you can copy all of the files on the card to Backup Files or copy selected files to the My Photos or My Videos folder on the Home screen, then press OK. You see this menu: 2 Select CF Memory Card Backup or SD Memory Card Backup, then press OK. The files are copied to a folder that is automatically created in the Backup Files folder on the viewer. 21
Copying All files 1 If the Memory Card menu doesn't open automatically, use the 4-way ring or jog dial to highlight Memory Card on the viewer. Copying Files from a Memory Card After you insert a memory card (as described on page 18 or 20), you can copy all of the files on the card to Backup Files or copy selected files to the My Photos or My Videos folder on the Home screen, then press OK. You see this menu: 2 Select CF Memory Card Backup or SD Memory Card Backup, then press OK. The files are copied to a folder that is automatically created in the Backup Files folder on the viewer. 21

Basics
Page 25
...Deleting Files After Copying You can have files automatically deleted after you copy them to the viewer. 1 On the Home screen, use the 4-way ring or jog dial to select ...to copy files without a warning message, after successfully copying the files. ◗ Confirm if you want the viewer to ask whether to delete the files from the memory card after the files are finished, press OK. data ...anything after copying. ◗ No Action if you are copied. 5 When you want the viewer to the previous screen. 25 Press Back to return to verify that the files were copied successfully. ◗ Verify &...
...Deleting Files After Copying You can have files automatically deleted after you copy them to the viewer. 1 On the Home screen, use the 4-way ring or jog dial to select ...to copy files without a warning message, after successfully copying the files. ◗ Confirm if you want the viewer to ask whether to delete the files from the memory card after the files are finished, press OK. data ...anything after copying. ◗ No Action if you are copied. 5 When you want the viewer to the previous screen. 25 Press Back to return to verify that the files were copied successfully. ◗ Verify &...

Basics
Page 27
... Videos Follow the instructions in this section to select the folder containing your photos, then press OK. Note: If you can display images at full-screen, zoom in Backup Files. 27 Viewing Photos You can connect the viewer to a TV or projector (see page 30). 1 Use the 4-way ring or jog dial to... view photos, create slide shows, and play videos on your P-6000/ P-7000. To share your images, slide...
... Videos Follow the instructions in this section to select the folder containing your photos, then press OK. Note: If you can display images at full-screen, zoom in Backup Files. 27 Viewing Photos You can connect the viewer to a TV or projector (see page 30). 1 Use the 4-way ring or jog dial to... view photos, create slide shows, and play videos on your P-6000/ P-7000. To share your images, slide...

Basics
Page 34
... see a progress bar on a TV You can connect the P-6000/P-7000 to view information including frame rate, bit rate, and video and audio codecs: Showing Photos and Videos on the video. The viewer remembers where you resume, playback starts 3 seconds before the stop point (for videos longer than 1 minute).
... see a progress bar on a TV You can connect the P-6000/P-7000 to view information including frame rate, bit rate, and video and audio codecs: Showing Photos and Videos on the video. The viewer remembers where you resume, playback starts 3 seconds before the stop point (for videos longer than 1 minute).

Basics
Page 35
... off. 3 Set the TV or projector to display video input from the viewer. Note: Some TVs may notice some flickering, for example, near the edges of the viewer's controls to show photos, videos, and slide shows on the side of your viewer's high image resolution. 35 Now you may crop your images at the...
... off. 3 Set the TV or projector to display video input from the viewer. Note: Some TVs may notice some flickering, for example, near the edges of the viewer's controls to show photos, videos, and slide shows on the side of your viewer's high image resolution. 35 Now you may crop your images at the...

