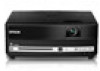
Start Here
Page 1
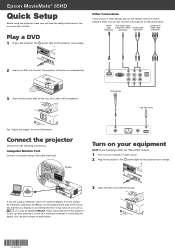
.... The power light on -screen User's Guide. Microphone USB flash drive See "Adjust the image" for more information. If you read the safety instructions in the on the projector turns orange. If you are using the projector, make sure you 're using a VGA cable (optional). Epson MovieMate® 85HD Quick Setup Before using a notebook, switch...
.... The power light on -screen User's Guide. Microphone USB flash drive See "Adjust the image" for more information. If you read the safety instructions in the on the projector turns orange. If you are using the projector, make sure you 're using a VGA cable (optional). Epson MovieMate® 85HD Quick Setup Before using a notebook, switch...
User's Guide
Page 4
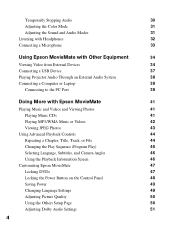
... Sound and Audio Modes 31 Listening with Headphones 32 Connecting a Microphone 33 Using Epson MovieMate with Other Equipment 34 Viewing Video from External Devices 34 Connecting a USB Device ... a Computer or Laptop 39 Connecting to the PC Port 39 Doing More with Epson MovieMate 41 Playing Music and Videos and Viewing Photos 41 Playing Music CDs 41 Playing... Play) 45 Selecting Language, Subtitles, and Camera Angles 46 Using the Playback Information Screen 46 Customizing Epson MovieMate 47 Locking DVDs 47 Locking the Power Button on the Control Panel 48 Saving Power...
... Sound and Audio Modes 31 Listening with Headphones 32 Connecting a Microphone 33 Using Epson MovieMate with Other Equipment 34 Viewing Video from External Devices 34 Connecting a USB Device ... a Computer or Laptop 39 Connecting to the PC Port 39 Doing More with Epson MovieMate 41 Playing Music and Videos and Viewing Photos 41 Playing Music CDs 41 Playing... Play) 45 Selecting Language, Subtitles, and Camera Angles 46 Using the Playback Information Screen 46 Customizing Epson MovieMate 47 Locking DVDs 47 Locking the Power Button on the Control Panel 48 Saving Power...
User's Guide
Page 7
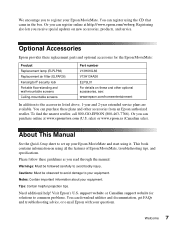
...: Contain helpful projection tips. Visit Epson's U.S. Welcome 7 About This Manual See the Quick Setup sheet to your equipment. support website or Canadian support website for the Epson MovieMate: Product Replacement lamp (ELPLP66) Replacement air filter (ELPAF26) Kensington® security lock Portable floor-standing and wall-mountable screens Ceiling-mountable screens Part number V13H010L66 V13H134A26 ELPSL01 For...
...: Contain helpful projection tips. Visit Epson's U.S. Welcome 7 About This Manual See the Quick Setup sheet to your equipment. support website or Canadian support website for the Epson MovieMate: Product Replacement lamp (ELPLP66) Replacement air filter (ELPAF26) Kensington® security lock Portable floor-standing and wall-mountable screens Ceiling-mountable screens Part number V13H010L66 V13H134A26 ELPSL01 For...

User's Guide
Page 18
For details, see "Wall and Projection Screen Recommendations" on a flat white wall. The following pictures show three different setups: Front Back Floor To project onto a wall, choose a flat white wall with projection paint to enhance the image quality. Choosing a Location You can use your Epson MovieMate just about anywhere-in the living room, bedroom, or...
For details, see "Wall and Projection Screen Recommendations" on a flat white wall. The following pictures show three different setups: Front Back Floor To project onto a wall, choose a flat white wall with projection paint to enhance the image quality. Choosing a Location You can use your Epson MovieMate just about anywhere-in the living room, bedroom, or...

User's Guide
Page 19
... zoom adjustment also affects image size. If necessary, you can adjust the shape using the keystone buttons on the remote control or the Visual Setup menu. Wide screen aspect ratio (16:10) Image size (diagonal) 33 in. 40 in. 50 in. 60 in. 80 in. 100 in. 150 in. 200 ...) 6.2 to 7.5 ft. (1.9 to the surface). This causes the image to 10.9 meters) Standard aspect ratio (4:3) Image size (diagonal) 29 in. 30 in front of the screen or wall, facing straight ahead (at a 90-degree angle to 2.3 meters) Unpacking and Setting Up 19 Projection distance 3 to 3.6 ft. (0.9 to 1.1 meters) 3.1 to 3.7 ft...
... zoom adjustment also affects image size. If necessary, you can adjust the shape using the keystone buttons on the remote control or the Visual Setup menu. Wide screen aspect ratio (16:10) Image size (diagonal) 33 in. 40 in. 50 in. 60 in. 80 in. 100 in. 150 in. 200 ...) 6.2 to 7.5 ft. (1.9 to the surface). This causes the image to 10.9 meters) Standard aspect ratio (4:3) Image size (diagonal) 29 in. 30 in front of the screen or wall, facing straight ahead (at a 90-degree angle to 2.3 meters) Unpacking and Setting Up 19 Projection distance 3 to 3.6 ft. (0.9 to 1.1 meters) 3.1 to 3.7 ft...
User's Guide
Page 23
...In a home theater setting-for watching DVD movies, HDTV broadcasts, or other widescreen content-the best screen shape ratio is 16:9, where the width is no cost or setup involved, and you can project and resize the image up to paint the wall with special reflective ...impact. There is almost twice the height. Viewing on a Projection Screen If you can easily view Epson MovieMate's high quality images on a Wall You can use a projection screen. Most DVD movies and HDTV broadcasts will fill the screen vertically and horizontally for optimum reflectivity and contrast in your home or...
...In a home theater setting-for watching DVD movies, HDTV broadcasts, or other widescreen content-the best screen shape ratio is 16:9, where the width is no cost or setup involved, and you can project and resize the image up to paint the wall with special reflective ...impact. There is almost twice the height. Viewing on a Projection Screen If you can easily view Epson MovieMate's high quality images on a Wall You can use a projection screen. Most DVD movies and HDTV broadcasts will fill the screen vertically and horizontally for optimum reflectivity and contrast in your home or...
User's Guide
Page 50
... page on the remote control. Press or to turn off this setting. 50 Doing More with Epson MovieMate Press to display the Others Setup Page. 3. Press on the Visual Setup menu to Auto. 1. You can choose from ■ Screen Saver: By default, the screen saver starts when a still image is set . Press to exit the menu.
... page on the remote control. Press or to turn off this setting. 50 Doing More with Epson MovieMate Press to display the Others Setup Page. 3. Press on the Visual Setup menu to Auto. 1. You can choose from ■ Screen Saver: By default, the screen saver starts when a still image is set . Press to exit the menu.
User's Guide
Page 52
... projecting images in a dark room or onto a small screen). If no image appears or you use the projector at an altitude above 4900 feet (1500 meters), to ensure that provides it . Press to exit the menu. 52 Doing More with Epson MovieMate You cannot select a Power Consumption setting when the Color...is too low or too high. ■ Closed Caption: Turn this setting on to display closed captioning for more information. until you see the Visual Setup menu. Press to exit the menu. to highlight Signal, then press to select it . ■ User Button: You can leave this set . button...
... projecting images in a dark room or onto a small screen). If no image appears or you use the projector at an altitude above 4900 feet (1500 meters), to ensure that provides it . Press to exit the menu. 52 Doing More with Epson MovieMate You cannot select a Power Consumption setting when the Color...is too low or too high. ■ Closed Caption: Turn this setting on to display closed captioning for more information. until you see the Visual Setup menu. Press to exit the menu. to highlight Signal, then press to select it . ■ User Button: You can leave this set . button...
User's Guide
Page 66
See page 50. ■ If the picture looks darker than it squarely toward the screen. See page 50. ■ If you're using external video equipment, check the solutions on... looks too light or too dark. ■ Press the button on the left or right side. The colors on the screen don't look right. ■ Press the button on the remote control or the Signal menu (see page 51). 66 ...Problem Solving Face it used to, you may need to adjust the Audio settings in the setup menu (see page 52)to select the best setting for your viewing environment. Use the or buttons on the remote...
See page 50. ■ If the picture looks darker than it squarely toward the screen. See page 50. ■ If you're using external video equipment, check the solutions on... looks too light or too dark. ■ Press the button on the left or right side. The colors on the screen don't look right. ■ Press the button on the remote control or the Signal menu (see page 51). 66 ...Problem Solving Face it used to, you may need to adjust the Audio settings in the setup menu (see page 52)to select the best setting for your viewing environment. Use the or buttons on the remote...
User's Guide
Page 67
...-in the setup menu (see page 51). ■ If the sound is distorted or too loud, try pressing the - No sound can 't change the language on a DVD. Make sure you may need to adjust the Audio settings in power microphone. Problems with External Video Equipment No picture appears on the screen. ■...
...-in the setup menu (see page 51). ■ If the sound is distorted or too loud, try pressing the - No sound can 't change the language on a DVD. Make sure you may need to adjust the Audio settings in power microphone. Problems with External Video Equipment No picture appears on the screen. ■...


