
Product Brochure
Page 4
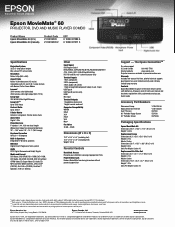
... Better Future is a trademark of toll-free, priority technical support, plus Epson's two-year limited warranty and a 90-day limited lamp warranty Contents Epson MovieMate 60, glow-in-the-dark remote control (with batteries), AC power cord, CD with Normal, Full or ... and reasonable recycling options at presentersonline.com Warranty Includes two-years of Seiko Epson Corporation. CPD-31088 10/09 Epson MovieMate® 60 Projector, DVD and music player combo Product Name Epson MovieMate 60 (U.S.) Epson MovieMate 60 (Canada) Product Code V11H319220 V11H319220-F UPC 0 10343 87389 6 0 10343...
... Better Future is a trademark of toll-free, priority technical support, plus Epson's two-year limited warranty and a 90-day limited lamp warranty Contents Epson MovieMate 60, glow-in-the-dark remote control (with batteries), AC power cord, CD with Normal, Full or ... and reasonable recycling options at presentersonline.com Warranty Includes two-years of Seiko Epson Corporation. CPD-31088 10/09 Epson MovieMate® 60 Projector, DVD and music player combo Product Name Epson MovieMate 60 (U.S.) Epson MovieMate 60 (Canada) Product Code V11H319220 V11H319220-F UPC 0 10343 87389 6 0 10343...
Quick Start
Page 1
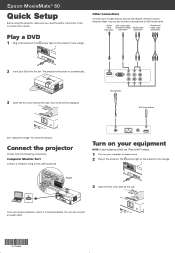
... slide all the way. If you are using a VGA cable (optional). Other Connections Connect up to 3 video devices and use the remote control to external display. Connect the projector Choose from the following connections: Computer Monitor Port Connect a computer using a notebook, switch it to..., see "Play a DVD" instead. 1 Turn on -screen User's Guide. You can also connect an audio cable. *411792800* *411792800* Epson MovieMate® 60 Quick Setup Before using the projector, make sure you read the safety instructions in the on your computer or video source. 2 Plug in the ...
... slide all the way. If you are using a VGA cable (optional). Other Connections Connect up to 3 video devices and use the remote control to external display. Connect the projector Choose from the following connections: Computer Monitor Port Connect a computer using a notebook, switch it to..., see "Play a DVD" instead. 1 Turn on -screen User's Guide. You can also connect an audio cable. *411792800* *411792800* Epson MovieMate® 60 Quick Setup Before using the projector, make sure you read the safety instructions in the on your computer or video source. 2 Plug in the ...
Quick Start
Page 2
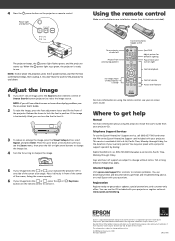
...is subject to cool down arrow buttons until you see an image, press the Source button (remote control) or Source Search button (projector) to correct it directly in XXXXXX CPD-27684 Epson MovieMate and PrivateLine are subject to change the image size. 4 Turn the focus ring to common ...problems. You can turn on light Control playback Control volume Access DVD features For more information about using the remote control, see the on -screen ...
...is subject to cool down arrow buttons until you see an image, press the Source button (remote control) or Source Search button (projector) to correct it directly in XXXXXX CPD-27684 Epson MovieMate and PrivateLine are subject to change the image size. 4 Turn the focus ring to common ...problems. You can turn on light Control playback Control volume Access DVD features For more information about using the remote control, see the on -screen ...
User Replaceable Parts List
Page 1
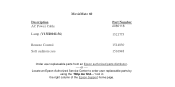
tool in the right column of the Epson Support home page. Locate an Epson Authorized Service Center to order user replaceable parts by using the "Help me find..." or ---- Description AC Power Cable Lamp (V13H010L56) Remote Control Soft cushion case MovieMate 60 Part Number 2080118 1521775 1514830 1516948 Order user replaceable parts from an Epson authorized parts distributor. ----
tool in the right column of the Epson Support home page. Locate an Epson Authorized Service Center to order user replaceable parts by using the "Help me find..." or ---- Description AC Power Cable Lamp (V13H010L56) Remote Control Soft cushion case MovieMate 60 Part Number 2080118 1521775 1514830 1516948 Order user replaceable parts from an Epson authorized parts distributor. ----
User's Guide
Page 8
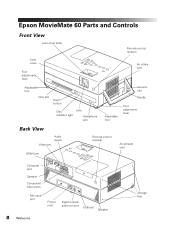
Epson MovieMate 60 Parts and Controls Front View Lens cover slide Lens cover Foot adjustment lever Remote control receiver Air intake vent Adjustable foot Disc slot Eject button Disc indicator light Lens Headphone jack Security slot Handle Adjustable foot Foot adjustment lever Back View Audio inputs Video port HDMI port Remote control receiver Air exhaust vent Computer port Speaker Component video ports Mic input port Power inlet Digital coaxial audio-out port USB port Speaker 8 Welcome Storage feet
Epson MovieMate 60 Parts and Controls Front View Lens cover slide Lens cover Foot adjustment lever Remote control receiver Air intake vent Adjustable foot Disc slot Eject button Disc indicator light Lens Headphone jack Security slot Handle Adjustable foot Foot adjustment lever Back View Audio inputs Video port HDMI port Remote control receiver Air exhaust vent Computer port Speaker Component video ports Mic input port Power inlet Digital coaxial audio-out port USB port Speaker 8 Welcome Storage feet

User's Guide
Page 10
Function/numerics toggle switch Eject DVD Project from external equipment Adjust picture for several minutes before using it in the dark. Expose the remote control to light for different lighting Fix image shape (if Epson MovieMate is tilted) Pause movie and turn on or off Note: The remote control buttons can glow in the dark. Remote Control Turn Epson MovieMate on light Control playback Control volume Access DVD features 10 Welcome
Function/numerics toggle switch Eject DVD Project from external equipment Adjust picture for several minutes before using it in the dark. Expose the remote control to light for different lighting Fix image shape (if Epson MovieMate is tilted) Pause movie and turn on or off Note: The remote control buttons can glow in the dark. Remote Control Turn Epson MovieMate on light Control playback Control volume Access DVD features 10 Welcome
User's Guide
Page 13
...to the case. ■ Make sure there is not in water. ■ Dispose of the required temperature range (41 to 95 °F [5 to 60 °C]) or in performance, indicating a need for long periods of children. ■ Don't overload wall outlets, extension cords, or integral convenience receptacles. ...This can be using the projector for the remote control out of the reach of time. If they run out. ■ Do not expose batteries to heat or flame and do not touch...
...to the case. ■ Make sure there is not in water. ■ Dispose of the required temperature range (41 to 95 °F [5 to 60 °C]) or in performance, indicating a need for long periods of children. ■ Don't overload wall outlets, extension cords, or integral convenience receptacles. ...This can be using the projector for the remote control out of the reach of time. If they run out. ■ Do not expose batteries to heat or flame and do not touch...
User's Guide
Page 15
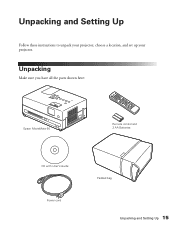
Unpacking and Setting Up Follow these instructions to unpack your projector, choose a location, and set up your projector. Unpacking Make sure you have all the parts shown here: Epson MovieMate 60 Remote control and 2 AA Batteries CD with User's Guide Power cord Padded bag Unpacking and Setting Up 15
Unpacking and Setting Up Follow these instructions to unpack your projector, choose a location, and set up your projector. Unpacking Make sure you have all the parts shown here: Epson MovieMate 60 Remote control and 2 AA Batteries CD with User's Guide Power cord Padded bag Unpacking and Setting Up 15

User's Guide
Page 17
... causes the image to 8.2 meters) 29.9 ft. (9.1 meters) Unpacking and Setting Up 17 Wide screen aspect ratio (16:9) Image size (diagonal) 30 in. 50 in. 60 in. 70 in. 80 in. 100 in. 150 in. 200 in. 300 in front of the screen or wall, facing straight ahead (at a 90-degree... extending the feet and tilting the projector up. Your projector should be . The farther you can adjust the shape using the keystone buttons on the remote control or the Visual Setup menu. Note that the zoom adjustment also affects image size.
... causes the image to 8.2 meters) 29.9 ft. (9.1 meters) Unpacking and Setting Up 17 Wide screen aspect ratio (16:9) Image size (diagonal) 30 in. 50 in. 60 in. 70 in. 80 in. 100 in. 150 in. 200 in. 300 in front of the screen or wall, facing straight ahead (at a 90-degree... extending the feet and tilting the projector up. Your projector should be . The farther you can adjust the shape using the keystone buttons on the remote control or the Visual Setup menu. Note that the zoom adjustment also affects image size.
User's Guide
Page 19
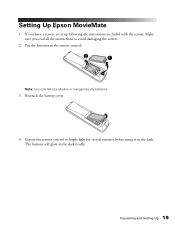
Put the batteries in the dark briefly. Make sure you have a screen, set it in the dark. Reattach the battery cover. 4. The buttons will glow in the remote control. Unpacking and Setting Up 19 If you read all the instructions to bright light for several minutes before using it up following the instructions included with the screen. Setting Up Epson MovieMate 1. Note: Use only AA-size alkaline or manganese dry batteries. 3. Expose the remote control to avoid damaging the screen. 2.
Put the batteries in the dark briefly. Make sure you have a screen, set it in the dark. Reattach the battery cover. 4. The buttons will glow in the remote control. Unpacking and Setting Up 19 If you read all the instructions to bright light for several minutes before using it up following the instructions included with the screen. Setting Up Epson MovieMate 1. Note: Use only AA-size alkaline or manganese dry batteries. 3. Expose the remote control to avoid damaging the screen. 2.

User's Guide
Page 20
Press the button on the projector or the on the remote control. 5. If there is a disc inside the projector, eject it is finished powering off. Close the lens cover. 20 Unpacking and Setting Up The light turns orange. Warning: Do not disconnect the power cable before the projector beeps, or you may damage the projector. 3. The projector will beep twice when it . 2. Turning the Projector Off 1. Open the lens cover, then connect the power cord and plug in the projector.
Press the button on the projector or the on the remote control. 5. If there is a disc inside the projector, eject it is finished powering off. Close the lens cover. 20 Unpacking and Setting Up The light turns orange. Warning: Do not disconnect the power cable before the projector beeps, or you may damage the projector. 3. The projector will beep twice when it . 2. Turning the Projector Off 1. Open the lens cover, then connect the power cord and plug in the projector.
User's Guide
Page 24
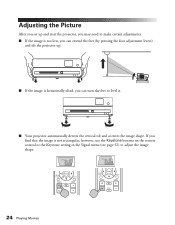
... and start the projector, you may need to make certain adjustments. ■ If the image is not rectangular, however, use the Keystone buttons on the remote control or the Keystone setting in the Signal menu (see page 52) to level it. ■ Your projector automatically detects the vertical tilt and corrects...
... and start the projector, you may need to make certain adjustments. ■ If the image is not rectangular, however, use the Keystone buttons on the remote control or the Keystone setting in the Signal menu (see page 52) to level it. ■ Your projector automatically detects the vertical tilt and corrects...

User's Guide
Page 25
■ Use the Zoom setting in the Signal menu to temporarily turn off the sound. You can also press the button on the remote control to adjust the image size. Playing Movies 25 See page 52. ■ Rotate the focus ring to sharpen the picture. ■ To enlarge or reduce the aspect ratio of the picture, press the button on the control panel or remote control. Volume buttons on the remote control to select Normal, Full, or Zoom (if available for the video source you're using). Adjusting the Sound To adjust the volume, use the + or -
■ Use the Zoom setting in the Signal menu to temporarily turn off the sound. You can also press the button on the remote control to adjust the image size. Playing Movies 25 See page 52. ■ Rotate the focus ring to sharpen the picture. ■ To enlarge or reduce the aspect ratio of the picture, press the button on the control panel or remote control. Volume buttons on the remote control to select Normal, Full, or Zoom (if available for the video source you're using). Adjusting the Sound To adjust the volume, use the + or -

User's Guide
Page 26
..., , again. You can also select items on the control ■ To pause a movie and display the Epson logo, press remote control or control panel. Note: DVD movies are divided into units called titles. on the remote control or on the control ■ To pause a movie and light up the screen or wall temporarily... or the control panel to pause, fast-forward, or replay sections of your media or file type. on the remote control or on a DVD menu by using the remote control. Pausing There are three ways to pause a DVD or audio track: ■ To pause a movie, or a music CD or MP3 ...
..., , again. You can also select items on the control ■ To pause a movie and display the Epson logo, press remote control or control panel. Note: DVD movies are divided into units called titles. on the remote control or on the control ■ To pause a movie and light up the screen or wall temporarily... or the control panel to pause, fast-forward, or replay sections of your media or file type. on the remote control or on a DVD menu by using the remote control. Pausing There are three ways to pause a DVD or audio track: ■ To pause a movie, or a music CD or MP3 ...

User's Guide
Page 27
...in slow motion. Press or to normal play. Press to return to move forward or backward through a video or music CD, press or on the remote control. 2. Each time you press the button, the speed decreases. 4. Playing in or out. position.) ■ Continue pressing to the start ...of the current chapter or track, press on the remote control. Press repeatedly to normal play a video frame by frame. 3. Use the , , , and around the image if necessary. Skipping ■ To ...
...in slow motion. Press or to normal play. Press to return to move forward or backward through a video or music CD, press or on the remote control. 2. Each time you press the button, the speed decreases. 4. Playing in or out. position.) ■ Continue pressing to the start ...of the current chapter or track, press on the remote control. Press repeatedly to normal play a video frame by frame. 3. Use the , , , and around the image if necessary. Skipping ■ To ...

User's Guide
Page 28
... also select a title or chapter by number. ■ If you want to use the numeric buttons, you need to set the toggle switch on the remote control to the -Num position. ■ After you set the toggle switch, you may need to display the top menu). ■ To select items in...
... also select a title or chapter by number. ■ If you want to use the numeric buttons, you need to set the toggle switch on the remote control to the -Num position. ■ After you set the toggle switch, you may need to display the top menu). ■ To select items in...

User's Guide
Page 29
... mode is normal. This is displayed on the screen. 4. You see the current setting displayed on the screen. 2. Note: Fan speed varies depending on the remote control. Press repeatedly until the desired color mode appears.
... mode is normal. This is displayed on the screen. 4. You see the current setting displayed on the screen. 2. Note: Fan speed varies depending on the remote control. Press repeatedly until the desired color mode appears.
User's Guide
Page 30
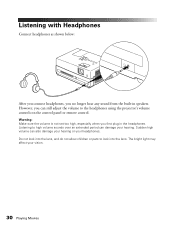
... shown below: After you connect headphones, you can still adjust the volume to the headphones using the projector's volume controls on the control panel or remote control. However, you no longer hear any sound from the built-in the headphones. Warning: Make sure the volume is not set too high, especially...
... shown below: After you connect headphones, you can still adjust the volume to the headphones using the projector's volume controls on the control panel or remote control. However, you no longer hear any sound from the built-in the headphones. Warning: Make sure the volume is not set too high, especially...
User's Guide
Page 31
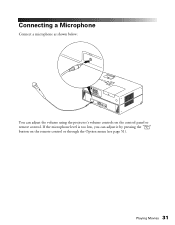
If the microphone level is too low, you can adjust the volume using the projector's volume controls on the remote control or through the Option menu (see page 51). Playing Movies 31 Connecting a Microphone Connect a microphone as shown below: You can adjust it by pressing the button on the control panel or remote control.
If the microphone level is too low, you can adjust the volume using the projector's volume controls on the remote control or through the Option menu (see page 51). Playing Movies 31 Connecting a Microphone Connect a microphone as shown below: You can adjust it by pressing the button on the control panel or remote control.
User's Guide
Page 34
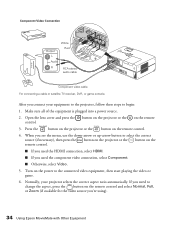
... projector or the button on the remote control. 3. Component Video Connection Output L White Red Audio R RCA stereo audio cable Component video cable For connecting a cable or satellite TV receiver, DVR, or game console. After you 're using). 34 Using Epson MovieMate with Other Equipment Open the lens... cover and press the button on the projector or the on the remote control. ■ If you used the HDMI connection, select HDMI. ■ If you ...
... projector or the button on the remote control. 3. Component Video Connection Output L White Red Audio R RCA stereo audio cable Component video cable For connecting a cable or satellite TV receiver, DVR, or game console. After you 're using). 34 Using Epson MovieMate with Other Equipment Open the lens... cover and press the button on the projector or the on the remote control. ■ If you used the HDMI connection, select HDMI. ■ If you ...


