
Technical Reference
Page 11
Contents TM-H6000III Technical Reference Guide TM-H6000III Technical Reference Guide Revision Information iv About This Manual v ... (Option 1-2 1.1.6 Others 1-2 1.1.7 About control method 1-2 1.2 Product Structure 1-3 1.2.1 Standard Parts Included with the Printer 1-3 1.2.2 Options 1-3 1.3 Consumables 1-3 1.3.1 Roll paper 1-3 1.3.2 Ribbons 1-3 1.4 Printing and Paper Specifications 1-4 1.4.1 Receipt Section 1-4 1.4.1.1 Autocutter 1-5 1.4.1.2 Paper Roll Supply Device Section 1-5 1.4.1.3 Paper Specifications 1-6 1.4.1.4 Printable Area 1-7 1.4.1.5 Printing and Cutting Positions...
Contents TM-H6000III Technical Reference Guide TM-H6000III Technical Reference Guide Revision Information iv About This Manual v ... (Option 1-2 1.1.6 Others 1-2 1.1.7 About control method 1-2 1.2 Product Structure 1-3 1.2.1 Standard Parts Included with the Printer 1-3 1.2.2 Options 1-3 1.3 Consumables 1-3 1.3.1 Roll paper 1-3 1.3.2 Ribbons 1-3 1.4 Printing and Paper Specifications 1-4 1.4.1 Receipt Section 1-4 1.4.1.1 Autocutter 1-5 1.4.1.2 Paper Roll Supply Device Section 1-5 1.4.1.3 Paper Specifications 1-6 1.4.1.4 Printable Area 1-7 1.4.1.5 Printing and Cutting Positions...
Technical Reference
Page 13
... Hexadecimal Dump 4-8 Rev. TM-H6000III Technical Reference Guide Chapter 3 ... (PS-180 3-8 3.3.2 Installing or Replacing the Ribbon Cassette 3-9 3.3.3 Installing or Replacing the Endorsement Ribbon Cassette 3-12 3.3.4 Installing or Replacing the Paper ... Paper 3-23 3.4.4 Memory Switches 3-23 3.4.5 How to Use Two-Color Printing 3-24 3.5 Self Tests 3-24 3.5.1 Running the Self ... Function (Option 3-25 Chapter 4 Maintenance & Troubleshooting 4.1 Maintenance 4-1 4.1.1 Cleaning the Thermal Print Head 4-1 4.1.2 Cleaning the MICR Mechanism 4-1 4.1.2.1 Cleaning frequency 4-1 4.1.2.2 Cleaning ...
... Hexadecimal Dump 4-8 Rev. TM-H6000III Technical Reference Guide Chapter 3 ... (PS-180 3-8 3.3.2 Installing or Replacing the Ribbon Cassette 3-9 3.3.3 Installing or Replacing the Endorsement Ribbon Cassette 3-12 3.3.4 Installing or Replacing the Paper ... Paper 3-23 3.4.4 Memory Switches 3-23 3.4.5 How to Use Two-Color Printing 3-24 3.5 Self Tests 3-24 3.5.1 Running the Self ... Function (Option 3-25 Chapter 4 Maintenance & Troubleshooting 4.1 Maintenance 4-1 4.1.1 Cleaning the Thermal Print Head 4-1 4.1.2 Cleaning the MICR Mechanism 4-1 4.1.2.1 Cleaning frequency 4-1 4.1.2.2 Cleaning ...
Technical Reference
Page 19
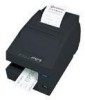
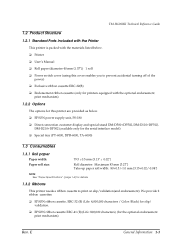
E General Information 1-3 We provide 2 ribbon cassettes: ❏ EPSON ribbon cassette, ERC-32 (B) (Life: 4,000,000 characters / Color: Black) for slip/ validation. ❏ EPSON ribbon cassette ERC-41 (B) (Life: 800,000 characters) (for details. 1.3.2 Ribbons This printer needs a ribbon cassette to print on slip/validation(and endorsement). TM-H6000III Technical Reference Guide 1.2 Product Structure 1.2.1 Standard Parts Included with the Printer This printer...
E General Information 1-3 We provide 2 ribbon cassettes: ❏ EPSON ribbon cassette, ERC-32 (B) (Life: 4,000,000 characters / Color: Black) for slip/ validation. ❏ EPSON ribbon cassette ERC-41 (B) (Life: 800,000 characters) (for details. 1.3.2 Ribbons This printer needs a ribbon cassette to print on slip/validation(and endorsement). TM-H6000III Technical Reference Guide 1.2 Product Structure 1.2.1 Standard Parts Included with the Printer This printer...

Technical Reference
Page 47
... must be installed horizontally. 1.6.6 Interfaces ❏ USB ❏ RS-232 ❏ IEEE 1284 bidirectional parallel ❏ 10BASE-T/100BASE-TX ❏ RS-485 TM-H6000III Technical Reference Guide 1.7 Notes for Barcode printing on slip printer This printer supports the barcode printing on the slip/validation. ❏ Ladder barcode is not... supported. ❏ HRI character must be added. ❏ Use the ERC-32(B) black ink ribbon cassette. ❏ Recognized rate of barcode reading may differ with HRI characters which can be used .
... must be installed horizontally. 1.6.6 Interfaces ❏ USB ❏ RS-232 ❏ IEEE 1284 bidirectional parallel ❏ 10BASE-T/100BASE-TX ❏ RS-485 TM-H6000III Technical Reference Guide 1.7 Notes for Barcode printing on slip printer This printer supports the barcode printing on the slip/validation. ❏ Ladder barcode is not... supported. ❏ HRI character must be added. ❏ Use the ERC-32(B) black ink ribbon cassette. ❏ Recognized rate of barcode reading may differ with HRI characters which can be used .
Technical Reference
Page 71
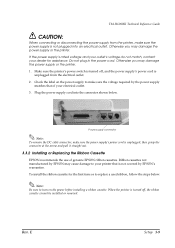
...the printer. Make sure the printer's power switch is turned off , the ribbon cassette cannot be installed or removed. Plug the power supply cord into an electrical outlet. TM-H6000III Technical Reference Guide CAUTION: When connecting or disconnecting the power supply from the ...printer, make sure the power supply is unplugged from the electrical outlet. 2. then grasp the connector at the arrow and pull it straight out. 3.3.2 Installing or Replacing the Ribbon Cassette EPSON...
...the printer. Make sure the printer's power switch is turned off , the ribbon cassette cannot be installed or removed. Plug the power supply cord into an electrical outlet. TM-H6000III Technical Reference Guide CAUTION: When connecting or disconnecting the power supply from the ...printer, make sure the power supply is unplugged from the electrical outlet. 2. then grasp the connector at the arrow and pull it straight out. 3.3.2 Installing or Replacing the Ribbon Cassette EPSON...

Technical Reference
Page 73
E Setup 3-11 Turn the knob two or three times to see if the ribbon is seated correctly. You can also look at the side of the printer. Close the front cover of the slip unit to make sure the ribbon is in the correct place. Edge of ribbon cassette Rev. TM-H6000III Technical Reference Guide 5. See below. 6.
E Setup 3-11 Turn the knob two or three times to see if the ribbon is seated correctly. You can also look at the side of the printer. Close the front cover of the slip unit to make sure the ribbon is in the correct place. Edge of ribbon cassette Rev. TM-H6000III Technical Reference Guide 5. See below. 6.

Technical Reference
Page 75
You can see a properly installed ribbon in the illustration below. 4. Turn the knob two or three times to the core because they might ...Do not use paper rolls that the printer is one. 4. Insert the paper roll as shown. Insert the ribbon cartridge into the printer. Remove the used paper roll core if there is not receiving data. 2. E Setup...sure that the ribbon is seated correctly. 5. Rev. Close the cover of the printer. 1. Open the paper roll cover by lifting up the two tabs on the paper roll cover and then pushing the cover back. 3. TM-H6000III Technical Reference Guide ...
You can see a properly installed ribbon in the illustration below. 4. Turn the knob two or three times to the core because they might ...Do not use paper rolls that the printer is one. 4. Insert the paper roll as shown. Insert the ribbon cartridge into the printer. Remove the used paper roll core if there is not receiving data. 2. E Setup...sure that the ribbon is seated correctly. 5. Rev. Close the cover of the printer. 1. Open the paper roll cover by lifting up the two tabs on the paper roll cover and then pushing the cover back. 3. TM-H6000III Technical Reference Guide ...


