User Manual
Page 2
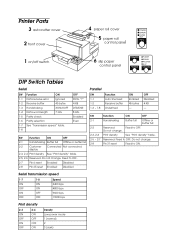
... 2-2 Reserved Fixed to OFF. 2-7 Pin 6 reset Enabled Disabled 2-8 Pin 25 reset Enabled Disabled SW 1-1 1-2 1-3 ~ 1-8 Function Auto line feed Receive buffer Undefined ON Enabled 45 bytes - Printer Parts 3 autocutter cover 2 front cover 1 on/off switch 4 paper roll cover 5 paper roll control panel POWER ERROR PAPER OUT FEED 6 slip paper control panel FORWARD...
... 2-2 Reserved Fixed to OFF. 2-7 Pin 6 reset Enabled Disabled 2-8 Pin 25 reset Enabled Disabled SW 1-1 1-2 1-3 ~ 1-8 Function Auto line feed Receive buffer Undefined ON Enabled 45 bytes - Printer Parts 3 autocutter cover 2 front cover 1 on/off switch 4 paper roll cover 5 paper roll control panel POWER ERROR PAPER OUT FEED 6 slip paper control panel FORWARD...
User Manual
Page 3
...or alterations to the printers that changes or modifications not expressly approved by Seiko Epson Corporation, Nagano, Japan. Safety Precautions This section presents important information intended to this printer will invalidate the EMC standards of Seiko Epson Corporation. TM-H5000II User's Manual 3...by Seiko Epson Corporation. Neither Seiko Epson Corporation nor its affiliates shall be required to the use of the information contained herein. EMC and Safety Standards Applied Product Name: TM-H5000II Model Name: M128C The following Directives and Norms: Directive 89/336/...
...or alterations to the printers that changes or modifications not expressly approved by Seiko Epson Corporation, Nagano, Japan. Safety Precautions This section presents important information intended to this printer will invalidate the EMC standards of Seiko Epson Corporation. TM-H5000II User's Manual 3...by Seiko Epson Corporation. Neither Seiko Epson Corporation nor its affiliates shall be required to the use of the information contained herein. EMC and Safety Standards Applied Product Name: TM-H5000II Model Name: M128C The following Directives and Norms: Directive 89/336/...
User Manual
Page 4
...lead to an improper power source may cause fire. Equipment may be dangerous. otherwise, the printer and the telephone line may fall into this manual. CAUTION: Do not connect cables in... this equipment, unplug the power cord immediately, and then contact your dealer or a SEIKO EPSON service center for advice. Doing so may cause fire. Improper repair work can be damaged....this product. Do not use the specified power source. CAUTION: The thermal head and print head are hot. 4 TM-H5000II User's Manual Continued usage may result in locations subject to use ...
...lead to an improper power source may cause fire. Equipment may be dangerous. otherwise, the printer and the telephone line may fall into this manual. CAUTION: Do not connect cables in... this equipment, unplug the power cord immediately, and then contact your dealer or a SEIKO EPSON service center for advice. Doing so may cause fire. Improper repair work can be damaged....this product. Do not use the specified power source. CAUTION: The thermal head and print head are hot. 4 TM-H5000II User's Manual Continued usage may result in locations subject to use ...

User Manual
Page 5
...one line; Slip Control Panel FORWARD button Press to feed continuously. TM-H5000II User's Manual 5 English Unpacking The following items are included with the standard specification printer. hold down to feed paper one line; POWER LED Lights when the printer is at the end or near the end. POWER LED Lights when... power is damaged, contact your dealer. ❏ Printer ❏ Power switch cover ❏ Ribbon cassette ❏ Paper roll ❏ Hexagonal lock screws (2 pcs) (only for the serial interface) Control Panels Paper Roll...
...one line; Slip Control Panel FORWARD button Press to feed continuously. TM-H5000II User's Manual 5 English Unpacking The following items are included with the standard specification printer. hold down to feed paper one line; POWER LED Lights when the printer is at the end or near the end. POWER LED Lights when... power is damaged, contact your dealer. ❏ Printer ❏ Power switch cover ❏ Ribbon cassette ❏ Paper roll ❏ Hexagonal lock screws (2 pcs) (only for the serial interface) Control Panels Paper Roll...
User Manual
Page 6
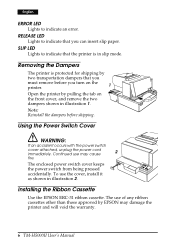
... the front cover, and remove the two dampers shown in illustration 1. Installing the Ribbon Cassette Use the EPSON ERC-31 ribbon cassette. Continued use may damage the printer and will void the warranty. 6 TM-H5000II User's Manual To use of any ribbon cassettes other than those approved by two transportation dampers that you...
... the front cover, and remove the two dampers shown in illustration 1. Installing the Ribbon Cassette Use the EPSON ERC-31 ribbon cassette. Continued use may damage the printer and will void the warranty. 6 TM-H5000II User's Manual To use of any ribbon cassettes other than those approved by two transportation dampers that you...
User Manual
Page 7
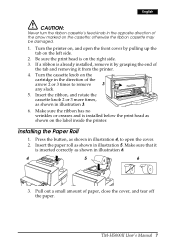
...Installing the Paper Roll 1. Press the button, as shown in illustration 6. 4 5 6 3. Make sure that it from the printer. 4. English CAUTION: Never turn the ribbon cassette's feed knob in the opposite direction of the arrow marked on the left side. 2. Insert the paper roll as shown in illustration 3. 6. Make sure the... in the direction of the arrow 2 or 3 times to open the front cover by grasping the end of paper, close the cover, and tear off the paper. Be sure the print head is already installed, remove it by pulling up the tab on the cassette; TM-H5000II User's Manual...
...Installing the Paper Roll 1. Press the button, as shown in illustration 6. 4 5 6 3. Make sure that it from the printer. 4. English CAUTION: Never turn the ribbon cassette's feed knob in the opposite direction of the arrow marked on the left side. 2. Insert the paper roll as shown in illustration 3. 6. Make sure the... in the direction of the arrow 2 or 3 times to open the front cover by grasping the end of paper, close the cover, and tear off the paper. Be sure the print head is already installed, remove it by pulling up the tab on the cassette; TM-H5000II User's Manual...
User Manual
Page 8
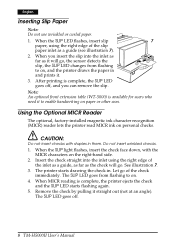
...not insert wrinkled checks. 1. The printer starts drawing the check in them. The SLIP LED goes off , and you insert the slip into the inlet using the right edge of the check immediately. After printing is complete, the SLIP LED goes off . 8 TM-H5000II User's Manual Let go , ...far as a guide (see illustration 7). 2. When you can remove the slip. 7 1 2 Note: An optional front extension table (WT-5000) is complete, the printer ejects the check and the SLIP LED starts flashing again. 5. English Inserting Slip Paper Note: Do not use wrinkled or curled paper. 1. Using the Optional...
...not insert wrinkled checks. 1. The printer starts drawing the check in them. The SLIP LED goes off , and you insert the slip into the inlet using the right edge of the check immediately. After printing is complete, the SLIP LED goes off . 8 TM-H5000II User's Manual Let go , ...far as a guide (see illustration 7). 2. When you can remove the slip. 7 1 2 Note: An optional front extension table (WT-5000) is complete, the printer ejects the check and the SLIP LED starts flashing again. 5. English Inserting Slip Paper Note: Do not use wrinkled or curled paper. 1. Using the Optional...
User Manual
Page 9
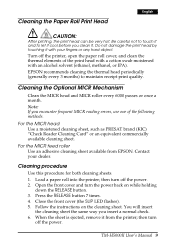
...errors, use one of the print head with a cotton swab moistened with your dealer. TM-H5000II User's Manual 9 Be careful not to touch it and to maintain receipt print quality. For...commercially available cleaning sheet. Load a paper roll into the printer; Press the RELEASE button 7 times. 4. When the sheet is ejected, remove it from EPSON. then turn the power back on the cleaning sheet.... every 6000 passes or once a month. then turn off the printer, open the paper roll cover, and clean the thermal elements of the following methods. Follow the instructions on while holding ...
...errors, use one of the print head with a cotton swab moistened with your dealer. TM-H5000II User's Manual 9 Be careful not to touch it and to maintain receipt print quality. For...commercially available cleaning sheet. Load a paper roll into the printer; Press the RELEASE button 7 times. 4. When the sheet is ejected, remove it from EPSON. then turn the power back on the cleaning sheet.... every 6000 passes or once a month. then turn off the printer, open the paper roll cover, and clean the thermal elements of the following methods. Follow the instructions on while holding ...
User Manual
Page 10
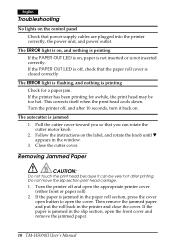
...either front or paper roll). 2. Turn the printer off, and after printing. Follow the instructions on , paper is not inserted or is jammed in the slip section, open the front cover and remove the jammed paper. 10 TM-H5000II User's Manual Turn the printer off , check that power supply cables are ...plugged into the printer correctly, the power unit, and power outlet. If the paper is closed correctly. Then remove the ...
...either front or paper roll). 2. Turn the printer off, and after printing. Follow the instructions on , paper is not inserted or is jammed in the slip section, open the front cover and remove the jammed paper. 10 TM-H5000II User's Manual Turn the printer off , check that power supply cables are ...plugged into the printer correctly, the power unit, and power outlet. If the paper is closed correctly. Then remove the ...


