
Quick Reference
Page 2
...manuals, double-click the PL Pro G5000 Series User Guide, EasyMP Operation Guide (for G5150NL and G5350NL users only), or EMP Monitor Operation Guide (for Windows users only) icon on your computer's desktop. Turning the Projector On 1. Or press the blue foot release lever and lift the front of the projector... to move your computer's CD or DVD drive. (Double-click the Epson installer icon, if necessary.) 2. After the power light stays green, the projector is connected. To turn the projector on this feature, see "Switching Between Image Sources" or "Troubleshooting." Select...
...manuals, double-click the PL Pro G5000 Series User Guide, EasyMP Operation Guide (for G5150NL and G5350NL users only), or EMP Monitor Operation Guide (for Windows users only) icon on your computer's desktop. Turning the Projector On 1. Or press the blue foot release lever and lift the front of the projector... to move your computer's CD or DVD drive. (Double-click the Epson installer icon, if necessary.) 2. After the power light stays green, the projector is connected. To turn the projector on this feature, see "Switching Between Image Sources" or "Troubleshooting." Select...
Installation Reference Guide
Page 11
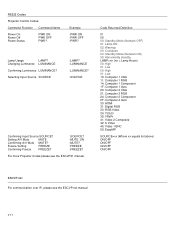
...MUTE Confirming A/V Mute MUTE? Selecting Input Source SOURCE :LAMP? :LUMINANCE :LUMINANCE? :SOURCE Confirming Input Source SOURCE? For more Projector Codes please see the ESCVP.net manual. V1.7 Freeze Setting FREEZE Confirming Freeze FREEZE? :SOURCE? :MUTE ON :MUTE? :FREEZE :FREEZE? Changing Luminance LUMINANCE Confirming ...ON/OFF ON/OFF ON/OFF ON/OFF ESCVP.net For communication over IP, please see the ESCVP21 manual. Lamp Usage LAMP? RS232 Codes Projector Control Codes: Command Function Command Name Power On Power Off Power Status PWR ON PWR OFF PWR? Example...
...MUTE Confirming A/V Mute MUTE? Selecting Input Source SOURCE :LAMP? :LUMINANCE :LUMINANCE? :SOURCE Confirming Input Source SOURCE? For more Projector Codes please see the ESCVP.net manual. V1.7 Freeze Setting FREEZE Confirming Freeze FREEZE? :SOURCE? :MUTE ON :MUTE? :FREEZE :FREEZE? Changing Luminance LUMINANCE Confirming ...ON/OFF ON/OFF ON/OFF ON/OFF ESCVP.net For communication over IP, please see the ESCVP21 manual. Lamp Usage LAMP? RS232 Codes Projector Control Codes: Command Function Command Name Power On Power Off Power Status PWR ON PWR OFF PWR? Example...

Operation Guide - EasyMP
Page 13
...) on the other computers while connected to the selected projector. SSID ("Quick Connection Mode" only) The projector's SSID is already connected. Use multi-display Select this when using a profile saved with the same SSID. Manual search In "Advanced Connection Mode", you can select it... s p.34 Clear list Deletes all search result lists. Currently in the profile Saves the results of a search for projectors on the network as a result of "Manual Search" or "Profile". 13 In "Quick Connection Mode", you click "Connect", the computer currently connected is disconnected and ...
...) on the other computers while connected to the selected projector. SSID ("Quick Connection Mode" only) The projector's SSID is already connected. Use multi-display Select this when using a profile saved with the same SSID. Manual search In "Advanced Connection Mode", you can select it... s p.34 Clear list Deletes all search result lists. Currently in the profile Saves the results of a search for projectors on the network as a result of "Manual Search" or "Profile". 13 In "Quick Connection Mode", you click "Connect", the computer currently connected is disconnected and ...

Operation Guide - EasyMP
Page 33
... search results are displayed on the EMP NS Connection projector selection screen. s p.34 q When you use "Manual search" in "Quick Connection Mode", you can narrow the search field by Specifying the IP Address and Projector Name (For "Advanced Connection Mode" only) 33 ... Enter the IP address or the projector name for the projector you perform a search. Procedure A Click "Manual search" on the EMP NS Connection projector selection screen. You see a similar screen even when using that projector, save the search as a profile, such that projector, and then click "Connect" to...
... search results are displayed on the EMP NS Connection projector selection screen. s p.34 q When you use "Manual search" in "Quick Connection Mode", you can narrow the search field by Specifying the IP Address and Projector Name (For "Advanced Connection Mode" only) 33 ... Enter the IP address or the projector name for the projector you perform a search. Procedure A Click "Manual search" on the EMP NS Connection projector selection screen. You see a similar screen even when using that projector, save the search as a profile, such that projector, and then click "Connect" to...

Operation Guide - EasyMP
Page 86
... connection Check Remedy Are the SSID settings for the access point and the projector set "EPSON Virtual Display" to allow connections from the computer's screen when using the multi-screen display. Select "Manual search" from "Security", set correctly at the access point? If this... For Windows happens, set correctly? f Cannot connect in "Screen properties". When EPSON Virtual Display is connected correctly. See your User's Guide for ...
... connection Check Remedy Are the SSID settings for the access point and the projector set "EPSON Virtual Display" to allow connections from the computer's screen when using the multi-screen display. Select "Manual search" from "Security", set correctly at the access point? If this... For Windows happens, set correctly? f Cannot connect in "Screen properties". When EPSON Virtual Display is connected correctly. See your User's Guide for ...

Operation Guide - EasyMP
Page 89
... to the computer with EMP NS Connection. Check the projector's keyword displayed on the computer? Quick Connection Mode There is an PowerLite 735c projector in the projector. One or more connected projectors do not respond. There are not restored after cutting the connection to the wireless LAN manually. Check Remedy Are you still cannot connect, check...
... to the computer with EMP NS Connection. Check the projector's keyword displayed on the computer? Quick Connection Mode There is an PowerLite 735c projector in the projector. One or more connected projectors do not respond. There are not restored after cutting the connection to the wireless LAN manually. Check Remedy Are you still cannot connect, check...
Product Brochure
Page 2
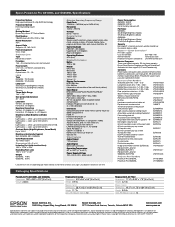
...: 480i, 480p; Epson PowerLite Pro G5150NL and G5350NL Specifications Projection System High-aperture Epson 3-chip 3LCD technology Projection Method Front/rear/ceiling mount LCD Driving Method Epson Poly-silicon TFT Active Matrix Pixel Number 786,432 pixel x 3 LCDs (1024 x 768) Native Resolution XGA Aspect Ratio Supports 4:3, 16:9, 16:10 Pixel Arrangement Cross stripe Projection Lens Type Manual focus/zoom F-number...
...: 480i, 480p; Epson PowerLite Pro G5150NL and G5350NL Specifications Projection System High-aperture Epson 3-chip 3LCD technology Projection Method Front/rear/ceiling mount LCD Driving Method Epson Poly-silicon TFT Active Matrix Pixel Number 786,432 pixel x 3 LCDs (1024 x 768) Native Resolution XGA Aspect Ratio Supports 4:3, 16:9, 16:10 Pixel Arrangement Cross stripe Projection Lens Type Manual focus/zoom F-number...

Product Support Bulletin(s)
Page 3
Countermeasure Hardware acceleration level is changed manually, at next startup, NS connection starts with the built-in the Set Options window of NS Connection. Limitation By setting hardware acceleration level to 3 when ...
Countermeasure Hardware acceleration level is changed manually, at next startup, NS connection starts with the built-in the Set Options window of NS Connection. Limitation By setting hardware acceleration level to 3 when ...

Product Support Bulletin(s)
Page 5
... Upgrade History: Version Release date 1.00 December 25, 2002 1.10 January 1, 2003 1.20 September 10, Remarks New release Release for PowerLite 7850p Improved the transfer rate specification for NSC V2.40. Macintosh OS In case of 8 PSB.2009.06.002 For example, when you ... which you need to uninstall. The program and bulletin are extracted and copied to find the bulletin. Delete manually. The files are inside this folder to C:\EPSON\epson13123_EMP_NS_Connection_251. Delete by installer exclusively for NS Connection. The program will double-click on the Mac, the extraction...
... Upgrade History: Version Release date 1.00 December 25, 2002 1.10 January 1, 2003 1.20 September 10, Remarks New release Release for PowerLite 7850p Improved the transfer rate specification for NSC V2.40. Macintosh OS In case of 8 PSB.2009.06.002 For example, when you ... which you need to uninstall. The program and bulletin are extracted and copied to find the bulletin. Delete manually. The files are inside this folder to C:\EPSON\epson13123_EMP_NS_Connection_251. Delete by installer exclusively for NS Connection. The program will double-click on the Mac, the extraction...

Product Support Bulletin(s)
Page 9
...+ / G5000 / Pro G5150 / Pro G5350 / Pro G5200W / 1725 / 1735W / 400W / 410W / 84 / 85 / 825 / 826W PowerLite 61p / 81p / 82c / 821p / 1810 / 260d (Latin America) / 280d (Latin America) with TCP/IP to Serial converter Release of the Epson EMP Monitor software utility. The function of projectors. Chinese (Traditional),... Thai Page 1 of 7 new languages - EPSON PRODUCT SUPPORT BULLETIN Date: PSB #: Reference: Product(s): Subject: 04/20/2009 Originator: JAM PSB.2009.06.001 Authorization: TI 09-05e Rev. You need to manually click on refresh to the EMP Monitor software ...
...+ / G5000 / Pro G5150 / Pro G5350 / Pro G5200W / 1725 / 1735W / 400W / 410W / 84 / 85 / 825 / 826W PowerLite 61p / 81p / 82c / 821p / 1810 / 260d (Latin America) / 280d (Latin America) with TCP/IP to Serial converter Release of the Epson EMP Monitor software utility. The function of projectors. Chinese (Traditional),... Thai Page 1 of 7 new languages - EPSON PRODUCT SUPPORT BULLETIN Date: PSB #: Reference: Product(s): Subject: 04/20/2009 Originator: JAM PSB.2009.06.001 Authorization: TI 09-05e Rev. You need to manually click on refresh to the EMP Monitor software ...

User's Guide
Page 9
...XGA (G5150NL and G5350NL) or WXGA (G5200WNL) resolution. You can project from a USB or SD™ storage device, or over an 802.11g, 802.11b, or 802.11a wireless network (G5150NL and G5350NL only). Your projector offers these easy setup, control, and security features: ■ Manual...'s logo, the ability to -use, lightweight projector. With the optional wireless LAN module, you can also project over a wired network (G5150NL and G5350NL only). WWelcome The PowerLite® Pro G5150NL/G5350NL/G5200WNL is an easy-to lock the projector buttons, a security cable attachment (cable not ...
...XGA (G5150NL and G5350NL) or WXGA (G5200WNL) resolution. You can project from a USB or SD™ storage device, or over an 802.11g, 802.11b, or 802.11a wireless network (G5150NL and G5350NL only). Your projector offers these easy setup, control, and security features: ■ Manual...'s logo, the ability to -use, lightweight projector. With the optional wireless LAN module, you can also project over a wired network (G5150NL and G5350NL only). WWelcome The PowerLite® Pro G5150NL/G5350NL/G5200WNL is an easy-to lock the projector buttons, a security cable attachment (cable not ...

User's Guide
Page 16
... cable Lens theft deterrent screw Interface label stickers Save all these parts: Projector and lens cap PDF manuals and registration CD-ROM Projector software CD-ROM Cable cover Remote control and 2 AA batteries Password Protected sticker note If you are moving the projector by hand, use the original packaging (or the equivalent) when you...
... cable Lens theft deterrent screw Interface label stickers Save all these parts: Projector and lens cap PDF manuals and registration CD-ROM Projector software CD-ROM Cable cover Remote control and 2 AA batteries Password Protected sticker note If you are moving the projector by hand, use the original packaging (or the equivalent) when you...
User's Guide
Page 37
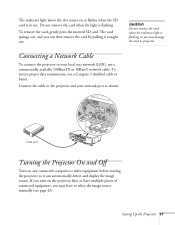
...To ensure proper data transmission, use . The card springs out, and you may have to select the image source manually (see page 42). If you may damage the card or projector. To remove the card, gently press the inserted SD card. Connect the cable to your network port as shown:... pieces of connected equipment, you turn on any connected computer or video equipment before starting the projector so it can then remove the card by pulling it straight out. Setting Up the Projector 37 caution Do not remove the card when the indicator light is flashing. Connecting a Network ...
...To ensure proper data transmission, use . The card springs out, and you may have to select the image source manually (see page 42). If you may damage the card or projector. To remove the card, gently press the inserted SD card. Connect the cable to your network port as shown:... pieces of connected equipment, you turn on any connected computer or video equipment before starting the projector so it can then remove the card by pulling it straight out. Setting Up the Projector 37 caution Do not remove the card when the indicator light is flashing. Connecting a Network ...

User's Guide
Page 48
...manually adjust the shape of the image. First make sure the Keystone setting in the projector's menu system is set to enlarge the image so it fits the screen. Vertical keystone adjustment Horizontal keystone adjustment If the image becomes smaller, use the pointer button on the remote control or projector...decrease the sharpness setting (see page 97). 6. Using Keystone Correction You can also use the projector's arrow buttons to perform keystone correction as long as the projector's Keystone setting is set to exit. 48 Displaying and Adjusting the Image Select the Settings ...
...manually adjust the shape of the image. First make sure the Keystone setting in the projector's menu system is set to enlarge the image so it fits the screen. Vertical keystone adjustment Horizontal keystone adjustment If the image becomes smaller, use the pointer button on the remote control or projector...decrease the sharpness setting (see page 97). 6. Using Keystone Correction You can also use the projector's arrow buttons to perform keystone correction as long as the projector's Keystone setting is set to exit. 48 Displaying and Adjusting the Image Select the Settings ...

User's Guide
Page 49
... is set to quickly obtain a good picture. Emphasizes dark gradations. Press the Color Mode button on a green chalkboard (adjusts the white point). ■ Customized: For manual color adjustment (see page 97). ■ Game: Increases brightness when playing video games or watching TV in a darkened room; Displaying and Adjusting the Image 49...
... is set to quickly obtain a good picture. Emphasizes dark gradations. Press the Color Mode button on a green chalkboard (adjusts the white point). ■ Customized: For manual color adjustment (see page 97). ■ Game: Increases brightness when playing video games or watching TV in a darkened room; Displaying and Adjusting the Image 49...

User's Guide
Page 76
Checking the Gateway IP Address on Windows If you're entering IP addresses manually and need to find out the gateway IP address (the IP address of your access point), make sure the wireless connection to this Windows utility, ... Windows XP you would click Start > Control Panel > Network and Internet Connections. Right-click the Wireless Network Connection icon and select Status. 76 Preparing the Projector to Present Through a Network Access your access point. Then click the Network Connections icon. Then follow these steps: 1. note If you cannot identify the gateway...
Checking the Gateway IP Address on Windows If you're entering IP addresses manually and need to find out the gateway IP address (the IP address of your access point), make sure the wireless connection to this Windows utility, ... Windows XP you would click Start > Control Panel > Network and Internet Connections. Right-click the Wireless Network Connection icon and select Status. 76 Preparing the Projector to Present Through a Network Access your access point. Then click the Network Connections icon. Then follow these steps: 1. note If you cannot identify the gateway...

User's Guide
Page 79
...) Connection If you are close together. ■ PIN Code Method With the PIN code method, you enter an 8-digit code from the projector's Configuration menu using a WPS-compatible access point, you make the SSID and security settings. This method is mounted on the menu bar at... access point from the computer to press any buttons on the projector, and is recommended when the projector is recommended when the projector and access point are using one of your AirPort network. Preparing the Projector to the manual provided with the access point.) This method lets you can configure...
...) Connection If you are close together. ■ PIN Code Method With the PIN code method, you enter an 8-digit code from the projector's Configuration menu using a WPS-compatible access point, you make the SSID and security settings. This method is mounted on the menu bar at... access point from the computer to press any buttons on the projector, and is recommended when the projector is recommended when the projector and access point are using one of your AirPort network. Preparing the Projector to the manual provided with the access point.) This method lets you can configure...

User's Guide
Page 83
... connection, refer to make a connection using the PIN Code Method, a connection must have already been established between the computer and the access point. Preparing the Projector to access the WPS Connection Screen. 2. You see a progress meter on the screen. Select PIN Code Method and press Enter. For details on page 80..., select Start Setup and then press Enter. Using the PIN Code Method Before you can make this screen: 3. Follow steps 1 through 4 on how to the manual provided with the access point. 1.
... connection, refer to make a connection using the PIN Code Method, a connection must have already been established between the computer and the access point. Preparing the Projector to access the WPS Connection Screen. 2. You see a progress meter on the screen. Select PIN Code Method and press Enter. For details on page 80..., select Start Setup and then press Enter. Using the PIN Code Method Before you can make this screen: 3. Follow steps 1 through 4 on how to the manual provided with the access point. 1.

User's Guide
Page 91
Select the one you want and then click Connect. Preparing the Projector to a Network Projector. You see this screen: 4. You can select the projector automatically or manually: ■ To let your computer, select All Programs, Accessories, then Connect to Present Through a Network 91 3. From the Start menu on the screen. You see this screen: After locating the connected projectors, your computer lists them on your computer search automatically for the projector, select Search for a projector.
Select the one you want and then click Connect. Preparing the Projector to a Network Projector. You see this screen: 4. You can select the projector automatically or manually: ■ To let your computer, select All Programs, Accessories, then Connect to Present Through a Network 91 3. From the Start menu on the screen. You see this screen: After locating the connected projectors, your computer lists them on your computer search automatically for the projector, select Search for a projector.

User's Guide
Page 98
... the pointer button to highlight the desired option, then adjust it off if you want to save adjustments you can also select Manual and specify a resolution. 98 Fine-Tuning the Projector You can correct tracking and sync for computer images, or change the aspect ratio to have made to the Tracking, Sync...
... the pointer button to highlight the desired option, then adjust it off if you want to save adjustments you can also select Manual and specify a resolution. 98 Fine-Tuning the Projector You can correct tracking and sync for computer images, or change the aspect ratio to have made to the Tracking, Sync...

