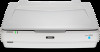
Users Guide
Page 4
... 6 Descriptions Used in this Manual 6 Operating System References 7 Important Instructions Safety Instructions 8 Restrictions on Copying 9 Scanner Basics Part Names 10 Buttons and Lights 11 Information on Applications 13 Epson Scan 2 13 Application for Updating Software and Firmware (EPSON Software Updater 13 Placing Originals on the Product Placing Originals 14 Placing Large or Thick...
... 6 Descriptions Used in this Manual 6 Operating System References 7 Important Instructions Safety Instructions 8 Restrictions on Copying 9 Scanner Basics Part Names 10 Buttons and Lights 11 Information on Applications 13 Epson Scan 2 13 Application for Updating Software and Firmware (EPSON Software Updater 13 Placing Originals on the Product Placing Originals 14 Placing Large or Thick...
Users Guide
Page 5
Cannot Scan Using Scanning Software Other Than Epson Scan 2 55 Scanned Image Problems 56 Uneven Colors, Dirt, Spots, and so on Appear when Scanning from the Scanner Glass 56 The Image Quality is Rough 56 Offset Appears in the Background of Images. . . . 56 Text is ... 61 Where to Get Help Technical Support Web Site 69 Contacting Epson Support 69 Before Contacting Epson 69 Help for Users in the United States, Canada, and the Caribbean 70 Technical Specifications General Scanner Specifications 63 Dimension Specifications 63 Electrical Specifications 63 Environmental Specifications 64...
Cannot Scan Using Scanning Software Other Than Epson Scan 2 55 Scanned Image Problems 56 Uneven Colors, Dirt, Spots, and so on Appear when Scanning from the Scanner Glass 56 The Image Quality is Rough 56 Offset Appears in the Background of Images. . . . 56 Text is ... 61 Where to Get Help Technical Support Web Site 69 Contacting Epson Support 69 Before Contacting Epson 69 Help for Users in the United States, Canada, and the Caribbean 70 Technical Specifications General Scanner Specifications 63 Dimension Specifications 63 Electrical Specifications 63 Environmental Specifications 64...
Users Guide
Page 9
Do not disassemble them correctly following items is heavy, one person should lift and carry the product. ❏ Do not place heavy objects on the scanner glass and do not press the glass with a damp cloth only. Restrictions on Copying Observe the following items: ❏ Private marketable securities (stock certificates, negotiable ...
Do not disassemble them correctly following items is heavy, one person should lift and carry the product. ❏ Do not place heavy objects on the scanner glass and do not press the glass with a damp cloth only. Restrictions on Copying Observe the following items: ❏ Private marketable securities (stock certificates, negotiable ...
Users Guide
Page 10
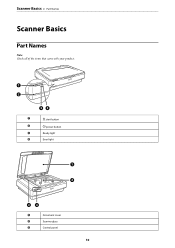
Scanner Basics > Part Names Scanner Basics Part Names Note: Check all of the items that came with your product. A a start button B . power button C Ready light D Error light A Document cover B Scanner glass C Control panel 10
Scanner Basics > Part Names Scanner Basics Part Names Note: Check all of the items that came with your product. A a start button B . power button C Ready light D Error light A Document cover B Scanner glass C Control panel 10
Users Guide
Page 11
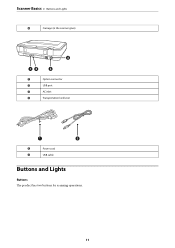
Scanner Basics > Buttons and Lights D Carriage (in the scanner glass) A Option connector B USB port C AC inlet D Transportation lock lever A Power cord B USB cable Buttons and Lights Buttons The product has two buttons for scanning operations. 11
Scanner Basics > Buttons and Lights D Carriage (in the scanner glass) A Option connector B USB port C AC inlet D Transportation lock lever A Power cord B USB cable Buttons and Lights Buttons The product has two buttons for scanning operations. 11
Users Guide
Page 12
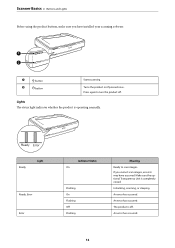
... once. button Starts scanning. Make sure the optional Transparency Unit is operating normally. If you have occurred. An error has occurred. The product is off . Scanner Basics > Buttons and Lights Before using the product buttons, make sure you cannot scan images, an error may have installed your scanning software. A a button...
... once. button Starts scanning. Make sure the optional Transparency Unit is operating normally. If you have occurred. An error has occurred. The product is off . Scanner Basics > Buttons and Lights Before using the product buttons, make sure you cannot scan images, an error may have installed your scanning software. A a button...
Users Guide
Page 13
... set the interval for checking for controlling your scanner. Starting on using TWAIN-compliant application software. Related Information & "Scanning Using a Scanner Button" on page 26 & "Scanner Lights Indicate an Error" on page 54 Information on page 18 Application for Updating Software and Firmware (EPSON Software Updater) EPSON Software Updater is a driver for updates in the...
... set the interval for checking for controlling your scanner. Starting on using TWAIN-compliant application software. Related Information & "Scanning Using a Scanner Button" on page 26 & "Scanner Lights Indicate an Error" on page 54 Information on page 18 Application for Updating Software and Firmware (EPSON Software Updater) EPSON Software Updater is a driver for updates in the...
Users Guide
Page 14
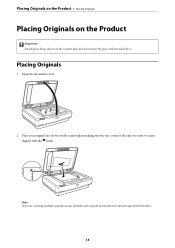
Note: If you want to scan is aligned with too much force. Open the document cover. 2. Placing Originals on the Product > Placing Originals Placing Originals on the Product c Important: Do not place heavy objects on the scanner glass making sure the top corner of the side you are scanning multiple originals at once, position each original at least 0.8 inch (20 mm) apart from the others. 14 Place your original face down on the scanner glass and do not press the glass with the d mark. Placing Originals 1.
Note: If you want to scan is aligned with too much force. Open the document cover. 2. Placing Originals on the Product > Placing Originals Placing Originals on the Product c Important: Do not place heavy objects on the scanner glass making sure the top corner of the side you are scanning multiple originals at once, position each original at least 0.8 inch (20 mm) apart from the others. 14 Place your original face down on the scanner glass and do not press the glass with the d mark. Placing Originals 1.
Users Guide
Page 15
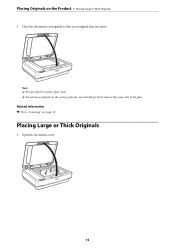
Note: ❏ Always keep the scanner glass clean. ❏ Do not leave originals on page 18 Placing Large or Thick Originals 1. Close the document cover gently so that your original does not move. Related Information & "Basic Scanning" on the scanner glass for an extended period of time as they may stick to the glass. Open the document cover. 15 Placing Originals on the Product > Placing Large or Thick Originals 3.
Note: ❏ Always keep the scanner glass clean. ❏ Do not leave originals on page 18 Placing Large or Thick Originals 1. Close the document cover gently so that your original does not move. Related Information & "Basic Scanning" on the scanner glass for an extended period of time as they may stick to the glass. Open the document cover. 15 Placing Originals on the Product > Placing Large or Thick Originals 3.
Users Guide
Page 16
Place a large or thick original face-down on the springs. ❏ Do not force the cover off the scanner or lift the cover from snapping back on the scanner glass. c Important: ❏ Before removing the document cover, make it easier to prevent the hinges from in front of the cover hinge; Make sure...
Place a large or thick original face-down on the springs. ❏ Do not force the cover off the scanner or lift the cover from snapping back on the scanner glass. c Important: ❏ Before removing the document cover, make it easier to prevent the hinges from in front of the cover hinge; Make sure...

Users Guide
Page 18
...Make sure there is a gap of image adjustment features that are suitable for photos or pictures. 1. When placing multiple originals on the scanner glass, you can scan them all at least 0.8 in the search charm, and then select the displayed icon. ❏ Windows 7/... Server 2008 R2 Click the start button, and select All Programs or Programs > EPSON > Epson Scan 2 > Epson Scan 2. ❏ Mac OS Select Go > Applications > Epson Software > Epson Scan 2. 3. Select Photo Mode from the Mode list. 18 Start Epson Scan 2. ❏ Windows 11/Windows Server 2022 Click the start button, and ...
...Make sure there is a gap of image adjustment features that are suitable for photos or pictures. 1. When placing multiple originals on the scanner glass, you can scan them all at least 0.8 in the search charm, and then select the displayed icon. ❏ Windows 7/... Server 2008 R2 Click the start button, and select All Programs or Programs > EPSON > Epson Scan 2 > Epson Scan 2. ❏ Mac OS Select Go > Applications > Epson Software > Epson Scan 2. 3. Select Photo Mode from the Mode list. 18 Start Epson Scan 2. ❏ Windows 11/Windows Server 2022 Click the start button, and ...
Users Guide
Page 23
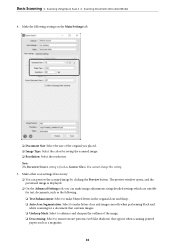
...images smooth when performing black and white scanning for saving the scanned image. ❏ Resolution: Select the resolution. Basic Scanning > Scanning Using Epson Scan 2 > Scanning Documents (Document Mode) 4. Note: The Document Source setting is displayed. ❏ On the Advanced Settings tab, ...you placed. ❏ Image Type: Select the color for a document that appear when scanning printed papers such as Scanner Glass. You cannot change this setting. 5. Make the following . ❏ Text Enhancement: Select to make blurred letters in the original ...
...images smooth when performing black and white scanning for saving the scanned image. ❏ Resolution: Select the resolution. Basic Scanning > Scanning Using Epson Scan 2 > Scanning Documents (Document Mode) 4. Note: The Document Source setting is displayed. ❏ On the Advanced Settings tab, ...you placed. ❏ Image Type: Select the color for a document that appear when scanning printed papers such as Scanner Glass. You cannot change this setting. 5. Make the following . ❏ Text Enhancement: Select to make blurred letters in the original ...
Users Guide
Page 26
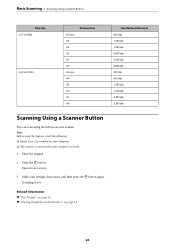
... 1,600 dpi 2,400 dpi 3,200 dpi 4,800 dpi 300 dpi 600 dpi 1,200 dpi 1,600 dpi 2,400 dpi 3,200 dpi Scanning Using a Scanner Button You can scan using this feature, check the following. ❏ Epson Scan 2 is connected to your scanner. Note: Before using the button on your computer correctly. 1. Place the original. 2.
... 1,600 dpi 2,400 dpi 3,200 dpi 4,800 dpi 300 dpi 600 dpi 1,200 dpi 1,600 dpi 2,400 dpi 3,200 dpi Scanning Using a Scanner Button You can scan using this feature, check the following. ❏ Epson Scan 2 is connected to your scanner. Note: Before using the button on your computer correctly. 1. Place the original. 2.

Users Guide
Page 40
... lock by turning it by lifting the cover straight up. 40 Turn off , and then unplug the power cord from the scanner. 2. Make sure the scanner is not in its home position. In this case, reattach the unit to its home position, you cannot lock the transportation lock... cover, and then remove it counter-clockwise one-quarter. the unit's lamp assembly then returns to the scanner, close the unit, and then turn on the scanner; Installing the Transparency Unit 1. Using the Transparency Unit > Installing the Transparency Unit 2. Use a coin to prevent damage. ❏ If the unit...
... lock by turning it by lifting the cover straight up. 40 Turn off , and then unplug the power cord from the scanner. 2. Make sure the scanner is not in its home position. In this case, reattach the unit to its home position, you cannot lock the transportation lock... cover, and then remove it counter-clockwise one-quarter. the unit's lamp assembly then returns to the scanner, close the unit, and then turn on the scanner; Installing the Transparency Unit 1. Using the Transparency Unit > Installing the Transparency Unit 2. Use a coin to prevent damage. ❏ If the unit...
Users Guide
Page 41
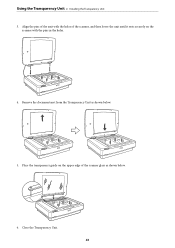
Align the pins of the unit with the holes of the scanner glass as shown below . 6. Close the Transparency Unit. 41 Using the Transparency Unit > Installing the Transparency Unit 3. Place the transparency guide on the upper edge of the scanner, and then lower the unit until it rests securely on the scanner with the pins in the holes. 4. Remove the document mat from the Transparency Unit as shown below . 5.
Align the pins of the unit with the holes of the scanner glass as shown below . 6. Close the Transparency Unit. 41 Using the Transparency Unit > Installing the Transparency Unit 3. Place the transparency guide on the upper edge of the scanner, and then lower the unit until it rests securely on the scanner with the pins in the holes. 4. Remove the document mat from the Transparency Unit as shown below . 5.
Users Guide
Page 42
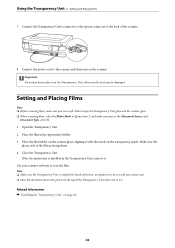
... Transparency Unit > Setting and Placing Films 7. Place the film holder on the scanner. Use your scanner software to the scanner and then turn on the scanner glass, aligning it . Make sure the glossy side of the scanner. 8. Connect the Transparency Unit's connector to wipe the Transparency Unit glass and ...the scanner glass. ❏ When scanning films, select the Photo Mode in Epson Scan 2, and make sure you cannot scan. ❏ Store the document mat in the appropriate holder. 3. otherwise, an option...
... Transparency Unit > Setting and Placing Films 7. Place the film holder on the scanner. Use your scanner software to the scanner and then turn on the scanner glass, aligning it . Make sure the glossy side of the scanner. 8. Connect the Transparency Unit's connector to wipe the Transparency Unit glass and ...the scanner glass. ❏ When scanning films, select the Photo Mode in Epson Scan 2, and make sure you cannot scan. ❏ Store the document mat in the appropriate holder. 3. otherwise, an option...
Users Guide
Page 44
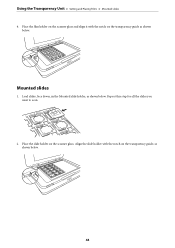
Align the slide holder with the notch on the scanner glass. Mounted slides 1. Place the film holder on the scanner glass and align it with the notch on the transparency guide, as shown below. Repeat this step for all the slides you want to scan. 2. Load slides, face down, in the Mounted slide holder, as shown below . 44 Place the slide holder on the transparency guide as shown below . Using the Transparency Unit > Setting and Placing Films > Mounted slides 4.
Align the slide holder with the notch on the scanner glass. Mounted slides 1. Place the film holder on the scanner glass and align it with the notch on the transparency guide, as shown below. Repeat this step for all the slides you want to scan. 2. Load slides, face down, in the Mounted slide holder, as shown below . 44 Place the slide holder on the transparency guide as shown below . Using the Transparency Unit > Setting and Placing Films > Mounted slides 4.
Users Guide
Page 46
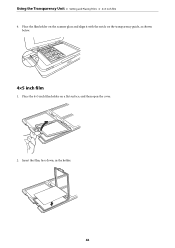
Using the Transparency Unit > Setting and Placing Films > 4×5 inch film 4. Place the film holder on the scanner glass and align it with the notch on a flat surface, and then open the cover. 2. Place the 4×5 inch film holder on the transparency guide, as shown below. 4×5 inch film 1. Insert the film, face down, in the holder. 46
Using the Transparency Unit > Setting and Placing Films > 4×5 inch film 4. Place the film holder on the scanner glass and align it with the notch on a flat surface, and then open the cover. 2. Place the 4×5 inch film holder on the transparency guide, as shown below. 4×5 inch film 1. Insert the film, face down, in the holder. 46
Users Guide
Page 47
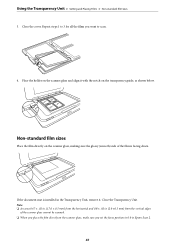
...standard film sizes Place the film directly on the scanner glass, making sure the glossy (smooth) side of the scanner glass cannot be scanned. ❏ When you place the film directly on the scanner glass and align it . Close the cover. ...Place the holder on the scanner glass, make sure you want to 0.0 in the Transparency Unit, remove it with ...horizontal and 0.8 ± .02 in (2.0 ±0.5 mm) from the vertical edges of the film is installed in Epson Scan 2. 47
...standard film sizes Place the film directly on the scanner glass, making sure the glossy (smooth) side of the scanner glass cannot be scanned. ❏ When you place the film directly on the scanner glass and align it . Close the cover. ...Place the holder on the scanner glass, make sure you want to 0.0 in the Transparency Unit, remove it with ...horizontal and 0.8 ± .02 in (2.0 ±0.5 mm) from the vertical edges of the film is installed in Epson Scan 2. 47
Users Guide
Page 48
...the resolution causes the data size to the scanning purpose. 6. Confirm the preview, and make sure you remove the transparency guide from the scanner glass. Set the Image Format setting. 9. Select Photo Mode from the Folder list. 11. Specify a suitable resolution according to increase..... 48 Click Preview. 7. Related Information & "Image Adjustment Features for the scanned image from the Mode list. 5. Start Epson Scan 2. 4. Make the following settings on the scanner glass. 3. Note: When you want to scan. 1. Confirm the save folder for Photo Mode" on the Advanced Settings tab...
...the resolution causes the data size to the scanning purpose. 6. Confirm the preview, and make sure you remove the transparency guide from the scanner glass. Set the Image Format setting. 9. Select Photo Mode from the Folder list. 11. Specify a suitable resolution according to increase..... 48 Click Preview. 7. Related Information & "Image Adjustment Features for the scanned image from the Mode list. 5. Start Epson Scan 2. 4. Make the following settings on the scanner glass. 3. Note: When you want to scan. 1. Confirm the save folder for Photo Mode" on the Advanced Settings tab...

