

Product Support Bulletin(s)
Page 1
... requires a device driver (CD-ROM, local area network, etc.), obviously the necessary device driver(s) must be loaded. In most consistent results, use the absolute minimal boot configuration that's allowed by the hardware being tested. The appropriate executable can then be started using an MS-DOS boot diskette that's 'clean' - in the CONFIG.SYS file. In attempting to benchmark or troubleshoot any computer system. EPSON Product Support Bulletin...
... requires a device driver (CD-ROM, local area network, etc.), obviously the necessary device driver(s) must be loaded. In most consistent results, use the absolute minimal boot configuration that's allowed by the hardware being tested. The appropriate executable can then be started using an MS-DOS boot diskette that's 'clean' - in the CONFIG.SYS file. In attempting to benchmark or troubleshoot any computer system. EPSON Product Support Bulletin...

Product Support Bulletin(s)
Page 26
... will support only the onboard memory above 1 MB, up to 15MB. What expanded memory boards are compatible with the Equity LT? A. Q16. A. Q15. A. Yes, the Equity 386/20 system software includes the device driver EEMM386EXE. No, the option slots on memory expansion boards. Yes, when SlMMs are installed to allow the use of 6 Q13. Is there a driver supplied with the Apex by Epson? See the matrix below: Memory Bank...
... will support only the onboard memory above 1 MB, up to 15MB. What expanded memory boards are compatible with the Equity LT? A. Q16. A. Q15. A. Yes, the Equity 386/20 system software includes the device driver EEMM386EXE. No, the option slots on memory expansion boards. Yes, when SlMMs are installed to allow the use of 6 Q13. Is there a driver supplied with the Apex by Epson? See the matrix below: Memory Bank...
Product Support Bulletin(s)
Page 36
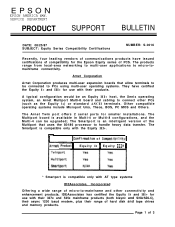
... smaller installations. Page 1 of PCS. SERVICE DEPARTMENT PRODUCT SUPPORT BULLETIN DATE: 08/25/87 SUBJECT: Equity Series Compatibility Certifications NUMBER: S-0016 Recently, four leading vendors of communications products have certified the Equity I+ and III+ for use with the Equity III+. The products range from local-area networking to multi-user applications to handle heavy data transfer. The Arnet Twin port offers 2 serial ports for the Epson Equity series of 3 EPSON EPSON...
... smaller installations. Page 1 of PCS. SERVICE DEPARTMENT PRODUCT SUPPORT BULLETIN DATE: 08/25/87 SUBJECT: Equity Series Compatibility Certifications NUMBER: S-0016 Recently, four leading vendors of communications products have certified the Equity I+ and III+ for use with the Equity III+. The products range from local-area networking to multi-user applications to handle heavy data transfer. The Arnet Twin port offers 2 serial ports for the Epson Equity series of 3 EPSON EPSON...

Product Support Bulletin(s)
Page 45
... (MSA-B4). 3. NUMBER: S-0001C HARD DISK FORMATTING INFORMATION PAGE: 5 of 5 ******IMPORTANT IMPORTANT IMpQRTANT***** * * * ALWAYS FORMAT THE HDD WITH THE SAME VERSION CONTROLLER BOARD AND HDC CPU FIRMWARE VERSION IT WILL BE USED WITH. * IT IS NOT NECESSARY TO REFORMAT IF THE ROM BIOS IS * * UPGRADED AS LONG AS THE SAME FIRMWARE CPU IS USED. * * * * * FOR LOW LEVEL FORMATTING: 1. EQUITY III FORMAT a. EQUITY III+ - Run HDFORMAT - See Product Support Bulletin # S-0006 Notes...
... (MSA-B4). 3. NUMBER: S-0001C HARD DISK FORMATTING INFORMATION PAGE: 5 of 5 ******IMPORTANT IMPORTANT IMpQRTANT***** * * * ALWAYS FORMAT THE HDD WITH THE SAME VERSION CONTROLLER BOARD AND HDC CPU FIRMWARE VERSION IT WILL BE USED WITH. * IT IS NOT NECESSARY TO REFORMAT IF THE ROM BIOS IS * * UPGRADED AS LONG AS THE SAME FIRMWARE CPU IS USED. * * * * * FOR LOW LEVEL FORMATTING: 1. EQUITY III FORMAT a. EQUITY III+ - Run HDFORMAT - See Product Support Bulletin # S-0006 Notes...

User Manual
Page 5
... Front Panel 6 Removing the disk drive protector sheet 7 The Rear Panel 7 Connecting the Power Cord 9 Connecting a Video Monitor 10 Connecting the Keyboard 12 Connecting a Printer 13 Parallel interface 13 Serial interface 15 The Equity III character set 15 Checking the DIP Switches 16 2 Using the Equity III 17 Safety Rules 17 Key Lock 18 Powering Up 19 Initial setup procedure 19 Initial screen display 19 Inserting and Removing Diskettes 20 Special Keys on the Equity III Keyboard 22 Resetting the Computer 23 Turning...
... Front Panel 6 Removing the disk drive protector sheet 7 The Rear Panel 7 Connecting the Power Cord 9 Connecting a Video Monitor 10 Connecting the Keyboard 12 Connecting a Printer 13 Parallel interface 13 Serial interface 15 The Equity III character set 15 Checking the DIP Switches 16 2 Using the Equity III 17 Safety Rules 17 Key Lock 18 Powering Up 19 Initial setup procedure 19 Initial screen display 19 Inserting and Removing Diskettes 20 Special Keys on the Equity III Keyboard 22 Resetting the Computer 23 Turning...

User Manual
Page 6
... Card 35 Post-Installation Setup 39 Removing an Option Card 39 Setting the DIP Switches 39 Replacing the Cover 42 Using an Epson Mouse 42 5 Troubleshooting 45 The Computer Fails to Start Up 45 The Video Display Does Not Appear 46 The Computer Hangs Up or Freezes 46 Floppy Disk Problems 47 Hard Disk Problems 48 Software Problems 48 Printer Problems 48 Option Card Problems 49 Appendixes A Equity III Specifications A-1 CPU and Memory A-1 Controllers A-1 Interfaces A-1 Power Supply A-2 Mass Storage A-2 Keyboard...
... Card 35 Post-Installation Setup 39 Removing an Option Card 39 Setting the DIP Switches 39 Replacing the Cover 42 Using an Epson Mouse 42 5 Troubleshooting 45 The Computer Fails to Start Up 45 The Video Display Does Not Appear 46 The Computer Hangs Up or Freezes 46 Floppy Disk Problems 47 Hard Disk Problems 48 Software Problems 48 Printer Problems 48 Option Card Problems 49 Appendixes A Equity III Specifications A-1 CPU and Memory A-1 Controllers A-1 Interfaces A-1 Power Supply A-2 Mass Storage A-2 Keyboard...

User Manual
Page 8
... one 20MB internal hard disk drive Both models include 640KB of choices. You can install additional drives in your configuration). Here are available. 1 First you choose between two models of the Equity III main unit, then you select the monitor and peripherals you want to use with your system: Monochrome monitor Monochrome video card RGB color monitor Color/graphics video card Memory expansion card 80287 Math coprocessor Mouse and mouse interface card An Epson printer or...
... one 20MB internal hard disk drive Both models include 640KB of choices. You can install additional drives in your configuration). Here are available. 1 First you choose between two models of the Equity III main unit, then you select the monitor and peripherals you want to use with your system: Monochrome monitor Monochrome video card RGB color monitor Color/graphics video card Memory expansion card 80287 Math coprocessor Mouse and mouse interface card An Epson printer or...

User Manual
Page 9
... troubleshooting. Chapter 3 explains how disks and disk drives work and shows how to start reading this book. Appendix A presents the Equity III's hardware specifications and Appendix B is a glossary of the special utility programs added by Epson. If you have purchased other software as well; You may describe a particular option or accessory you can use them. some general operational procedures. Be sure to refer to install and remove option cards. Consult your Epson...
... troubleshooting. Chapter 3 explains how disks and disk drives work and shows how to start reading this book. Appendix A presents the Equity III's hardware specifications and Appendix B is a glossary of the special utility programs added by Epson. If you have purchased other software as well; You may describe a particular option or accessory you can use them. some general operational procedures. Be sure to refer to install and remove option cards. Consult your Epson...

User Manual
Page 13
... hard disk drive in place, turn it counterclockwise until it is being accessed. Disk lock/ release latch Floppy disk drive LED lamp Key Lock RESET button Power LED lamp "%tsk LED lamp Slot for optional disk drive. l Hard disk drive LED lamp. l Floppy disk drive. To release a diskette, turn this light is vertical. The top drive is a floppy disk drive that the drive is horizontal. . Floppy disk drive LED lamp. All Equity units come with at least one 1.2MB floppy disk drive. Front panel The front panel components work as...
... hard disk drive in place, turn it counterclockwise until it is being accessed. Disk lock/ release latch Floppy disk drive LED lamp Key Lock RESET button Power LED lamp "%tsk LED lamp Slot for optional disk drive. l Hard disk drive LED lamp. l Floppy disk drive. To release a diskette, turn this light is vertical. The top drive is a floppy disk drive that the drive is horizontal. . Floppy disk drive LED lamp. All Equity units come with at least one 1.2MB floppy disk drive. Front panel The front panel components work as...

User Manual
Page 14
.... Use the power switch on the hard disk, you plug in the power cable, always turn it . After you can remove the key in the floppy disk drive. A red light indicates the power is in the power cable. Be sure to reset the computer. The Rear Panel Now look at the factory to identify the input/output ports. Figure 1-3 shows where you connect or disconnect any cables. Key Lock. Locks the main unit and keyboard. Press...
.... Use the power switch on the hard disk, you plug in the power cable, always turn it . After you can remove the key in the floppy disk drive. A red light indicates the power is in the power cable. Be sure to reset the computer. The Rear Panel Now look at the factory to identify the input/output ports. Figure 1-3 shows where you connect or disconnect any cables. Key Lock. Locks the main unit and keyboard. Press...

User Manual
Page 16
... Equity III has eight slots to hold a monochrome or a color/graphics video card to eight option cards. One option card slot holds the hard disk controller card and another must hold up to control your computer's performance. For now, do not plug the power cord into the AC power inlet on the far left side of the rear panel, as a memory expansion card or a mouse. Connecting the Power Cord Insert the power cord into an electrical outlet. l Option card access slots...
... Equity III has eight slots to hold a monochrome or a color/graphics video card to eight option cards. One option card slot holds the hard disk controller card and another must hold up to control your computer's performance. For now, do not plug the power cord into the AC power inlet on the far left side of the rear panel, as a memory expansion card or a mouse. Connecting the Power Cord Insert the power cord into an electrical outlet. l Option card access slots...

User Manual
Page 22
The Equity III uses a DB-9P connector, so be adapted. You need to ensure the RS-232C serial port is set that assigns graphics and international characters to the port marked RS-232C at the back of the parallel port. In addition, some of the ASCII codes. Plug the printer's power cable into an electrical outlet. If you are using the port for instructions. In most cases, if you have a compatible cable. Ask...
The Equity III uses a DB-9P connector, so be adapted. You need to ensure the RS-232C serial port is set that assigns graphics and international characters to the port marked RS-232C at the back of the parallel port. In addition, some of the ASCII codes. Plug the printer's power cable into an electrical outlet. If you are using the port for instructions. In most cases, if you have a compatible cable. Ask...

User Manual
Page 26
... your computer starts up and the cooling fan inside the main unit starts. The power indicator on the main unit. You may need to use the controls on your monitor to adjust the brightness and contrast until characters on your system configuration-by adding a disk drive, for instructions. This is plugged into a 3-prong, l20-volt, grounded electrical outlet. You can see the screen display clearly, use the diagnostics diskette to...
... your computer starts up and the cooling fan inside the main unit starts. The power indicator on the main unit. You may need to use the controls on your monitor to adjust the brightness and contrast until characters on your system configuration-by adding a disk drive, for instructions. This is plugged into a 3-prong, l20-volt, grounded electrical outlet. You can see the screen display clearly, use the diagnostics diskette to...

User Manual
Page 40
... install an option card or change DIP switch settings, you cannot take the cover off the power switches on each peripheral, let the computer stand for more information. As shown in your Equity III to remove the cover from Epson as well as other vendors. Before you can buy option cards from your system. 3 . Consult your monitor occupies another disk drive, expand the computer's internal memory up to 15.5MB, or connect a mouse. Remove...
... install an option card or change DIP switch settings, you cannot take the cover off the power switches on each peripheral, let the computer stand for more information. As shown in your Equity III to remove the cover from Epson as well as other vendors. Before you can buy option cards from your system. 3 . Consult your monitor occupies another disk drive, expand the computer's internal memory up to 15.5MB, or connect a mouse. Remove...

User Manual
Page 44
... adapter plate on the end of the card goes into the slot as shown in Figure 4-5, guiding it down . Unpack the option card and adjust any of the metal slot cover on the circuit board, especially the gold-edge connections. Note: Pay attention to use and then remove the retaining screw from the top of the contacts on the rear panel. Make sure the contact pins...
... adapter plate on the end of the card goes into the slot as shown in Figure 4-5, guiding it down . Unpack the option card and adjust any of the metal slot cover on the circuit board, especially the gold-edge connections. Note: Pay attention to use and then remove the retaining screw from the top of the contacts on the rear panel. Make sure the contact pins...

User Manual
Page 46
... cables. When a switch is down, it is up and out of the empty option slot with the original packing materials, and place it inside its memory), you may need to change the configuration of your Equity III (for example, by adding a disk drive or a monitor, or by expanding its box for safe storage. Cover the end of the connector. Also, if you previously changed some operating system settings in the diagnostics SETUP...
... cables. When a switch is down, it is up and out of the empty option slot with the original packing materials, and place it inside its memory), you may need to change the configuration of your Equity III (for example, by adding a disk drive or a monitor, or by expanding its box for safe storage. Cover the end of the connector. Also, if you previously changed some operating system settings in the diagnostics SETUP...

User Manual
Page 49
... cover, replace the two screws on the rear panel. If you need to install an option card to use the mouse, remove the velcro strip that is off. If your mouse does not require a card, connect the cable to the serial port on either side of the main unit. 4. To use the mouse, follow these steps to replace the main unit's cover: 1. Replacing the Cover After you install (or remove) an option card or change DIP switch settings, follow the instructions...
... cover, replace the two screws on the rear panel. If you need to install an option card to use the mouse, remove the velcro strip that is off. If your mouse does not require a card, connect the cable to the serial port on either side of the main unit. 4. To use the mouse, follow these steps to replace the main unit's cover: 1. Replacing the Cover After you install (or remove) an option card or change DIP switch settings, follow the instructions...

User Manual
Page 54
... set the DIP switches. An application routine does not work , reset the computer (as described in Chapter 2 under "Resetting the Computer"), reload the program, and try the routine again. If you install it, make sure the printer has power and connects to remove the main unit's cover and set for your hard disk, you may have accidentally repartitioned or reformatted part or all of possible problems...
... set the DIP switches. An application routine does not work , reset the computer (as described in Chapter 2 under "Resetting the Computer"), reload the program, and try the routine again. If you install it, make sure the printer has power and connects to remove the main unit's cover and set for your hard disk, you may have accidentally repartitioned or reformatted part or all of possible problems...

User Manual
Page 56
... bus; seven slots available in base configuration A-l controller on main system board; Appendix A Equity III Specifications CPU and Memory 16-bit CPU Main memory ROM Math coprocessor Controllers Floppy disk Hard disk Interfaces serial Printer Option slots 80286 microprocessor, 6 MHz clockrate Real address @O&compatible) and protected virtual address (multi-tasking or multi-user) modes 24-bit address and 16-bit data bus 640KB RAM on main system board Supports up to two drives available in...
... bus; seven slots available in base configuration A-l controller on main system board; Appendix A Equity III Specifications CPU and Memory 16-bit CPU Main memory ROM Math coprocessor Controllers Floppy disk Hard disk Interfaces serial Printer Option slots 80286 microprocessor, 6 MHz clockrate Real address @O&compatible) and protected virtual address (multi-tasking or multi-user) modes 24-bit address and 16-bit data bus 640KB RAM on main system board Supports up to two drives available in...

User Manual
Page 76
... Side screws, main unit 33-34 Single floppy disk drive, using 30-31 Single-sided diskettes 27 Slots, option 9, 35-36 Software definition B-6 problems 48 programs 48 Speaker interface A-2 Special character set 15 Special keys 22 Specifications, Equity III, A-1 A-4 Squeeze locks, printer 14-15 Storing diskettes 28 Switches,setting 16, 39-41, 46, 48-49 Switch, power 19 system arrangement 5 configuration 1, 16, 19 diskette 3, 19-20, 29, 31...
... Side screws, main unit 33-34 Single floppy disk drive, using 30-31 Single-sided diskettes 27 Slots, option 9, 35-36 Software definition B-6 problems 48 programs 48 Speaker interface A-2 Special character set 15 Special keys 22 Specifications, Equity III, A-1 A-4 Squeeze locks, printer 14-15 Storing diskettes 28 Switches,setting 16, 39-41, 46, 48-49 Switch, power 19 system arrangement 5 configuration 1, 16, 19 diskette 3, 19-20, 29, 31...


