Installation Guide
Page 5
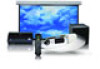
... of a button. The system comes with other components neatly in DVD player and delivers high-definition video and surround sound output. Introduction The Ensemble HDTM home cinema system by Epson® includes everything that can mount the screen on the projector, lower the screen, switch between different video sources and optimize the sound quality...
... of a button. The system comes with other components neatly in DVD player and delivers high-definition video and surround sound output. Introduction The Ensemble HDTM home cinema system by Epson® includes everything that can mount the screen on the projector, lower the screen, switch between different video sources and optimize the sound quality...

Installation Guide
Page 10
You may need at different points during the installation. Tip Leave all the boxes listed below. Box #1 • Projector (PowerLite Home Cinema 1080 or PowerLite Home Cinema 720) • Projector ceiling mount • AV controller with built-in their containers until the instructions tell you to remove them. That way, you can ...
You may need at different points during the installation. Tip Leave all the boxes listed below. Box #1 • Projector (PowerLite Home Cinema 1080 or PowerLite Home Cinema 720) • Projector ceiling mount • AV controller with built-in their containers until the instructions tell you to remove them. That way, you can ...
Installation Guide
Page 12
... provide advice concerning construction practices or building codes in your home theater system. Internet Support Visit Epson's support website at epson.com/support and select your product for your area. Where To Get Help Epson provides the following information ready: ■ Product name (Ensemble HD home cinema system) ■ Product serial number (located on the back of the...
... provide advice concerning construction practices or building codes in your home theater system. Internet Support Visit Epson's support website at epson.com/support and select your product for your area. Where To Get Help Epson provides the following information ready: ■ Product name (Ensemble HD home cinema system) ■ Product serial number (located on the back of the...
Installation Guide
Page 14
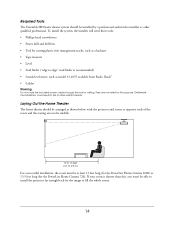
... by a professional audio/video installer or other safety hazards. Required Tools The Ensemble HD home theater system should be arranged as shown below, with the projector and screen at least 13 feet long (for the PowerLite Home Cinema 1080) or 13.5 feet long (for this , you won't be able...Warning Do not route the included power cables through the wall or ceiling. They are not rated for the PowerLite Home Cinema 720). Laying Out the Home Theater The home theater should be at opposite ends of the room and the seating area in fire or other qualified professional. Deliberate...
... by a professional audio/video installer or other safety hazards. Required Tools The Ensemble HD home theater system should be arranged as shown below, with the projector and screen at least 13 feet long (for the PowerLite Home Cinema 1080) or 13.5 feet long (for this , you won't be able...Warning Do not route the included power cables through the wall or ceiling. They are not rated for the PowerLite Home Cinema 720). Laying Out the Home Theater The home theater should be at opposite ends of the room and the seating area in fire or other qualified professional. Deliberate...
Installation Guide
Page 32
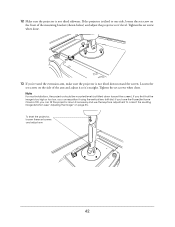
... and speakers About 10 to 19 feet At least 15 inches from the back of these steps to mark and drill holes for the PowerLite Home Cinema 720. 32 Plan to place the mount as far back as possible, but no closer than 15 inches (38 cm) from the rear wall. (If... one side instead of the projector does not exceed 23 feet (7 m). and hanging the screen lower on which the screen is 9.8 feet for the PowerLite Home Cinema 1080, and 10.4 feet for attaching the mount. 1 Determine how far back you want to fill the whole screen. Otherwise, the cables won 't be able...
... and speakers About 10 to 19 feet At least 15 inches from the back of these steps to mark and drill holes for the PowerLite Home Cinema 720. 32 Plan to place the mount as far back as possible, but no closer than 15 inches (38 cm) from the rear wall. (If... one side instead of the projector does not exceed 23 feet (7 m). and hanging the screen lower on which the screen is 9.8 feet for the PowerLite Home Cinema 1080, and 10.4 feet for attaching the mount. 1 Determine how far back you want to fill the whole screen. Otherwise, the cables won 't be able...
Installation Guide
Page 42
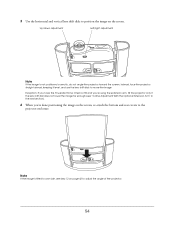
... too low, you can reposition it using the vertical lens shift dial. Tighten the set screws and adjust arm 42 If you have the PowerLite Home Cinema 720, you can tilt the projector down if necessary and use the keystone adjustment to one side, loosen the set screw on the front of...
... too low, you can reposition it using the vertical lens shift dial. Tighten the set screws and adjust arm 42 If you have the PowerLite Home Cinema 720, you can tilt the projector down if necessary and use the keystone adjustment to one side, loosen the set screw on the front of...
Installation Guide
Page 54
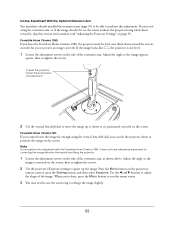
... vertical lens shift dials to position the image on page 42 to adjust the angle of the projector. 54 Exception: If you have the PowerLite Home Cinema 720 and you're using the extension arm, tilt the projector only if the lens shift dial does not lower the image far enough (see...
... vertical lens shift dials to position the image on page 42 to adjust the angle of the projector. 54 Exception: If you have the PowerLite Home Cinema 720 and you're using the extension arm, tilt the projector only if the lens shift dial does not lower the image far enough (see...
Installation Guide
Page 55
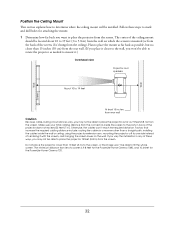
Adjust the angle so the image appears square, then re-tighten the screws. Press the Menu button on the screen. PowerLite Home Cinema 1080: If you have the PowerLite Home Cinema 1080, the projector must have a keystone adjustment for you 're done, press the Menu button to exit the menu screen. 3 You ... Use the vertical lens shift dial to move the image up the image. Note Do not perform this section and continue with the PowerLite Home Cinema 1080. Incline Adjustment With the Optional Extension Arm You must be able to perform this adjustment. Adjust the angle so the image is not ...
Adjust the angle so the image appears square, then re-tighten the screws. Press the Menu button on the screen. PowerLite Home Cinema 1080: If you have the PowerLite Home Cinema 1080, the projector must have a keystone adjustment for you 're done, press the Menu button to exit the menu screen. 3 You ... Use the vertical lens shift dial to move the image up the image. Note Do not perform this section and continue with the PowerLite Home Cinema 1080. Incline Adjustment With the Optional Extension Arm You must be able to perform this adjustment. Adjust the angle so the image is not ...

Installation Guide
Page 57
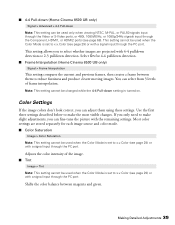
...Mode Set the projector's Color Mode to the sRGB color standard (PowerLite Home Cinema 720 only) 4 The projector's remote control is not needed for making any other adjustments or using the Video menu in the Ensemble HD menu system. See the User's Guide for details. 1 Press the ...Color Mode button on the Ensemble HD remote control. 2 You see a screen like this: [Color Mode] Dynamic EntLeivr inngewRoPoamssword Natural Theatre Theatre Black 1 Theatre Black 2 Screen shown for the PowerLite Home Cinema 1080 3 Use the u or d button to highlight the setting ...
...Mode Set the projector's Color Mode to the sRGB color standard (PowerLite Home Cinema 720 only) 4 The projector's remote control is not needed for making any other adjustments or using the Video menu in the Ensemble HD menu system. See the User's Guide for details. 1 Press the ...Color Mode button on the Ensemble HD remote control. 2 You see a screen like this: [Color Mode] Dynamic EntLeivr inngewRoPoamssword Natural Theatre Theatre Black 1 Theatre Black 2 Screen shown for the PowerLite Home Cinema 1080 3 Use the u or d button to highlight the setting ...
Installation Guide
Page 71
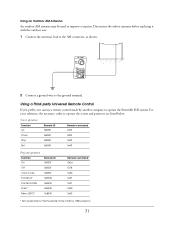
... Antenna An outdoor AM antenna may be used to operate the Ensemble HD system. Disconnect the indoor antenna before replacing it with the outdoor one. 1 Connect the antenna's lead to the AM connector, as shown. 2 Connect a ground wire to the PowerLite Home Cinema 1080 projector. 71 Screen operation Function Up Down Stop Set Remote...
... Antenna An outdoor AM antenna may be used to operate the Ensemble HD system. Disconnect the indoor antenna before replacing it with the outdoor one. 1 Connect the antenna's lead to the AM connector, as shown. 2 Connect a ground wire to the PowerLite Home Cinema 1080 projector. 71 Screen operation Function Up Down Stop Set Remote...
User's Guide - PowerLite Home Cinema 8100 / 8500 UB
Page 1
PowerLite® Home Cinema 8100/8500 UB Home Theater Projector User's Guide
PowerLite® Home Cinema 8100/8500 UB Home Theater Projector User's Guide
User's Guide - PowerLite Home Cinema 8100 / 8500 UB
Page 7
...; Reon-VX technology for more film-like images free of noise or artifacts ■ 10-bit (Home Cinema 8100) or 12-bit (Home Cinema 8500 UB) color quality for unmatched color accuracy, with over a billion colors available ■ Epson AccuCinema™ color management delivered by the built-in the relaxing environment of custom color adjustments Introduction...
...; Reon-VX technology for more film-like images free of noise or artifacts ■ 10-bit (Home Cinema 8100) or 12-bit (Home Cinema 8500 UB) color quality for unmatched color accuracy, with over a billion colors available ■ Epson AccuCinema™ color management delivered by the built-in the relaxing environment of custom color adjustments Introduction...
User's Guide - PowerLite Home Cinema 8100 / 8500 UB
Page 29
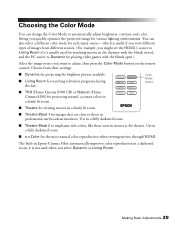
... the blinds open.) Select the image source you quickly optimize the projected image for various lighting environments. The built-in Epson Cinema Filter automatically improves color reproduction in a fully darkened room. ■ x.v.Color for the most natural color reproduction when viewing...9632; Theatre Black 2 to adjust, then press the Color Mode button on the remote control. Color Mode button ■ THX (Home Cinema 8500 UB) or Natural (Home Cinema 8100) for projecting natural, accurate colors in a dimly lit room. ■ Theatre for watching television programs during the day. ...
... the blinds open.) Select the image source you quickly optimize the projected image for various lighting environments. The built-in Epson Cinema Filter automatically improves color reproduction in a fully darkened room. ■ x.v.Color for the most natural color reproduction when viewing...9632; Theatre Black 2 to adjust, then press the Color Mode button on the remote control. Color Mode button ■ THX (Home Cinema 8500 UB) or Natural (Home Cinema 8100) for projecting natural, accurate colors in a dimly lit room. ■ Theatre for watching television programs during the day. ...
User's Guide - PowerLite Home Cinema 8100 / 8500 UB
Page 36
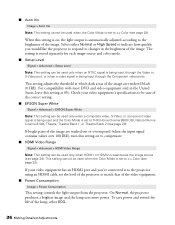
This setting adjusts the threshold at 0%. If your video equipment's specifications to THX (Home Cinema 8500 UB), Natural (Home Cinema 8100), Theatre, Theatre Black 1, or Theatre Black 2 (see page 29). To save power and extend the life of the image. The setting is stored separately ... when the Color Mode is being input and the Color Mode is automatically adjusted according to the brightness of the correct setting. ■ EPSON Super White Signal > Advanced > EPSON Super White Note: This setting can be used only when HDMI1 or HDMI2 is set to be sure of the image. If bright...
This setting adjusts the threshold at 0%. If your video equipment's specifications to THX (Home Cinema 8500 UB), Natural (Home Cinema 8100), Theatre, Theatre Black 1, or Theatre Black 2 (see page 29). To save power and extend the life of the image. The setting is stored separately ... when the Color Mode is being input and the Color Mode is automatically adjusted according to the brightness of the correct setting. ■ EPSON Super White Signal > Advanced > EPSON Super White Note: This setting can be used only when HDMI1 or HDMI2 is set to be sure of the image. If bright...

User's Guide - PowerLite Home Cinema 8100 / 8500 UB
Page 37
...to Off when viewing images with a large amount of the entire image, or select Advanced to progressive signals. The projector uses 3D DigiScan™ HD Circuitry Processing for watching videos captured with a video camera. For film-sourced images, you can use these settings to correct it. ■ Sharpness... This setting is turned on (see page 68). Choose Thick-Line Enhancement to Film if flickering appears with the Auto setting. For the Home Cinema 8500 UB, this function to make lines and edges appear more distinct in the image. Note: This setting can be used only when viewing ...
...to Off when viewing images with a large amount of the entire image, or select Advanced to progressive signals. The projector uses 3D DigiScan™ HD Circuitry Processing for watching videos captured with a video camera. For film-sourced images, you can use these settings to correct it. ■ Sharpness... This setting is turned on (see page 68). Choose Thick-Line Enhancement to Film if flickering appears with the Auto setting. For the Home Cinema 8500 UB, this function to make lines and edges appear more distinct in the image. Note: This setting can be used only when viewing ...
User's Guide - PowerLite Home Cinema 8100 / 8500 UB
Page 38
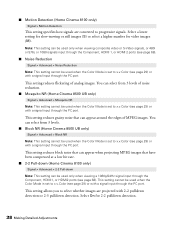
...x.v.Color (see page 29) or with a signal input through the PC port. Note: This setting can select from 3 levels. ■ Block NR (Home Cinema 8500 UB only) Signal > Advanced > Block NR Note: This setting cannot be used when the Color Mode is set to x.v.Color (see page 29) or... images. This setting reduces block noise that can appear when projecting MPEG images that can select from 3 levels of noise reduction. ■ Mosquito NR (Home Cinema 8500 UB only) Signal > Advanced > Mosquito NR Note: This setting cannot be used when the Color Mode is set to x.v.Color (see page 68)....
...x.v.Color (see page 29) or with a signal input through the PC port. Note: This setting can select from 3 levels. ■ Block NR (Home Cinema 8500 UB only) Signal > Advanced > Block NR Note: This setting cannot be used when the Color Mode is set to x.v.Color (see page 29) or... images. This setting reduces block noise that can appear when projecting MPEG images that can select from 3 levels of noise reduction. ■ Mosquito NR (Home Cinema 8500 UB only) Signal > Advanced > Mosquito NR Note: This setting cannot be used when the Color Mode is set to x.v.Color (see page 68)....
User's Guide - PowerLite Home Cinema 8100 / 8500 UB
Page 39
...make the most visible changes. This setting allows you to select whether images are stored separately for 4-4 pulldown detection. ■ Frame Interpolation (Home Cinema 8500 UB only) Signal > Frame Interpolation This setting compares the current and previous frames, then creates a frame between magenta and green. Select ... the Video or S-Video ports, or 480i, 1080i/60Hz, or 1080p/24Hz signals input through the PC port. ■ 4-4 Pull-down (Home Cinema 8500 UB only) Signal > Advanced > 4-4 Pull-down setting is turned on. This setting cannot be used when the Color Mode is set to ...
...make the most visible changes. This setting allows you to select whether images are stored separately for 4-4 pulldown detection. ■ Frame Interpolation (Home Cinema 8500 UB only) Signal > Frame Interpolation This setting compares the current and previous frames, then creates a frame between magenta and green. Select ... the Video or S-Video ports, or 480i, 1080i/60Hz, or 1080p/24Hz signals input through the PC port. ■ 4-4 Pull-down (Home Cinema 8500 UB only) Signal > Advanced > 4-4 Pull-down setting is turned on. This setting cannot be used when the Color Mode is set to ...
User's Guide - PowerLite Home Cinema 8100 / 8500 UB
Page 41
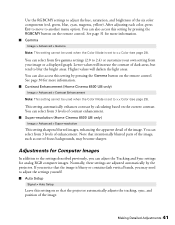
...29). Higher values will increase the contrast of the image. You can select from 3 levels of contrast enhancement. ■ Super-resolution (Home Cinema 8500 UB only) Image > Advanced > Super-resolution This setting sharpens blurred images, enhancing the apparent detail of the six color components (red,... Note that intentionally blurred parts of the image, such as out-of enhancement. Adjustments for more information. ■ Contrast Enhancement (Home Cinema 8500 UB only) Image > Advanced > Contrast Enhancement Note: This setting cannot be used when the Color Mode is set to blur ...
...29). Higher values will increase the contrast of the image. You can select from 3 levels of contrast enhancement. ■ Super-resolution (Home Cinema 8500 UB only) Image > Advanced > Super-resolution This setting sharpens blurred images, enhancing the apparent detail of the six color components (red,... Note that intentionally blurred parts of the image, such as out-of enhancement. Adjustments for more information. ■ Contrast Enhancement (Home Cinema 8500 UB only) Image > Advanced > Contrast Enhancement Note: This setting cannot be used when the Color Mode is set to blur ...
User's Guide - PowerLite Home Cinema 8100 / 8500 UB
Page 43
... the Memory button on the remote control. 2. Deleting Saved Memory Settings You can rename memory settings so that is displayed. 4. Renaming Memory Settings With the Home Cinema 8500 UB, you have selected all your memory settings at once. 1. Before saving them to memory, adjust the settings to select a character, then press the Enter...
... the Memory button on the remote control. 2. Deleting Saved Memory Settings You can rename memory settings so that is displayed. 4. Renaming Memory Settings With the Home Cinema 8500 UB, you have selected all your memory settings at once. 1. Before saving them to memory, adjust the settings to select a character, then press the Enter...
User's Guide - PowerLite Home Cinema 8100 / 8500 UB
Page 63
... www.epsonstore.com (U.S. Here you call, please have the following information ready: ■ Product name (PowerLite Home Cinema 8100 or Home Cinema 8500 UB) ■ Product serial number (located on the Epson PrivateLine Support card that came with a projector support specialist by dialing one of these numbers: ■ U.S.: ... of your projector. You may apply. This is available 6 AM to a Support Representative To use the Epson PrivateLine Support service, call 800-GO-EPSON (800-463-7766). Where to change without notice. Toll or long distance charges may also speak with your...
... www.epsonstore.com (U.S. Here you call, please have the following information ready: ■ Product name (PowerLite Home Cinema 8100 or Home Cinema 8500 UB) ■ Product serial number (located on the Epson PrivateLine Support card that came with a projector support specialist by dialing one of these numbers: ■ U.S.: ... of your projector. You may apply. This is available 6 AM to a Support Representative To use the Epson PrivateLine Support service, call 800-GO-EPSON (800-463-7766). Where to change without notice. Toll or long distance charges may also speak with your...


