Installation Guide
Page 38
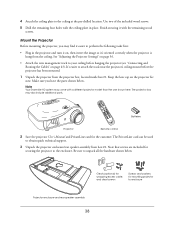
... wire management track to the enclosure. Keep the lens cap on page 43). Batteries Projector Remote control 2 Save the projector User's Manual and PrivateLine card for securing the projector to your ceiling before the projector has been mounted. 1 Unpack the projector from box #2. ...box, located inside box #1. Make sure you may find it easier to enclosure Projector enclosure and rear speaker assembly 38 Note Your Ensemble HD system may also include additional parts. Finish securing it 's oriented correctly when the projector is hung from the ceiling. The projector box...
... wire management track to the enclosure. Keep the lens cap on page 43). Batteries Projector Remote control 2 Save the projector User's Manual and PrivateLine card for securing the projector to your ceiling before the projector has been mounted. 1 Unpack the projector from box #2. ...box, located inside box #1. Make sure you may find it easier to enclosure Projector enclosure and rear speaker assembly 38 Note Your Ensemble HD system may also include additional parts. Finish securing it 's oriented correctly when the projector is hung from the ceiling. The projector box...

Installation Guide
Page 62
After Completing the Installation After setup of the Ensemble HD system is complete, retain all the manuals included with your calculation. When you want to play, then press SEL to play it nearly equal to the others. To stop a test tone, press ... on using the system, see the User's Guide for details). Play each of capabilities and how to use a sound-level meter to the height of the peaking frequency and make it . For an introduction to the home theater's full range of the test tones and use them, watch the Ensemble HD DVD that is...
After Completing the Installation After setup of the Ensemble HD system is complete, retain all the manuals included with your calculation. When you want to play, then press SEL to play it nearly equal to the others. To stop a test tone, press ... on using the system, see the User's Guide for details). Play each of capabilities and how to use a sound-level meter to the height of the peaking frequency and make it . For an introduction to the home theater's full range of the test tones and use them, watch the Ensemble HD DVD that is...
Installation Guide
Page 68
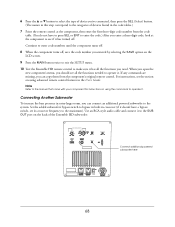
...frequency to the maximum). For instructions, see the section on using the commands to operate it . Note Refer to the manual that came with your component for instructions on using advanced remote control features in the User's Guide. When you open ... the MAIN button twice to exit the SETUP menu. 10 Test the Ensemble HD remote control to make sure it to the SUB OUT port on the back of the Ensemble HD subwoofer: BASS CONTOUR CONTROL FREQ 61 82 47 98 99 LEVEL PWR ON... enter the first three-digit code number from the component's original remote control. Continue to the system.
...frequency to the maximum). For instructions, see the section on using the commands to operate it . Note Refer to the manual that came with your component for instructions on using advanced remote control features in the User's Guide. When you open ... the MAIN button twice to exit the SETUP menu. 10 Test the Ensemble HD remote control to make sure it to the SUB OUT port on the back of the Ensemble HD subwoofer: BASS CONTOUR CONTROL FREQ 61 82 47 98 99 LEVEL PWR ON... enter the first three-digit code number from the component's original remote control. Continue to the system.
Product Brochure
Page 19
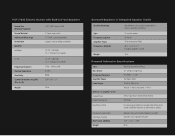
..." x 9.5" x 5" 76 lb Surround Speakers in 2000 cu.ft. Horizontal +/- 47% (150x1 sub) (50x1 center) (35x4 LR/SrSl) 32-31kHz Five pre-programmed EQs manually selected based on screen installation location on either wall or ceiling Sub Acoustic Adjustment Anti-Boom Circuitry Dimensions (WxHxD) Weight... Manual rotary control varies frequency and gain Smooths room induced base peak 14.9" x 16.1" x 18.0" 65 lb also removable for corner wall/ceiling installation 4"...
..." x 9.5" x 5" 76 lb Surround Speakers in 2000 cu.ft. Horizontal +/- 47% (150x1 sub) (50x1 center) (35x4 LR/SrSl) 32-31kHz Five pre-programmed EQs manually selected based on screen installation location on either wall or ceiling Sub Acoustic Adjustment Anti-Boom Circuitry Dimensions (WxHxD) Weight... Manual rotary control varies frequency and gain Smooths room induced base peak 14.9" x 16.1" x 18.0" 65 lb also removable for corner wall/ceiling installation 4"...
Supplemental / Late Breaking Information
Page 1
...; 2009 Epson America, Inc. 4/09 CPD-27509 The optional plastic cleats shown on your wall and ceiling. Two reduced-length power cables are not rated for on -wall version of Ensemble HD system you '... are almost the same as indicated in doubt about a particular setting, consult the manual that the enclosure has been updated to position the center of the enclosure at least...Epson est une marque déposée et « Epson Exceed Your Vision » est un logo déposé de Seiko Epson Corporation. Their menu settings are not packaged with the PowerLite® Home Cinema 6100...
...; 2009 Epson America, Inc. 4/09 CPD-27509 The optional plastic cleats shown on your wall and ceiling. Two reduced-length power cables are not rated for on -wall version of Ensemble HD system you '... are almost the same as indicated in doubt about a particular setting, consult the manual that the enclosure has been updated to position the center of the enclosure at least...Epson est une marque déposée et « Epson Exceed Your Vision » est un logo déposé de Seiko Epson Corporation. Their menu settings are not packaged with the PowerLite® Home Cinema 6100...
User's Guide - PowerLite Home Cinema 6100
Page 3
Contents Introduction Projector Parts Front Back Bottom Projector Control Panel Remote Control Button Map Optional Accessories Registration and Warranty Using This Manual Setting Up the Projector Choosing a Location Installing the Projector Connecting the Cables Connecting Video and Computer Equipment Making Other Connections Installing Batteries in the Remote ...
Contents Introduction Projector Parts Front Back Bottom Projector Control Panel Remote Control Button Map Optional Accessories Registration and Warranty Using This Manual Setting Up the Projector Choosing a Location Installing the Projector Connecting the Cables Connecting Video and Computer Equipment Making Other Connections Installing Batteries in the Remote ...
User's Guide - PowerLite Home Cinema 6100
Page 12
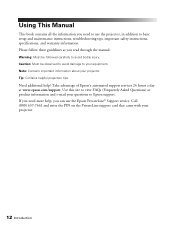
... card that came with your projector. Tip: Contains helpful projection tips. Take advantage of Epson's automated support services 24 hours a day at www.epson.com/support. If you need to use the Epson PrivateLine® Support service. Using This Manual This book contains all the information you need more help ? Please follow these guidelines...
... card that came with your projector. Tip: Contains helpful projection tips. Take advantage of Epson's automated support services 24 hours a day at www.epson.com/support. If you need to use the Epson PrivateLine® Support service. Using This Manual This book contains all the information you need more help ? Please follow these guidelines...

User's Guide - PowerLite Home Cinema 6100
Page 48
... can properly cool the projector at an altitude of time before shutoff; decreasing the time conserves power and extends the life of equipment connected to manually select your projection screen. See page 32 for more information. ■ High Altitude Mode Settings > High Altitude Mode Adjusts the speed of the fan so...
... can properly cool the projector at an altitude of time before shutoff; decreasing the time conserves power and extends the life of equipment connected to manually select your projection screen. See page 32 for more information. ■ High Altitude Mode Settings > High Altitude Mode Adjusts the speed of the fan so...
User's Guide - PowerLite Home Cinema 6100
Page 60
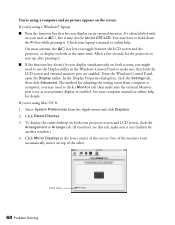
.... You're using a computer and no picture appears on both at the same time. It's often labeled with an icon such as your laptop's manual or online help for the projector to hold down the Fn key while pressing it isn't hidden by another window.) 4. The method for adjusting the... from computer to computer; Click Mirror Displays in the Windows Control Panel to make sure that both your computer manual or online help . On most systems, the key lets you 're using a Windows® laptop: ■ Press the function key that lets you might need to click a Monitor tab, then make...
.... You're using a computer and no picture appears on both at the same time. It's often labeled with an icon such as your laptop's manual or online help for the projector to hold down the Fn key while pressing it isn't hidden by another window.) 4. The method for adjusting the... from computer to computer; Click Mirror Displays in the Windows Control Panel to make sure that both your computer manual or online help . On most systems, the key lets you 're using a Windows® laptop: ■ Press the function key that lets you might need to click a Monitor tab, then make...
User's Guide - PowerLite Home Cinema 6100
Page 70
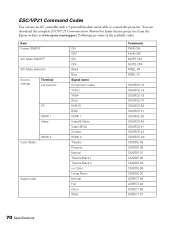
ESC/VP21 Command Codes You can download the complete ESC/VP 21 Communication Manual for home theater projectors from the Epson website at www.epson.com/support. Following are some of the available codes: Item Power ON/OFF A/V Mute ON/OFF A/V Mute selection Source change Terminal Component PC HDMI 1 Video ...
ESC/VP21 Command Codes You can download the complete ESC/VP 21 Communication Manual for home theater projectors from the Epson website at www.epson.com/support. Following are some of the available codes: Item Power ON/OFF A/V Mute ON/OFF A/V Mute selection Source change Terminal Component PC HDMI 1 Video ...
User's Guide
Page 6
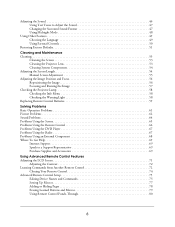
... Parental Controls 50 Restoring Factory Defaults 51 Cleaning and Maintenance Cleaning 53 Cleaning the Screen 53 Cleaning the Projector Lens 53 Cleaning System Components 54 Adjusting the Screen Length 54 Manual Screen Adjustment 55 Adjusting the Image Position and Focus 56 Repositioning the Image 56 Focusing and Resizing the Image 57 Checking...
... Parental Controls 50 Restoring Factory Defaults 51 Cleaning and Maintenance Cleaning 53 Cleaning the Screen 53 Cleaning the Projector Lens 53 Cleaning System Components 54 Adjusting the Screen Length 54 Manual Screen Adjustment 55 Adjusting the Image Position and Focus 56 Repositioning the Image 56 Focusing and Resizing the Image 57 Checking...
User's Guide
Page 15
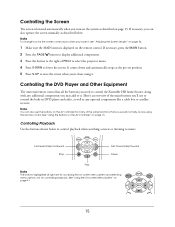
... the button to the right of the same functions that you may add to control the Ensemble HD home theater, along with any optional components like a cable box or satellite receiver. See "Using the On-screen Menu System" on page 16. If necessary, you can also use to control the built-in DVD... normally access using it. Note You can also operate the screen manually as described on page 13. Note To change how far the screen comes down and automatically stops at right are for accessing the on-screen menu system and selecting menu options, not for many of PROJ to select ...
... the button to the right of the same functions that you may add to control the Ensemble HD home theater, along with any optional components like a cable box or satellite receiver. See "Using the On-screen Menu System" on page 16. If necessary, you can also use to control the built-in DVD... normally access using it. Note You can also operate the screen manually as described on page 13. Note To change how far the screen comes down and automatically stops at right are for accessing the on-screen menu system and selecting menu options, not for many of PROJ to select ...

User's Guide
Page 29
Tuning to the Desired Station 1 Select the RADIO option on the remote control to activate the radio: MAIN DVD CABLE SAT HD RADIO 1 OF 2 Select RADIO Note To use the AV controller to find the next available station automatically. Weak stations are skipped during the auto-tuning ... audio source) is connected, as described in the Installation Guide. Listening to AM/FM Radio You can use the radio, it to change the frequency manually. • Or press and hold the button to receive AM or FM radio broadcasts. First make sure an antenna is connected to the AUDIO 1 port...
Tuning to the Desired Station 1 Select the RADIO option on the remote control to activate the radio: MAIN DVD CABLE SAT HD RADIO 1 OF 2 Select RADIO Note To use the AV controller to find the next available station automatically. Weak stations are skipped during the auto-tuning ... audio source) is connected, as described in the Installation Guide. Listening to AM/FM Radio You can use the radio, it to change the frequency manually. • Or press and hold the button to receive AM or FM radio broadcasts. First make sure an antenna is connected to the AUDIO 1 port...
User's Guide
Page 38
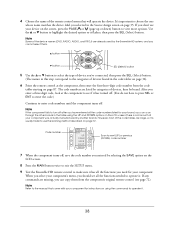
... PAGE or (page up or down) button to see if it has all the code numbers listed for your component was actually manufactured by the Ensemble HD system, and you can scan through the other brands in the table using the commands to operate it . Note Refer to turn off . Note If the... component fails to the manual that will operate the device. However, most of the code tables are listed by categories of devices, then by selecting the SAVE option on the LCD screen. 8 Press the MAIN button twice to exit the SETUP menu. 9 Test the Ensemble HD remote control to make sure...
... PAGE or (page up or down) button to see if it has all the code numbers listed for your component was actually manufactured by the Ensemble HD system, and you can scan through the other brands in the table using the commands to operate it . Note Refer to turn off . Note If the... component fails to the manual that will operate the device. However, most of the code tables are listed by categories of devices, then by selecting the SAVE option on the LCD screen. 8 Press the MAIN button twice to exit the SETUP menu. 9 Test the Ensemble HD remote control to make sure...
User's Guide
Page 40
... to operate it. 3 When you're done using your component for instructions on the remote control and press the OFF button. 4 To turn off the Ensemble HD system, press the MAIN button to return to the MAIN menu. Note When the menu is displayed for a component (not the MAIN menu), the ON and... OFF buttons operate that came with your component, make sure its menu screen is displayed, the ON and OFF buttons control the Ensemble HD system. Refer to the manual that component.
... to operate it. 3 When you're done using your component for instructions on the remote control and press the OFF button. 4 To turn off the Ensemble HD system, press the MAIN button to return to the MAIN menu. Note When the menu is displayed for a component (not the MAIN menu), the ON and... OFF buttons operate that came with your component, make sure its menu screen is displayed, the ON and OFF buttons control the Ensemble HD system. Refer to the manual that component.
User's Guide
Page 54
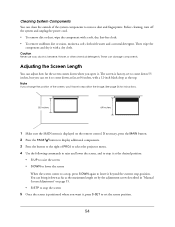
... the screen comes down when you can set it to come down as far as the maximum length set by the adjustment screw described in "Manual Screen Adjustment" on the remote control. Caution Never use wax, alcohol, benzene, thinner, or other chemical detergents. If necessary, press the MAIN button. 2 Press the... the screen, and to stop it . You can bring it down 55 inches, but you open it at the top. Before cleaning, turn off the system and unplug the power cord. • To remove dirt or dust, wipe the component with a soft, dry, lint-free cloth. • To remove stubborn dirt...
... the screen comes down when you can set it to come down as far as the maximum length set by the adjustment screw described in "Manual Screen Adjustment" on the remote control. Caution Never use wax, alcohol, benzene, thinner, or other chemical detergents. If necessary, press the MAIN button. 2 Press the... the screen, and to stop it . You can bring it down 55 inches, but you open it at the top. Before cleaning, turn off the system and unplug the power cord. • To remove dirt or dust, wipe the component with a soft, dry, lint-free cloth. • To remove stubborn dirt...
User's Guide
Page 55
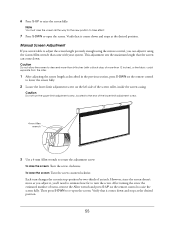
Manual Screen Adjustment If you can come down and stops at the desired position. Then press S-DWN to adjust the screen length precisely enough using the 4-..., press S-DWN on the remote control to raise the screen fully. Caution Do not allow the screen to descend more than 64 inches (with your system. This adjustment sets the maximum length that it , you adjust it comes down . 6 Press S-UP to lower the screen fully. 2 Locate the lower-limit adjustment...
Manual Screen Adjustment If you can come down and stops at the desired position. Then press S-DWN to adjust the screen length precisely enough using the 4-..., press S-DWN on the remote control to raise the screen fully. Caution Do not allow the screen to descend more than 64 inches (with your system. This adjustment sets the maximum length that it , you adjust it comes down . 6 Press S-UP to lower the screen fully. 2 Locate the lower-limit adjustment...
User's Guide
Page 67
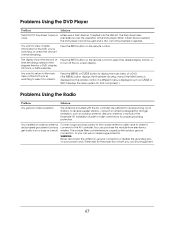
... menu is displayed, such as a result. Or you 're watching, or check the amount of a DVD. (The MENU button displays the Ensemble HD setup menu if the MAIN menu is inserted, the DVD player cannot be used and a disc cannot be inserted or ejected. The flash drive takes...display the main menu of time remaining. Press the MENU or GUIDE button to where it displays the menu system for stronger reception, such an outdoor antenna. See your antenna's manual or the Ensemble HD Installation Guide to the coaxial antenna cable close . Connect a ground loop isolator to make connections for a ...
... menu is displayed, such as a result. Or you 're watching, or check the amount of a DVD. (The MENU button displays the Ensemble HD setup menu if the MAIN menu is inserted, the DVD player cannot be used and a disc cannot be inserted or ejected. The flash drive takes...display the main menu of time remaining. Press the MENU or GUIDE button to where it displays the menu system for stronger reception, such an outdoor antenna. See your antenna's manual or the Ensemble HD Installation Guide to the coaxial antenna cable close . Connect a ground loop isolator to make connections for a ...
User's Guide
Page 121
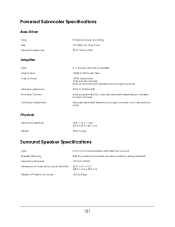
also removable for ceiling installation 100 Hz to 20 kHz ±2dB 5 pre-programmed EQs, manually selectable depending on installed location of Projector Enclosure 4" (10 cm) coaxial speaker; side/reflective surround Built into projector enclosure;...45.7 cm) 35 lb (16 kg) Surround Speaker Specifications Type Speaker Mounting Frequency Response Dimensions of Projector Enclosure (W×H×D) Weight of screen Manually selectable frequency and gain; Powered Subwoofer Specifications Bass Driver Type Size Frequency Response Ported enclosure, front-firing 10" (254 mm), long throw 32 ...
also removable for ceiling installation 100 Hz to 20 kHz ±2dB 5 pre-programmed EQs, manually selectable depending on installed location of Projector Enclosure 4" (10 cm) coaxial speaker; side/reflective surround Built into projector enclosure;...45.7 cm) 35 lb (16 kg) Surround Speaker Specifications Type Speaker Mounting Frequency Response Dimensions of Projector Enclosure (W×H×D) Weight of screen Manually selectable frequency and gain; Powered Subwoofer Specifications Bass Driver Type Size Frequency Response Ported enclosure, front-firing 10" (254 mm), long throw 32 ...

