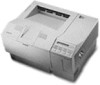
Product Information Guide
Page 12
... on line 0004 of communication problems between the printer and computer. EPL-8000-12 3/3/92 Laser Printers Related Documentation TM-EPL8ooo EPL8ooo Service Manual PL-EPL8ooo SPKEPL8ooo EPL-8000 Parts Price List EPL-8ooo self Paced Kit 4oooa34 GtI1-00 EPL-8000 User's Guide 4uoos35 Gal-al EPL-8000 Quick Setup& Maintenance Guide 4. In data dump mode, the printer produces...
... on line 0004 of communication problems between the printer and computer. EPL-8000-12 3/3/92 Laser Printers Related Documentation TM-EPL8ooo EPL8ooo Service Manual PL-EPL8ooo SPKEPL8ooo EPL-8000 Parts Price List EPL-8ooo self Paced Kit 4oooa34 GtI1-00 EPL-8000 User's Guide 4uoos35 Gal-al EPL-8000 Quick Setup& Maintenance Guide 4. In data dump mode, the printer produces...

Product Support Bulletin(s)
Page 3
... locations on the 0KB memory expansion board? The EPL-8000 comes standard with the EPL-8000? A. Q. What printer operating modes are filled in sets (part numbers RAM-5A and RAM-20A). 11. The board will accommodate four sets of the EPL-8000 to the type of 7.5MB by installing a ... X 4 memory chips may be mixed as long as they are built-in operating modes: 1. A. Each set ) Note: The Epson Accessories Department sells both types of the EPL-8000 up to expand the memory of RAMS in alphabetical order (sector A, then, sector B, and so on the 0KB memory expansion board?...
... locations on the 0KB memory expansion board? The EPL-8000 comes standard with the EPL-8000? A. Q. What printer operating modes are filled in sets (part numbers RAM-5A and RAM-20A). 11. The board will accommodate four sets of the EPL-8000 to the type of 7.5MB by installing a ... X 4 memory chips may be mixed as long as they are built-in operating modes: 1. A. Each set ) Note: The Epson Accessories Department sells both types of the EPL-8000 up to expand the memory of RAMS in alphabetical order (sector A, then, sector B, and so on the 0KB memory expansion board?...
Product Support Bulletin(s)
Page 4
...life of the consumable items? A. Q. A. Using letter or A4-size paper with 5% toner coverage of the options and supplies: Part Number Description C812281 Lower Paper Tray C812231 Legal Paper Cassette C812271 Face-up Output Tray C82206l 0KB Memory Expansion Board so5 1009 Long ...(Type B) C823101 32KB Parallel Interface Board (Type B) C826051 Adobe PostScript Identity Card 15. RS-232C or RS-422 Serial The EPL-8000 also has an additional slot for the EPSON "B" Type interfaces. 13. A. Centronics Parallel 2. What is 8,000 pages. PSB No: P-0085 Page: 3 of the most...
...life of the consumable items? A. Q. A. Using letter or A4-size paper with 5% toner coverage of the options and supplies: Part Number Description C812281 Lower Paper Tray C812231 Legal Paper Cassette C812271 Face-up Output Tray C82206l 0KB Memory Expansion Board so5 1009 Long ...(Type B) C823101 32KB Parallel Interface Board (Type B) C826051 Adobe PostScript Identity Card 15. RS-232C or RS-422 Serial The EPL-8000 also has an additional slot for the EPSON "B" Type interfaces. 13. A. Centronics Parallel 2. What is 8,000 pages. PSB No: P-0085 Page: 3 of the most...

User Manual
Page 2
... equipment will not occur in a particular installation. For Canadian Users This digital apparatus does not exceed the Class B limits for a class B digital device, pursuant to Part 15 of the following measures: • Reorient or relocate the receiving antenna • Increase the separation between the equipment and receiver • Connect the equipment...
... equipment will not occur in a particular installation. For Canadian Users This digital apparatus does not exceed the Class B limits for a class B digital device, pursuant to Part 15 of the following measures: • Reorient or relocate the receiving antenna • Increase the separation between the equipment and receiver • Connect the equipment...

User Manual
Page 4
... unauthorized modifications, repairs, or alterations to this publication may be liable against any damages or problems arising from the use of Seiko Epson Corporation. No patent liability is a U.S. No part of this product, or (excluding the U.S.) failure to strictly comply with respect to the purchaser of this product or third parties for...
... unauthorized modifications, repairs, or alterations to this publication may be liable against any damages or problems arising from the use of Seiko Epson Corporation. No patent liability is a U.S. No part of this product, or (excluding the U.S.) failure to strictly comply with respect to the purchaser of this product or third parties for...

User Manual
Page 6
..., do not attempt to repair the printer yourself. l If you to dangerous voltage points or other controls may touch dangerous voltage points or short out parts that could expose you use an extension cord, make sure that the total of all servicing in those controls that are followed. Also, make sure...
..., do not attempt to repair the printer yourself. l If you to dangerous voltage points or other controls may touch dangerous voltage points or short out parts that could expose you use an extension cord, make sure that the total of all servicing in those controls that are followed. Also, make sure...

User Manual
Page 10
Chapter 5 Maintenance and Transportation Replacing Consumable Parts Cleaning the Printer Transporting Your Printer 5-2 5-14 5-22 Chapter 6 Troubleshooting Status and Error Messages Troubleshooting Directory Paper Jam Problems Power Supply Test Prints Printing Problems ...
Chapter 5 Maintenance and Transportation Replacing Consumable Parts Cleaning the Printer Transporting Your Printer 5-2 5-14 5-22 Chapter 6 Troubleshooting Status and Error Messages Troubleshooting Directory Paper Jam Problems Power Supply Test Prints Printing Problems ...

User Manual
Page 14
Contact your local dealer for the part number in option part numbers, represented by an asterisk (*), varies by country. You can load up to 500 sheets. For detailed information on these options, see Chapter 7. The last ...
Contact your local dealer for the part number in option part numbers, represented by an asterisk (*), varies by country. You can load up to 500 sheets. For detailed information on these options, see Chapter 7. The last ...

User Manual
Page 19
... information on this chapter before purchasing your paper supply. If the printer does not operate properly or the printed results are illustrations identifying the different parts of printer terms and an index. Chapter 2 contains information on paper handling. The appendixes contain information on maintaining your printer. Be sure to set it...
... information on this chapter before purchasing your paper supply. If the printer does not operate properly or the printed results are illustrations identifying the different parts of printer terms and an index. Chapter 2 contains information on paper handling. The appendixes contain information on maintaining your printer. Be sure to set it...

User Manual
Page 20
... or Service Center Technical assistance with the installation, configuration, and operation of Epson products Epson technical information library fax service Product literature with technical specifications on the operation of ribbons, supplies, parts, documentation, and accessories for your Epson product Customer Relations. Finding Your Way Around Warnings, Cautions, and Notes WARNINGS: must be followed carefully...
... or Service Center Technical assistance with the installation, configuration, and operation of Epson products Epson technical information library fax service Product literature with technical specifications on the operation of ribbons, supplies, parts, documentation, and accessories for your Epson product Customer Relations. Finding Your Way Around Warnings, Cautions, and Notes WARNINGS: must be followed carefully...
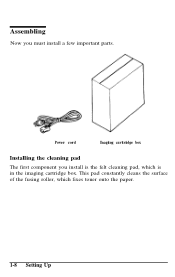
User Manual
Page 28
This pad constantly cleans the surface of the fusing roller, which is in the imaging cartridge box. Power cord Imaging cartridge box Installing the cleaning pad The first component you must install a few important parts. Assembling Now you install is the felt cleaning pad, which fixes toner onto the paper. 1-8 Setting Up
This pad constantly cleans the surface of the fusing roller, which is in the imaging cartridge box. Power cord Imaging cartridge box Installing the cleaning pad The first component you must install a few important parts. Assembling Now you install is the felt cleaning pad, which fixes toner onto the paper. 1-8 Setting Up

User Manual
Page 32
Handling the imaging cartridge Keep the following cautions in mind whenever you handle the imaging cartridge: l Do not turn the cartridge upside down. 1-12 Setting Up Assembling The imaging cartridge The imaging cartridge is light-sensitive, never expose it onto the paper. CAUTION: Do not expose the drum to lighting brighter than necessary. Because the drum is the part of the printer mechanism that forms the image and transfers it to light any longer than normal room light.
Handling the imaging cartridge Keep the following cautions in mind whenever you handle the imaging cartridge: l Do not turn the cartridge upside down. 1-12 Setting Up Assembling The imaging cartridge The imaging cartridge is light-sensitive, never expose it onto the paper. CAUTION: Do not expose the drum to lighting brighter than necessary. Because the drum is the part of the printer mechanism that forms the image and transfers it to light any longer than normal room light.

User Manual
Page 48
... you to enter Level 2. Running a test print The test print option allows you have removed all packing materials from the printer and installed all printer parts, as described in print tests: two test prints, a status sheet, and a font sample. Hold down the button long enough to print two patterns: pattern 1 consists...
... you to enter Level 2. Running a test print The test print option allows you have removed all packing materials from the printer and installed all printer parts, as described in print tests: two test prints, a status sheet, and a font sample. Hold down the button long enough to print two patterns: pattern 1 consists...

User Manual
Page 49
Part of vertical lines and outputs the page face-down in the top exit tray. The display reads as follows: 5. 4. The printer prints a test pattern of a typical pattern 1 test print is shown below: Testing and Connecting Your Printer 2-7 To run the test, press once more. Press Testing the Printer once. CAUTION: Never open the printer's covers during printing.
Part of vertical lines and outputs the page face-down in the top exit tray. The display reads as follows: 5. 4. The printer prints a test pattern of a typical pattern 1 test print is shown below: Testing and Connecting Your Printer 2-7 To run the test, press once more. Press Testing the Printer once. CAUTION: Never open the printer's covers during printing.

User Manual
Page 67
... need to do unless you are sharing your printer to the interfaces. Testing and Connecting Your Printer 2-25 Sharing the Printer You can allocate a separate part of the parallel, serial, and optional interfaces. Simply connect interface cables from the computers through the following channels: Channel P is the optional interface.
... need to do unless you are sharing your printer to the interfaces. Testing and Connecting Your Printer 2-25 Sharing the Printer You can allocate a separate part of the parallel, serial, and optional interfaces. Simply connect interface cables from the computers through the following channels: Channel P is the optional interface.

User Manual
Page 85
SUB CONFIG The submenu for information on the printer mode you are using. SYSTEM CONFIG This option includes the following is different in HP emulation mode. See the Appendixes for the SUB CONFIG option is part of a typical font sample in each printer mode. Level 1 Options The following eight submenus: Menu/submenu Available options FULL PRINT T-OFFSET L-OFFSET MEMORY LEFT LOAD MACRO SAVE MACRO DELETE MACRO POWERON MACRO SelecType 3-17
SUB CONFIG The submenu for information on the printer mode you are using. SYSTEM CONFIG This option includes the following is different in HP emulation mode. See the Appendixes for the SUB CONFIG option is part of a typical font sample in each printer mode. Level 1 Options The following eight submenus: Menu/submenu Available options FULL PRINT T-OFFSET L-OFFSET MEMORY LEFT LOAD MACRO SAVE MACRO DELETE MACRO POWERON MACRO SelecType 3-17
User Manual
Page 110
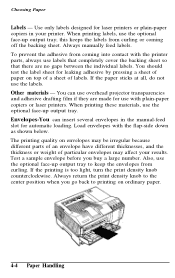
... use the optional face-up output tray; The printing quality on top of a sheet of particular envelopes may be irregular because different parts of an envelope have different thicknesses, and the thickness or weight of labels. When printing these materials, use the labels. this keeps...labels, use overhead projector transparencies and adhesive drafting film if they are no gaps between the individual labels. Load envelopes with the printer parts, always use labels that completely cover the backing sheet so that there are made for leaking adhesive by pressing a sheet of paper ...
... use the optional face-up output tray; The printing quality on top of a sheet of particular envelopes may be irregular because different parts of an envelope have different thicknesses, and the thickness or weight of labels. When printing these materials, use the labels. this keeps...labels, use overhead projector transparencies and adhesive drafting film if they are no gaps between the individual labels. Load envelopes with the printer parts, always use labels that completely cover the backing sheet so that there are made for leaking adhesive by pressing a sheet of paper ...

User Manual
Page 123
Chapter 5 Maintenance and Transportation Replacing Consumable Parts Removing the imaging cartridge Cleaning the transfer charger wire Cleaning the glass lens Replacing the cleaning pad Replacing the imaging cartridge 5-2 5-3 5-5 5-7 5-8 5-10 Cleaning the Printer ...
Chapter 5 Maintenance and Transportation Replacing Consumable Parts Removing the imaging cartridge Cleaning the transfer charger wire Cleaning the glass lens Replacing the cleaning pad Replacing the imaging cartridge 5-2 5-3 5-5 5-7 5-8 5-10 Cleaning the Printer ...

User Manual
Page 124
... the cleaning pad. 5. Remove the imaging cartridge. 2. Clean the transfer charger wire. 3. When the TONER LOW message appears, you see the following sections: 1. Replacing Consumable Parts The printer's imaging cartridge can print up to 8,000 pages, depending upon the complexity of your printer starts to run out of toner: TONER LOW...
... the cleaning pad. 5. Remove the imaging cartridge. 2. Clean the transfer charger wire. 3. When the TONER LOW message appears, you see the following sections: 1. Replacing Consumable Parts The printer's imaging cartridge can print up to 8,000 pages, depending upon the complexity of your printer starts to run out of toner: TONER LOW...

User Manual
Page 125
Make sure the printer is turned off. Open the cover to remove the imaging cartridge: 1. Remove any paper in the paper output tray. 3. Open the front cover. 4. Press the blue release button while lifting up on the printer's top cover. Maintenance and Transportation 5-3 Then unplug the power cord from the wall outlet. 2. Replacing Consumable Parts Removing the imaging cartridge Follow these steps to the upper position, as shown below.
Make sure the printer is turned off. Open the cover to remove the imaging cartridge: 1. Remove any paper in the paper output tray. 3. Open the front cover. 4. Press the blue release button while lifting up on the printer's top cover. Maintenance and Transportation 5-3 Then unplug the power cord from the wall outlet. 2. Replacing Consumable Parts Removing the imaging cartridge Follow these steps to the upper position, as shown below.
