
Owners Manual
Page 2
... light can cause severe injury. Children covering their heads with your projector. Use a cloth or gloves to qualified service personnel. Important Safety Information Warning: Never look into the projector lens when the lamp is on the projector except the lamp and filter covers. Be particularly careful around small ...children. Warning: Keep the plastic bags for the projector, accessories and optional parts out of the reach of children. Warning: Never open any covers on . Refer all servicing to handle ...
... light can cause severe injury. Children covering their heads with your projector. Use a cloth or gloves to qualified service personnel. Important Safety Information Warning: Never look into the projector lens when the lamp is on the projector except the lamp and filter covers. Be particularly careful around small ...children. Warning: Keep the plastic bags for the projector, accessories and optional parts out of the reach of children. Warning: Never open any covers on . Refer all servicing to handle ...
Owners Manual
Page 3
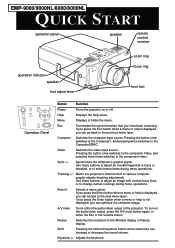
...a menu or help is displayed, you can optimize the computer image. Resize Switches the resolution to the component video. EMP-9000/9000NL/8000/8000NL QUICK START operation panel speaker remoto control receiver operation indicator speaker foot adjust lever zoom ring focus ring ... increase or decrease the sound volume. Keystone Shift Volume Operation Panel Tracking Button Function Power Turns the projector on the audio/videio output of the projector. Sync +/- Match the projectos's internal clock to change numeric settings during menu operations. Shift Pressing ...
...a menu or help is displayed, you can optimize the computer image. Resize Switches the resolution to the component video. EMP-9000/9000NL/8000/8000NL QUICK START operation panel speaker remoto control receiver operation indicator speaker foot adjust lever zoom ring focus ring ... increase or decrease the sound volume. Keystone Shift Volume Operation Panel Tracking Button Function Power Turns the projector on the audio/videio output of the projector. Sync +/- Match the projectos's internal clock to change numeric settings during menu operations. Shift Pressing ...
Owners Manual
Page 4
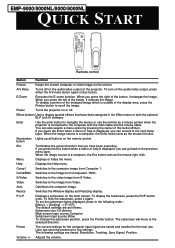
...image. The following order : [Menu] → [Setting] → [P in the following settings are as the mouse left of the projector. E-Zoom Executes the E-zoom function. When the image source is displayed, you can also selects a menu option by pressing the center of... Optimizes the computer image. To set the subscreen being displayed, press in P]. button Esc Terminates the current function that have been executing . EMP-9000/9000NL/8000/8000NL QUICK START Freeze A/V Mute E-Zoom 3 2 Power R/C ON OFF 4 1 5 Enter Esc Remote control Button Function Freeze...
...image. The following order : [Menu] → [Setting] → [P in the following settings are as the mouse left of the projector. E-Zoom Executes the E-zoom function. When the image source is displayed, you can also selects a menu option by pressing the center of... Optimizes the computer image. To set the subscreen being displayed, press in P]. button Esc Terminates the current function that have been executing . EMP-9000/9000NL/8000/8000NL QUICK START Freeze A/V Mute E-Zoom 3 2 Power R/C ON OFF 4 1 5 Enter Esc Remote control Button Function Freeze...
Owners Manual
Page 8
... Accessories ix About This Manual xi Safety Instructions xii Where to Get Help xiv World Wide Web site xiv Transporting your projector xv 1 Installation 1 Unpacking the Projector 2 Additional Components 3 Setting Up the Projector 4 Connecting to a Computer 6 Connecting to a PC Desktop Computer 7 Connecting to a PC Laptop Computer 11 Connecting to a Desktop Macintosh 15 Connecting...
... Accessories ix About This Manual xi Safety Instructions xii Where to Get Help xiv World Wide Web site xiv Transporting your projector xv 1 Installation 1 Unpacking the Projector 2 Additional Components 3 Setting Up the Projector 4 Connecting to a Computer 6 Connecting to a PC Desktop Computer 7 Connecting to a PC Laptop Computer 11 Connecting to a Desktop Macintosh 15 Connecting...
Owners Manual
Page 9
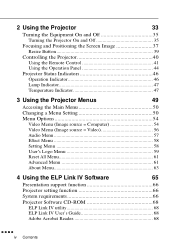
... the Screen Image 37 Resize Button 39 Controlling the Projector 40 Using the Remote Control 41 Using the Operation Panel 44 Projector Status Indicators 46 Operation Indicator 46 Lamp Indicator 47 Temperature Indicator 47 3 Using the Projector Menus 49 Accessing the Main Menu 50 Changing a ... All Menu 61 Advanced Menu 61 About Menu 63 4 Using the ELP Link IV Software 65 Presentation support function 66 Projector setting function 66 System requirements 66 Projector Software CD-ROM 68 ELP Link IV utility 68 ELP Link IV User's Guide 68 Adobe Acrobat Reader 68 s s...
... the Screen Image 37 Resize Button 39 Controlling the Projector 40 Using the Remote Control 41 Using the Operation Panel 44 Projector Status Indicators 46 Operation Indicator 46 Lamp Indicator 47 Temperature Indicator 47 3 Using the Projector Menus 49 Accessing the Main Menu 50 Changing a ... All Menu 61 Advanced Menu 61 About Menu 63 4 Using the ELP Link IV Software 65 Presentation support function 66 Projector setting function 66 System requirements 66 Projector Software CD-ROM 68 ELP Link IV utility 68 ELP Link IV User's Guide 68 Adobe Acrobat Reader 68 s s...
Owners Manual
Page 10
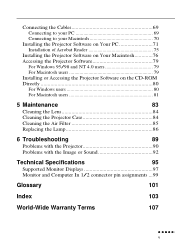
...69 Connecting to your PC 69 Connecting to your Macintosh 70 Installing the Projector Software on Your PC 71 Installation of Acrobat Reader 75 Installing the Projector Software on Your Macintosh 76 Accessing the Projector Software 79 For Windows 95/98 and NT 4.0 users 79 For Macintosh ... 80 For Macintosh users 81 5 Maintenance 83 Cleaning the Lens 84 Cleaning the Projector Case 84 Cleaning the Air Filter 85 Replacing the Lamp 86 6 Troubleshooting 89 Problems with the Projector 90 Problems with the Image or Sound 92 Technical Specifications 95 Supported Monitor Displays...
...69 Connecting to your PC 69 Connecting to your Macintosh 70 Installing the Projector Software on Your PC 71 Installation of Acrobat Reader 75 Installing the Projector Software on Your Macintosh 76 Accessing the Projector Software 79 For Windows 95/98 and NT 4.0 users 79 For Macintosh ... 80 For Macintosh users 81 5 Maintenance 83 Cleaning the Lens 84 Cleaning the Projector Case 84 Cleaning the Air Filter 85 Replacing the Lamp 86 6 Troubleshooting 89 Problems with the Projector 90 Problems with the Image or Sound 92 Technical Specifications 95 Supported Monitor Displays...
Owners Manual
Page 12
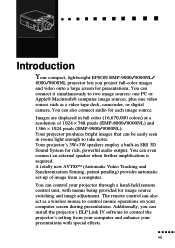
... colors) at a resolution of image from your computer and enhance your presentations with menus being provided for presentations. s s s s ss s s s s s s s s s Introduction Your compact, lightweight EPSON EMP-9000/9000NL/ 8000/8000NL projector lets you can also act as a video tape deck, camcorder, or digital camera. You can control your computer screen during presentations. You can be...
... colors) at a resolution of image from your computer and enhance your presentations with menus being provided for presentations. s s s s ss s s s s s s s s s Introduction Your compact, lightweight EPSON EMP-9000/9000NL/ 8000/8000NL projector lets you can also act as a video tape deck, camcorder, or digital camera. You can control your computer screen during presentations. You can be...

Owners Manual
Page 13
The EMP-9000/9000NL/8000/8000NL projector supports IBM compatible PCs and laptops, as well as VGA, SXGA (EMP-9000/9000NL) output and SVGA, XGA (EMP-8000/8000NL) output. The video source can be NTSC, PAL or SECAM in composite video, S-Video format....Chapter 7 for details on supported computers and video formats. s s s s viii Introduction Your projector features the newest resizing technology DAR (Digital Active Resizing) which supports the true XGA (EMP8000/8000NL) and SXGA (EMP-9000/9000NL) computer output, as well as Apple® Macintosh®, Power Macintosh and PowerBook computers...
The EMP-9000/9000NL/8000/8000NL projector supports IBM compatible PCs and laptops, as well as VGA, SXGA (EMP-9000/9000NL) output and SVGA, XGA (EMP-8000/8000NL) output. The video source can be NTSC, PAL or SECAM in composite video, S-Video format....Chapter 7 for details on supported computers and video formats. s s s s viii Introduction Your projector features the newest resizing technology DAR (Digital Active Resizing) which supports the true XGA (EMP8000/8000NL) and SXGA (EMP-9000/9000NL) computer output, as well as Apple® Macintosh®, Power Macintosh and PowerBook computers...

Owners Manual
Page 14
...system you to control the settings for a quick summary of the important features. Optional Accessories To enhance your use of the projector, EPSON provides the following optional accessories: • Spare Lamp ELPLP08 (A screwdriver is contained with a full set of features that enable...freeze, volume, mute and image source switching. To get the most out of your computer's mouse. Getting the Most Out of Your Projector Your projector comes with the spare lamp.) • Image Presentation Camera ELPDC01 • Mac Adapter Set ELPAP01 • ELP Communication Cable Set ELPKC04 ...
...system you to control the settings for a quick summary of the important features. Optional Accessories To enhance your use of the projector, EPSON provides the following optional accessories: • Spare Lamp ELPLP08 (A screwdriver is contained with a full set of features that enable...freeze, volume, mute and image source switching. To get the most out of your computer's mouse. Getting the Most Out of Your Projector Your projector comes with the spare lamp.) • Image Presentation Camera ELPDC01 • Mac Adapter Set ELPAP01 • ELP Communication Cable Set ELPKC04 ...
Owners Manual
Page 16
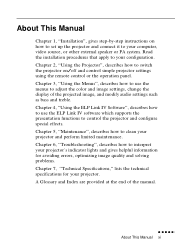
Chapter 6, "Troubleshooting", describes how to switch the projector on how to set up the projector and connect it to your projector. Chapter 2, "Using the Projector", describes how to interpret your projector's indicator lights and gives helpful information for avoiding errors, optimizing image quality ..."Using the ELP Link IV Software", describes how to use the menus to your projector and perform limited maintenance. Chapter 5, "Maintenance", describes how to control the projector and configure special effects. About This Manual Chapter 1, "Installation", gives step-by-...
Chapter 6, "Troubleshooting", describes how to switch the projector on how to set up the projector and connect it to your projector. Chapter 2, "Using the Projector", describes how to interpret your projector's indicator lights and gives helpful information for avoiding errors, optimizing image quality ..."Using the ELP Link IV Software", describes how to use the menus to your projector and perform limited maintenance. Chapter 5, "Maintenance", describes how to control the projector and configure special effects. About This Manual Chapter 1, "Installation", gives step-by-...

Owners Manual
Page 17
...prong outlet, contact an electrician to the plug. 10. Failure to comply with these safety instructions when setting up and using the projector: 1. It may result in sparks or fire. • Do not insert the plug into an outlet with wet hands. 7. Do not use ...plug firmly into a properly grounded outlet. If you are not sure of heat. 3. s s s s xii Introduction Do not place the projector on the projector. Do not place the projector where the cord can cause fire or electric shock. 9. Safety Instructions Follow these precautions could result in fraying or damage to replace...
...prong outlet, contact an electrician to the plug. 10. Failure to comply with these safety instructions when setting up and using the projector: 1. It may result in sparks or fire. • Do not insert the plug into an outlet with wet hands. 7. Do not use ...plug firmly into a properly grounded outlet. If you are not sure of heat. 3. s s s s xii Introduction Do not place the projector on the projector. Do not place the projector where the cord can cause fire or electric shock. 9. Safety Instructions Follow these precautions could result in fraying or damage to replace...

Owners Manual
Page 18
..., or if it exhibits a distinct change in cabinet unless proper ventilation is damaged or frayed • If liquid has been spilled into the projector. 13. Unplug the projector during thunder storms or when it has been dropped or the housing has been damaged 17. When you purchased, use the...refer servicing to qualified service personnel under the following conditions: • When the power cord or plug is provided. 12. Do not place the projector and remote control on a sofa, rug or other coutnies except the where you use the pure power cable suits to that country. Do not block...
..., or if it exhibits a distinct change in cabinet unless proper ventilation is damaged or frayed • If liquid has been spilled into the projector. 13. Unplug the projector during thunder storms or when it has been dropped or the housing has been damaged 17. When you purchased, use the...refer servicing to qualified service personnel under the following conditions: • When the power cord or plug is provided. 12. Do not place the projector and remote control on a sofa, rug or other coutnies except the where you use the pure power cable suits to that country. Do not block...
Owners Manual
Page 19
If you can access to EPSON's World Wide Web site at the end of this manual. Before you call, please have the following information ready: • Product name • Product serial ... and FAQ's (Frequently Asked Questions) and the EPSON Chart area. epson. Where to Get Help If you What's New, EPSON Products, EPSON Connection, Corporate Info and EPSON Contacts. Link to the EPSON Connection for local EPSON subsidiaries. com. EPSON's home page provides you are having trouble setting up or running your projector, first see Chapter 6, "Troubleshooting". s s s s xiv Introduction To...
If you can access to EPSON's World Wide Web site at the end of this manual. Before you call, please have the following information ready: • Product name • Product serial ... and FAQ's (Frequently Asked Questions) and the EPSON Chart area. epson. Where to Get Help If you What's New, EPSON Products, EPSON Connection, Corporate Info and EPSON Contacts. Link to the EPSON Connection for local EPSON subsidiaries. com. EPSON's home page provides you are having trouble setting up or running your projector, first see Chapter 6, "Troubleshooting". s s s s xiv Introduction To...

Owners Manual
Page 20
..., use equivalent materials, placing plenty of cushioning around the projector. • When transporting the projector for business use, first put the projector in a firm box, using cushioning around the case. ♦ Note: EPSON shall not be liable for repairs, use the original packaging... it in a hard carrying case (such as the optional EPSON accessory case: ELPKS15), then pack it , please follow these packing guidelines to Get Help xv s s s s s s Where to prevent damaging the projector: • When shipping the projector for any damages incurred during transportation.
..., use equivalent materials, placing plenty of cushioning around the projector. • When transporting the projector for business use, first put the projector in a firm box, using cushioning around the case. ♦ Note: EPSON shall not be liable for repairs, use the original packaging... it in a hard carrying case (such as the optional EPSON accessory case: ELPKS15), then pack it , please follow these packing guidelines to Get Help xv s s s s s s Where to prevent damaging the projector: • When shipping the projector for any damages incurred during transportation.

Owners Manual
Page 22
...s s s s s 1 Installation This chapter describes how to unpack and set up your projector, and connect it to a computer or a video source such as a wireless mouse. • Connect the projector to amplify the audio. s s s s s s 1 The projector must be the computer, video source, or another device such as a stereo. • ...Connect the projector to an external speaker or PA system to an audio...
...s s s s s 1 Installation This chapter describes how to unpack and set up your projector, and connect it to a computer or a video source such as a wireless mouse. • Connect the projector to amplify the audio. s s s s s s 1 The projector must be the computer, video source, or another device such as a stereo. • ...Connect the projector to an external speaker or PA system to an audio...

Owners Manual
Page 23
s s s s 2 It should be transported in the future. Unpacking the Projector When you unpack the projector, make sure you have all these components: • Projector • Remote control • 2 AA batteries • Power cord • Computer cable (mini D-sub 15pin) • Computer cable (5BNC) • Audio cable ... cable • Mac serial cable • ELP Link IV Software Depending on the configuration of your equipment, you need to ship the projector in its original packaging or the equivalent. Save all packaging materials in case you may not need all these components.
s s s s 2 It should be transported in the future. Unpacking the Projector When you unpack the projector, make sure you have all these components: • Projector • Remote control • 2 AA batteries • Power cord • Computer cable (mini D-sub 15pin) • Computer cable (5BNC) • Audio cable ... cable • Mac serial cable • ELP Link IV Software Depending on the configuration of your equipment, you need to ship the projector in its original packaging or the equivalent. Save all packaging materials in case you may not need all these components.

Owners Manual
Page 24
... a Kensington MicroSaver® anti-theft device in the hole on how you plan to use the projector, you need these items from Apple for each video source. • To connect the projector to a Macintosh PowerBook, you may require a special connector, cable, or other components. s s... s s s s Unpacking the Projector 3 You can obtain these additional components: • To receive an S-Video signal,...
... a Kensington MicroSaver® anti-theft device in the hole on how you plan to use the projector, you need these items from Apple for each video source. • To connect the projector to a Macintosh PowerBook, you may require a special connector, cable, or other components. s s... s s s s Unpacking the Projector 3 You can obtain these additional components: • To receive an S-Video signal,...

Owners Manual
Page 25
...of the computer or video source. ♦ Caution: Do not hold the projector by an orange power indicator. Setting Up the Projector 1. This can damage the lens. 2. The distance between the projector and the screen determines the actual image size. Screen size Horizontal distance from ... (61x46cm) 43.3 inches (1.1 m) ~ 55.1 inches (1.4 m) ♦ Note: The projection distance described above is for a standard lens. Turn the projector so that the lens is not angled correctly, the screen image will be in sleep mode, indicated by the lens. Use the general guidelines below...
...of the computer or video source. ♦ Caution: Do not hold the projector by an orange power indicator. Setting Up the Projector 1. This can damage the lens. 2. The distance between the projector and the screen determines the actual image size. Screen size Horizontal distance from ... (61x46cm) 43.3 inches (1.1 m) ~ 55.1 inches (1.4 m) ♦ Note: The projection distance described above is for a standard lens. Turn the projector so that the lens is not angled correctly, the screen image will be in sleep mode, indicated by the lens. Use the general guidelines below...

Owners Manual
Page 26
...the battery compartment cover. 6. Insert the two AA batteries included with a soft cloth. There is a risk that children should not be using the projector for a long period of the batteries is on your eyes. The light from the lamp can damage your hands, wash them immediately. • ...; Replace batteries as soon as they run out. Make sure the polarity of time. If the batteries leak, wipe away battery fluid with the projector. If fluid gets on . To insert the batteries in use. When replacing batteries, take the following precautions: • Do not recharge the ...
...the battery compartment cover. 6. Insert the two AA batteries included with a soft cloth. There is a risk that children should not be using the projector for a long period of the batteries is on your eyes. The light from the lamp can damage your hands, wash them immediately. • ...; Replace batteries as soon as they run out. Make sure the polarity of time. If the batteries leak, wipe away battery fluid with the projector. If fluid gets on . To insert the batteries in use. When replacing batteries, take the following precautions: • Do not recharge the ...

Owners Manual
Page 27
...®, and Power Macintosh • Any Apple PowerBook with video-out capability, including all the interface ports on the back of the projector; The following types of SVGA, VGA, SXGA and XGA output. The illustration below identifies all 160, 165, 180 and 500 series PowerBooks To connect the video and mouse cables...
...®, and Power Macintosh • Any Apple PowerBook with video-out capability, including all the interface ports on the back of the projector; The following types of SVGA, VGA, SXGA and XGA output. The illustration below identifies all 160, 165, 180 and 500 series PowerBooks To connect the video and mouse cables...


