User Manual
Page 2
... qualified service personnel. Use a cloth or glove to the purchaser of this product yourself. Never let children look into the lens when it is on. No part of their respective owners. Important Safety Information WARNING: Never look into the projector lens when the lamp is turned on; WARNING: The projector and its affiliates shall be liable to handle the new lamp. EPSON Extra Care, EPSON Connection, and EPSON...
... qualified service personnel. Use a cloth or glove to the purchaser of this product yourself. Never let children look into the lens when it is on. No part of their respective owners. Important Safety Information WARNING: Never look into the projector lens when the lamp is turned on; WARNING: The projector and its affiliates shall be liable to handle the new lamp. EPSON Extra Care, EPSON Connection, and EPSON...

User Manual
Page 5
... Information 56 Restoring the Default Settings 57 Maintaining and Transporting the Projector 59 Cleaning the Lens 60 Cleaning the Projector Case 60 Cleaning and Replacing the Air Filter 61 Replacing the Lamp 62 Resetting the Lamp Timer 65 Transporting the Projector 66 Solving Problems 67 Using On-Screen Help 68 What To Do When the Lights Flash 69 Solving Problems with the Image or Sound 72 Solving Problems with the Remote Control 78 Where To Get Help 79 Telephone Support Services 79 v
... Information 56 Restoring the Default Settings 57 Maintaining and Transporting the Projector 59 Cleaning the Lens 60 Cleaning the Projector Case 60 Cleaning and Replacing the Air Filter 61 Replacing the Lamp 62 Resetting the Lamp Timer 65 Transporting the Projector 66 Solving Problems 67 Using On-Screen Help 68 What To Do When the Lights Flash 69 Solving Problems with the Image or Sound 72 Solving Problems with the Remote Control 78 Where To Get Help 79 Telephone Support Services 79 v

User Manual
Page 7
... lighting. With EPSON's patented SizeWise™ chip, the projector supports computer displays ranging from VGA through UXGA (or SXGA on the PowerLite 600p). Support for USB audio and new horizontal keystone control contribute to auditoriums, your full-color presentations and videos will be bright and visible even in a wide variety of environments. The 0.9-inch LCD provides a high contrast ratio for rich, saturated images, while 5-watt amplified sound and whisper-quiet operation...
... lighting. With EPSON's patented SizeWise™ chip, the projector supports computer displays ranging from VGA through UXGA (or SXGA on the PowerLite 600p). Support for USB audio and new horizontal keystone control contribute to auditoriums, your full-color presentations and videos will be bright and visible even in a wide variety of environments. The 0.9-inch LCD provides a high contrast ratio for rich, saturated images, while 5-watt amplified sound and whisper-quiet operation...

User Manual
Page 10
... as Presenters Services to a related topic. See page 68 for common problems. Available from the Help button on the projector or the remote control. You can also use the arrow buttons in the table of contents on the left side of the screen to a laptop or PowerBook computer. I Owner's Kit folder Includes your projector at all the instructions you need to install any software to Presenters...
... as Presenters Services to a related topic. See page 68 for common problems. Available from the Help button on the projector or the remote control. You can also use the arrow buttons in the table of contents on the left side of the screen to a laptop or PowerBook computer. I Owner's Kit folder Includes your projector at all the instructions you need to install any software to Presenters...
User Manual
Page 18
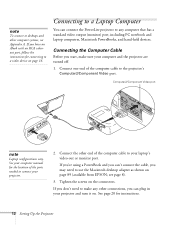
.... See your computer manual for the location of the computer cable to the projector's Computer2/Component Video port. note To connect to desktops and other computer systems, see page 8). 3. Connecting the Computer Cable Before you have an iBook with an RCA videoout port, follow the instructions for instructions. 12 Setting Up the Projector Connect the other end of the ports needed to connect your laptop's video-out or monitor...
.... See your computer manual for the location of the computer cable to the projector's Computer2/Component Video port. note To connect to desktops and other computer systems, see page 8). 3. Connecting the Computer Cable Before you have an iBook with an RCA videoout port, follow the instructions for instructions. 12 Setting Up the Projector Connect the other end of the ports needed to connect your laptop's video-out or monitor...

User Manual
Page 24
... Video port VGA-to-component video cable A/V cable If your video source has RCA audio, you can use them to project a higher quality video image. Before starting, make sure the projector and your video source has component (blue, green, and red) connectors, you can use the A/V cable to connect to -component video cable, which is available from EPSON; However, you may need a VGA-to the projector's Audio L (white) and R (red) jacks. Connect the VGA end of the cable to the Audio 1 jack on your video source. 3. Connect it...
... Video port VGA-to-component video cable A/V cable If your video source has RCA audio, you can use them to project a higher quality video image. Before starting, make sure the projector and your video source has component (blue, green, and red) connectors, you can use the A/V cable to connect to -component video cable, which is available from EPSON; However, you may need a VGA-to the projector's Audio L (white) and R (red) jacks. Connect the VGA end of the cable to the Audio 1 jack on your video source. 3. Connect it...

User Manual
Page 26
The P power light on top of the projector turns orange, indicating that the projector is receiving power but if you have to switch to the desired source as described in and turn on your projector and other equipment are set up and connected correctly, as described on your computer and video equipment in any equipment you've connected to it. You can turn on page 28. Then turn on...
The P power light on top of the projector turns orange, indicating that the projector is receiving power but if you have to switch to the desired source as described in and turn on your projector and other equipment are set up and connected correctly, as described on your computer and video equipment in any equipment you've connected to it. You can turn on page 28. Then turn on...

User Manual
Page 27
... projector correctly prevents premature lamp failure and possible damage to the projector from a computer, turn to appear, see a New Hardware Wizard message about 30 seconds. When you 're projecting a video, press the Play button on . This is especially dangerous for help. If a projected image fails to page 24 for instructions on focusing and making other image adjustments. Using the Projector 21 power light Power button 6. Once you should see your image, turn on in about USB audio...
... projector correctly prevents premature lamp failure and possible damage to the projector from a computer, turn to appear, see a New Hardware Wizard message about 30 seconds. When you 're projecting a video, press the Play button on . This is especially dangerous for help. If a projected image fails to page 24 for instructions on focusing and making other image adjustments. Using the Projector 21 power light Power button 6. Once you should see your image, turn on in about USB audio...

User Manual
Page 33
... page 76. The screen image is needed, you can correct the image manually using the E-Zoom button on the remote), you can press the Resize button to return it with the Resize button. Adjusting the Tracking and Synchronization If you may look heavy or blurred. incorrect tracking incorrect sync Resize button Auto button Using the Projector 27 If you're projecting from a computer and displaying an image that contains a lot...
... page 76. The screen image is needed, you can correct the image manually using the E-Zoom button on the remote), you can press the Resize button to return it with the Resize button. Adjusting the Tracking and Synchronization If you may look heavy or blurred. incorrect tracking incorrect sync Resize button Auto button Using the Projector 27 If you're projecting from a computer and displaying an image that contains a lot...

User Manual
Page 34
..., using the remote control as a company logo, display on the screen whenever you can use the A/V Mute button on the control panel to more than one computer and/or video source, you press the A/V Mute button. This is connected to darken your projector's control panel. Press the Video button to switch between standard (composite) video and S-Video. You can also have an image, such as described in Chapter 3. Power Help Computer/YCbCr Video Source Menu Esc Sync+ Tracking...
..., using the remote control as a company logo, display on the screen whenever you can use the A/V Mute button on the control panel to more than one computer and/or video source, you press the A/V Mute button. This is connected to darken your projector's control panel. Press the Video button to switch between standard (composite) video and S-Video. You can also have an image, such as described in Chapter 3. Power Help Computer/YCbCr Video Source Menu Esc Sync+ Tracking...

User Manual
Page 35
... projector. 7. If you've connected a computer or laptop and it's displaying only through the projector (the computer's monitor is green or flashing orange. Replace the lens cap and unplug the power cord. 6. If you 're using the projector, unplug the power cord. This extends the life of the lamp. If you want to turn it . 5. When the projector has cooled, the orange light stays on and the exhaust fan shuts off the projector, press the red Power button...
... projector. 7. If you've connected a computer or laptop and it's displaying only through the projector (the computer's monitor is green or flashing orange. Replace the lens cap and unplug the power cord. 6. If you 're using the projector, unplug the power cord. This extends the life of the lamp. If you want to turn it . 5. When the projector has cooled, the orange light stays on and the exhaust fan shuts off the projector, press the red Power button...

User Manual
Page 62
.... If the number shown is about the display settings of your computer and the number of the lamp is close to 1500, make sure you have a spare lamp handy. I Ceiling Turn on the right: note The lamp usage timer doesn't register until you've used . 1. Use the Sync- button (control panel) or the button (remote control) to reset the lamp timer. 56 Fine-tuning the Projector I COM Port Switches between serial (RS-232C) and USB communication for...
.... If the number shown is about the display settings of your computer and the number of the lamp is close to 1500, make sure you have a spare lamp handy. I Ceiling Turn on the right: note The lamp usage timer doesn't register until you've used . 1. Use the Sync- button (control panel) or the button (remote control) to reset the lamp timer. 56 Fine-tuning the Projector I COM Port Switches between serial (RS-232C) and USB communication for...
User Manual
Page 78
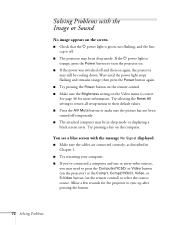
... screen saver. Try selecting the Reset All setting to return all setup menus to sync up after pressing the button. 72 Solving Problems I If you've connected a computer and one or more information. You see a blue screen with the Image or Sound No image appears on the Video menu is off. I Try restarting your computer. I Check that the P power light is green, not flashing, and the lens cap is correct. I The projector...
... screen saver. Try selecting the Reset All setting to return all setup menus to sync up after pressing the button. 72 Solving Problems I If you've connected a computer and one or more information. You see a blue screen with the Image or Sound No image appears on the Video menu is off. I Try restarting your computer. I Check that the P power light is green, not flashing, and the lens cap is correct. I The projector...

User Manual
Page 81
... the Video menu (see the effect on the screen immediately. When you change video settings, you can always select Reset to return to prevent interference. If you 're using the focus ring. I Keep your laptop computer and the projector, turn off the laptop's LCD display. The image contains static or noise. See page 54. If you don't like the new settings, you should be reduced. I Make sure the lens is...
... the Video menu (see the effect on the screen immediately. When you change video settings, you can always select Reset to return to prevent interference. If you 're using the focus ring. I Keep your laptop computer and the projector, turn off the laptop's LCD display. The image contains static or noise. See page 54. If you don't like the new settings, you should be reduced. I Make sure the lens is...

User Manual
Page 88
... by using the V Keystone function in the projector's Advanced menu. You can be square and you 'll have to adjust it down to lose its square shape. If you place the lens lower than the top of the screen, the image will be installed for four different viewing setups: front projection, ceiling mounting, rear projection onto a semi-transparent screen, or rear/ceiling projection, as shown: front projection ceiling mounting rear projection rear/ceiling projection...
... by using the V Keystone function in the projector's Advanced menu. You can be square and you 'll have to adjust it down to lose its square shape. If you place the lens lower than the top of the screen, the image will be installed for four different viewing setups: front projection, ceiling mounting, rear projection onto a semi-transparent screen, or rear/ceiling projection, as shown: front projection ceiling mounting rear projection rear/ceiling projection...
User Manual
Page 106
... or serial number be removed or should the product fail to be new or previously repaired to the EPSON standard of original purchase, to function properly as a result of misuse, abuse, improper installation, neglect, improper shipping, damage caused by an EPSON Authorized Servicer. The exchanged product or part may be properly maintained or fail to your responsibility. However, each replacement lamp carries...
... or serial number be removed or should the product fail to be new or previously repaired to the EPSON standard of original purchase, to function properly as a result of misuse, abuse, improper installation, neglect, improper shipping, damage caused by an EPSON Authorized Servicer. The exchanged product or part may be properly maintained or fail to your responsibility. However, each replacement lamp carries...

User Manual
Page 115
..., 55 to 56 Air filter, cleaning and replacing, 61 to 62 Anti-theft device, 8, 11 Arrow button, remote control, 40 Aspect ratio, 27, 103 Audio adjusting tone, 49 adjusting volume, 28, 34, 49 connecting desktop, 87, 91 connecting laptop, 14 connecting second computer, 92 menu, 42, 49 outputting to external sound system, 83 problems, troubleshooting, 77 turning off (using A/V Mute), 28, 34 Audio Out jack, 83 Auto button, 27, 46 B Back adjustable foot, 25...
..., 55 to 56 Air filter, cleaning and replacing, 61 to 62 Anti-theft device, 8, 11 Arrow button, remote control, 40 Aspect ratio, 27, 103 Audio adjusting tone, 49 adjusting volume, 28, 34, 49 connecting desktop, 87, 91 connecting laptop, 14 connecting second computer, 92 menu, 42, 49 outputting to external sound system, 83 problems, troubleshooting, 77 turning off (using A/V Mute), 28, 34 Audio Out jack, 83 Auto button, 27, 46 B Back adjustable foot, 25...

User Manual
Page 116
... projection distance, 10, 103 turning off (using A/V Mute), 28, 34 zooming, 24 to 25, 35 Installing projector, 82 to 83 K Kensington anti-theft device, 8, 11 Keystone correction, 26, 53, 74, 103 L Lamp number of hours used, 56 replacing, 62 to 65 status light, 69 to 71 Lamp timer, resetting, 65 Language setting, 68 Laptop computer connecting to, 12 to 14 displaying on, 23, 73 Lens cleaning, 60 specifications, 103 Lights, status, 69 to 72 Lines, drawing on screen...
... projection distance, 10, 103 turning off (using A/V Mute), 28, 34 zooming, 24 to 25, 35 Installing projector, 82 to 83 K Kensington anti-theft device, 8, 11 Keystone correction, 26, 53, 74, 103 L Lamp number of hours used, 56 replacing, 62 to 65 status light, 69 to 71 Lamp timer, resetting, 65 Language setting, 68 Laptop computer connecting to, 12 to 14 displaying on, 23, 73 Lens cleaning, 60 specifications, 103 Lights, status, 69 to 72 Lines, drawing on screen...

User Manual
Page 117
... specifications, 104 status light, 69 to 71 Presenters Online, 4, 79 Preset button, 48 PrivateLine Support, 5, 79 Problems color, 77 image, 72 to 77 remote control, 78 sound, 77 Projection lamp See Lamp Projector carrying case, 8, 66 cleaning, 60 to 62 connections, see Connecting projector distance from screen, 10, 103 feet, adjusting height with, 25 installing, 82 to 83 lamp specifications, 104 options, 8 positioning, 10 to 11 resolution, 1, 103 specifications, 103 to 108 transporting, 66 troubleshooting, 67 to 77 turning...
... specifications, 104 status light, 69 to 71 Presenters Online, 4, 79 Preset button, 48 PrivateLine Support, 5, 79 Problems color, 77 image, 72 to 77 remote control, 78 sound, 77 Projection lamp See Lamp Projector carrying case, 8, 66 cleaning, 60 to 62 connections, see Connecting projector distance from screen, 10, 103 feet, adjusting height with, 25 installing, 82 to 83 lamp specifications, 104 options, 8 positioning, 10 to 11 resolution, 1, 103 specifications, 103 to 108 transporting, 66 troubleshooting, 67 to 77 turning...

User Manual
Page 118
... 97 specifications, 105 Screen blank, 22 to 23 distance from projector, 10 Screen image See Image Setting menu, 42, 53 to 54 Shift button, 76 Sleep mode, 29, 54 Sound adjusting, 49 See Audio turning off (using A/V Mute), 28 Source, selecting, 28, 33 Speaker, specifications, 103 Speakers, connecting to external, 83 Special effects buttons, 37 to 38 Specifications brightness, 1, 103 dimensions, 104 electrical, 104 environmental, 105 general, 103 lens, 103 remote control, 104 resolution, 1, 103...
... 97 specifications, 105 Screen blank, 22 to 23 distance from projector, 10 Screen image See Image Setting menu, 42, 53 to 54 Shift button, 76 Sleep mode, 29, 54 Sound adjusting, 49 See Audio turning off (using A/V Mute), 28 Source, selecting, 28, 33 Speaker, specifications, 103 Speakers, connecting to external, 83 Special effects buttons, 37 to 38 Specifications brightness, 1, 103 dimensions, 104 electrical, 104 environmental, 105 general, 103 lens, 103 remote control, 104 resolution, 1, 103...


