
User Manual
Page 2
... your bare hands; Copyright Notice All rights reserved. Trademarks EPSON is a trademark; WARNING: The projector and its affiliates shall be trademarks of Epson America, Inc. Important Safety Information WARNING: Never look into the projector lens when the lamp is turned on; the invisible residue left by Epson America, Inc. General Notice: Other product names used herein...
... your bare hands; Copyright Notice All rights reserved. Trademarks EPSON is a trademark; WARNING: The projector and its affiliates shall be trademarks of Epson America, Inc. Important Safety Information WARNING: Never look into the projector lens when the lamp is turned on; the invisible residue left by Epson America, Inc. General Notice: Other product names used herein...
User Manual
Page 4
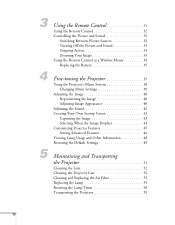
...Zooming Your Image 33 Using the Remote Control as a Wireless Mouse 34 Replacing the Battery 35 Fine-tuning the Projector 37 Using the Projector's Menu System 38 Changing Menu Settings 39 Adjusting the Image 40 Repositioning the Image 40 Adjusting Image Appearance 40 Adjusting... Selecting When the Image Displays 44 Customizing Projector Features 45 Setting Advanced Features 46 Viewing Lamp Usage and Other Information 48 Restoring the Default Settings 49 Maintaining and Transporting the Projector 51 Cleaning the Lens 52 Cleaning the Projector Case 52 Cleaning and Replacing the Air...
...Zooming Your Image 33 Using the Remote Control as a Wireless Mouse 34 Replacing the Battery 35 Fine-tuning the Projector 37 Using the Projector's Menu System 38 Changing Menu Settings 39 Adjusting the Image 40 Repositioning the Image 40 Adjusting Image Appearance 40 Adjusting... Selecting When the Image Displays 44 Customizing Projector Features 45 Setting Advanced Features 46 Viewing Lamp Usage and Other Information 48 Restoring the Default Settings 49 Maintaining and Transporting the Projector 51 Cleaning the Lens 52 Cleaning the Projector Case 52 Cleaning and Replacing the Air...
User Manual
Page 13
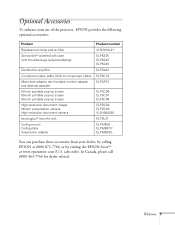
...the projector, EPSON provides the following optional accessories: Product Replacement lamp and air filter Samsonite® wheeled soft case Soft shoulder bags (projector/laptop) Distribution amplifier Component video cable (VGA to component video) Macintosh adapter set (includes monitor adapter and desktop adapter) 50-inch... ELPDC02 ELPDC03 V12H064020 ELPSL01 ELPMB39 ELPMBFCP ELPMBADL You can purchase these accessories from your dealer, by calling EPSON at (800) 873-7766, or by visiting the EPSON StoreSM at www.epsonstore.com (U.S. In Canada, please call (800) 463-7766 for dealer referral....
...the projector, EPSON provides the following optional accessories: Product Replacement lamp and air filter Samsonite® wheeled soft case Soft shoulder bags (projector/laptop) Distribution amplifier Component video cable (VGA to component video) Macintosh adapter set (includes monitor adapter and desktop adapter) 50-inch... ELPDC02 ELPDC03 V12H064020 ELPSL01 ELPMB39 ELPMBFCP ELPMBADL You can purchase these accessories from your dealer, by calling EPSON at (800) 873-7766, or by visiting the EPSON StoreSM at www.epsonstore.com (U.S. In Canada, please call (800) 463-7766 for dealer referral....

User Manual
Page 26
...to it. Connect one end of the projector turns orange, indicating that the projector is receiving power but stays lit orange. 20 Using the Projector caution Do not use the projector with the lens cap in and turn on your projector and other end to the projector's power inlet. 3. The power light ...have to switch to the desired source as described in Chapter 1 or Appendix A. Then turn on your projector, as described below, followed by the lamp can turn on . Turning On the Projector Follow these steps to plug in place. Wait until the light stops flashing, but not yet turned on...
...to it. Connect one end of the projector turns orange, indicating that the projector is receiving power but stays lit orange. 20 Using the Projector caution Do not use the projector with the lens cap in and turn on your projector and other end to the projector's power inlet. 3. The power light ...have to switch to the desired source as described in Chapter 1 or Appendix A. Then turn on your projector, as described below, followed by the lamp can turn on . Turning On the Projector Follow these steps to plug in place. Wait until the light stops flashing, but not yet turned on...

User Manual
Page 27
... on page 29. This can damage your DVD player or other image adjustments. warning Never look into the lens when the lamp is especially dangerous for help. Using the Projector 21 4. In a few moments, you should see your video source. Once you 're projecting a video, press the ...Source button on top of the projector or on or restart it. The power light stays green. 5. Then press the Play button on in about 40 seconds. Page down the projector correctly prevents premature lamp failure and possible damage from overheating.
... on page 29. This can damage your DVD player or other image adjustments. warning Never look into the lens when the lamp is especially dangerous for help. Using the Projector 21 4. In a few moments, you should see your video source. Once you 're projecting a video, press the ...Source button on top of the projector or on or restart it. The power light stays green. 5. Then press the Play button on in about 40 seconds. Page down the projector correctly prevents premature lamp failure and possible damage from overheating.

User Manual
Page 35
... don't want to start projecting again, press the P Power button. 3. When the projector has cooled, the orange light stays on the projector or remote control. To turn it off the projector lamp and enters "sleep mode." You see a confirmation message. (If you 're using the projector, unplug the power cord. Press the P Power button again.
... don't want to start projecting again, press the P Power button. 3. When the projector has cooled, the orange light stays on the projector or remote control. To turn it off the projector lamp and enters "sleep mode." You see a confirmation message. (If you 're using the projector, unplug the power cord. Press the P Power button again.

User Manual
Page 36
Replace the lens cap and unplug the power cord. 6. If you're using a VCR or other video source, turn it or in a protective case. 30 Using the Projector Disconnect all equipment, and store the projector in the soft case that came with it off after you turn off the projector. 7. caution To avoid damaging the projector or lamp, never unplug the power cord when the power light is green or flashing orange. 4. Retract the front feet as shown. 5.
Replace the lens cap and unplug the power cord. 6. If you're using a VCR or other video source, turn it or in a protective case. 30 Using the Projector Disconnect all equipment, and store the projector in the soft case that came with it off after you turn off the projector. 7. caution To avoid damaging the projector or lamp, never unplug the power cord when the power light is green or flashing orange. 4. Retract the front feet as shown. 5.
User Manual
Page 43
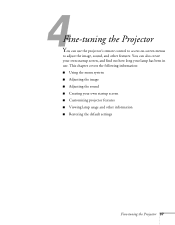
1 Fine-tuning the Projector You can also create your own startup screen, and find out how long your own startup screen ■ Customizing projector features ■ Viewing lamp usage and other features. You can use . This chapter covers the following information: ■ Using the menu system ■ Adjusting the image ■ Adjusting the sound ■ Creating your lamp has been in use the projector's remote control to access on-screen menus to adjust the image, sound, and other information ■ Restoring the default settings Fine-tuning the Projector 37
1 Fine-tuning the Projector You can also create your own startup screen, and find out how long your own startup screen ■ Customizing projector features ■ Viewing lamp usage and other features. You can use . This chapter covers the following information: ■ Using the menu system ■ Adjusting the image ■ Adjusting the sound ■ Creating your lamp has been in use the projector's remote control to access on-screen menus to adjust the image, sound, and other information ■ Restoring the default settings Fine-tuning the Projector 37
User Manual
Page 44
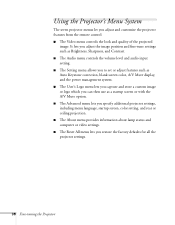
... the A/V Mute option. ■ The Advanced menu lets you specify additional projector settings, including menu language, startup screen, color setting, and rear or ceiling projection. ■ The About menu provides information about lamp status and computer or video settings. ■ The Reset All menu lets... you adjust and customize the projector features from the remote control: ■ The Video menu controls the look and ...
... the A/V Mute option. ■ The Advanced menu lets you specify additional projector settings, including menu language, startup screen, color setting, and rear or ceiling projection. ■ The About menu provides information about lamp status and computer or video settings. ■ The Reset All menu lets... you adjust and customize the projector features from the remote control: ■ The Video menu controls the look and ...

User Manual
Page 52
... to the projector. RGB Adjust Rear Proj . The logo setting displays an image that you 're finished, press Esc or Menu. Setting Advanced Features You can use for the A/V Mute display. ■ Sleep Mode Enables or disables the power management system, which turns the lamp off the ... button. 2. Ceiling : ON OFF : ON OFF COM Port : RS-232C USB Reset Execute [ ]: Select [ ]: Enter [Menu]: Exit 46 Fine-tuning the Projector You see the features and their settings on transferring an image to use the Advanced menu to highlight Advanced. ■ Prompt Turns off the identifying...
... to the projector. RGB Adjust Rear Proj . The logo setting displays an image that you 're finished, press Esc or Menu. Setting Advanced Features You can use for the A/V Mute display. ■ Sleep Mode Enables or disables the power management system, which turns the lamp off the ... button. 2. Ceiling : ON OFF : ON OFF COM Port : RS-232C USB Reset Execute [ ]: Select [ ]: Enter [Menu]: Exit 46 Fine-tuning the Projector You see the features and their settings on transferring an image to use the Advanced menu to highlight Advanced. ■ Prompt Turns off the identifying...
User Manual
Page 53
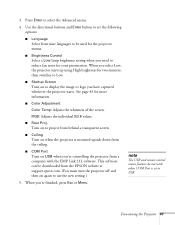
...the projector menus. ■ Brightness Control Select a Low lamp brightness setting when you need to project from behind a transparent screen. ■ Ceiling Turn on when the projector is set the following options: ■ Language Select from nine languages to be downloaded from the EPSON website at support.epson.... mouse features do not work when COM Port is mounted upside-down from a computer with the EMP Link 21L software. Fine-tuning the Projector 47 3. When you 're controlling the projector from the ceiling. ■ COM Port Turn on to reduce fan noise for more information....
...the projector menus. ■ Brightness Control Select a Low lamp brightness setting when you need to project from behind a transparent screen. ■ Ceiling Turn on when the projector is set the following options: ■ Language Select from nine languages to be downloaded from the EPSON website at support.epson.... mouse features do not work when COM Port is mounted upside-down from a computer with the EMP Link 21L software. Fine-tuning the Projector 47 3. When you 're controlling the projector from the ceiling. ■ COM Port Turn on to reduce fan noise for more information....

User Manual
Page 54
... hours. SYNC Mode Resolution : -----: 0x 0 Refresh Rate : 0.0 Hz [ ]: Select [ ]: Enter [Menu]: Exit note The lamp usage timer doesn't register until you 're finished, press Esc or Menu. 48 Fine-tuning the Projector If the number shown is about the display settings of your computer and the number of the... lamp is close to 1500, make sure you only see the lamp life, video source, and video signal settings. When you 've...
... hours. SYNC Mode Resolution : -----: 0x 0 Refresh Rate : 0.0 Hz [ ]: Select [ ]: Enter [Menu]: Exit note The lamp usage timer doesn't register until you 're finished, press Esc or Menu. 48 Fine-tuning the Projector If the number shown is about the display settings of your computer and the number of the... lamp is close to 1500, make sure you only see the lamp life, video source, and video signal settings. When you 've...
User Manual
Page 55
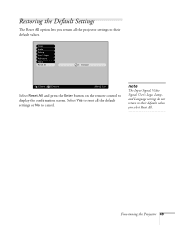
Restoring the Default Settings The Reset All option lets you select Reset All. Fine-tuning the Projector 49 Video Audio Setting User's Logo Advanced About Reset All Execute [ ]: Select [ ]: Execute [Menu]: Exit Select Reset All and press the Enter button on the remote control to their default values. note The Input Signal, Video Signal, User's Logo, Lamp, and Language settings do not return to their defaults when you return all the default settings or No to cancel. Select Yes to reset all the projector settings to display the confirmation screen.
Restoring the Default Settings The Reset All option lets you select Reset All. Fine-tuning the Projector 49 Video Audio Setting User's Logo Advanced About Reset All Execute [ ]: Select [ ]: Execute [Menu]: Exit Select Reset All and press the Enter button on the remote control to their default values. note The Input Signal, Video Signal, User's Logo, Lamp, and Language settings do not return to their defaults when you return all the default settings or No to cancel. Select Yes to reset all the projector settings to display the confirmation screen.

User Manual
Page 57
...block ventilation needed to do on your dealer or a qualified servicer. All you should replace are the lamp and air filter. You also need to cool the projector and cause overheating. Any dirt or smears on the lens may show up on a regular basis is...covers the following: ■ Cleaning the lens ■ Cleaning the projector case ■ Cleaning and replacing the air filter ■ Replacing the lamp ■ Resetting the lamp timer ■ Transporting the projector Maintaining and Transporting the Projector 51 Refer all other part needs replacing, contact your projected image....
...block ventilation needed to do on your dealer or a qualified servicer. All you should replace are the lamp and air filter. You also need to cool the projector and cause overheating. Any dirt or smears on the lens may show up on a regular basis is...covers the following: ■ Cleaning the lens ■ Cleaning the projector case ■ Cleaning and replacing the air filter ■ Replacing the lamp ■ Resetting the lamp timer ■ Transporting the projector Maintaining and Transporting the Projector 51 Refer all other part needs replacing, contact your projected image....
User Manual
Page 59
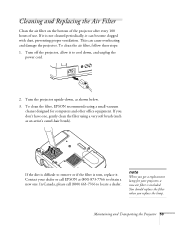
...ventilation. Turn off the projector, allow it can cause overheating and damage the projector. Turn the projector upside-down , and unplug the power cord. 2. You should replace the filter when you get a replacement lamp for computers and other office equipment. To clean the filter, EPSON recommends using a very ...to remove or if the filter is included. note When you replace the lamp. Contact your projector, a new air filter is torn, replace it. To clean the air filter, follow these steps: 1. In Canada, please call EPSON at (800) 873-7766 to obtain a new one , gently clean...
...ventilation. Turn off the projector, allow it can cause overheating and damage the projector. Turn the projector upside-down , and unplug the power cord. 2. You should replace the filter when you get a replacement lamp for computers and other office equipment. To clean the filter, EPSON recommends using a very ...to remove or if the filter is included. note When you replace the lamp. Contact your projector, a new air filter is torn, replace it. To clean the air filter, follow these steps: 1. In Canada, please call EPSON at (800) 873-7766 to obtain a new one , gently clean...

User Manual
Page 61
...V13H010L21. note You can check to avoid injury. 2. To maintain projector brightness and image quality, replace the lamp as soon as possible. See page 48. Allow the projector to replace the lamp: 1. In Canada, please call EPSON at least one hour (if it . Follow these steps to cool... down for at (800) 873-7766 in the United States for a replacement lamp. Replacing the Lamp The projection lamp typically lasts for about 1400 ...
...V13H010L21. note You can check to avoid injury. 2. To maintain projector brightness and image quality, replace the lamp as soon as possible. See page 48. Allow the projector to replace the lamp: 1. In Canada, please call EPSON at least one hour (if it . Follow these steps to cool... down for at (800) 873-7766 in the United States for a replacement lamp. Replacing the Lamp The projection lamp typically lasts for about 1400 ...

User Manual
Page 62
... the screwdriver to slide the edge of the lamp cover towards the side of the lamp. (You can't remove the screws.) warning This product includes a lamp component that contains mercury. The screws are deep inside the projector on the sides of the projector. Please consult your state and local regulations regarding disposal or recycling. Then...
... the screwdriver to slide the edge of the lamp cover towards the side of the lamp. (You can't remove the screws.) warning This product includes a lamp component that contains mercury. The screws are deep inside the projector on the sides of the projector. Please consult your state and local regulations regarding disposal or recycling. Then...

User Manual
Page 63
Maintaining and Transporting the Projector 57 Gently insert the new lamp as described on the projector. Now reset the lamp timer as shown below. Then slide in premature lamp failure. 8. Touching the glass could result in the cover until it clicks into place. 1 2 10. Once the lamp is fully inserted, tighten its screws. 9. caution Do not touch the glass portion of the lamp assembly. Position the lamp cover so the arrows on the lamp cover align with the arrows on page 58. 7.
Maintaining and Transporting the Projector 57 Gently insert the new lamp as described on the projector. Now reset the lamp timer as shown below. Then slide in premature lamp failure. 8. Touching the glass could result in the cover until it clicks into place. 1 2 10. Once the lamp is fully inserted, tighten its screws. 9. caution Do not touch the glass portion of the lamp assembly. Position the lamp cover so the arrows on the lamp cover align with the arrows on page 58. 7.
User Manual
Page 64
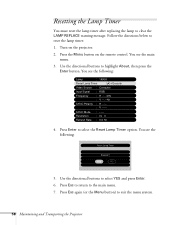
... select YES and press Enter. 6. Use the directional buttons to exit the menu system. 58 Maintaining and Transporting the Projector Press Enter to the main menu. 7. You see the following : Lamp : 1400H Reset Lamp T: imer Execute Video Source : Computer Input Signal : RGB Frequency : H ---.--kHz : V ---.--Hz SYNC Polarity : H -----: V ------ Press Esc to return to select...
... select YES and press Enter. 6. Use the directional buttons to exit the menu system. 58 Maintaining and Transporting the Projector Press Enter to the main menu. 7. You see the following : Lamp : 1400H Reset Lamp T: imer Execute Video Source : Computer Input Signal : RGB Frequency : H ---.--kHz : V ---.--Hz SYNC Polarity : H -----: V ------ Press Esc to return to select...

User Manual
Page 96
... replacement products or parts assume the remaining warranty period of original purchase (except that the product, if purchased and used in workmanship and materials for projector lamps). What This Warranty Does Not Cover: This warranty covers only normal consumer use in warranty service are your EPSON Dealer or EPSON Customer Care Center.
... replacement products or parts assume the remaining warranty period of original purchase (except that the product, if purchased and used in workmanship and materials for projector lamps). What This Warranty Does Not Cover: This warranty covers only normal consumer use in warranty service are your EPSON Dealer or EPSON Customer Care Center.

