
User Manual
Page 2
...where there is accessible to incorrect handling. Keep this User's Guide and follow all safety instructions for your document camera. Environmental Precautions Warning Do not leave the document camera or the remote control with batteries inside a vehicle with correct operation. The unit may result. Operate in... they will be subject to a lot of time, or where it will be exposed to incorrect handling. Do not place the document camera where it may become extremely hot. Caution This symbol indicates information that, if ignored, could possibly result in other places that ,...
...where there is accessible to incorrect handling. Keep this User's Guide and follow all safety instructions for your document camera. Environmental Precautions Warning Do not leave the document camera or the remote control with batteries inside a vehicle with correct operation. The unit may result. Operate in... they will be subject to a lot of time, or where it will be exposed to incorrect handling. Do not place the document camera where it may become extremely hot. Caution This symbol indicates information that, if ignored, could possibly result in other places that ,...
User Manual
Page 3
... in this guide. This may result. • Do not modify the power cable. • Do not place heavy objects on the document camera except as specifically explained in fire or electric shock. Failure to use any covers on top of a different power source may cause damage,... not touch the plug during an electrical storm. If the AC adapter, power cord, or document camera is damaged. always be sure to disassemble or modify the document camera. Unplug the document camera from the outlet and refer all repairs to qualified service technicians under these precautions could result in...
... in this guide. This may result. • Do not modify the power cable. • Do not place heavy objects on the document camera except as specifically explained in fire or electric shock. Failure to use any covers on top of a different power source may cause damage,... not touch the plug during an electrical storm. If the AC adapter, power cord, or document camera is damaged. always be sure to disassemble or modify the document camera. Unplug the document camera from the outlet and refer all repairs to qualified service technicians under these precautions could result in...

User Manual
Page 4
... not insert or drop metal, flammable, or foreign objects into the document camera. This could cause serious injury. Do not use . Doing so may crack. Do not place the document camera on the document camera, the document camera housing may result in a poorly ventilated place where heat can accumulate.... Do not spill liquid or spray fine mist into the document camera's vents or openings nor leave them . Using the ...
... not insert or drop metal, flammable, or foreign objects into the document camera. This could cause serious injury. Do not use . Doing so may crack. Do not place the document camera on the document camera, the document camera housing may result in a poorly ventilated place where heat can accumulate.... Do not spill liquid or spray fine mist into the document camera's vents or openings nor leave them . Using the ...

User Manual
Page 5
..., overheating, or explosion. Remove the batteries if you throw away the batteries, follow your eyes. If a discharged battery is on document camera, or it may cause batteries to prevent electric shock. If liquid from the outlet before cleaning to rupture and leak battery fluid, ...corrosion of batteries. The bright light can damage your area's regulations regarding disposal or recycling. Do not use excessive force when adjusting the document camera. Wash them into the lens when the LED illumination lamp is left inside for a long period of water and consult a doctor. ...
..., overheating, or explosion. Remove the batteries if you throw away the batteries, follow your eyes. If a discharged battery is on document camera, or it may cause batteries to prevent electric shock. If liquid from the outlet before cleaning to rupture and leak battery fluid, ...corrosion of batteries. The bright light can damage your area's regulations regarding disposal or recycling. Do not use excessive force when adjusting the document camera. Wash them into the lens when the LED illumination lamp is left inside for a long period of water and consult a doctor. ...

User Manual
Page 6
... 13 Remote Control Buttons 14 Remote Control 14 Projector operations 14 Document camera operation 14 Storing the Document Camera 16 Securing the Document Camera 17 Connecting Connecting to a Projector 19 Connecting to a Computer 21 Connect for Use with the Document Camera Software 21 Connect for Use Without the Document Camera Software 22 Projecting Plugging In and Turning On 24 Displaying...
... 13 Remote Control Buttons 14 Remote Control 14 Projector operations 14 Document camera operation 14 Storing the Document Camera 16 Securing the Document Camera 17 Connecting Connecting to a Projector 19 Connecting to a Computer 21 Connect for Use with the Document Camera Software 21 Connect for Use Without the Document Camera Software 22 Projecting Plugging In and Turning On 24 Displaying...
User Manual
Page 7
... Operation Problems 64 Image Quality Problems 64 Problems Using an SD Card 65 Problems Using a USB Drive 65 Problems Connecting a Laptop 65 Problems Using the Document Camera Software 65 Where to Get Help 67 Europe 67 Africa 72 Middle East 72 North and Central America 73 South America 73 Asia and Oceania...
... Operation Problems 64 Image Quality Problems 64 Problems Using an SD Card 65 Problems Using a USB Drive 65 Problems Connecting a Laptop 65 Problems Using the Document Camera Software 65 Where to Get Help 67 Europe 67 Africa 72 Middle East 72 North and Central America 73 South America 73 Asia and Oceania...

User Manual
Page 8
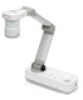
With the included software, you can use the Epson ELPDC20 document camera to capture and project pages from books or other documents, and even three-dimensional objects. Introduction You can create time-lapse photos and annotate images produced by the document camera.
With the included software, you can use the Epson ELPDC20 document camera to capture and project pages from books or other documents, and even three-dimensional objects. Introduction You can create time-lapse photos and annotate images produced by the document camera.

User Manual
Page 10
s "Control Panel" p.11 s p.17 s "Interface" p.12 Lets you save and display images on an SD card. s p.17 Lets you attach a commercially available security cable to lock the document camera in place. s p.37 Name A Camera head B Remote receiver C Control panel Function s "Camera Head" p.11 Receives signals from the remote control. Document Camera Parts Top/Side/Rear Name D Security slot E Interface F Security bar G SD card slot 10 Function The security slot is compatible with the Microsaver security system manufactured by Kensington.
s "Control Panel" p.11 s p.17 s "Interface" p.12 Lets you save and display images on an SD card. s p.17 Lets you attach a commercially available security cable to lock the document camera in place. s p.37 Name A Camera head B Remote receiver C Control panel Function s "Camera Head" p.11 Receives signals from the remote control. Document Camera Parts Top/Side/Rear Name D Security slot E Interface F Security bar G SD card slot 10 Function The security slot is compatible with the Microsaver security system manufactured by Kensington.

User Manual
Page 11
... in three steps: bright, dim, and off . [ ] Projects images from the document camera. [ ] Projects images from a computer. Turn on this lamp when there is not enough light on or off . Document Camera Parts Camera Head 11 Name E Camera arm Function Extends or retracts the camera arm to gently wipe the lens. Use a soft cloth to adjust the...
... in three steps: bright, dim, and off . [ ] Projects images from the document camera. [ ] Projects images from a computer. Turn on this lamp when there is not enough light on or off . Document Camera Parts Camera Head 11 Name E Camera arm Function Extends or retracts the camera arm to gently wipe the lens. Use a soft cloth to adjust the...

User Manual
Page 12
...If you press and release the button, the image is frozen. Outputs image signals to automatically focus the image. Connects the document camera to a projector. Connects a commercially available microphone when recording audio and video. Enlarges or reduces the image without changing the ... software. When the menu is displayed, pressing this button confirms the current item. Inputs image signals from the surface of the camera lens. Document Camera Parts 12 D[ [ Name Function button When the menu screen is displayed, pressing these buttons selects menu items and setting values....
...If you press and release the button, the image is frozen. Outputs image signals to automatically focus the image. Connects the document camera to a projector. Connects a commercially available microphone when recording audio and video. Enlarges or reduces the image without changing the ... software. When the menu is displayed, pressing this button confirms the current item. Inputs image signals from the surface of the camera lens. Document Camera Parts 12 D[ [ Name Function button When the menu screen is displayed, pressing these buttons selects menu items and setting values....

User Manual
Page 13
s p.17 s p.17 Lets you attach a commercially available security cable to a table, cart, or stand with commercially available M4 bolts. Document Camera Parts 13 Base Name A Mounting points B Security bar Function You can attach the document camera to lock the document camera in place.
s p.17 s p.17 Lets you attach a commercially available security cable to a table, cart, or stand with commercially available M4 bolts. Document Camera Parts 13 Base Name A Mounting points B Security bar Function You can attach the document camera to lock the document camera in place.
User Manual
Page 14
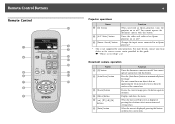
...that are approximately 10 cm (4 inches) or less from the surface of an Epson projector on or off.* Changes the input source connected to automatically focus the image. press the button again to Get Help" p.67 Document camera operation Name D [t] button E [Auto Focus] button F [Freeze] button G... [Menu] button H buttons I [Enter] button Function Turns the document camera on or off. Press the [Auto Focus] button to an Epson projector.* * This is not supported by some...
...that are approximately 10 cm (4 inches) or less from the surface of an Epson projector on or off.* Changes the input source connected to automatically focus the image. press the button again to Get Help" p.67 Document camera operation Name D [t] button E [Auto Focus] button F [Freeze] button G... [Menu] button H buttons I [Enter] button Function Turns the document camera on or off. Press the [Auto Focus] button to an Epson projector.* * This is not supported by some...

User Manual
Page 15
... changing the projection size. Starts and stops video recording. Captures still images. s p.26 Adjusts the image brightness. [ ] Projects images from a computer. [ ] Projects images from the document camera.
... changing the projection size. Starts and stops video recording. Captures still images. s p.26 Adjusts the image brightness. [ ] Projects images from a computer. [ ] Projects images from the document camera.

User Manual
Page 16
Storing the Document Camera 16 When you're not using the document camera, simply fold its arm down as shown. Caution Do not try to press the arm flat or fold it backwards, or it may get damaged.
Storing the Document Camera 16 When you're not using the document camera, simply fold its arm down as shown. Caution Do not try to press the arm flat or fold it backwards, or it may get damaged.

User Manual
Page 17
you can thread them . A Mounting points Attention Fasten the bolts securely but do not overtighten them into the Kensington security port. In addition, you can attach the document camera to a maximum depth of 9 mm (0.35 inch). Use M4 bolts; Do not use adhesives. Securing the Document Camera 17 You can secure the document camera by fastening a cable to the security bar, shown below, or by inserting a Kensington anti-theft cable into the document camera case to a table, cart, or stand at the mounting points indicated below.
you can thread them . A Mounting points Attention Fasten the bolts securely but do not overtighten them into the Kensington security port. In addition, you can attach the document camera to a maximum depth of 9 mm (0.35 inch). Use M4 bolts; Do not use adhesives. Securing the Document Camera 17 You can secure the document camera by fastening a cable to the security bar, shown below, or by inserting a Kensington anti-theft cable into the document camera case to a table, cart, or stand at the mounting points indicated below.

User Manual
Page 18
Connecting Follow the instructions in this section to set up the document camera and give a presentation.
Connecting Follow the instructions in this section to set up the document camera and give a presentation.

User Manual
Page 19
a You can connect the document camera to a projector using a standard VGA cable, composite video cable, or HDMI cable, or to a Projector 19 You can also use , based on the type of ... connection HDMI port HDMI cable A Composite port B Composite video cable Connecting to other video equipment: VGA port (computer monitor style) VGA cable (included) b Connect the document camera by one of cable you will use the...
a You can connect the document camera to a projector using a standard VGA cable, composite video cable, or HDMI cable, or to a Projector 19 You can also use , based on the type of ... connection HDMI port HDMI cable A Composite port B Composite video cable Connecting to other video equipment: VGA port (computer monitor style) VGA cable (included) b Connect the document camera by one of cable you will use the...

User Manual
Page 21
... for Use with a USB cable, as display PowerPoint slides or images from other applications. s p.54 a Connect the document camera to your computer with the Document Camera Software This connection method lets you use the included software, as well as shown. a It's also possible to connect with...computer also lets you display PowerPoint slides or other output ports is not displayed. • You cannot display images by directly connecting the document camera to a projector with a USB cable, video from another application on p.55 to use the software or it may not function normally....
... for Use with a USB cable, as display PowerPoint slides or images from other applications. s p.54 a Connect the document camera to your computer with the Document Camera Software This connection method lets you use the included software, as well as shown. a It's also possible to connect with...computer also lets you display PowerPoint slides or other output ports is not displayed. • You cannot display images by directly connecting the document camera to a projector with a USB cable, video from another application on p.55 to use the software or it may not function normally....

User Manual
Page 22
...appear on the screen, check your computer, but you display PowerPoint slides or images from another application on the screen, the document camera's USB Mode may be output from the document camera's Display Out port to your computer. A Computer In port see p.65 to check your computer's monitor-out port to.... s p.65 • A video signal from the Computer In port can 't use the included software. Connect for Use Without the Document Camera Software This connection method lets you can only be set to Mass Storage; If you 're using a desktop computer, disconnect the monitor from...
...appear on the screen, check your computer, but you display PowerPoint slides or images from another application on the screen, the document camera's USB Mode may be output from the document camera's Display Out port to your computer. A Computer In port see p.65 to check your computer's monitor-out port to.... s p.65 • A video signal from the Computer In port can 't use the included software. Connect for Use Without the Document Camera Software This connection method lets you can only be set to Mass Storage; If you 're using a desktop computer, disconnect the monitor from...

User Manual
Page 24
b Press the [t] power button to output an image. It takes about 20 seconds for the document camera to turn it off, disconnect any cables, and fold down the camera arm. c Turn on the port to which you 're done using the document camera, press the [t] power button twice to turn on the document camera. a When you connected. s p.16 Plugging In and Turning On 24 a Connect the power adapter as shown and plug the adapter into a wall outlet. d Select the appropriate "source" on the projector depending on your projector.
b Press the [t] power button to output an image. It takes about 20 seconds for the document camera to turn it off, disconnect any cables, and fold down the camera arm. c Turn on the port to which you 're done using the document camera, press the [t] power button twice to turn on the document camera. a When you connected. s p.16 Plugging In and Turning On 24 a Connect the power adapter as shown and plug the adapter into a wall outlet. d Select the appropriate "source" on the projector depending on your projector.


