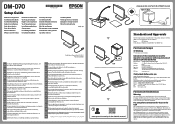
Setup Guide
Page 1
...-52-3131 Web: www.epson.com/ For Users in accordance with the instruction manual, may cause harmful interference to correct the interference at his own expense. This equipment generates, uses, and can radiate radio frequency energy and, if not installed and used in the Americas Warning The connection of a non-shielded interface cable to this display will be required to radio...
...-52-3131 Web: www.epson.com/ For Users in accordance with the instruction manual, may cause harmful interference to correct the interference at his own expense. This equipment generates, uses, and can radiate radio frequency energy and, if not installed and used in the Americas Warning The connection of a non-shielded interface cable to this display will be required to radio...

Technical Reference Guide
Page 2
...Epson ESC/POS is compatible with Seiko Epson Corporation's operating and maintenance instructions. • Seiko Epson Corporation shall not be reproduced, stored in a retrieval system, or transmitted in POS environments. Android™ is any liability assumed for errors or omissions. • Neither is a trademark of their respective owners and used...or unauthorized modifications, repairs, or alterations to this manual, Seiko Epson Corporation assumes no responsibility for damages resulting from the use of Apple Inc., registered in the U.S. It comprises a set of Cisco in the...
...Epson ESC/POS is compatible with Seiko Epson Corporation's operating and maintenance instructions. • Seiko Epson Corporation shall not be reproduced, stored in a retrieval system, or transmitted in POS environments. Android™ is any liability assumed for errors or omissions. • Neither is a trademark of their respective owners and used...or unauthorized modifications, repairs, or alterations to this manual, Seiko Epson Corporation assumes no responsibility for damages resulting from the use of Apple Inc., registered in the U.S. It comprises a set of Cisco in the...

Technical Reference Guide
Page 3
...bodily injury and malfunction. ∗ Set up the product on a firm, stable, horizontal surface. ∗ Do not place heavy objects on the product. ∗ Never attempt to disconnect all cables in the manual. ∗ Never disassemble or modify the product. ∗ Do not use a cable covered with dust or foreign matters. &#...If the product is too hot to avoid serious bodily injury. Warnings WARNING O Immediately unplug the product when any power supply or voltage other than those mentioned in advance. 3 When transporting the product, make sure to repair the product yourself.
...bodily injury and malfunction. ∗ Set up the product on a firm, stable, horizontal surface. ∗ Do not place heavy objects on the product. ∗ Never attempt to disconnect all cables in the manual. ∗ Never disassemble or modify the product. ∗ Do not use a cable covered with dust or foreign matters. &#...If the product is too hot to avoid serious bodily injury. Warnings WARNING O Immediately unplug the product when any power supply or voltage other than those mentioned in advance. 3 When transporting the product, make sure to repair the product yourself.

Technical Reference Guide
Page 6
... Computer 13 ■ Routing the USB Cable ...13 ■ Changing the Angle of the Display Unit 14 ■ Turning the Power On/Off 14 ■ Adjusting the Display Brightness 15 ■ Cleaning the Outer Case ...16 ■ Troubleshooting...17 Nothing is Displayed on the Screen ...17 The Screen Looks Dark when the Display is Attached in Portrait Orientation 17 Installing the Product in Various Ways 19...
... Computer 13 ■ Routing the USB Cable ...13 ■ Changing the Angle of the Display Unit 14 ■ Turning the Power On/Off 14 ■ Adjusting the Display Brightness 15 ■ Cleaning the Outer Case ...16 ■ Troubleshooting...17 Nothing is Displayed on the Screen ...17 The Screen Looks Dark when the Display is Attached in Portrait Orientation 17 Installing the Product in Various Ways 19...
Technical Reference Guide
Page 7
... ■ Software...36 Development Kit ...36 Drivers ...36 Utilities ...37 Others...37 Download ...37 ■ Screen Display ...38 Display Mode...38 Standard Mode ...38 Fixed Column and Row Mode ...41 Displaying Character String ...42 Displaying QR Code...42 Displaying Graphics Data ...43 Storing Graphics Data ...43 Available Functions by Display Mode...44 List of Settings...45 Appendix...46 ■ Configurable Number of Columns and Rows 46 When Installed in...
... ■ Software...36 Development Kit ...36 Drivers ...36 Utilities ...37 Others...37 Download ...37 ■ Screen Display ...38 Display Mode...38 Standard Mode ...38 Fixed Column and Row Mode ...41 Displaying Character String ...42 Displaying QR Code...42 Displaying Graphics Data ...43 Storing Graphics Data ...43 Available Functions by Display Mode...44 List of Settings...45 Appendix...46 ■ Configurable Number of Columns and Rows 46 When Installed in...
Technical Reference Guide
Page 9
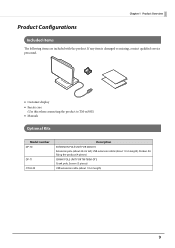
... is damaged or missing, contact qualified service personnel. • Customer display • Ferrite core (Use this when connecting the product to TM-m30II) • Manuals Optional Kits Model number DP-70 DP-71 OT-UL30 Description EXTENSION POLE UNIT FOR DM-D70 Extension pole (about 24 cm tall), USB extension cable (about 1.0 m length), Stickers for fixing the product (4 pieces) CRANK POLE UNIT...
... is damaged or missing, contact qualified service personnel. • Customer display • Ferrite core (Use this when connecting the product to TM-m30II) • Manuals Optional Kits Model number DP-70 DP-71 OT-UL30 Description EXTENSION POLE UNIT FOR DM-D70 Extension pole (about 24 cm tall), USB extension cable (about 1.0 m length), Stickers for fixing the product (4 pieces) CRANK POLE UNIT...

Technical Reference Guide
Page 10
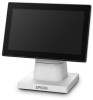
... or a computer. Remove the screws when changing the display orientation from landscape to a VESA mount. The screws can be turned by hand. Remove this cover when operating the brightness up /down buttons or when changing the display orientation from landscape to portrait, or when connecting the display to portrait. Supports the display unit. Allows you to adjust the brightness of the display. 10 Part name 1 Display 2 Stand 3 USB cable 4 Rear cover 5 Screws (4 pieces) 6 Brightness up /down buttons Description A LCD screen. Part Names Chapter...
... or a computer. Remove the screws when changing the display orientation from landscape to a VESA mount. The screws can be turned by hand. Remove this cover when operating the brightness up /down buttons or when changing the display orientation from landscape to portrait, or when connecting the display to portrait. Supports the display unit. Allows you to adjust the brightness of the display. 10 Part name 1 Display 2 Stand 3 USB cable 4 Rear cover 5 Screws (4 pieces) 6 Brightness up /down buttons Description A LCD screen. Part Names Chapter...
Technical Reference Guide
Page 11
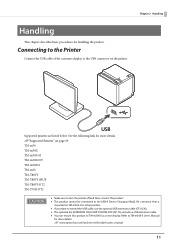
... • Make sure to turn the printer off and then connect this product. • The product cannot be connected to the USB-A Device Charging (iPad2.1A) connector that is mounted on TM-m30II-H or other printers. • If you want to extend the USB cable, use the optional USB extension cable (OT-UL30). • The optional kit, EXTENSION POLE UNIT FOR DM-D70 (DP...
... • Make sure to turn the printer off and then connect this product. • The product cannot be connected to the USB-A Device Charging (iPad2.1A) connector that is mounted on TM-m30II-H or other printers. • If you want to extend the USB cable, use the optional USB extension cable (OT-UL30). • The optional kit, EXTENSION POLE UNIT FOR DM-D70 (DP...

Technical Reference Guide
Page 15
Chapter 2 Handling Adjusting the Display Brightness The brightness of the display can be adjusted by connecting it to the printer or a computer. 2 Remove the rear cover. 3 Press the brightness up/down buttons to the brightest setting by default. 1 Turn on the display by pressing the brightness up/down buttons. There are four brightness levels. 4 Attach the rear cover. 15 It is set to adjust the brightness.
Chapter 2 Handling Adjusting the Display Brightness The brightness of the display can be adjusted by connecting it to the printer or a computer. 2 Remove the rear cover. 3 Press the brightness up/down buttons to the brightest setting by default. 1 Turn on the display by pressing the brightness up/down buttons. There are four brightness levels. 4 Attach the rear cover. 15 It is set to adjust the brightness.
Technical Reference Guide
Page 17
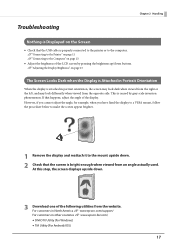
... in other countries U www.epson-biz.com/ • DM-D70 Utility (For Windows) • TM Utility (For Android/iOS) 17 Troubleshooting Chapter 2 Handling Nothing is Displayed on the Screen • Check that the USB cable is properly connected to the printer or to the Computer" on page 13 • Adjust the brightness of the LCD screen by gray scale inversion phenomenon. U"Connecting to the Printer" on...
... in other countries U www.epson-biz.com/ • DM-D70 Utility (For Windows) • TM Utility (For Android/iOS) 17 Troubleshooting Chapter 2 Handling Nothing is Displayed on the Screen • Check that the USB cable is properly connected to the printer or to the Computer" on page 13 • Adjust the brightness of the LCD screen by gray scale inversion phenomenon. U"Connecting to the Printer" on...

Technical Reference Guide
Page 21
Chapter 3 Installing the Product in Various Ways 5 Change orientation of the stand referring to the mark on the rear of the display. 6 Secure the stand with the four screws. 7 Route the USB cable as shown below. 8 Attach the rear cover. 21
Chapter 3 Installing the Product in Various Ways 5 Change orientation of the stand referring to the mark on the rear of the display. 6 Secure the stand with the four screws. 7 Route the USB cable as shown below. 8 Attach the rear cover. 21

Technical Reference Guide
Page 34
...-Device XML User's Manual. 34 ePOS-Device Service that is pre-installed on the TM Intelligent printer receives the request and printing or displaying data is directly connected to the request. Controlling the Customer Display This product supports the following development kits and drivers. • Epson ePOS SDK • EPSON OPOS ADK • EPSON OPOS ADK for .NET • EPSON Advanced Printer Driver ePOS-Print...
...-Device XML User's Manual. 34 ePOS-Device Service that is pre-installed on the TM Intelligent printer receives the request and printing or displaying data is directly connected to the request. Controlling the Customer Display This product supports the following development kits and drivers. • Epson ePOS SDK • EPSON OPOS ADK • EPSON OPOS ADK for .NET • EPSON Advanced Printer Driver ePOS-Print...

Technical Reference Guide
Page 36
... quantity of codes using extensive APIs. It allows you to develop applications that are provided for JavaScript EPSON OPOS ADK OCX driver that enables printing from the following pieces of software are compatible with the UPOS (Unified POS) specifications. Operating environment Windows Windows 36 You can easily develop an iOS/Android native application or Web application. Use this when controlling the display using the...
... quantity of codes using extensive APIs. It allows you to develop applications that are provided for JavaScript EPSON OPOS ADK OCX driver that enables printing from the following pieces of software are compatible with the UPOS (Unified POS) specifications. Operating environment Windows Windows 36 You can easily develop an iOS/Android native application or Web application. Use this when controlling the display using the...

Technical Reference Guide
Page 37
.... Use this utility to make the settings of the product from one of multiple products can be done efficiently. Settings of the following web site: U www.epson-biz.com/ 37 Chapter 4 Application Development Information Utilities Software DM-D70 Utility Epson TM Utility Deployment Tool DM-D70 Firmware Updater Description Operating environment A utility for checking and changing various settings of the product. This manual comes with sample programs. Download...
.... Use this utility to make the settings of the product from one of multiple products can be done efficiently. Settings of the following web site: U www.epson-biz.com/ 37 Chapter 4 Application Development Information Utilities Software DM-D70 Utility Epson TM Utility Deployment Tool DM-D70 Firmware Updater Description Operating environment A utility for checking and changing various settings of the product. This manual comes with sample programs. Download...
Technical Reference Guide
Page 41
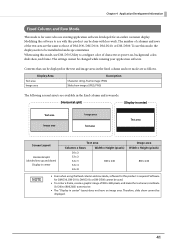
... users who use DM-D70 Utility to configure color of characters at power-on, background color, slide show, and frame. Display Area Text area Image area Description Character string, Frame image (PNG) Slide show images (JPEG, PNG) The following screen layouts are the same as follows. The number of columns and rows of the text area are available in the fixed column and row mode. [Horizontal...
... users who use DM-D70 Utility to configure color of characters at power-on, background color, slide show, and frame. Display Area Text area Image area Description Character string, Frame image (PNG) Slide show images (JPEG, PNG) The following screen layouts are the same as follows. The number of columns and rows of the text area are available in the fixed column and row mode. [Horizontal...
Technical Reference Guide
Page 43
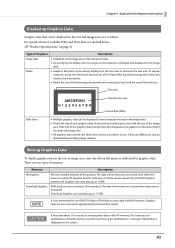
... (horizontal and vertical pixel size) with the size of the image area. Memory NV Graphics Download Graphics Description NV (non-volatile) memory of available JPEG and PNG data, see the link below. The data in the NV memory. It is recommended to use DM-D70 Utility or TM Utility to be transmissive. • Match the size of the frame data (horizontal and vertical pixel size...
... (horizontal and vertical pixel size) with the size of the image area. Memory NV Graphics Download Graphics Description NV (non-volatile) memory of available JPEG and PNG data, see the link below. The data in the NV memory. It is recommended to use DM-D70 Utility or TM Utility to be transmissive. • Match the size of the frame data (horizontal and vertical pixel size...
Technical Reference Guide
Page 44
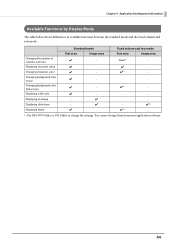
...Displaying a QR code ✔ - - - Displaying an image - ✔ - - You cannot change the settings. Standard mode Fixed column and row mode Text area Image area Text area Image area Changing the number of ✔ columns and rows - Displaying slide show - ✔ - ✔ * Displaying frame ✔ - ✔ * - ∗: Use DM-D70 Utility or TM Utility to change them from your application software. 44 Changing background color ✔ - - - (rows) Changing background color (full screen) ✔ - ✔ * - Displaying...
...Displaying a QR code ✔ - - - Displaying an image - ✔ - - You cannot change the settings. Standard mode Fixed column and row mode Text area Image area Text area Image area Changing the number of ✔ columns and rows - Displaying slide show - ✔ - ✔ * Displaying frame ✔ - ✔ * - ∗: Use DM-D70 Utility or TM Utility to change them from your application software. 44 Changing background color ✔ - - - (rows) Changing background color (full screen) ✔ - ✔ * - Displaying...
Technical Reference Guide
Page 45
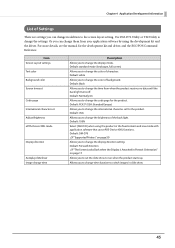
... your application software by using the product in Portrait Orientation" on page 50 Allows you to change the display mode. Default: black Allows you to change the international character set Adjust Brightness ePOS-Device XML mode Display direction Autoplay slideshow Image change time Description Allows you to change the display direction setting. Allows you to change time duration to change the color of characters. Default: standard mode (landscape, full screen) Allows you to switch images in...
... your application software by using the product in Portrait Orientation" on page 50 Allows you to change the display mode. Default: black Allows you to change the international character set Adjust Brightness ePOS-Device XML mode Display direction Autoplay slideshow Image change time Description Allows you to change the display direction setting. Allows you to change time duration to change the color of characters. Default: standard mode (landscape, full screen) Allows you to switch images in...
Technical Reference Guide
Page 50
... display is not updated. In addition, set the screen layout setting to Ver.5.10 or later. DM-D70 Utility cannot be used in TM-T88VI-DT2 or TM-T70II-DT2 because the software does not support DMD70. Restrictions C • When developing a PC-POS application software, you need to update the TM-DT software to [Fixed column and row mode], and then select [20 x 2] as the number of driver...
... display is not updated. In addition, set the screen layout setting to Ver.5.10 or later. DM-D70 Utility cannot be used in TM-T88VI-DT2 or TM-T70II-DT2 because the software does not support DMD70. Restrictions C • When developing a PC-POS application software, you need to update the TM-DT software to [Fixed column and row mode], and then select [20 x 2] as the number of driver...

Technical Reference Guide
Page 51
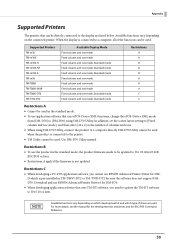
Appendix Product Specifications Display size 7 inch (800 x 480 pixels), Viewing area 154.1 x 85.9 mm Display type TFT LCD (16.2 million colors) Pixel pitch The number of defective dots*1 Brightness Viewing angle (landscape orientation)*2 0.1926 (horizontal) x 0.179 (vertical) mm 5 dots or less Approx. 300 cd/m2 (standard) (Peak brightness soon after purchasing, measured at 25 degrees C) Vertical 120°, Horizontal 150° (standard) Alphanumeric 95 character International characters 18 sets Graphic characters...
Appendix Product Specifications Display size 7 inch (800 x 480 pixels), Viewing area 154.1 x 85.9 mm Display type TFT LCD (16.2 million colors) Pixel pitch The number of defective dots*1 Brightness Viewing angle (landscape orientation)*2 0.1926 (horizontal) x 0.179 (vertical) mm 5 dots or less Approx. 300 cd/m2 (standard) (Peak brightness soon after purchasing, measured at 25 degrees C) Vertical 120°, Horizontal 150° (standard) Alphanumeric 95 character International characters 18 sets Graphic characters...