Product Information Guide
Page 1
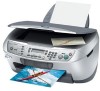
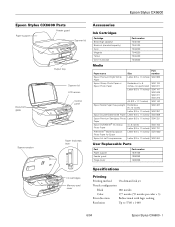
Epson Stylus CX6600 Epson Stylus CX6600 Parts Feeder guard Paper support Scanner lid Document glass Output tray Scanner lid LCD screen Control panel Scanner section Paper thickness lever Accessories Ink Cartridges Cartridge Black (high capacity) Black ink (standard capacity) Cyan Magenta Yellow Color multi-pack Part number T043120 T044120 T044220 T044320 T044420 T044520 Media Paper name Size Part number Epson Premium...
Epson Stylus CX6600 Epson Stylus CX6600 Parts Feeder guard Paper support Scanner lid Document glass Output tray Scanner lid LCD screen Control panel Scanner section Paper thickness lever Accessories Ink Cartridges Cartridge Black (high capacity) Black ink (standard capacity) Cyan Magenta Yellow Color multi-pack Part number T043120 T044120 T044220 T044320 T044420 T044520 Media Paper name Size Part number Epson Premium...
Product Information Guide
Page 4
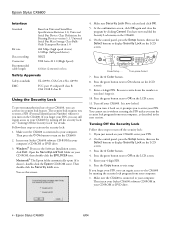
... EMC UL 60950, CSA C22.2 No. 60950 FCC part 15 subpart B class B CSA C108.8 class B Using the Security Lock To prevent unauthorized use of your CX6600, you can still regain access to your Stylus CX6600 software CD-ROM in the next section. You have .... 2. Make sure Security Lock On is now locked. If you turn on the CX6600. Epson Stylus CX6600 6/04 Open the SecurityLockTool folder on your CX6600, enter your computer. Press the x Color button. 4. Epson Stylus CX6600 Interface Standard Bit rate Data encoding Connector Recommended cable length Based on Universal Serial Bus...
... EMC UL 60950, CSA C22.2 No. 60950 FCC part 15 subpart B class B CSA C108.8 class B Using the Security Lock To prevent unauthorized use of your CX6600, you can still regain access to your Stylus CX6600 software CD-ROM in the next section. You have .... 2. Make sure Security Lock On is now locked. If you turn on the CX6600. Epson Stylus CX6600 6/04 Open the SecurityLockTool folder on your CX6600, enter your computer. Press the x Color button. 4. Epson Stylus CX6600 Interface Standard Bit rate Data encoding Connector Recommended cable length Based on Universal Serial Bus...

Quick Reference Guide
Page 2
... other equipment. Trademarks Epson and Epson Stylus are for identification purposes only and may be trademarks of copyrighted material in those designated as Original Epson Products or Epson Approved Products by any use of Seiko Epson Corporation. Epson encourages each user to...cameras, scanners, and ink jet printers. Copyright Notice All rights reserved. No part of this Epson product. Epson is a trademark, and Epson Connection, Epson Store, and SoundAdvice are registered trademarks, PremierArt is not responsible for use of Epson America, Inc. BorderFree and DURABrite...
... other equipment. Trademarks Epson and Epson Stylus are for identification purposes only and may be trademarks of copyrighted material in those designated as Original Epson Products or Epson Approved Products by any use of Seiko Epson Corporation. Epson encourages each user to...cameras, scanners, and ink jet printers. Copyright Notice All rights reserved. No part of this Epson product. Epson is a trademark, and Epson Connection, Epson Store, and SoundAdvice are registered trademarks, PremierArt is not responsible for use of Epson America, Inc. BorderFree and DURABrite...

Quick Reference Guide
Page 11
... Jet Transparencies Letter (8.5 × 11 inches) Epson DURABrite® Ink Glossy Photo Paper Letter (8.5 × 11 inches) 4 × 6 inches PremierArt™ Matte Scrapbook Paper for the Stylus CX6600. Using Special Papers 11 Using Special Papers Epson® offers the following special ink jet papers for Epson Letter (8.5 × 11 inches) Part number S041586 S041134/S041671 S041141/S041649...
... Jet Transparencies Letter (8.5 × 11 inches) Epson DURABrite® Ink Glossy Photo Paper Letter (8.5 × 11 inches) 4 × 6 inches PremierArt™ Matte Scrapbook Paper for the Stylus CX6600. Using Special Papers 11 Using Special Papers Epson® offers the following special ink jet papers for Epson Letter (8.5 × 11 inches) Part number S041586 S041134/S041671 S041141/S041649...

Quick Reference Guide
Page 43
..., which the receiver is encouraged to try to provide reasonable protection against harmful interference in the same environment as the Stylus CX6600. LCD Panel Safety Instructions ■ Use only a dry soft cloth to Part 15 of the cartridge. ■ Do not touch the green IC chip on the side of the FCC Rules...
..., which the receiver is encouraged to try to provide reasonable protection against harmful interference in the same environment as the Stylus CX6600. LCD Panel Safety Instructions ■ Use only a dry soft cloth to Part 15 of the cartridge. ■ Do not touch the green IC chip on the side of the FCC Rules...

Start Here Card
Page 1
Caution: Do not remove the yellow sticker until instructed. 3 Lift up the scanner. 4 Peel off the tape from the printer. Epson Stylus CX6600 Software CD-ROM Quick Guide Paper support Ink cartridges Feeder guard 2 Remove all the parts shown here. 4049498-00 XXX Start Here Epson Stylus® CX6600 1 Unpack 1 Make sure you have all the blue packing tape from the ink cartridge holder. 5 Close the scanner section. If any parts are missing, contact Epson® as described on the back of this sheet.
Caution: Do not remove the yellow sticker until instructed. 3 Lift up the scanner. 4 Peel off the tape from the printer. Epson Stylus CX6600 Software CD-ROM Quick Guide Paper support Ink cartridges Feeder guard 2 Remove all the parts shown here. 4049498-00 XXX Start Here Epson Stylus® CX6600 1 Unpack 1 Make sure you have all the blue packing tape from the ink cartridge holder. 5 Close the scanner section. If any parts are missing, contact Epson® as described on the back of this sheet.

Start Here Card
Page 2
2 Attach the Parts 1 Insert the paper support into the slots behind the printer, as shown. 2 Lower the feeder guard into the slots behind the scanner lid. (Insert the hinges on the feeder guard into the corresponding slots on the printer.) 3 Plug In and Turn On 1 Plug the Stylus CX into a grounded electrical outlet. 2 Press and hold the On button until the green lights come on. On button
2 Attach the Parts 1 Insert the paper support into the slots behind the printer, as shown. 2 Lower the feeder guard into the slots behind the scanner lid. (Insert the hinges on the feeder guard into the corresponding slots on the printer.) 3 Plug In and Turn On 1 Plug the Stylus CX into a grounded electrical outlet. 2 Press and hold the On button until the green lights come on. On button

Start Here Card
Page 3
To avoid damaging the Stylus CX, never move the print head by hand. 4 Open the ink cartridge cover. 5 Place each cartridge, one at a time, in its holder. 6 Press down on each cartridge until you see "Initial Charge" displayed on the LCD screen. 2 Lift up the scanner. 3 Shake the package of printing. Then remove the cartridges from the package. continue Don't touch the green part Caution: You must install all the cartridges and leave them installed for all types of ink cartridges four or five times. 4 Install Ink Cartridges 1 Wait until it clicks into place.
To avoid damaging the Stylus CX, never move the print head by hand. 4 Open the ink cartridge cover. 5 Place each cartridge, one at a time, in its holder. 6 Press down on each cartridge until you see "Initial Charge" displayed on the LCD screen. 2 Lift up the scanner. 3 Shake the package of printing. Then remove the cartridges from the package. continue Don't touch the green part Caution: You must install all the cartridges and leave them installed for all types of ink cartridges four or five times. 4 Install Ink Cartridges 1 Wait until it clicks into place.

Start Here Card
Page 6
... this screen: 3 Click Install. 4 Read the license agreement, then click Agree. Then double-click the Epson installer icon. Note: If you see this screen. Note: Click Quit when each part finishes installing. 9 When installation is complete, you 're installing on the screen to install additional software. ... your CD-ROM or DVD drive. 2 Double-click the Epson CD-ROM icon, if necessary. Caution: Make sure the USB cable fits securely into your Stylus CX as shown. For Macintosh OS 9: Follow any on -screen CX6600 Reference Guide for instructions. Then route the cable in the slot...
... this screen: 3 Click Install. 4 Read the license agreement, then click Agree. Then double-click the Epson installer icon. Note: If you see this screen. Note: Click Quit when each part finishes installing. 9 When installation is complete, you 're installing on the screen to install additional software. ... your CD-ROM or DVD drive. 2 Double-click the Epson CD-ROM icon, if necessary. Caution: Make sure the USB cable fits securely into your Stylus CX as shown. For Macintosh OS 9: Follow any on -screen CX6600 Reference Guide for instructions. Then route the cable in the slot...


