

Technical Reference
Page 1
... asendttinnegcethssearUyBi-nRf0o3rm. M00002804 Rev. UB-R03 Technical Reference Guide Product Overview DTheissccrihbaespfteeartuerxepslaaninds gtheneefreaal stupreecisfiocfattihoenspfroordtuhce tp.roduct. ation when you develop applications. Exchange from the UB-R02 This chapter explains how to replace the UB-R02 with the UB-R03. Programming Samples TDheissccrhibaeps theorwextoplhaainnsdlineftohremparotidouncfto. UB-R03 Specifications This chapter explains the specification of the UB-R03. E r programming. TM printer and use it.
... asendttinnegcethssearUyBi-nRf0o3rm. M00002804 Rev. UB-R03 Technical Reference Guide Product Overview DTheissccrihbaespfteeartuerxepslaaninds gtheneefreaal stupreecisfiocfattihoenspfroordtuhce tp.roduct. ation when you develop applications. Exchange from the UB-R02 This chapter explains how to replace the UB-R02 with the UB-R03. Programming Samples TDheissccrhibaeps theorwextoplhaainnsdlineftohremparotidouncfto. UB-R03 Specifications This chapter explains the specification of the UB-R03. E r programming. TM printer and use it.

Technical Reference
Page 2
... • Neither is any liability assumed for damages resulting from the use of the information contained herein. • Neither Seiko Epson Corporation nor its own POS printer command system (ESC/POS). The functionality and the user-friendliness is valued around the world. 2 Its high scalability enables users .... • The contents of this document are subject to build versatile POS systems. The system is compatible with all types of EPSON POS printers (excluding the TM-C100) and displays. Cautions • No part of this document may be reproduced, stored in a retrieval system, ...
... • Neither is any liability assumed for damages resulting from the use of the information contained herein. • Neither Seiko Epson Corporation nor its own POS printer command system (ESC/POS). The functionality and the user-friendliness is valued around the world. 2 Its high scalability enables users .... • The contents of this document are subject to build versatile POS systems. The system is compatible with all types of EPSON POS printers (excluding the TM-C100) and displays. Cautions • No part of this document may be reproduced, stored in a retrieval system, ...

Technical Reference
Page 5
...; Personal information and secret information can be removed. • Invalid information can be destroyed by an electronic virus. 5 Security is communicated between the PC and printer. Such a person could receive items such as the following problems may occur. Communication data can be received by using radio waves instead of the user...
...; Personal information and secret information can be removed. • Invalid information can be destroyed by an electronic virus. 5 Security is communicated between the PC and printer. Such a person could receive items such as the following problems may occur. Communication data can be received by using radio waves instead of the user...
Technical Reference
Page 10
Manual Content The manual is made up of the Manual This manual is aimed to provide all the necessary information for development engineers to develop, design, and install POS system, or to develop and design printer applications. About this Manual Aim of the following sections: Chapter 1 Product Overview Chapter 2 Installation Chapter 3 Utilities Chapter 4 Programming Samples Chapter 5 UB-R03 Specifications Chapter 6 Exchange from the UB-R02 10
Manual Content The manual is made up of the Manual This manual is aimed to provide all the necessary information for development engineers to develop, design, and install POS system, or to develop and design printer applications. About this Manual Aim of the following sections: Chapter 1 Product Overview Chapter 2 Installation Chapter 3 Utilities Chapter 4 Programming Samples Chapter 5 UB-R03 Specifications Chapter 6 Exchange from the UB-R02 10
Technical Reference
Page 11
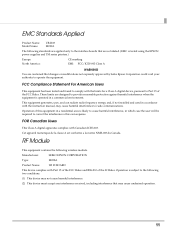
... that may cause undesired operation. 11 EMC Standards Applied Product Name: Model Name: UB-R03 M239A The following standards are applied only to the interface boards that are so labeled. (EMC is tested using the EPSON power supplies and TM series printers.) Europe: North America: CE marking EMI: FCC/ICES-003 Class A WARNING You...
... that may cause undesired operation. 11 EMC Standards Applied Product Name: Model Name: UB-R03 M239A The following standards are applied only to the interface boards that are so labeled. (EMC is tested using the EPSON power supplies and TM series printers.) Europe: North America: CE marking EMI: FCC/ICES-003 Class A WARNING You...
Technical Reference
Page 13
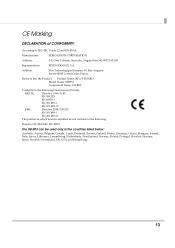
...UB-R03 can be used only in which board is installed do not conform to the following Directives and Norms R&TTE: Directive 1999/5/EC EN 300 328 EN 60950-1 EN 301 489-1 EN 301 489-17 EMC: Directive 2004/108/EC EN 301 489-1 EN 301 489-17 The printers... Product: Product Name: RF I/F BOARD Model Name: M239A Commercial Name: UB-R03 Conforms to ISO/IEC Guide 22 and EN 45014 Manufacturer: SEIKO EPSON CORPORATION Address: 3-5, Owa 3-chome, Suwa-shi, Nagano-ken 392-8502 JAPAN Representative: EPSON FRANCE S.A. CE Marking DECLARATION of CONFORMITY According to the following ;
...UB-R03 can be used only in which board is installed do not conform to the following Directives and Norms R&TTE: Directive 1999/5/EC EN 300 328 EN 60950-1 EN 301 489-1 EN 301 489-17 EMC: Directive 2004/108/EC EN 301 489-1 EN 301 489-17 The printers... Product: Product Name: RF I/F BOARD Model Name: M239A Commercial Name: UB-R03 Conforms to ISO/IEC Guide 22 and EN 45014 Manufacturer: SEIKO EPSON CORPORATION Address: 3-5, Owa 3-chome, Suwa-shi, Nagano-ken 392-8502 JAPAN Representative: EPSON FRANCE S.A. CE Marking DECLARATION of CONFORMITY According to the following ;
Technical Reference
Page 14
...; Features...17 Supported OS ...18 Supported browser...18 Supported Protocols ...18 ■ Product Information ...19 Parts Name and Function ...19 Usable Countries ...20 Supported TM Printers ...20 Communication Distance ...20 Unpacking ...20 Space Required for Installation...21 Environmental Specifications ...21 Limitations ...21 14
...; Features...17 Supported OS ...18 Supported browser...18 Supported Protocols ...18 ■ Product Information ...19 Parts Name and Function ...19 Usable Countries ...20 Supported TM Printers ...20 Communication Distance ...20 Unpacking ...20 Space Required for Installation...21 Environmental Specifications ...21 Limitations ...21 14

Technical Reference
Page 15
...9632; Installation Precautions Cautions and Note 23 ■ Connect the UB-R03 to the TM Printer 24 ■ How to Set the UB-R03 ...26 ■ Setting using the USB connection 26 Procedure for setting the UB-R03 using the USB connection 26 The preparation of the computer and the...connection 37 Procedure for setting the UB-R03 using the wireless LAN connection 37 Preparation of the computer ...38 Printing a Dynamic Status Sheet ...38 Connection from the setting computer 40 Setting of the UB-R03 ...40 Confirming the operation ...44 ■ Initializing the UB-R03 ...45 ■ Changing of ...
...9632; Installation Precautions Cautions and Note 23 ■ Connect the UB-R03 to the TM Printer 24 ■ How to Set the UB-R03 ...26 ■ Setting using the USB connection 26 Procedure for setting the UB-R03 using the USB connection 26 The preparation of the computer and the...connection 37 Procedure for setting the UB-R03 using the wireless LAN connection 37 Preparation of the computer ...38 Printing a Dynamic Status Sheet ...38 Connection from the setting computer 40 Setting of the UB-R03 ...40 Confirming the operation ...44 ■ Initializing the UB-R03 ...45 ■ Changing of ...
Technical Reference
Page 17
... LAN (for Ad‐Hoc mode) for other uses. • Exclusive utility software (TMNetWinConfig V3) is installed in the TM‐series printers as printing. • You can be used only for setting the network parameter. The network parameter can check and set through the USB connector. •...;R02) as usual. • The UB‐R03 has the USB connector only for printing or other purposes, such as an interface board to set through the USB connector. Network Function • IPv4 capable. Setting • The setting from the EPSON Web site and use it from the computer ...
... LAN (for Ad‐Hoc mode) for other uses. • Exclusive utility software (TMNetWinConfig V3) is installed in the TM‐series printers as printing. • You can be used only for setting the network parameter. The network parameter can check and set through the USB connector. •...;R02) as usual. • The UB‐R03 has the USB connector only for printing or other purposes, such as an interface board to set through the USB connector. Network Function • IPv4 capable. Setting • The setting from the EPSON Web site and use it from the computer ...
Technical Reference
Page 18
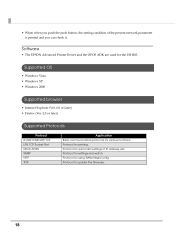
Protocol for the UB‐R03. • When when you can check it. Protocol for settings and watch. Protocol for using TMNet WebConfig. Protocol for various functions. Supported OS • Windows ..., TCP LPR, TCP Socket Port DHCP, APIPA SNMP HTTP TFTP Application Basic communications protocols for printing. Software • The EPSON Advanced Printer Driver and the OPOS ADK are used for automatic settings of the present network parameter is printed and you push the push button, the setting condition of IP address, etc. Protocol to...
Protocol for the UB‐R03. • When when you can check it. Protocol for settings and watch. Protocol for using TMNet WebConfig. Protocol for various functions. Supported OS • Windows ..., TCP LPR, TCP Socket Port DHCP, APIPA SNMP HTTP TFTP Application Basic communications protocols for printing. Software • The EPSON Advanced Printer Driver and the OPOS ADK are used for automatic settings of the present network parameter is printed and you push the push button, the setting condition of IP address, etc. Protocol to...

Technical Reference
Page 19
... Function Chapter 1 Product Overview Connector to printer RF module Antenna Push button 1 USB connector (Parameter Setting) Push button A push button is provided to perform the following functions. • Status sheet printing Push and hold the push button and while turning on ); USB connector (Parameter Setting) The UB‐R03 has a USB connector to set...
... Function Chapter 1 Product Overview Connector to printer RF module Antenna Push button 1 USB connector (Parameter Setting) Push button A push button is provided to perform the following functions. • Status sheet printing Push and hold the push button and while turning on ); USB connector (Parameter Setting) The UB‐R03 has a USB connector to set...
Technical Reference
Page 20
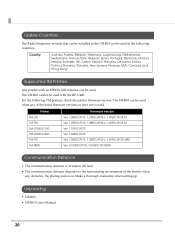
Usable Countries The Radio Frequency module that can be installed in the following TM printers, check the printer firmware version. Unpacking • UB‐R03 • UB‐R03 Userʹs Manual 20 Printer TM-L90 TM-T90 TM-J7000/J7100 TM-J7500/J7600 TM-T70 TM-T88IV Firmware version Ver. ... communication distance is used in the UB‐R03 can be used . For the following countries. The UB‐R03 can be used with an EPSON UIB interface can be used. Supported TM Printers Any printer with the RP‐U420. The UB‐R03 cannot be used when any of ...
Usable Countries The Radio Frequency module that can be installed in the following TM printers, check the printer firmware version. Unpacking • UB‐R03 • UB‐R03 Userʹs Manual 20 Printer TM-L90 TM-T90 TM-J7000/J7100 TM-J7500/J7600 TM-T70 TM-T88IV Firmware version Ver. ... communication distance is used in the UB‐R03 can be used . For the following countries. The UB‐R03 can be used with an EPSON UIB interface can be used. Supported TM Printers Any printer with the RP‐U420. The UB‐R03 cannot be used when any of ...

Technical Reference
Page 21
Take this into consideration for the TM Printer • It cannot be used with the RP‐U420. • AC adapter Connection (Note about TM‐U200,210) When combining and using the TM‐U200 or U210 and the UB‐R03, the PA, PB series AC adapter packed with the TM‐...;U200 and U210 cannot be used. Limitations for your installation. Use the PS‐180. 21 For example, when it increases the depth of by printer by 30 mm(1.26ʺ). Environmental...
Take this into consideration for the TM Printer • It cannot be used with the RP‐U420. • AC adapter Connection (Note about TM‐U200,210) When combining and using the TM‐U200 or U210 and the UB‐R03, the PA, PB series AC adapter packed with the TM‐...;U200 and U210 cannot be used. Limitations for your installation. Use the PS‐180. 21 For example, when it increases the depth of by printer by 30 mm(1.26ʺ). Environmental...

Technical Reference
Page 22
...available in the Ad‐Hoc mode, printing a dynamic status sheet is subject to the following conditions, the wireless LAN function of the interface does not operate. • The UB‐R03 is connected the computer with a USB cable. • The TM printer is off‐line. (No paper or... the Signal Level. Although using the UB‐R03 in the Ad‐Hoc mode. If the host computer connected to connect is found, "0dBm" appears as printing or setting the TM printer. Restrictions on and the time when the printer to the TM printer discontinues communication, the value that had been...
...available in the Ad‐Hoc mode, printing a dynamic status sheet is subject to the following conditions, the wireless LAN function of the interface does not operate. • The UB‐R03 is connected the computer with a USB cable. • The TM printer is off‐line. (No paper or... the Signal Level. Although using the UB‐R03 in the Ad‐Hoc mode. If the host computer connected to connect is found, "0dBm" appears as printing or setting the TM printer. Restrictions on and the time when the printer to the TM printer discontinues communication, the value that had been...

Technical Reference
Page 23
...to be set up the printer, install the UB‐R03 in the Epson TM printer and initialize the UB‐R03 to return it on the circuit board. Even when the power switch is still present at a time. 23 Then change the setting of the UB‐R03 using the dedicated utility ...injury, fire, or electric shock. Because the default IP address for Epson TM printers. To set by using the setting PC. Chapter 2 Installation Installation This chapter describes the UB‐R03 installation. Tampering with the UB‐R03. The Radio Frequency module is installed on which is installed the ...
...to be set up the printer, install the UB‐R03 in the Epson TM printer and initialize the UB‐R03 to return it on the circuit board. Even when the power switch is still present at a time. 23 Then change the setting of the UB‐R03 using the dedicated utility ...injury, fire, or electric shock. Because the default IP address for Epson TM printers. To set by using the setting PC. Chapter 2 Installation Installation This chapter describes the UB‐R03 installation. Tampering with the UB‐R03. The Radio Frequency module is installed on which is installed the ...

Technical Reference
Page 24
... these settings for details. Connector to your needs. 24 The interface of the TM printer must be selected as "parallel" with two screws. Refer to "enable." Connect the UB-R03 to the TM Printer 1 Confirm items in the pack. ("Unpacking" on page 20) 2 Remove the two screws of the universal interface ...connector of the TM Printer and connect the UB-R03, and fix it with the appropriate settings. If a TM printer that can set the reset signal for pin 31 is used, set the memory switches according to the TM...
... these settings for details. Connector to your needs. 24 The interface of the TM printer must be selected as "parallel" with two screws. Refer to "enable." Connect the UB-R03 to the TM Printer 1 Confirm items in the pack. ("Unpacking" on page 20) 2 Remove the two screws of the universal interface ...connector of the TM Printer and connect the UB-R03, and fix it with the appropriate settings. If a TM printer that can set the reset signal for pin 31 is used, set the memory switches according to the TM...

Technical Reference
Page 25
The printer prints the status sheet for the network connection. Chapter 2 Installation 4 Power on while pressing the Feed button. Push button 5 Turn the power switch of the printer on the interface card for more than 3 seconds. You can check all setting values necessary for the UB-R03. The printer prints current status of the TM Printer on the printer. Then, after waiting a little, hold down the push button on the paper. 2 6 Turn off the TM Printer. 25
The printer prints the status sheet for the network connection. Chapter 2 Installation 4 Power on while pressing the Feed button. Push button 5 Turn the power switch of the printer on the interface card for more than 3 seconds. You can check all setting values necessary for the UB-R03. The printer prints current status of the TM Printer on the printer. Then, after waiting a little, hold down the push button on the paper. 2 6 Turn off the TM Printer. 25

Technical Reference
Page 26
... and the acquisition of the UB-R03 using the USB cable. If a setting that the UB-R03 operates correctly. How to Set the UB-R03 There are two ways to set the UB‐R03. • Setting with the USB connection Connect the computer to the USB connector (Parameter Setting) of the TM printer with the wireless LAN. Also...
... and the acquisition of the UB-R03 using the USB cable. If a setting that the UB-R03 operates correctly. How to Set the UB-R03 There are two ways to set the UB‐R03. • Setting with the USB connection Connect the computer to the USB connector (Parameter Setting) of the TM printer with the wireless LAN. Also...

Technical Reference
Page 27
...Acquisition of the setting information Acquire the following information from the network administrator. Set the same setting as the computer for each printer √ √ 27 Set the same setting as the access point for each network of the information Prepare the computer before setting... up the UB‐R03. Common device for network √ √ √ Setting for the infrastructure mode. Name Explanation SSID(ESSID) Security Setting IP Address...
...Acquisition of the setting information Acquire the following information from the network administrator. Set the same setting as the computer for each printer √ √ 27 Set the same setting as the access point for each network of the information Prepare the computer before setting... up the UB‐R03. Common device for network √ √ √ Setting for the infrastructure mode. Name Explanation SSID(ESSID) Security Setting IP Address...
Technical Reference
Page 28
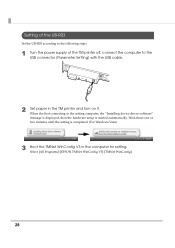
...]-[EPSON TMNet WinConfig V3]-[TMNet WinConfig]. 28 Wait about one or two minutes until the setting is started automatically. When the first connecting to the USB connector (Parameter Setting) with the USB cable. 2 Set paper in the computer for setting. Setting of the UB-R03 Set the UB‐R03... according to the following steps. 1 Turn the power supply of the TM printer off, connect the computer to the setting computer, the "Installing device driver software" message is ...
...]-[EPSON TMNet WinConfig V3]-[TMNet WinConfig]. 28 Wait about one or two minutes until the setting is started automatically. When the first connecting to the USB connector (Parameter Setting) with the USB cable. 2 Set paper in the computer for setting. Setting of the UB-R03 Set the UB‐R03... according to the following steps. 1 Turn the power supply of the TM printer off, connect the computer to the setting computer, the "Installing device driver software" message is ...
