User Guide
Page 2
Contents Welcome 4 Prepare to View and Print 8 View Photos and Print 12 Do More With Your Photos 18 Print From an External Device 26 Save Photos 32 Print From a Computer 35 Copy Photos to and From Your Computer 53 Replace Print Pack 56 Take PictureMate With You 60 Set PictureMate Preferences 61 Printer Care and Troubleshooting 64 Set Up Network Printing 78 2
Contents Welcome 4 Prepare to View and Print 8 View Photos and Print 12 Do More With Your Photos 18 Print From an External Device 26 Save Photos 32 Print From a Computer 35 Copy Photos to and From Your Computer 53 Replace Print Pack 56 Take PictureMate With You 60 Set PictureMate Preferences 61 Printer Care and Troubleshooting 64 Set Up Network Printing 78 2
User Guide
Page 4
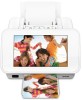
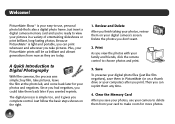
... and vibrant generations from your photos, use , personal photo lab that's also a digital photo frame. Then you complete control. Plus, your digital camera's screen. The digital process is light and portable, you can reprint them in a variety of entertaining slideshows... or print brilliant, long-lasting photos. Clear the Memory Card After you save them any time. 4. Welcome! Because PictureMate...
... and vibrant generations from your photos, use , personal photo lab that's also a digital photo frame. Then you complete control. Plus, your digital camera's screen. The digital process is light and portable, you can reprint them in a variety of entertaining slideshows... or print brilliant, long-lasting photos. Clear the Memory Card After you save them any time. 4. Welcome! Because PictureMate...

User Guide
Page 5
...printing right from your camera. (See page 26.) If you have a PictBridge®-enabled camera, you can view your camera supports DPOF (Digital Print Order Format), you can connect the camera to PictureMate for printing using the optional Bluetooth Photo Print Adapter. (See page 28.) 5 When you insert the card into... have to select Yes and press OK. (See page 16.) If you have a Bluetooth®-enabled mobile device or computer, you can select from PictureMate-no computer required. (See page 18.) If your photos and press the Print button on the spot. (See page 15.) You can crop photos ...
...printing right from your camera. (See page 26.) If you have a PictBridge®-enabled camera, you can view your camera supports DPOF (Digital Print Order Format), you can connect the camera to PictureMate for printing using the optional Bluetooth Photo Print Adapter. (See page 28.) 5 When you insert the card into... have to select Yes and press OK. (See page 16.) If you have a Bluetooth®-enabled mobile device or computer, you can select from PictureMate-no computer required. (See page 18.) If your photos and press the Print button on the spot. (See page 15.) You can crop photos ...
User Guide
Page 6
...sheet to the User's Guide is sold or from your PictureMate. To find the nearest reseller, call 800-GO-EPSON (800-463-7766). Supported Photo Formats Make sure your photos meet these requirements for using PictureMate. The following Print Packs are available: Print Pack contents..., and solve problems. The online User's Guide has detailed instructions for viewing and printing with your PictureMate (without a computer): ● JPEG files only ● Resolutions ranging from an Epson authorized reseller. Basics explains how to print in one box: photo paper and a photo cartridge.
...sheet to the User's Guide is sold or from your PictureMate. To find the nearest reseller, call 800-GO-EPSON (800-463-7766). Supported Photo Formats Make sure your photos meet these requirements for using PictureMate. The following Print Packs are available: Print Pack contents..., and solve problems. The online User's Guide has detailed instructions for viewing and printing with your PictureMate (without a computer): ● JPEG files only ● Resolutions ranging from an Epson authorized reseller. Basics explains how to print in one box: photo paper and a photo cartridge.

User Guide
Page 7
PictureMate Remote Control Buttons Set PictureMate to standby mode or turn it on from standby mode Decrease number of copies Cancel current operation and go back View help information Stop printing or cancel settings Return to home menu Set/increase number of copies Confirm settings Start printing Change the number of photos displayed View print settings or maintenance options 7
PictureMate Remote Control Buttons Set PictureMate to standby mode or turn it on from standby mode Decrease number of copies Cancel current operation and go back View help information Stop printing or cancel settings Return to home menu Set/increase number of copies Confirm settings Start printing Change the number of photos displayed View print settings or maintenance options 7

User Guide
Page 8
Memory card slots 8 Insert just one card at a time. Inserting Your Memory Card 1 Press the top of the screen to slide it up. 2 Press the P On button to : ● Insert your memory card (below) ● Load paper (see page 10) When you're finished, you can remove your memory card (see page 10). Prepare to View and Print Before you view and print with PictureMate, you need to turn on PictureMate. 3 Insert the memory card into the correct slot, as shown on the following page.
Memory card slots 8 Insert just one card at a time. Inserting Your Memory Card 1 Press the top of the screen to slide it up. 2 Press the P On button to : ● Insert your memory card (below) ● Load paper (see page 10) When you're finished, you can remove your memory card (see page 10). Prepare to View and Print Before you view and print with PictureMate, you need to turn on PictureMate. 3 Insert the memory card into the correct slot, as shown on the following page.

User Guide
Page 9
When the card is flashing; Top slot: Memory card light SDTM (Secure Digital) and SDHCTM (High Capacity) miniSDTM * and miniSDHC* microSD* and microSDHC* MMCTM (MultiMediaCardTM) MMCplus, MMCmobile*, MMCmicro* xD-Picture CardTM xD-Picture Card (Type M, M+, and H) Sony Memory ... to view your card. you are ready to flash. Caution: Do not remove a card while the memory card light is in all the way). Note: PictureMate can't read multiple cards at once. 4 Push the card in carefully until it stops (it won't go in , the memory card light comes on your...
When the card is flashing; Top slot: Memory card light SDTM (Secure Digital) and SDHCTM (High Capacity) miniSDTM * and miniSDHC* microSD* and microSDHC* MMCTM (MultiMediaCardTM) MMCplus, MMCmobile*, MMCmicro* xD-Picture CardTM xD-Picture Card (Type M, M+, and H) Sony Memory ... to view your card. you are ready to flash. Caution: Do not remove a card while the memory card light is in all the way). Note: PictureMate can't read multiple cards at once. 4 Push the card in carefully until it stops (it won't go in , the memory card light comes on your...

User Guide
Page 10
... and separate the sheets slightly by fanning them. 4 Place your card. Load glossy or whiter side up . Removing Your Memory Card When you may damage PictureMate. 1 Open the paper support. 3 Create a stack of up to remove a memory card, first make sure the memory card light is flashing; Loading Paper Caution: Don...
... and separate the sheets slightly by fanning them. 4 Place your card. Load glossy or whiter side up . Removing Your Memory Card When you may damage PictureMate. 1 Open the paper support. 3 Create a stack of up to remove a memory card, first make sure the memory card light is flashing; Loading Paper Caution: Don...

User Guide
Page 11
...your paper glossy or whiter side up to prevent smearing. 5 Store any button to return to prevent curling. See page 56 for more paper, order a PictureMate Print Pack. Note: To turn it flat in a dry area to the function you were using. 2 When you need more information. 6 Attach the ... P On button on the side of the printer. 11 Note: Load a maximum of the printer to return PictureMate to turn PictureMate off completely, use the P On button on the remote control to place PictureMate in standby mode and save energy. 1 Press the P On button on the remote control. Using the P ...
...your paper glossy or whiter side up to prevent smearing. 5 Store any button to return to prevent curling. See page 56 for more paper, order a PictureMate Print Pack. Note: To turn it flat in a dry area to the function you were using. 2 When you need more information. 6 Attach the ... P On button on the side of the printer. 11 Note: Load a maximum of the printer to return PictureMate to turn PictureMate off completely, use the P On button on the remote control to place PictureMate in standby mode and save energy. 1 Press the P On button on the remote control. Using the P ...

User Guide
Page 12
... d for more 12 information, or select Contents for a list of entertaining slide shows. See page 64 for comfortable viewing. Make sure your printed photos, see page 17. Make sure you are not using PictureMate, a slideshow of the screen for details about the help at any button to return...(see page 14) ● Print from the following options for printing them in your photos begins automatically after 3 minutes. Printing Individual Photos PictureMate's 7-inch screen makes it easy to select the photos you want to the function you were using . You can print your photos or ...
... d for more 12 information, or select Contents for a list of entertaining slide shows. See page 64 for comfortable viewing. Make sure your printed photos, see page 17. Make sure you are not using PictureMate, a slideshow of the screen for details about the help at any button to return...(see page 14) ● Print from the following options for printing them in your photos begins automatically after 3 minutes. Printing Individual Photos PictureMate's 7-inch screen makes it easy to select the photos you want to the function you were using . You can print your photos or ...

User Guide
Page 13
... at a time, press the Display button. See page 18 for this photo 13 Press l or r to crop or edit your photos. You see a preview screen showing the number of sheets required and other settings, for example: Total number of sheets Number of copies for instructions. 5 To print more than one photo... want to move through your photo, press OK. Your photos are displayed by month. 4 When you see your memory card has more than 1000 photos, PictureMate divides them into groups of 999. You can select the group you want to view and print. 3 Press u or d to see a photo you want to...
... at a time, press the Display button. See page 18 for this photo 13 Press l or r to crop or edit your photos. You see a preview screen showing the number of sheets required and other settings, for example: Total number of sheets Number of copies for instructions. 5 To print more than one photo... want to move through your photo, press OK. Your photos are displayed by month. 4 When you see your memory card has more than 1000 photos, PictureMate divides them into groups of 999. You can select the group you want to view and print. 3 Press u or d to see a photo you want to...

User Guide
Page 14
...display a slideshow of copies or to decrease it. Note: The date comes from your camera. 10 Make sure you want and press OK again. Whenever PictureMate does not have enough paper loaded, then press Print to print with a white border or include the date, select Borderless/Date Stamp: Off and press... OK. If you need to cancel printing, press Clear Stop/ After printing, you see a screen like the following, showing the number of photos to be printed: 3 If you want more than one copy of each picture, press to save the printed photos to the...
...display a slideshow of copies or to decrease it. Note: The date comes from your camera. 10 Make sure you want and press OK again. Whenever PictureMate does not have enough paper loaded, then press Print to print with a white border or include the date, select Borderless/Date Stamp: Off and press... OK. If you need to cancel printing, press Clear Stop/ After printing, you see a screen like the following, showing the number of photos to be printed: 3 If you want more than one copy of each picture, press to save the printed photos to the...
User Guide
Page 15
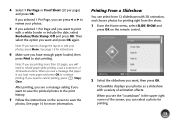
...see a message asking if you can press l or r to start printing. Printing From a Slideshow You can select from the show. 1 From the Home menu, select SLIDE SHOW and press OK on the screen to the print history. 7 Follow the instructions on the remote control. 2 Select the slideshow you... can select a photo for printing right from 12 slideshows with a white border or include the date, select Borderless/Date Stamp: Off and press OK. PictureMate ...
...see a message asking if you can press l or r to start printing. Printing From a Slideshow You can select from the show. 1 From the Home menu, select SLIDE SHOW and press OK on the screen to the print history. 7 Follow the instructions on the remote control. 2 Select the slideshow you... can select a photo for printing right from 12 slideshows with a white border or include the date, select Borderless/Date Stamp: Off and press OK. PictureMate ...
User Guide
Page 16
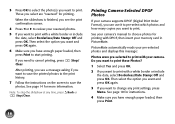
...sure you select are "reserved" for more information. See page 14 for printing. Printing Camera-Selected DPOF Photos If your camera supports DPOF (Digital Print Order Format), you can use it to pre-select which photos and how many copies you want to change any time, press Back or...Make sure you have enough paper loaded, then press Print. 16 3 Press OK to select the photo(s) you want to print with your camera. PictureMate automatically reads your pre-selected photos and displays this message: Photos were pre-selected to print. Do you want to print these Photos? 1 Select...
...sure you select are "reserved" for more information. See page 14 for printing. Printing Camera-Selected DPOF Photos If your camera supports DPOF (Digital Print Order Format), you can use it to pre-select which photos and how many copies you want to change any time, press Back or...Make sure you have enough paper loaded, then press Print. 16 3 Press OK to select the photo(s) you want to print with your camera. PictureMate automatically reads your pre-selected photos and displays this message: Photos were pre-selected to print. Do you want to print these Photos? 1 Select...

User Guide
Page 17
... paper flat to the original package. Follow these guidelines to help prevent fading. During this time, the colors may look great for 24 hours before framing. ● After you expect. Displaying Your Photos ● To ensure photos will last as long as the ink dries. Storing Unused Paper Return unused ...paper to prevent curling, and keep it away from extreme temperatures, high humidity, and bright light. 17 Storing and Displaying Your PictureMate Photos Photos printed on your photos until they will look different than you print, the colors on...
... paper flat to the original package. Follow these guidelines to help prevent fading. During this time, the colors may look great for 24 hours before framing. ● After you expect. Displaying Your Photos ● To ensure photos will last as long as the ink dries. Storing Unused Paper Return unused ...paper to prevent curling, and keep it away from extreme temperatures, high humidity, and bright light. 17 Storing and Displaying Your PictureMate Photos Photos printed on your photos until they will look different than you print, the colors on...

User Guide
Page 21
... Print. 2 Select Fix Red-Eye and press OK. 3 Select On and press OK. Note: PictureMate may not be able to print, you see a screen like the following, showing your cropped photo and the layout: Fixing Red-Eye PictureMate can fix red eyes in all photos, and printing will be slower when you use...
... Print. 2 Select Fix Red-Eye and press OK. 3 Select On and press OK. Note: PictureMate may not be able to print, you see a screen like the following, showing your cropped photo and the layout: Fixing Red-Eye PictureMate can fix red eyes in all photos, and printing will be slower when you use...
User Guide
Page 22
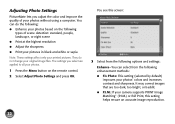
...: Enhance-You can do not change your photos without using a computer. You see this setting helps ensure an accurate image reproduction. 22 Adjusting Photo Settings PictureMate lets you select are too dark, too bright, or backlit. ● P.I.M.: If your camera supports PRINT Image Matching® (P.I.M.) or Exif Print, this screen: 3 Select...
...: Enhance-You can do not change your photos without using a computer. You see this setting helps ensure an accurate image reproduction. 22 Adjusting Photo Settings PictureMate lets you select are too dark, too bright, or backlit. ● P.I.M.: If your camera supports PRINT Image Matching® (P.I.M.) or Exif Print, this screen: 3 Select...
User Guide
Page 25
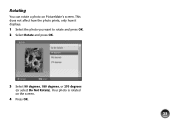
Rotating You can rotate a photo on the screen. 4 Press OK. 25 This does not affect how the photo prints, only how it displays. 1 Select the photo you want to rotate and press OK. 2 Select Rotate and press OK. 3 Select 90 degrees, 180 degrees, or 270 degrees (or select Do Not Rotate). Your photo is rotated on PictureMate's screen.
Rotating You can rotate a photo on the screen. 4 Press OK. 25 This does not affect how the photo prints, only how it displays. 1 Select the photo you want to rotate and press OK. 2 Select Rotate and press OK. 3 Select 90 degrees, 180 degrees, or 270 degrees (or select Do Not Rotate). Your photo is rotated on PictureMate's screen.
User Guide
Page 26
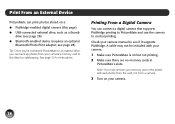
... it supports PictBridge. Check your camera's memory card to control printing. Printing From a Digital Camera You can connect a digital camera that supports PictBridge printing to PictureMate and use the camera to the drive for instructions. Print From an External Device PictureMate can print photos stored on your camera. 26 A cable may not be included...
... it supports PictBridge. Check your camera's memory card to control printing. Printing From a Digital Camera You can connect a digital camera that supports PictBridge printing to PictureMate and use the camera to the drive for instructions. Print From an External Device PictureMate can print photos stored on your camera. 26 A cable may not be included...
User Guide
Page 27
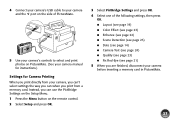
...Setup Menu. 1 Press the Menu button on the remote control. 2 Select Setup and press OK. 3 Select PictBridge Settings and press OK. 4 Select one of PictureMate. 5 Use your camera's controls to select and print photos on the side of the following settings, then press OK. ● Layout (see page 19) ●... settings the way you can when you print directly from a memory card. 4 Connect your camera's USB cable to your camera and the port on PictureMate. (See your camera manual for instructions.) Settings for Camera Printing When you print from your camera before inserting a memory card in...
...Setup Menu. 1 Press the Menu button on the remote control. 2 Select Setup and press OK. 3 Select PictBridge Settings and press OK. 4 Select one of PictureMate. 5 Use your camera's controls to select and print photos on the side of the following settings, then press OK. ● Layout (see page 19) ●... settings the way you can when you print directly from a memory card. 4 Connect your camera's USB cable to your camera and the port on PictureMate. (See your camera manual for instructions.) Settings for Camera Printing When you print from your camera before inserting a memory card in...

