User Manual
Page 4
... Wired Network Settings 46 Wireless Network Projection ...48 Installing the Wireless LAN Module 50 Using Quick Wireless Connection (Windows Only 52 Selecting Wireless Network Settings Manually 53 Wireless LAN Menu Settings ...55 Selecting Wireless Network Settings in Windows 57 Selecting Wireless Network Settings in Mac OS X 57 Setting Up Wireless Network...
... Wired Network Settings 46 Wireless Network Projection ...48 Installing the Wireless LAN Module 50 Using Quick Wireless Connection (Windows Only 52 Selecting Wireless Network Settings Manually 53 Wireless LAN Menu Settings ...55 Selecting Wireless Network Settings in Windows 57 Selecting Wireless Network Settings in Mac OS X 57 Setting Up Wireless Network...
User Manual
Page 6
... 104 Installing a Security Cable ...105 Creating a User Pattern to Display 105 Using the Interactive Pens...107 Using the Pens ...107 Calibrating Automatically ...109 Calibrating Manually ...111 Using BrightLink With a Computer 115 Adjusting the Pen Operation Area 115 Easy Interactive Tools ...117 Easy Interactive Tools System Requirements 118 Installing Easy Interactive Tools 119...
... 104 Installing a Security Cable ...105 Creating a User Pattern to Display 105 Using the Interactive Pens...107 Using the Pens ...107 Calibrating Automatically ...109 Calibrating Manually ...111 Using BrightLink With a Computer 115 Adjusting the Pen Operation Area 115 Easy Interactive Tools ...117 Easy Interactive Tools System Requirements 118 Installing Easy Interactive Tools 119...
User Manual
Page 8
... Appears 196 Solutions When "Error Occurred in the Easy Interactive Function" Message Appears 196 Solutions When the Interactive Pens Do Not Work 197 Solutions When Manual Calibration is Difficult 198 Solutions When the Built-In Toolbar (PC Free Annotation)Does Not Work 198 8
... Appears 196 Solutions When "Error Occurred in the Easy Interactive Function" Message Appears 196 Solutions When the Interactive Pens Do Not Work 197 Solutions When Manual Calibration is Difficult 198 Solutions When the Built-In Toolbar (PC Free Annotation)Does Not Work 198 8
User Manual
Page 12
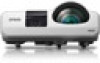
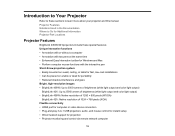
... device connection • Plug-and-play 3-in the Documentation Where to Go for Additional Information Projector Part Locations Projector Features BrightLink 436Wi/421iprojectors include these special features: Unique interactive functions • Annotation with or without a computer • Annotation with two ...network support for portability • Reduced shadow interference and glare Bright, high-resolution images • BrightLink 436Wi: Up to 3000 lumens of brightness (white light output and color light output) BrightLink 421i: Up to learn more about your projector and this manual.
... device connection • Plug-and-play 3-in the Documentation Where to Go for Additional Information Projector Part Locations Projector Features BrightLink 436Wi/421iprojectors include these special features: Unique interactive functions • Annotation with or without a computer • Annotation with two ...network support for portability • Reduced shadow interference and glare Bright, high-resolution images • BrightLink 436Wi: Up to 3000 lumens of brightness (white light output and color light output) BrightLink 421i: Up to learn more about your projector and this manual.
User Manual
Page 15
...to connect to obtain an adapter. Note: To connect a Mac that allows you need an S-Video cable compatible with audio from Epson or an authorized Epson reseller. Contact Apple for compatible adapter options. Contact Apple for compatible adapter options. See your local computer or electronics dealer for purchase... DisplayPort, Thunderbolt port, or Mini-DVI port for Easy Interactive Function CD-ROM 14 TeamBoard Draw CD-ROM 15 Projector Manual CD-ROM 16 Password Protected sticker Note: A Video Tutorials DVD is also included in the Welcome Kit. Parent topic: Projector Features 15...
...to connect to obtain an adapter. Note: To connect a Mac that allows you need an S-Video cable compatible with audio from Epson or an authorized Epson reseller. Contact Apple for compatible adapter options. Contact Apple for compatible adapter options. See your local computer or electronics dealer for purchase... DisplayPort, Thunderbolt port, or Mini-DVI port for Easy Interactive Function CD-ROM 14 TeamBoard Draw CD-ROM 15 Projector Manual CD-ROM 16 Password Protected sticker Note: A Video Tutorials DVD is also included in the Welcome Kit. Parent topic: Projector Features 15...
User Manual
Page 18
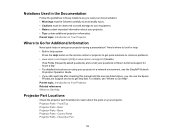
...the remote control or projector to get quick solutions to common problems. • www.epson.com/support (U.S) or www.epson.ca/support (Canada) View FAQs (frequently asked questions) and e-mail your questions to Epson technical support 24 hours a day. • For detailed instructions on using your projector...Need quick help fast. For details, see the EasyMP Network Projection Operation Guide. • If you still need help after checking this manual and the sources listed above, you read your documentation: • Warnings must be followed carefully to avoid bodily injury. • Cautions...
...the remote control or projector to get quick solutions to common problems. • www.epson.com/support (U.S) or www.epson.ca/support (Canada) View FAQs (frequently asked questions) and e-mail your questions to Epson technical support 24 hours a day. • For detailed instructions on using your projector...Need quick help fast. For details, see the EasyMP Network Projection Operation Guide. • If you still need help after checking this manual and the sources listed above, you read your documentation: • Warnings must be followed carefully to avoid bodily injury. • Cautions...
User Manual
Page 41
...Make sure the connected USB source is turned on the remote control. 3. You may not operate correctly. 3. See the document camera's manual for instructions. 1. Press the USB button on , if necessary. 2. Parent topic: Connecting to External USB Devices Related topics Projecting a ...Slide Show Selecting the Connected USB Source You can connect the Epson DC-06 document camera to your projector's Computer port. Connect the other USB sources, if available. Parent topic: Connecting to your...
...Make sure the connected USB source is turned on the remote control. 3. You may not operate correctly. 3. See the document camera's manual for instructions. 1. Press the USB button on , if necessary. 2. Parent topic: Connecting to External USB Devices Related topics Projecting a ...Slide Show Selecting the Connected USB Source You can connect the Epson DC-06 document camera to your projector's Computer port. Connect the other USB sources, if available. Parent topic: Connecting to your...

User Manual
Page 42
2. Caution: Use only the type of different types, or mix new and old batteries. 1. Parent topic: Projector Connections Related references Optional Equipment and Replacement Parts Installing Batteries in this manual. Open the battery cover as shown. 42 Connect the USB cable to the document camera's USB Type B port. Do not install batteries of batteries specified in the Remote Control The remote control uses the two AA batteries that came with the projector. Connect the other end of the cable to the projector's USB TypeA port. 3.
2. Caution: Use only the type of different types, or mix new and old batteries. 1. Parent topic: Projector Connections Related references Optional Equipment and Replacement Parts Installing Batteries in this manual. Open the battery cover as shown. 42 Connect the USB cable to the document camera's USB Type B port. Do not install batteries of batteries specified in the Remote Control The remote control uses the two AA batteries that came with the projector. Connect the other end of the cable to the projector's USB TypeA port. 3.
User Manual
Page 48
... displayed keyboard, press the arrow buttons on -screen instructions to your IP Settings as needed. When you must install the optional Epson 802.11b/g/n wireless LAN module, and then set addresses manually, turn off IP Address Display. 11. To prevent display of the IP address on the DHCP setting. • If you...
... displayed keyboard, press the arrow buttons on -screen instructions to your IP Settings as needed. When you must install the optional Epson 802.11b/g/n wireless LAN module, and then set addresses manually, turn off IP Address Display. 11. To prevent display of the IP address on the DHCP setting. • If you...
User Manual
Page 49
...for instructions. • EasyMP Monitor software (Windows only) lets you can download the latest software and documentation from the Epson Projector Software CD on a Network Related references Optional Equipment and Replacement Parts Projector Network Settings - See the EasyMP Network ... through the network. Installing the Wireless LAN Module Using Quick Wireless Connection (Windows Only) Selecting Wireless Network Settings Manually Selecting Wireless Network Settings in Windows Selecting Wireless Network Settings in toolbar to annotate images projected over the network. Note...
...for instructions. • EasyMP Monitor software (Windows only) lets you can download the latest software and documentation from the Epson Projector Software CD on a Network Related references Optional Equipment and Replacement Parts Projector Network Settings - See the EasyMP Network ... through the network. Installing the Wireless LAN Module Using Quick Wireless Connection (Windows Only) Selecting Wireless Network Settings Manually Selecting Wireless Network Settings in Windows Selecting Wireless Network Settings in toolbar to annotate images projected over the network. Note...
User Manual
Page 53
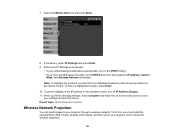
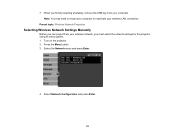
Select Network Configuration and press Enter. 53 When you must select the network settings for the projector using its menu system. 1. Parent topic: Wireless Network Projection Selecting Wireless Network Settings Manually Before you can project from your wireless network, you finish projecting wirelessly, remove the USB key from your computer. Press the Menu button. 3. Select the Network menu and press Enter. 4. Note: You may need to restart your computer to reactivate your wireless LAN connection. Turn on the projector. 2. 7.
Select Network Configuration and press Enter. 53 When you must select the network settings for the projector using its menu system. 1. Parent topic: Wireless Network Projection Selecting Wireless Network Settings Manually Before you can project from your wireless network, you finish projecting wirelessly, remove the USB key from your computer. Press the Menu button. 3. Select the Network menu and press Enter. 4. Note: You may need to restart your computer to reactivate your wireless LAN connection. Turn on the projector. 2. 7.

User Manual
Page 57
... IP Address Display Options On Off Description Selects whether to display the IP address on the network standby screen Parent topic: Selecting Wireless Network Settings Manually Selecting Wireless Network Settings in Mac OS X. 1. Parent topic: Wireless Network Projection Selecting Wireless Network Settings in Mac OS X Before connecting to the projector, select...
... IP Address Display Options On Off Description Selects whether to display the IP address on the network standby screen Parent topic: Selecting Wireless Network Settings Manually Selecting Wireless Network Settings in Mac OS X. 1. Parent topic: Wireless Network Projection Selecting Wireless Network Settings in Mac OS X Before connecting to the projector, select...
User Manual
Page 109
Calibrating Automatically Calibrating Manually Parent topic: Using the Interactive Pens Calibrating Automatically Calibration coordinates the positioning of your projector, and you can start Auto Calibration by pressing the User ...
Calibrating Automatically Calibrating Manually Parent topic: Using the Interactive Pens Calibrating Automatically Calibration coordinates the positioning of your projector, and you can start Auto Calibration by pressing the User ...
User Manual
Page 111
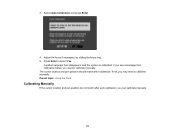
Press Enter to calibrate manually. If not, you may need to calibrate manually. Select Auto Calibration and press Enter. 4. The cursor location and pen position should match after auto calibration, you need to select Yes. Parent topic: Using the Pens Calibrating Manually If the cursor location and pen position do not match after calibration. 3. A pattern appears then disappears, and the system is calibrated. If you see a message that calibration failed, you can calibrate manually. 111 Adjust the focus if necessary, by sliding the focus ring. 5.
Press Enter to calibrate manually. If not, you may need to calibrate manually. Select Auto Calibration and press Enter. 4. The cursor location and pen position should match after auto calibration, you need to select Yes. Parent topic: Using the Pens Calibrating Manually If the cursor location and pen position do not match after calibration. 3. A pattern appears then disappears, and the system is calibrated. If you see a message that calibration failed, you can calibrate manually. 111 Adjust the focus if necessary, by sliding the focus ring. 5.
User Manual
Page 113
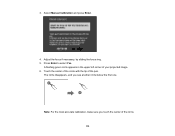
The circle disappears, and you touch the center of the circle. 113 Press Enter to select Yes. Touch the center of the circle with the tip of your projected image. 6. A flashing green circle appears in the upper left corner of the pen. Note: For the most accurate calibration, make sure you see another circle below the first one. Select Manual Calibration and press Enter. 4. 3. Adjust the focus if necessary, by sliding the focus ring. 5.
The circle disappears, and you touch the center of the circle. 113 Press Enter to select Yes. Touch the center of the circle with the tip of your projected image. 6. A flashing green circle appears in the upper left corner of the pen. Note: For the most accurate calibration, make sure you see another circle below the first one. Select Manual Calibration and press Enter. 4. 3. Adjust the focus if necessary, by sliding the focus ring. 5.
User Manual
Page 115
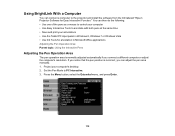
... notice that the pen position is normally adjusted automatically if you can connect a computer to the projector and install the software from the CD labeled "Epson Projector Software for annotation in Windows 8, Windows 7 or Windows Vista • Use Ink Tools for Easy Interactive Function." Press the Menu button, select the Extended...
... notice that the pen position is normally adjusted automatically if you can connect a computer to the projector and install the software from the CD labeled "Epson Projector Software for annotation in Windows 8, Windows 7 or Windows Vista • Use Ink Tools for Easy Interactive Function." Press the Menu button, select the Extended...
User Manual
Page 117
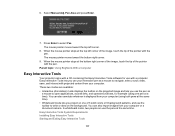
... images from your computer (using one of 3 solid colors or 6 background patterns, and use the pens at the same time. Select Manual Adj. You can also annotate whatever is displayed from your interactive pen as a mouse to open applications, access links, and operate scroll bars..., for use the pen as a mouse to select Yes. When the mouse pointer stops at a time). Parent topic: Using BrightLink With a Computer Easy Interactive Tools Your projector came with a computer. When the mouse pointer stops at the same time). • Whiteboard mode ...
... images from your computer (using one of 3 solid colors or 6 background patterns, and use the pens at the same time. Select Manual Adj. You can also annotate whatever is displayed from your interactive pen as a mouse to open applications, access links, and operate scroll bars..., for use the pen as a mouse to select Yes. When the mouse pointer stops at a time). Parent topic: Using BrightLink With a Computer Easy Interactive Tools Your projector came with a computer. When the mouse pointer stops at the same time). • Whiteboard mode ...
User Manual
Page 154
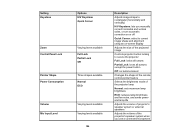
... Off Three shapes available Normal ECO Varying levels available Varying levels available 154 Description Adjusts image shape to rectangular (horizontally and vertically) H/V Keystone: lets you manually correct horizontal and vertical sides, or turn automatic correction on or off Quick Corner: select to correct image shape and alignment using an on-screen...
... Off Three shapes available Normal ECO Varying levels available Varying levels available 154 Description Adjusts image shape to rectangular (horizontally and vertically) H/V Keystone: lets you manually correct horizontal and vertical sides, or turn automatic correction on or off Quick Corner: select to correct image shape and alignment using an on-screen...
User Manual
Page 157
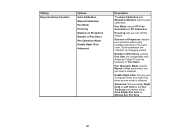
Pen Area 157 If pen operations are unstable, try changing modes. Setting Easy Interactive Function Options Auto Calibration Manual Calibration Pen Mode Hovering Distance of Projectors Number of Projectors: adjusts pen operation when using multiple projectors in the same room. Number... Advanced: lets you turn off this feature Distance of Pen Users Pen Operation Mode Enable Right Click Advanced Description The Auto Calibration and Manual Calibration options start calibration Pen Mode: selects PC Free Annotation or PC Interactive Hovering: lets you assign Right Click or Left Click to...
Pen Area 157 If pen operations are unstable, try changing modes. Setting Easy Interactive Function Options Auto Calibration Manual Calibration Pen Mode Hovering Distance of Projectors Number of Projectors: adjusts pen operation when using multiple projectors in the same room. Number... Advanced: lets you turn off this feature Distance of Pen Users Pen Operation Mode Enable Right Click Advanced Description The Auto Calibration and Manual Calibration options start calibration Pen Mode: selects PC Free Annotation or PC Interactive Hovering: lets you assign Right Click or Left Click to...
User Manual
Page 167
...projector can injure you severely. If any other servicing to service this product yourself, except as specifically explained in this manual. Warning: Do not try to qualified servicers. Dangerous electrical voltages in these sections to place. Cleaning the Lens Cover...parts you notice dust or smudges on the projector, except as specifically explained in this manual. Refer all other part needs replacing, contact Epson or an authorized Epson servicer. Projector Maintenance Transporting the Projector Projector Maintenance Your projector needs little maintenance to blocked ...
...projector can injure you severely. If any other servicing to service this product yourself, except as specifically explained in this manual. Warning: Do not try to qualified servicers. Dangerous electrical voltages in these sections to place. Cleaning the Lens Cover...parts you notice dust or smudges on the projector, except as specifically explained in this manual. Refer all other part needs replacing, contact Epson or an authorized Epson servicer. Projector Maintenance Transporting the Projector Projector Maintenance Your projector needs little maintenance to blocked ...

