Start Here
Page 2
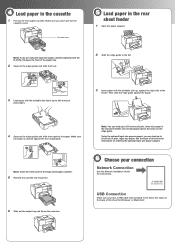
...paper with the printable side up, against the right side of the legal-sized paper cassette. 5 Reinsert the cassette into the printer. 6 Slide out the output tray and flip up to 150 sheets of plain, letter-size paper in the rear sheet feeder. Make sure the paper is stacked against... the paper. Note: Close the front cover of the feeder. Using the optional legal-size paper support, you have a USB cable (not included). B-310N/B-510DN...
...paper with the printable side up, against the right side of the legal-sized paper cassette. 5 Reinsert the cassette into the printer. 6 Slide out the output tray and flip up to 150 sheets of plain, letter-size paper in the rear sheet feeder. Make sure the paper is stacked against... the paper. Note: Close the front cover of the feeder. Using the optional legal-size paper support, you have a USB cable (not included). B-310N/B-510DN...
Start Here
Page 4
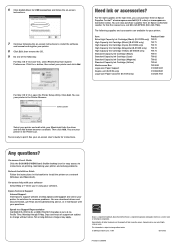
... register your printer: Item Extra High Capacity Ink Cartridge (Black) (B-510DN only) High Capacity Ink Cartridge (Black) (B-510DN only) High Capacity Ink Cartridge (Cyan) (B-510DN only) High Capacity Ink Cartridge (Magenta) (B-510DN only) High Capacity Ink Cartridge (Yellow) (B-510DN only) Standard Capacity Ink Cartridge (Black) Standard Capacity Ink Cartridge (Cyan) Standard Capacity Ink Cartridge (Magenta) Standard Capacity Ink Cartridge (Yellow) Maintenance Box Legal-size Paper Support...
... register your printer: Item Extra High Capacity Ink Cartridge (Black) (B-510DN only) High Capacity Ink Cartridge (Black) (B-510DN only) High Capacity Ink Cartridge (Cyan) (B-510DN only) High Capacity Ink Cartridge (Magenta) (B-510DN only) High Capacity Ink Cartridge (Yellow) (B-510DN only) Standard Capacity Ink Cartridge (Black) Standard Capacity Ink Cartridge (Cyan) Standard Capacity Ink Cartridge (Magenta) Standard Capacity Ink Cartridge (Yellow) Maintenance Box Legal-size Paper Support...
User's Guide
Page 3
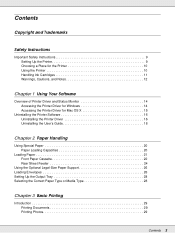
... Setting Up the Printer 9 Choosing a Place for the Printer 10 Using the Printer 10 Handling Ink Cartridges 11 Warnings, Cautions, and Notes 12 Chapter 1 Using Your Software Overview of Printer Driver and Status Monitor 14 Accessing the Printer Driver for Windows 14 Accessing the Printer Driver for Mac ...Uninstalling the Printer Software 16 Uninstalling the Printer Driver 16 Uninstalling the User's Guide 18 Chapter 2 Paper Handling Using Special Paper 20 Paper Loading Capacities 20 Loading Paper 21 Front Paper Cassette 22 Rear Sheet Feeder 24 Using the Optional Legal-Size Paper ...
... Setting Up the Printer 9 Choosing a Place for the Printer 10 Using the Printer 10 Handling Ink Cartridges 11 Warnings, Cautions, and Notes 12 Chapter 1 Using Your Software Overview of Printer Driver and Status Monitor 14 Accessing the Printer Driver for Windows 14 Accessing the Printer Driver for Mac ...Uninstalling the Printer Software 16 Uninstalling the Printer Driver 16 Uninstalling the User's Guide 18 Chapter 2 Paper Handling Using Special Paper 20 Paper Loading Capacities 20 Loading Paper 21 Front Paper Cassette 22 Rear Sheet Feeder 24 Using the Optional Legal-Size Paper ...
User's Guide
Page 5
Printer Settings 90 How to Make a Poster from Your Printouts 93 Watermark Printing (for Windows only 94 Printing the Watermark 95 Creating Your Own Watermark 97 ... Duplex Unit 111 Uninstalling the Optional Duplex Unit 112 Optional Legal-size Paper Cassette 113 Installing the Optional Legal-size Paper Cassette 113 Chapter 7 Replacing Consumables Ink Cartridges 114 Checking the Ink Cartridge Status 114 Purchasing Epson Cartridges 118 Handling Precautions 118 Replacing an Ink Cartridge 120 Maintenance Box 123 Checking the Maintenance Box Status 123...
Printer Settings 90 How to Make a Poster from Your Printouts 93 Watermark Printing (for Windows only 94 Printing the Watermark 95 Creating Your Own Watermark 97 ... Duplex Unit 111 Uninstalling the Optional Duplex Unit 112 Optional Legal-size Paper Cassette 113 Installing the Optional Legal-size Paper Cassette 113 Chapter 7 Replacing Consumables Ink Cartridges 114 Checking the Ink Cartridge Status 114 Purchasing Epson Cartridges 118 Handling Precautions 118 Replacing an Ink Cartridge 120 Maintenance Box 123 Checking the Maintenance Box Status 123...
User's Guide
Page 7
... Color Ink is Consumed Even When Printing in Black Ink Only 163 Appendix A Where To Get Help Epson Technical Support 164 Speak to a Support Representative 164 Purchase Accessories 164 Appendix B Product Information Printer Parts 165 167 Paper, Consumables, and Options 167 Paper 167 Ink Cartridges 168 Maintenance Box 168 Duplex Unit (B-310N Users only 168 Legal-size...
... Color Ink is Consumed Even When Printing in Black Ink Only 163 Appendix A Where To Get Help Epson Technical Support 164 Speak to a Support Representative 164 Purchase Accessories 164 Appendix B Product Information Printer Parts 165 167 Paper, Consumables, and Options 167 Paper 167 Ink Cartridges 168 Maintenance Box 168 Duplex Unit (B-310N Users only 168 Legal-size...
User's Guide
Page 10
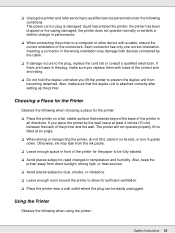
...it is tilted at least 4 inches (10 cm) between the back of the connectors. Otherwise, ink may damage both devices connected by the wall, leave at an angle. ❏ When storing or transporting the printer, do not tilt it, stand it upside down. Choosing a Place for sufficient ventilation. ❏... the following when using the printer: Safety Instructions 10 the printer does not operate normally or exhibits a distinct change in the plug, make sure that extends beyond the base of the correct size and rating. ❏ Do not hold the duplex unit when you replace them with a cable, ...
...it is tilted at least 4 inches (10 cm) between the back of the connectors. Otherwise, ink may damage both devices connected by the wall, leave at an angle. ❏ When storing or transporting the printer, do not tilt it, stand it upside down. Choosing a Place for sufficient ventilation. ❏... the following when using the printer: Safety Instructions 10 the printer does not operate normally or exhibits a distinct change in the plug, make sure that extends beyond the base of the correct size and rating. ❏ Do not hold the duplex unit when you replace them with a cable, ...

User's Guide
Page 23
Gently reinsert the cassette into the printer. Paper Handling 23 Note: If the legal-size paper cassette is attached instead of print jobs. Load the paper with the printable side down. Note: Avoid adding paper in the middle of the front paper cassette, close its cover. 6. Squeeze the edge guides and slide them against the paper until they click. 4. Doing so may prevent the paper from feeding smoothly. 5.
Gently reinsert the cassette into the printer. Paper Handling 23 Note: If the legal-size paper cassette is attached instead of print jobs. Load the paper with the printable side down. Note: Avoid adding paper in the middle of the front paper cassette, close its cover. 6. Squeeze the edge guides and slide them against the paper until they click. 4. Doing so may prevent the paper from feeding smoothly. 5.

User's Guide
Page 24
Open the paper support. 2. Note: ❏ Leave enough space in front of the printer for the paper to be fully ejected. ❏ Make sure the paper stack fits under the c arrow mark inside the left edge guide. ❏ The legal size paper cassette does not align flush with the output tray. Slide out... and extend the extension tray. Paper Handling 24 Rear Sheet Feeder 1. c Caution: To avoid paper jams, do not force the front paper cassette or legal size paper cassette into the printer and check the edge guides after inserting the cassette. 7.
Open the paper support. 2. Note: ❏ Leave enough space in front of the printer for the paper to be fully ejected. ❏ Make sure the paper stack fits under the c arrow mark inside the left edge guide. ❏ The legal size paper cassette does not align flush with the output tray. Slide out... and extend the extension tray. Paper Handling 24 Rear Sheet Feeder 1. c Caution: To avoid paper jams, do not force the front paper cassette or legal size paper cassette into the printer and check the edge guides after inserting the cassette. 7.
User's Guide
Page 31
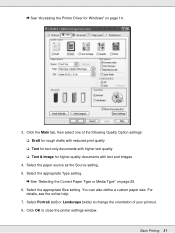
Select the appropriate Size setting. For details, see the online help. 7. Click OK to change the orientation of the following Quality Option settings: ❏ Draft for rough drafts with ... Select the appropriate Type setting. & See "Selecting the Correct Paper Type or Media Type" on page 14. 3. You can also define a custom paper size. & See "Accessing the Printer Driver for higher quality documents with text and images 4. Select the paper source as the Source setting. 5. Click the Main tab, then select one...
Select the appropriate Size setting. For details, see the online help. 7. Click OK to change the orientation of the following Quality Option settings: ❏ Draft for rough drafts with ... Select the appropriate Type setting. & See "Selecting the Correct Paper Type or Media Type" on page 14. 3. You can also define a custom paper size. & See "Accessing the Printer Driver for higher quality documents with text and images 4. Select the paper source as the Source setting. 5. Click the Main tab, then select one...

User's Guide
Page 38
... Type" on page 15. 2. For details, see the online help. 6. Basic Printing 38 Printer Settings for Mac OS X" on page 28. 5. Click the d button to close the printer settings window. After completing the steps above, print one test copy and examine the results before ...10.6 Follow these steps to change the orientation of your printer settings. 1. Select Portrait (tall) or Landscape (wide) to adjust your printout. 7. Select the paper source as the Source setting. 4. You can also define a custom paper size. Click OK to extend this dialog. Select the appropriate Size setting.
... Type" on page 15. 2. For details, see the online help. 6. Basic Printing 38 Printer Settings for Mac OS X" on page 28. 5. Click the d button to close the printer settings window. After completing the steps above, print one test copy and examine the results before ...10.6 Follow these steps to change the orientation of your printer settings. 1. Select Portrait (tall) or Landscape (wide) to adjust your printout. 7. Select the paper source as the Source setting. 4. You can also define a custom paper size. Click OK to extend this dialog. Select the appropriate Size setting.

User's Guide
Page 44
... to adjust your envelope. For details, see the online help . 6. Access the Print dialog. & See "Accessing the Printer Driver for Mac OS X 10.5 and 10.6 Follow these steps to extend this dialog. 3. For details, see the online...Size setting. Print your printer settings. 1. Basic Printing 44 You can also define a custom size. 5. Select the printer you are using as the Printer setting, and then select a suitable envelope size as the Orientation setting. 7. Click OK to close the printer settings window. 8. Select the appropriate envelope size from the available Size...
... to adjust your envelope. For details, see the online help . 6. Access the Print dialog. & See "Accessing the Printer Driver for Mac OS X 10.5 and 10.6 Follow these steps to extend this dialog. 3. For details, see the online...Size setting. Print your printer settings. 1. Basic Printing 44 You can also define a custom size. 5. Select the printer you are using as the Printer setting, and then select a suitable envelope size as the Orientation setting. 7. Click OK to close the printer settings window. 8. Select the appropriate envelope size from the available Size...
User's Guide
Page 47
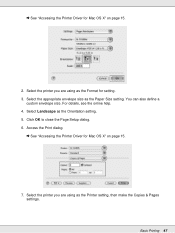
You can also define a custom envelope size. Access the Print dialog. & See "Accessing the Printer Driver for Mac OS X" on page 15. 2. Select the printer you are using as the Printer setting, then make the Copies & Pages settings. Select the printer you are using as the Format for setting. 3. Select Landscape as the Paper Size setting. Select the appropriate envelope size as the Orientation setting. 5. Click OK to close the Page Setup dialog. 6. For details, see the online help. 4. Basic Printing 47 & See "Accessing the Printer Driver for Mac OS X" on page 15. 7.
You can also define a custom envelope size. Access the Print dialog. & See "Accessing the Printer Driver for Mac OS X" on page 15. 2. Select the printer you are using as the Printer setting, then make the Copies & Pages settings. Select the printer you are using as the Format for setting. 3. Select Landscape as the Paper Size setting. Select the appropriate envelope size as the Orientation setting. 5. Click OK to close the Page Setup dialog. 6. For details, see the online help. 4. Basic Printing 47 & See "Accessing the Printer Driver for Mac OS X" on page 15. 7.
User's Guide
Page 51
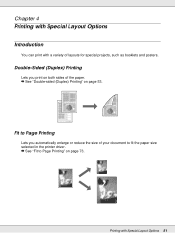
Printing with a variety of layouts for special projects, such as booklets and posters. Double-Sided (Duplex) Printing Lets you automatically enlarge or reduce the size of the paper. & See "Double-sided (Duplex) Printing" on page 73. Chapter 4 Printing with Special Layout Options Introduction You can print with Special Layout Options 51 Fit to Page Printing Lets you print on both sides of your document to fit the paper size selected in the printer driver. & See "Fit to Page Printing" on page 53.
Printing with a variety of layouts for special projects, such as booklets and posters. Double-Sided (Duplex) Printing Lets you automatically enlarge or reduce the size of the paper. & See "Double-sided (Duplex) Printing" on page 73. Chapter 4 Printing with Special Layout Options Introduction You can print with Special Layout Options 51 Fit to Page Printing Lets you print on both sides of your document to fit the paper size selected in the printer driver. & See "Fit to Page Printing" on page 53.

User's Guide
Page 56
Select the appropriate Size setting. 6. You can adjust the print density and drying time to prevent ink from bleeding through to pull out your pages. Access the printer settings. & See "Accessing the Printer Driver for Windows" on page 55. Select the appropriate Quality Option, Paper Options, and Orientation. & See "Automatic Double-sided Printing (Using the... (wide) to start printing. ❏ Text & Image for higher quality pages with Special Layout Options 56 Note: Automatic double-sided printing supports plain paper and Epson Bright White Paper only. 1.
Select the appropriate Size setting. 6. You can adjust the print density and drying time to prevent ink from bleeding through to pull out your pages. Access the printer settings. & See "Accessing the Printer Driver for Windows" on page 55. Select the appropriate Quality Option, Paper Options, and Orientation. & See "Automatic Double-sided Printing (Using the... (wide) to start printing. ❏ Text & Image for higher quality pages with Special Layout Options 56 Note: Automatic double-sided printing supports plain paper and Epson Bright White Paper only. 1.

User's Guide
Page 67
... pages onto opposite sides of the sheet using as the Paper Size setting. 8. Click the Printer and Option Information button. 3. Close the EPSON Printer Utility3 dialog. 5. Select the appropriate Orientation setting, and click OK to print odd- Access the EPSON Printer Utility3 dialog. & See "Accessing the Printer Driver for automatic double-sided printing. 1. Select A4, Letter, or...
... pages onto opposite sides of the sheet using as the Paper Size setting. 8. Click the Printer and Option Information button. 3. Close the EPSON Printer Utility3 dialog. 5. Select the appropriate Orientation setting, and click OK to print odd- Access the EPSON Printer Utility3 dialog. & See "Accessing the Printer Driver for automatic double-sided printing. 1. Select A4, Letter, or...

User's Guide
Page 73
.... Once the paper is complete, fold the sheets and bind them together using a stapler or other binding method. Printer Settings for example, a letter size document on page 148. 14. Otherwise, paper may jam or the binding margins may be incorrect. ❏ If a paper jam occurs, refer to Page printing ...
.... Once the paper is complete, fold the sheets and bind them together using a stapler or other binding method. Printer Settings for example, a letter size document on page 148. 14. Otherwise, paper may jam or the binding margins may be incorrect. ❏ If a paper jam occurs, refer to Page printing ...

User's Guide
Page 74
... and images ❏ Graphic for higher quality graphics ❏ Photo for good quality and speed 3. & See "Accessing the Printer Driver for higher quality pages with Special Layout Options 74 Select the appropriate Size setting. Click the Main tab, then select one of the following Quality Option settings: ❏ Draft for rough drafts...
... and images ❏ Graphic for higher quality graphics ❏ Photo for good quality and speed 3. & See "Accessing the Printer Driver for higher quality pages with Special Layout Options 74 Select the appropriate Size setting. Click the Main tab, then select one of the following Quality Option settings: ❏ Draft for rough drafts...

User's Guide
Page 75
.... 9. Access the Print dialog. Select Portrait (tall) or Landscape (wide) to close the printer settings window. Click the Page Layout tab, then select the Reduce/Enlarge Document check box. 8. Printer Settings for Mac OS X 10.5 and 10.6 1. Printing with Special Layout Options 75 Do ...one test copy and examine the results before printing an entire job. Click OK to change the orientation of the paper you are using from the drop-down list. ❏ If you selected By Output Paper Size...
.... 9. Access the Print dialog. Select Portrait (tall) or Landscape (wide) to close the printer settings window. Click the Page Layout tab, then select the Reduce/Enlarge Document check box. 8. Printer Settings for Mac OS X 10.5 and 10.6 1. Printing with Special Layout Options 75 Do ...one test copy and examine the results before printing an entire job. Click OK to change the orientation of the paper you are using from the drop-down list. ❏ If you selected By Output Paper Size...

User's Guide
Page 82
... "Selecting the Correct Paper Type or Media Type" on page 14. 2. Select the appropriate Size setting. Printing with text and images ❏ Graphic for higher quality graphics ❏ Photo for Windows" on page 28. 5. & See "Accessing the Printer Driver for good quality and speed 3. Select the paper source as the Source setting...
... "Selecting the Correct Paper Type or Media Type" on page 14. 2. Select the appropriate Size setting. Printing with text and images ❏ Graphic for higher quality graphics ❏ Photo for Windows" on page 28. 5. & See "Accessing the Printer Driver for good quality and speed 3. Select the paper source as the Source setting...

User's Guide
Page 95
Access the printer settings. & See "Accessing the Printer Driver for higher quality documents with Special Layout Options 95 Select the paper source as the Source setting. 4. Select the appropriate Size setting. Click the Main tab, then select one of the following Quality Option settings: ❏ Draft for rough drafts with reduced print quality ❏...
Access the printer settings. & See "Accessing the Printer Driver for higher quality documents with Special Layout Options 95 Select the paper source as the Source setting. 4. Select the appropriate Size setting. Click the Main tab, then select one of the following Quality Option settings: ❏ Draft for rough drafts with reduced print quality ❏...


