Network Installation Guide
Page 10
9. If your wireless network has security enabled, do one of the following: ■ If you see the WEP Security Settings screen, select ASCII if your WEP key is either 5 or 13 characters, or select ...: If your wireless network doesn't have security enabled, continue with step 11. If your router or access point doesn't broadcast its network name (SSID), select Manually Enter Network Name (SSID) and enter the network name.
9. If your wireless network has security enabled, do one of the following: ■ If you see the WEP Security Settings screen, select ASCII if your WEP key is either 5 or 13 characters, or select ...: If your wireless network doesn't have security enabled, continue with step 11. If your router or access point doesn't broadcast its network name (SSID), select Manually Enter Network Name (SSID) and enter the network name.
Network Installation Guide
Page 11
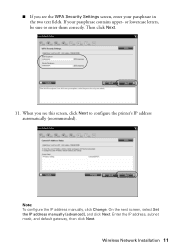
Wireless Network Installation 11 When you see this screen, click Next to enter them correctly. On the next screen, select Set the IP address manually (advanced), and click Next. Enter the IP address, subnet mask, and default gateway, then click Next. Then click Next. 11. Note: To configure the IP address manually, click Change. If your passphrase in the two text fields. or lowercase letters, be sure to configure the printer's IP address automatically (recommended). ■ If you see the WPA Security Settings screen, enter your passphrase contains upper-
Wireless Network Installation 11 When you see this screen, click Next to enter them correctly. On the next screen, select Set the IP address manually (advanced), and click Next. Enter the IP address, subnet mask, and default gateway, then click Next. Then click Next. 11. Note: To configure the IP address manually, click Change. If your passphrase in the two text fields. or lowercase letters, be sure to configure the printer's IP address automatically (recommended). ■ If you see the WPA Security Settings screen, enter your passphrase contains upper-
Network Installation Guide
Page 21
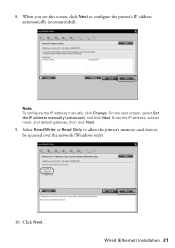
Note: To configure the IP address manually, click Change. On the next screen, select Set the IP address manually (advanced), and click Next. Wired (Ethernet) Installation 21 Select Read/Write or Read Only to allow the printer's memory card slots to configure the printer's IP address automatically (recommended). 8. When you see this screen, click Next to be accessed over the network (Windows only). 10. Enter the IP address, subnet mask, and default gateway, then click Next. 9. Click Next.
Note: To configure the IP address manually, click Change. On the next screen, select Set the IP address manually (advanced), and click Next. Wired (Ethernet) Installation 21 Select Read/Write or Read Only to allow the printer's memory card slots to configure the printer's IP address automatically (recommended). 8. When you see this screen, click Next to be accessed over the network (Windows only). 10. Enter the IP address, subnet mask, and default gateway, then click Next. 9. Click Next.
Network Installation Guide
Page 33
...mask, 255.255.255.0 is set , register the printer's MAC address on your network should use the same value as MAC address filtering) set on the wireless router or access point. When the router is connected to enter the SSID manually in segments of IP address and subnet mask is invalid... address setting to Auto(DHCP). (See page 11 for wireless installations or page 21 for wired installations.) ■ If you want to manually configure the printer's IP address, click Change when you entered the correct WEP key or passphrase for your computer is set to obtain the MAC address. For ...
...mask, 255.255.255.0 is set , register the printer's MAC address on your network should use the same value as MAC address filtering) set on the wireless router or access point. When the router is connected to enter the SSID manually in segments of IP address and subnet mask is invalid... address setting to Auto(DHCP). (See page 11 for wireless installations or page 21 for wired installations.) ■ If you want to manually configure the printer's IP address, click Change when you entered the correct WEP key or passphrase for your computer is set to obtain the MAC address. For ...
Network Installation Guide
Page 34
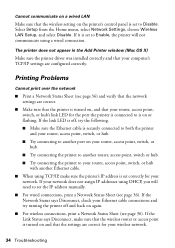
... is set to Disable. Cannot communicate on a wired LAN Make sure that the wireless setting on the printer's control panel is set to Enable, the printer will need to set the IP address manually. ■ For wired connections, print a Network Status Sheet (see page 36). Select Setup from the... Home menu, select Network Settings, choose Wireless LAN Setup, and select Disable. If the Link Status says Disconnect, make sure the printer's IP address is set correctly...
... is set to Disable. Cannot communicate on a wired LAN Make sure that the wireless setting on the printer's control panel is set to Enable, the printer will need to set the IP address manually. ■ For wired connections, print a Network Status Sheet (see page 36). Select Setup from the... Home menu, select Network Settings, choose Wireless LAN Setup, and select Disable. If the Link Status says Disconnect, make sure the printer's IP address is set correctly...
Network Installation Guide
Page 35
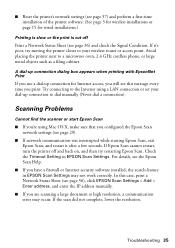
... oven, 2.4 GHz cordless phone, or large metal objects such as a filing cabinet. If Epson Scan cannot restart, turn the printer off Print a Network Status Sheet (see page 36), click EPSON Scan Settings > Add > Enter address, and enter the IP address manually. ■ If you are scanning a large document at high resolution, a communication error may...
... oven, 2.4 GHz cordless phone, or large metal objects such as a filing cabinet. If Epson Scan cannot restart, turn the printer off Print a Network Status Sheet (see page 36), click EPSON Scan Settings > Add > Enter address, and enter the IP address manually. ■ If you are scanning a large document at high resolution, a communication error may...
Product Brochure
Page 2
...page complexity. Visit www.wilhelm-research.com for 2-sided printing Artisan 800 photo all-in-one, setup and instruction manuals, CD-ROM with drivers and creativity software, power cord, ethernet cable (CAT-5), telephone cord, Epson PreferredSM invitation and free 4x6 photo paper plus coupons with ...Mac OS® X 10.3.9, 10.4.11 and 10.5.x (PowerPC® or Intel® processor) Epson printer driver, Epson Print CD, Web to Page, Epson Scan, ArcSoft® Print Creations™, Epson scanner drivers, ABBYY® FineReader® Auto Photo Correction and ICM 34.6 dB Operating: 50 °...
...page complexity. Visit www.wilhelm-research.com for 2-sided printing Artisan 800 photo all-in-one, setup and instruction manuals, CD-ROM with drivers and creativity software, power cord, ethernet cable (CAT-5), telephone cord, Epson PreferredSM invitation and free 4x6 photo paper plus coupons with ...Mac OS® X 10.3.9, 10.4.11 and 10.5.x (PowerPC® or Intel® processor) Epson printer driver, Epson Print CD, Web to Page, Epson Scan, ArcSoft® Print Creations™, Epson scanner drivers, ABBYY® FineReader® Auto Photo Correction and ICM 34.6 dB Operating: 50 °...
Using the Control Panel for Wireless Network Installation
Page 5
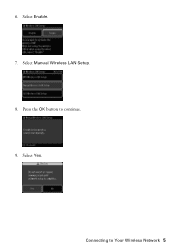
Press the OK button to Your Wireless Network 5 Select Yes. Connecting to continue. 9. 6. Select Manual Wireless LAN Setup. 8. Select Enable. 7.
Press the OK button to Your Wireless Network 5 Select Yes. Connecting to continue. 9. 6. Select Manual Wireless LAN Setup. 8. Select Enable. 7.
Using the Control Panel for Wireless Network Installation
Page 22
...point is set to assign IP addresses using DHCP, try setting the printer's IP address setting to Auto(DHCP). ■ If you want to manually configure the printer's IP address, click Change when you will also need to enter the SSID manually (see page 25) to not broadcast its network name (SSID)....■ Make sure there aren't any access restrictions (such as the IP address for your wireless router or access point. 22 Troubleshooting If your printer. All IP addresses are either ASCII or hexadecimal. For example: IP address of your router or access point: 192.168.1.1 IP address of four ...
...point is set to assign IP addresses using DHCP, try setting the printer's IP address setting to Auto(DHCP). ■ If you want to manually configure the printer's IP address, click Change when you will also need to enter the SSID manually (see page 25) to not broadcast its network name (SSID)....■ Make sure there aren't any access restrictions (such as the IP address for your wireless router or access point. 22 Troubleshooting If your printer. All IP addresses are either ASCII or hexadecimal. For example: IP address of your router or access point: 192.168.1.1 IP address of four ...
Using the Control Panel for Wireless Network Installation
Page 23
...or set your dial-up connection for your network. If your wireless router or access point. If the Link Status says Disconnect, make sure the printer's IP address is cut off Print a Network Status Sheet (see this message every time you will need to a microwave oven, 2.4 GHz cordless ...over the network ■ Print a Network Status Sheet (see page 25). Avoid placing the printer next to set correctly for Internet access, you print. Printing is slow or the print is set the IP address manually. ■ Print a Network Status Sheet (see page 25) and verify that the settings...
...or set your dial-up connection for your network. If your wireless router or access point. If the Link Status says Disconnect, make sure the printer's IP address is cut off Print a Network Status Sheet (see this message every time you will need to a microwave oven, 2.4 GHz cordless ...over the network ■ Print a Network Status Sheet (see page 25). Avoid placing the printer next to set correctly for Internet access, you print. Printing is slow or the print is set the IP address manually. ■ Print a Network Status Sheet (see page 25) and verify that the settings...

Using the Control Panel for Wireless Network Installation
Page 24
... > Enter address, and enter the IP address manually. ■ If you configured the Epson Scan network settings (see your network devices in "Configuring Epson Scan Network Settings" on your router's documentation for the printer (see page 18). ■ If network communication was interrupted while starting Epson Scan, exit Epson Scan, and restart it after a few seconds...
... > Enter address, and enter the IP address manually. ■ If you configured the Epson Scan network settings (see your network devices in "Configuring Epson Scan Network Settings" on your router's documentation for the printer (see page 18). ■ If network communication was interrupted while starting Epson Scan, exit Epson Scan, and restart it after a few seconds...
Basics
Page 23
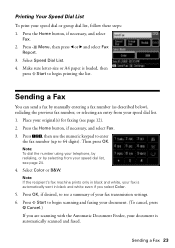
... Your Speed Dial List To print your original(s) for faxing (see page 12). 2. Note: To dial the number using your telephone, by redialing, or by manually entering a fax number (as described below), redialing the previous fax number, or selecting an entry from your speed dial list, see a summary of your document...
... Your Speed Dial List To print your original(s) for faxing (see page 12). 2. Note: To dial the number using your telephone, by redialing, or by manually entering a fax number (as described below), redialing the previous fax number, or selecting an entry from your speed dial list, see a summary of your document...
Basics
Page 24
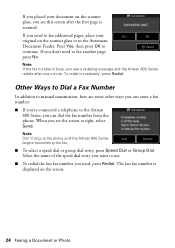
... Automatic Document Feeder. The last fax number is displayed on the scanner glass, you see this screen after one minute. Other Ways to Dial a Fax Number In addition to manual transmission, here are some other ways you can dial the fax number from the phone. If you need ... Send. To redial immediately, press Redial. When you can enter a fax number: ■ If you've connected a telephone to the Artisan 800 Series, you see a redialing message and the Artisan 800 Series redials after the first page is busy, you used, press Redial. Note: Don't hang up the phone until the...
... Automatic Document Feeder. The last fax number is displayed on the scanner glass, you see this screen after one minute. Other Ways to Dial a Fax Number In addition to manual transmission, here are some other ways you can dial the fax number from the phone. If you need ... Send. To redial immediately, press Redial. When you can enter a fax number: ■ If you've connected a telephone to the Artisan 800 Series, you see a redialing message and the Artisan 800 Series redials after the first page is busy, you used, press Redial. Note: Don't hang up the phone until the...
Basics
Page 25
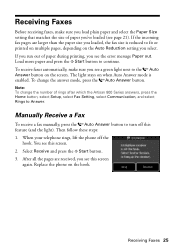
...pages are received, you see page 21). Note: To change the answer mode, press the Auto Answer button. Receiving Faxes 25 Manually Receive a Fax To receive a fax manually, press the Auto Answer button to fit or printed on multiple pages, depending on the hook. You see this screen again.... When your telephone rings, lift the phone off this screen. 2. Select Receive and press the x Start button. 3. If you run out of rings after which the Artisan 800 ...
...pages are received, you see page 21). Note: To change the answer mode, press the Auto Answer button. Receiving Faxes 25 Manually Receive a Fax To receive a fax manually, press the Auto Answer button to fit or printed on multiple pages, depending on the hook. You see this screen again.... When your telephone rings, lift the phone off this screen. 2. Select Receive and press the x Start button. 3. If you run out of rings after which the Artisan 800 ...

Basics
Page 32
...screen, press OK. 8. to select the number (up to 99). 10. When you , or select Place photos manually to arrange the images yourself. 7. Note: If you don't select enough photos to fill the layout you selected, ...you 're done selecting settings, press OK. 11. Select one of the following options: ■ Print Settings to change any of the sheet, press + or - To print...have some blank spaces. 9. Select Automatic layout to let the Artisan 800 Series place images in the layout sheets for you 're ready to print, press x Start.
...screen, press OK. 8. to select the number (up to 99). 10. When you , or select Place photos manually to arrange the images yourself. 7. Note: If you don't select enough photos to fill the layout you selected, ...you 're done selecting settings, press OK. 11. Select one of the following options: ■ Print Settings to change any of the sheet, press + or - To print...have some blank spaces. 9. Select Automatic layout to let the Artisan 800 Series place images in the layout sheets for you 're ready to print, press x Start.
Basics
Page 33
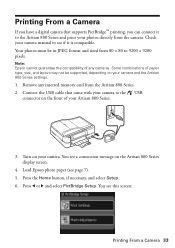
... Some combinations of any inserted memory card from the camera. You see page 7). 5. Remove any cameras. Load Epson photo paper (see a connection message on the front of your Artisan 800 Series. 3. Press the Home button, if necessary, and select Setup. 6. You see if it to see...; printing, you have a digital camera that came with your photos directly from the Artisan 800 Series. 2. Check your camera manual to the Artisan 800 Series and print your camera to the USB connector on the Artisan 800 Series display screen. 4. Press l or r and select PictBridge Setup. Turn on ...
... Some combinations of any inserted memory card from the camera. You see page 7). 5. Remove any cameras. Load Epson photo paper (see a connection message on the front of your Artisan 800 Series. 3. Press the Home button, if necessary, and select Setup. 6. You see if it to see...; printing, you have a digital camera that came with your photos directly from the Artisan 800 Series. 2. Check your camera manual to the Artisan 800 Series and print your camera to the USB connector on the Artisan 800 Series display screen. 4. Press l or r and select PictBridge Setup. Turn on ...

Basics
Page 39
Follow these steps to transfer one you want to include. For more information, see this screen: 5. You can also press Display/Crop and crop your Artisan 800 Series to 99). 12. Press the Home..., and create your own designs using the Epson Print CD software that photo. To prevent errors, burn files, music, or video onto your Artisan 800 Series. Press the + button to select the...(see page 28). 3. Select Automatic layout or Place photos manually, if necessary. 7. Insert your CD/DVD. You see the on-screen Epson Information Center. 1. Press l or r to indicate the ...
Follow these steps to transfer one you want to include. For more information, see this screen: 5. You can also press Display/Crop and crop your Artisan 800 Series to 99). 12. Press the Home..., and create your own designs using the Epson Print CD software that photo. To prevent errors, burn files, music, or video onto your Artisan 800 Series. Press the + button to select the...(see page 28). 3. Select Automatic layout or Place photos manually, if necessary. 7. Insert your CD/DVD. You see the on-screen Epson Information Center. 1. Press l or r to indicate the ...

Basics
Page 50
... on page 43, but complete the additional steps below before you can configure the printer software and perform two-sided printing even if you don't have the auto duplexer. Select Auto or Manual 2. Windows Follow the Windows printing instructions beginning on two-sided printing and installing or... Two-sided Printing If you have the optional auto duplexer, you start printing. 1. Click the Page Layout tab in the printer software. With Windows, you can print on -screen Epson Information Center. To purchase the auto duplexer from Epson, see the on both sides of the page automatically.
... on page 43, but complete the additional steps below before you can configure the printer software and perform two-sided printing even if you don't have the auto duplexer. Select Auto or Manual 2. Windows Follow the Windows printing instructions beginning on two-sided printing and installing or... Two-sided Printing If you have the optional auto duplexer, you start printing. 1. Click the Page Layout tab in the printer software. With Windows, you can print on -screen Epson Information Center. To purchase the auto duplexer from Epson, see the on both sides of the page automatically.


