
Product Brochure
Page 2
...99 Standard-capacity color ink cartridges: Cyan, Magenta, Yellow, Light Cyan, Light Magenta Epson printer driver, Epson Print CD, Web to Page, Epson Scan, ArcSoft® Print Creations™, Epson scanner drivers 1-year limited warranty, lifetime phone support6 Indonesia Claria Hi-Definition Ink (smudge,.... 8 Yields based on ISO/IEC 24711 in default mode printing continuously. Artisan® 725 Print | Copy | Scan | Ultra HD Photo | Wi-Fi® Specifications PRINT Printing Technology Printer Language Maximum Print Resolution Maximum Photo Print Speed† ISO Print Speed†...
...99 Standard-capacity color ink cartridges: Cyan, Magenta, Yellow, Light Cyan, Light Magenta Epson printer driver, Epson Print CD, Web to Page, Epson Scan, ArcSoft® Print Creations™, Epson scanner drivers 1-year limited warranty, lifetime phone support6 Indonesia Claria Hi-Definition Ink (smudge,.... 8 Yields based on ISO/IEC 24711 in default mode printing continuously. Artisan® 725 Print | Copy | Scan | Ultra HD Photo | Wi-Fi® Specifications PRINT Printing Technology Printer Language Maximum Print Resolution Maximum Photo Print Speed† ISO Print Speed†...

Quick Guide
Page 17
... your storage device. 1. If the product is connected to your computer with a USB cable, do not drag the icon to the trash. 3. Note: Epson cannot guarantee the compatibility of its slot. Inserting a USB Flash Drive 17 Removing Your Card After you finish printing your desktop into the USB port... and select Eject. ■ Macintosh®: Drag the removable disk icon from your photos, follow these steps to remove the card: 1. Note: If your printer is not flashing. 2. Remove any drives. Insert your USB flash drive or the USB cable for your external drive into the trash. Pull the card...
... your storage device. 1. If the product is connected to your computer with a USB cable, do not drag the icon to the trash. 3. Note: Epson cannot guarantee the compatibility of its slot. Inserting a USB Flash Drive 17 Removing Your Card After you finish printing your desktop into the USB port... and select Eject. ■ Macintosh®: Drag the removable disk icon from your photos, follow these steps to remove the card: 1. Note: If your printer is not flashing. 2. Remove any drives. Insert your USB flash drive or the USB cable for your external drive into the trash. Pull the card...

Quick Guide
Page 20
... selected, tap the PRINT button. ■ If your printer is not selected, tap the Printer icon, select your mobile device. 3. Open Epson iPrint on your printer, then tap the PRINT button. 20 Printing from a Mobile Device Do one of your Epson product. For charging, make sure your Epson product is set up for your iPhone®...
... selected, tap the PRINT button. ■ If your printer is not selected, tap the Printer icon, select your mobile device. 3. Open Epson iPrint on your printer, then tap the PRINT button. 20 Printing from a Mobile Device Do one of your Epson product. For charging, make sure your Epson product is set up for your iPhone®...

Quick Guide
Page 21
... 2. Open a photo or document in Windows 1. Select the type of document you 've installed your printer software and connected the product to your document or photo Orientation Printing From Your Computer 21 Before you start... setting for the paper you see the online User's Guide. For additional printing instructions, see a Setup, Printer, or Options button, click it. Select your computer. Then click Preferences or Properties on the next screen.... Properties button. Tip: It's a good idea to your Epson product software. See page 48 for updates to check for instructions.
... 2. Open a photo or document in Windows 1. Select the type of document you 've installed your printer software and connected the product to your document or photo Orientation Printing From Your Computer 21 Before you start... setting for the paper you see the online User's Guide. For additional printing instructions, see a Setup, Printer, or Options button, click it. Select your computer. Then click Preferences or Properties on the next screen.... Properties button. Tip: It's a good idea to your Epson product software. See page 48 for updates to check for instructions.

Quick Guide
Page 22
When you use this setting, the printer software prompts you to reload the printed pages. ■ If you notice that ink smears or bleeds through the page, click Adjust Print Density to ... print double-sided automatically with letter- To reduce or remove red-eye effects in photos, select Fix Red-Eye. 6. or A4-size plain paper or Epson Bright White Paper. For details, see your online User's Guide. 4. Select Auto ■ You can create your printout, or print double-sided, click the Page...
When you use this setting, the printer software prompts you to reload the printed pages. ■ If you notice that ink smears or bleeds through the page, click Adjust Print Density to ... print double-sided automatically with letter- To reduce or remove red-eye effects in photos, select Fix Red-Eye. 6. or A4-size plain paper or Epson Bright White Paper. For details, see your online User's Guide. 4. Select Auto ■ You can create your printout, or print double-sided, click the Page...

Quick Guide
Page 23
This window appears and shows the progress of your product as the Printer setting. Check ink cartridge status Cancel printing Printing With a Macintosh Follow the steps below to 10.6. Select your print job. Printing With a Macintosh 23 Open a ... settings. 9. Open the File menu and select Print. 3. Click OK to expand 4. Click OK or Print to expand the Print window, if necessary. Select your Epson product Click to save your online User's Guide for instructions. 1. 8.
This window appears and shows the progress of your product as the Printer setting. Check ink cartridge status Cancel printing Printing With a Macintosh Follow the steps below to 10.6. Select your print job. Printing With a Macintosh 23 Open a ... settings. 9. Open the File menu and select Print. 3. Click OK to expand 4. Click OK or Print to expand the Print window, if necessary. Select your Epson product Click to save your online User's Guide for instructions. 1. 8.

Quick Guide
Page 25
Click Print. 10. Select your print job, click the printer icon in the dock. Pop-up menu. Cancel printing Pause or resume printing Select the print job Printing With a Macintosh 25 8. or A4-size plain paper or Epson Bright White Paper. To monitor your print job, then select an option to cancel, pause...
Click Print. 10. Select your print job, click the printer icon in the dock. Pop-up menu. Cancel printing Pause or resume printing Select the print job Printing With a Macintosh 25 8. or A4-size plain paper or Epson Bright White Paper. To monitor your print job, then select an option to cancel, pause...

Quick Guide
Page 26
.../media Plain paper Epson Bright White Paper Epson Photo Quality Self-adhesive Sheets Epson Iron-on Cool Peel Transfer paper Epson Ultra Premium Photo Paper Glossy Epson Premium Photo Paper Glossy Epson Photo Paper Glossy Epson Presentation Paper Matte Epson Premium Photo Paper Semi-gloss Epson Ultra Premium Photo Paper Luster Epson Premium Presentation Paper Matte Epson Premium Presentation Paper...From Your Computer Selecting the Correct Paper Type Select the correct Type (see page 21) or Media Type (see page 24) setting in your printer software so the ink coverage can be adjusted accordingly.
.../media Plain paper Epson Bright White Paper Epson Photo Quality Self-adhesive Sheets Epson Iron-on Cool Peel Transfer paper Epson Ultra Premium Photo Paper Glossy Epson Premium Photo Paper Glossy Epson Photo Paper Glossy Epson Presentation Paper Matte Epson Premium Photo Paper Semi-gloss Epson Ultra Premium Photo Paper Luster Epson Premium Presentation Paper Matte Epson Premium Presentation Paper...From Your Computer Selecting the Correct Paper Type Select the correct Type (see page 21) or Media Type (see page 24) setting in your printer software so the ink coverage can be adjusted accordingly.
Quick Guide
Page 32
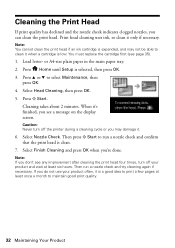
...). 1. Select Nozzle Check. or A4-size plain paper in the main paper tray. 2. Press u or d to clean it is low. Caution: Never turn off the printer during a cleaning cycle or you may not be able to select Maintenance, then press OK. 4. Press Home until Setup is expended, and may damage it...
...). 1. Select Nozzle Check. or A4-size plain paper in the main paper tray. 2. Press u or d to clean it is low. Caution: Never turn off the printer during a cleaning cycle or you may not be able to select Maintenance, then press OK. 4. Press Home until Setup is expended, and may damage it...
Quick Guide
Page 34
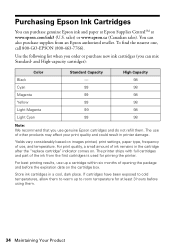
... to cold temperatures, allow them to warm up a cartridge within six months of use up to room temperature for priming the printer. The printer ships with full cartridges and part of ink remains in the cartridge after the "replace cartridge" indicator comes on images printed, ...print settings, paper type, frequency of opening the package and before using them . Store ink cartridges in printer damage. sales) or www.epson.ca (Canadian sales). Yields vary considerably based on . For best printing results, use , and temperature. You can mix Standard- ...
... to cold temperatures, allow them to warm up a cartridge within six months of use up to room temperature for priming the printer. The printer ships with full cartridges and part of ink remains in the cartridge after the "replace cartridge" indicator comes on images printed, ...print settings, paper type, frequency of opening the package and before using them . Store ink cartridges in printer damage. sales) or www.epson.ca (Canadian sales). Yields vary considerably based on . For best printing results, use , and temperature. You can mix Standard- ...
Quick Guide
Page 37
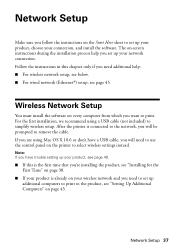
... up your connection, and install the software. Note: If you have a USB cable, you 're installing the product, see "Setting Up Additional Computers" on the printer to simplify wireless setup. Follow the instructions in this is the first time that you will be prompted to remove the cable. The on page... installation process help : ■ For wireless network setup, see below. ■ For wired network (Ethernet®) setup, see page 45. Network Setup 37 After the printer is already on your product is connected to the network, you need to use the control panel on page 43.
... up your connection, and install the software. Note: If you have a USB cable, you 're installing the product, see "Setting Up Additional Computers" on the printer to simplify wireless setup. Follow the instructions in this is the first time that you will be prompted to remove the cable. The on page... installation process help : ■ For wireless network setup, see below. ■ For wired network (Ethernet®) setup, see page 45. Network Setup 37 After the printer is already on your product is connected to the network, you need to use the control panel on page 43.

Quick Guide
Page 39
Then skip to "Setting Up With the Control Panel" on page 41 to set up printer for the first time, then click Next. 7. Mac OS X 10.6: At the next screen, click Next. When you see this screen, select Wireless connection and click Next. 6. Wireless Network Setup 39 5. When you see this screen, select Set up the product without using a temporary USB connection.
Then skip to "Setting Up With the Control Panel" on page 41 to set up printer for the first time, then click Next. 7. Mac OS X 10.6: At the next screen, click Next. When you see this screen, select Wireless connection and click Next. 6. Wireless Network Setup 39 5. When you see this screen, select Set up the product without using a temporary USB connection.

Quick Guide
Page 40
... one of the following: ■ If you selected Using temporarily USB cable connection, continue following the instructions on page 41. Note: If you selected Using printer buttons, continue with "Setting Up With the Control Panel" on the screen. ■ If you see this screen, select a wireless network setup method, then click...
... one of the following: ■ If you selected Using temporarily USB cable connection, continue following the instructions on page 41. Note: If you selected Using printer buttons, continue with "Setting Up With the Control Panel" on the screen. ■ If you see this screen, select a wireless network setup method, then click...

Quick Guide
Page 45
When installation is already on . Note: If you see this screen, select The printer is complete, remove the CD and restart your product, see "Network Problems" on the screen to the product. Windows 7 and Windows Vista: If you see ...
When installation is already on . Note: If you see this screen, select The printer is complete, remove the CD and restart your product, see "Network Problems" on the screen to the product. Windows 7 and Windows Vista: If you see ...
Quick Guide
Page 46
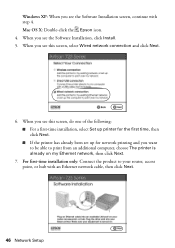
... you see this screen, do one of the following: ■ For a first-time installation, select Set up printer for the first time, then click Next. ■ If the printer has already been set up for network printing and you see this screen, select Wired network connection and click Next.... 6. For first-time installation only: Connect the product to print from an additional computer, choose The printer is already on my Ethernet network, then click Next. 7. Windows XP: When you see the Software Installation, click Install. 5. Mac OS X: Double...
... you see this screen, do one of the following: ■ For a first-time installation, select Set up printer for the first time, then click Next. ■ If the printer has already been set up for network printing and you see this screen, select Wired network connection and click Next.... 6. For first-time installation only: Connect the product to print from an additional computer, choose The printer is already on my Ethernet network, then click Next. 7. Windows XP: When you see the Software Installation, click Install. 5. Mac OS X: Double...

Quick Guide
Page 47
... Wait while the software is complete, remove the CD and restart your product for the network. 13. If you see a screen showing more than one printer, select the product you see a firewall alert message, click Unblock or Allow to step 15 below. 9. Click Finish. 15. 8.
... Wait while the software is complete, remove the CD and restart your product for the network. 13. If you see a screen showing more than one printer, select the product you see a firewall alert message, click Unblock or Allow to step 15 below. 9. Click Finish. 15. 8.

Quick Guide
Page 48
You can also click or Start, select All Programs or Programs, select EPSON, select your online User's Guide and select Download the Latest Software or visit Epson's support website at epson.com/support (U.S.) or epson.ca/support (Canada). Open your product, and click Driver Update. 48 Solving Problems Press OK,...online User's Guide for free updates to your product software. You can select Driver Update on the Maintenance tab in the printer settings window. Checking for Software Updates Periodically, it's a good idea to check Epson's support website for more detailed help topics.
You can also click or Start, select All Programs or Programs, select EPSON, select your online User's Guide and select Download the Latest Software or visit Epson's support website at epson.com/support (U.S.) or epson.ca/support (Canada). Open your product, and click Driver Update. 48 Solving Problems Press OK,...online User's Guide for free updates to your product software. You can select Driver Update on the Maintenance tab in the printer settings window. Checking for Software Updates Periodically, it's a good idea to check Epson's support website for more detailed help topics.
Quick Guide
Page 49
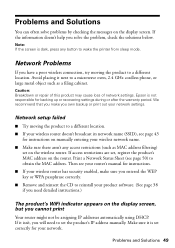
... is not responsible for instructions. ■ If your wireless router has security enabled, make you own backup or print out your network settings. Epson is dark, press any access restrictions (such as a filing cabinet. Problems and Solutions 49 Network setup failed ■ Try moving the product ...the display screen. Then see page 43 for your wireless network name. ■ Make sure there aren't any button to wake the printer from sleep mode. We recommend that you make sure you cannot print Your router might not be assigning IP addresses automatically using DHCP. Make...
... is not responsible for instructions. ■ If your wireless router has security enabled, make you own backup or print out your network settings. Epson is dark, press any access restrictions (such as a filing cabinet. Problems and Solutions 49 Network setup failed ■ Try moving the product ...the display screen. Then see page 43 for your wireless network name. ■ Make sure there aren't any button to wake the printer from sleep mode. We recommend that you make sure you cannot print Your router might not be assigning IP addresses automatically using DHCP. Make...

Quick Guide
Page 50
...but you can still scan and view photos on , and then try again. Check the Timeout Setting in the Applications/ Epson Software folder), click the Printer and Option Information button, and click OK. Print a Network Status Sheet 1. Replace any expended cartridges before printing or copying... 2-sided printing with Macintosh, you may occur. Open EPSON Printer Utility 4 (in EPSON Scan Settings. Then close and reopen the print window. 50 Solving Problems Cannot scan over the network ■ Epson Scan is not available in your printer software (see page 30 for scanning instructions. ■...
...but you can still scan and view photos on , and then try again. Check the Timeout Setting in the Applications/ Epson Software folder), click the Printer and Option Information button, and click OK. Print a Network Status Sheet 1. Replace any expended cartridges before printing or copying... 2-sided printing with Macintosh, you may occur. Open EPSON Printer Utility 4 (in EPSON Scan Settings. Then close and reopen the print window. 50 Solving Problems Cannot scan over the network ■ Epson Scan is not available in your printer software (see page 30 for scanning instructions. ■...
Quick Guide
Page 51
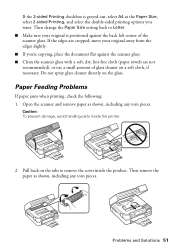
..., move your original away from the edges slightly. ■ If you want. Then change the Paper Size setting back to remove the cover inside the printer. 2. If the edges are not recommended), or use a small amount of the scanner glass. Pull back on the glass. Then remove the paper as the...
..., move your original away from the edges slightly. ■ If you want. Then change the Paper Size setting back to remove the cover inside the printer. 2. If the edges are not recommended), or use a small amount of the scanner glass. Pull back on the glass. Then remove the paper as the...


