Network Installation Guide
Page 2
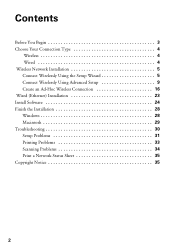
Contents Before You Begin 3 Choose Your Connection Type 4 Wireless 4 Wired 4 Wireless Network Installation 5 Connect Wirelessly Using the Setup Wizard 5 Connect Wirelessly Using Advanced Setup 9 Create an Ad-Hoc Wireless Connection 16 Wired (Ethernet) Installation 23 Install Software 24 Finish the Installation 28 Windows 28 Macintosh 29 Troubleshooting 30 Setup Problems 31 Printing Problems 33 Scanning Problems 34 Print a Network Status Sheet 35 Copyright Notice 35 2
Contents Before You Begin 3 Choose Your Connection Type 4 Wireless 4 Wired 4 Wireless Network Installation 5 Connect Wirelessly Using the Setup Wizard 5 Connect Wirelessly Using Advanced Setup 9 Create an Ad-Hoc Wireless Connection 16 Wired (Ethernet) Installation 23 Install Software 24 Finish the Installation 28 Windows 28 Macintosh 29 Troubleshooting 30 Setup Problems 31 Printing Problems 33 Scanning Problems 34 Print a Network Status Sheet 35 Copyright Notice 35 2
Network Installation Guide
Page 5
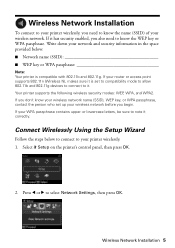
...contact the person who set to compatibility mode to allow 802.11b and 802.11g devices to connect to it correctly. Connect Wirelessly Using the Setup Wizard Follow the steps below : ■ Network name (SSID WEP key or WPA passphrase Note: Your printer is set up your wireless network... in the space provided below to connect to select Network Settings, then press OK. or lowercase letters, be sure to note it . Select F Setup on the printer's control panel, then press OK. 2. Wireless Network Installation To connect to your printer wirelessly, you need to know the WEP key...
...contact the person who set to compatibility mode to allow 802.11b and 802.11g devices to connect to it correctly. Connect Wirelessly Using the Setup Wizard Follow the steps below : ■ Network name (SSID WEP key or WPA passphrase Note: Your printer is set up your wireless network... in the space provided below to connect to select Network Settings, then press OK. or lowercase letters, be sure to note it . Select F Setup on the printer's control panel, then press OK. 2. Wireless Network Installation To connect to your printer wirelessly, you need to know the WEP key...
Network Installation Guide
Page 6
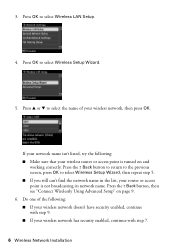
... its network name. Press the y Back button to return to the previous screen, press OK to select Wireless Setup Wizard. 5. Press the y Back button, then see "Connect Wirelessly Using Advanced Setup" on and working correctly. If your network name isn't listed, try the following : ■ If your .... Do one of your wireless network has security enabled, continue with step 7. 6 Wireless Network Installation 3. Press u or d to select Wireless LAN Setup. 4. Press OK to select the name of the following : ■ Make sure that your router or access point is turned on page 9. 6.
... its network name. Press the y Back button to return to the previous screen, press OK to select Wireless Setup Wizard. 5. Press the y Back button, then see "Connect Wirelessly Using Advanced Setup" on and working correctly. If your network name isn't listed, try the following : ■ If your .... Do one of your wireless network has security enabled, continue with step 7. 6 Wireless Network Installation 3. Press u or d to select Wireless LAN Setup. 4. Press OK to select the name of the following : ■ Make sure that your router or access point is turned on page 9. 6.
Network Installation Guide
Page 8
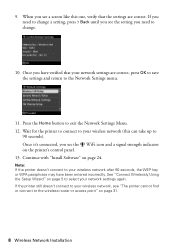
... correct. Press the Home button to your wireless network, see the WiFi icon and a signal strength indicator on page 24. See "Connect Wirelessly Using the Setup Wizard" on page 31. 8 Wireless Network Installation If the printer still doesn't connect to 90 seconds). 9. Once you see "The printer cannot find or connect...
... correct. Press the Home button to your wireless network, see the WiFi icon and a signal strength indicator on page 24. See "Connect Wirelessly Using the Setup Wizard" on page 31. 8 Wireless Network Installation If the printer still doesn't connect to 90 seconds). 9. Once you see "The printer cannot find or connect...
Network Installation Guide
Page 9
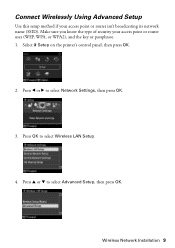
Press l or r to select Advanced Setup, then press OK. Press u or d to select Network Settings, then press OK. 3. Wireless Network Installation 9 Make sure you know the type of security your access point or router isn't broadcasting its network name (SSID). Press OK to select Wireless LAN Setup. 4. Connect Wirelessly Using Advanced Setup Use this setup method if your access point or router uses (WEP, WPA, or WPA2), and the key or passphrase. 1. Select F Setup on the printer's control panel, then press OK. 2.
Press l or r to select Advanced Setup, then press OK. Press u or d to select Network Settings, then press OK. 3. Wireless Network Installation 9 Make sure you know the type of security your access point or router isn't broadcasting its network name (SSID). Press OK to select Wireless LAN Setup. 4. Connect Wirelessly Using Advanced Setup Use this setup method if your access point or router uses (WEP, WPA, or WPA2), and the key or passphrase. 1. Select F Setup on the printer's control panel, then press OK. 2.
Network Installation Guide
Page 10
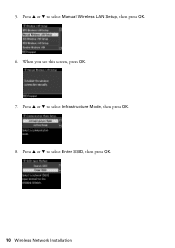
Press u or d to select Enter SSID, then press OK. 10 Wireless Network Installation 5. Press u or d to select Infrastructure Mode, then press OK. 8. When you see this screen, press OK. 7. Press u or d to select Manual Wireless LAN Setup, then press OK. 6.
Press u or d to select Enter SSID, then press OK. 10 Wireless Network Installation 5. Press u or d to select Infrastructure Mode, then press OK. 8. When you see this screen, press OK. 7. Press u or d to select Manual Wireless LAN Setup, then press OK. 6.
Network Installation Guide
Page 15
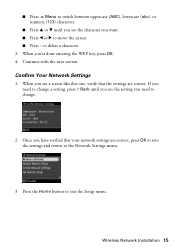
... to the Network Settings menu. 3. Once you have verified that the settings are correct, press OK to save the settings and return to exit the Setup menu. When you see a screen like this one, verify that your network settings are correct. When you're done entering the WEP key, press OK...
... to the Network Settings menu. 3. Once you have verified that the settings are correct, press OK to save the settings and return to exit the Setup menu. When you see a screen like this one, verify that your network settings are correct. When you're done entering the WEP key, press OK...
Network Installation Guide
Page 16
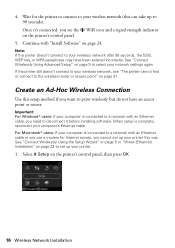
...a modem for the printer to connect to your printer. 1. See "Connect Wirelessly Using the Setup Wizard" on page 5 or "Wired (Ethernet) Installation" on page 23 to 90 seconds). Select F Setup on page 24. If the printer still doesn't connect to your wireless network, see the WiFi... indicator on page 31. For Macintosh® users: If your computer is complete, reconnect your network settings again. See "Connect Wirelessly Using Advanced Setup" on page 9 to the wireless router or access point" on the printer's control panel. 5. 4. Create an Ad-Hoc Wireless Connection Use ...
...a modem for the printer to connect to your printer. 1. See "Connect Wirelessly Using the Setup Wizard" on page 5 or "Wired (Ethernet) Installation" on page 23 to 90 seconds). Select F Setup on page 24. If the printer still doesn't connect to your wireless network, see the WiFi... indicator on page 31. For Macintosh® users: If your computer is complete, reconnect your network settings again. See "Connect Wirelessly Using Advanced Setup" on page 9 to the wireless router or access point" on the printer's control panel. 5. 4. Create an Ad-Hoc Wireless Connection Use ...
Network Installation Guide
Page 17
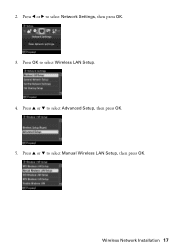
Press l or r to select Manual Wireless LAN Setup, then press OK. Wireless Network Installation 17 Press u or d to select Network Settings, then press OK. 3. Press u or d to select Wireless LAN Setup. 4. Press OK to select Advanced Setup, then press OK. 5. 2.
Press l or r to select Manual Wireless LAN Setup, then press OK. Wireless Network Installation 17 Press u or d to select Network Settings, then press OK. 3. Press u or d to select Wireless LAN Setup. 4. Press OK to select Advanced Setup, then press OK. 5. 2.
Network Installation Guide
Page 22
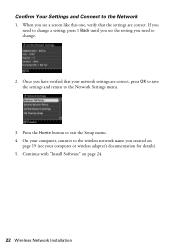
Confirm Your Settings and Connect to exit the Setup menu. 4. Once you have verified that the settings are correct, press OK to save the settings and return to the Network Settings menu. 3. Press the ...
Confirm Your Settings and Connect to exit the Setup menu. 4. Once you have verified that the settings are correct, press OK to save the settings and return to the Network Settings menu. 3. Press the ...
Network Installation Guide
Page 23
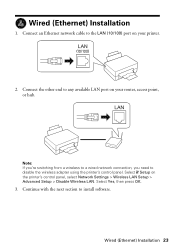
Continue with the next section to disable the wireless adapter using the printer's control panel. Wired (Ethernet) Installation 23 Select F Setup on your printer. 2. Note: If you're switching from a wireless to a wired network connection, you need to install software. Wired (Ethernet) Installation 1. Connect the other ... router, access point, or hub. Connect an Ethernet network cable to any available LAN port on the printer's control panel, select Network Settings > Wireless LAN Setup > Advanced Setup > Disable Wireless LAN. Select Yes, then press OK. 3.
Continue with the next section to disable the wireless adapter using the printer's control panel. Wired (Ethernet) Installation 23 Select F Setup on your printer. 2. Note: If you're switching from a wireless to a wired network connection, you need to install software. Wired (Ethernet) Installation 1. Connect the other ... router, access point, or hub. Connect an Ethernet network cable to any available LAN port on the printer's control panel, select Network Settings > Wireless LAN Setup > Advanced Setup > Disable Wireless LAN. Select Yes, then press OK. 3.
Network Installation Guide
Page 24
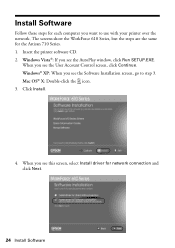
... your printer over the network. Mac OS® X: Double-click the icon. 3. Insert the printer software CD. 2. When you see the AutoPlay window, click Run SETUP.EXE. The screens show the WorkForce 610 Series, but the steps are the same for network connection and click Next. 24 Install Software Click Install...® XP: When you see the User Account Control screen, click Continue. Windows Vista®: If you see this screen, select Install driver for the Artisan 710 Series. 1. Install Software Follow these steps for each computer you want to step 3.
... your printer over the network. Mac OS® X: Double-click the icon. 3. Insert the printer software CD. 2. When you see the AutoPlay window, click Run SETUP.EXE. The screens show the WorkForce 610 Series, but the steps are the same for network connection and click Next. 24 Install Software Click Install...® XP: When you see the User Account Control screen, click Continue. Windows Vista®: If you see this screen, select Install driver for the Artisan 710 Series. 1. Install Software Follow these steps for each computer you want to step 3.
Network Installation Guide
Page 25
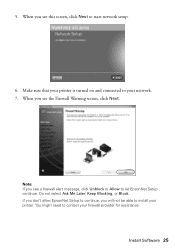
Note: If you will not be able to install your printer. You might need to your firewall provider for assistance. Make sure that your printer is turned on and connected to contact your network. 7. If you don't allow EpsonNet Setup to continue, you see a firewall alert message, click Unblock or Allow to start network setup. 6. 5. Do not select Ask Me Later, Keep Blocking, or Block. Install Software 25 When you see the Firewall Warning screen, click Next. When you see this screen, click Next to let EpsonNet Setup continue.
Note: If you will not be able to install your printer. You might need to your firewall provider for assistance. Make sure that your printer is turned on and connected to contact your network. 7. If you don't allow EpsonNet Setup to continue, you see a firewall alert message, click Unblock or Allow to start network setup. 6. 5. Do not select Ask Me Later, Keep Blocking, or Block. Install Software 25 When you see the Firewall Warning screen, click Next. When you see this screen, click Next to let EpsonNet Setup continue.
Network Installation Guide
Page 26
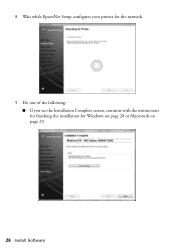
Do one of the following: ■ If you see the Installation Complete screen, continue with the instructions for finishing the installation for the network. 9. 8. Wait while EpsonNet Setup configures your printer for Windows on page 28 or Macintosh on page 29. 26 Install Software
Do one of the following: ■ If you see the Installation Complete screen, continue with the instructions for finishing the installation for the network. 9. 8. Wait while EpsonNet Setup configures your printer for Windows on page 28 or Macintosh on page 29. 26 Install Software
Network Installation Guide
Page 27
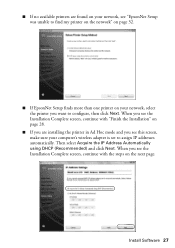
... unable to find my printer on the network" on page 32. ■ If EpsonNet Setup finds more than one printer on the next page. ■ If no available printers are installing the printer in Ad Hoc mode and you see ...
... unable to find my printer on the network" on page 32. ■ If EpsonNet Setup finds more than one printer on the next page. ■ If no available printers are installing the printer in Ad Hoc mode and you see ...

Network Installation Guide
Page 30
... you see page 35). 30 Troubleshooting 4. See your product on a network, check these sections for help: ■ "Setup Problems" below ■ "Printing Problems" on page 33 ■ "Scanning Problems" on -screen Epson Information Center for your computer. When installation is complete, restart your computer to print a Network Status Sheet (see this... Add Printer. 5. Note: It may take up or using your printed documentation and on page 34 This section also explains how to find the EPSON TCP/IP printer on the network. 6. When you have problems setting up to scan and print.
... you see page 35). 30 Troubleshooting 4. See your product on a network, check these sections for help: ■ "Setup Problems" below ■ "Printing Problems" on page 33 ■ "Scanning Problems" on -screen Epson Information Center for your computer. When installation is complete, restart your computer to print a Network Status Sheet (see this... Add Printer. 5. Note: It may take up or using your printed documentation and on page 34 This section also explains how to find the EPSON TCP/IP printer on the network. 6. When you have problems setting up to scan and print.
Network Installation Guide
Page 31
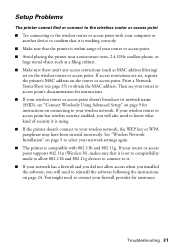
Print a Network Status Sheet (see "Connect Wirelessly Using Advanced Setup" on page 9 for assistance. If your wireless router or access point has wireless security enabled, you will also need to reinstall the software following the ... sure that it is compatible with your computer or another device to contact your firewall provider for instructions on the wireless router or access point. Setup Problems The printer cannot find or connect to the wireless router or access point ■ Try connecting to the wireless router or access point with...
Print a Network Status Sheet (see "Connect Wirelessly Using Advanced Setup" on page 9 for assistance. If your wireless router or access point has wireless security enabled, you will also need to reinstall the software following the ... sure that it is compatible with your computer or another device to contact your firewall provider for instructions on the wireless router or access point. Setup Problems The printer cannot find or connect to the wireless router or access point ■ Try connecting to the wireless router or access point with...
Network Installation Guide
Page 32
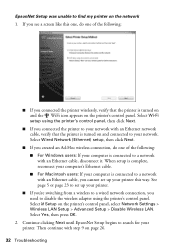
...users: If your computer is turned on the printer's control panel, select Network Settings > Wireless LAN Setup > Advanced Setup > Disable Wireless LAN. Select Yes, then press OK. 2. Continue clicking Next until EpsonNet Setup begins to search for your printer this one, do one of the following : ■ If you... page 5 or page 23 to set up your computer is turned on and the WiFi icon appears on the network 1. Select Wired Network (Ethernet) setup, then click Next. ■ If you created an Ad-Hoc wireless connection, do one of the following : ■ For Windows users: If your...
...users: If your computer is turned on the printer's control panel, select Network Settings > Wireless LAN Setup > Advanced Setup > Disable Wireless LAN. Select Yes, then press OK. 2. Continue clicking Next until EpsonNet Setup begins to search for your printer this one, do one of the following : ■ If you... page 5 or page 23 to set up your computer is turned on and the WiFi icon appears on the network 1. Select Wired Network (Ethernet) setup, then click Next. ■ If you created an Ad-Hoc wireless connection, do one of the following : ■ For Windows users: If your...
Network Installation Guide
Page 33
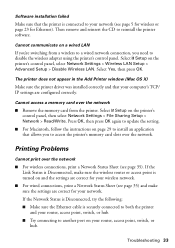
...: ■ Make sure the Ethernet cable is turned on a wired LAN If you're switching from the printer. Select F Setup on the printer's control panel, then select Network Settings > File Sharing Setup > Network > Read/Write. Select Yes, then press OK. Troubleshooting 33 Then remove and reinsert the CD to disable the wireless...). Press OK, then press OK again to update the setting. ■ For Macintosh, follow the instructions on your router, access point, switch, or hub. Select F Setup on the printer's control panel, select Network Settings > Wireless LAN...
...: ■ Make sure the Ethernet cable is turned on a wired LAN If you're switching from the printer. Select F Setup on the printer's control panel, then select Network Settings > File Sharing Setup > Network > Read/Write. Select Yes, then press OK. Troubleshooting 33 Then remove and reinsert the CD to disable the wireless...). Press OK, then press OK again to update the setting. ■ For Macintosh, follow the instructions on your router, access point, switch, or hub. Select F Setup on the printer's control panel, select Network Settings > Wireless LAN...
Network Installation Guide
Page 35
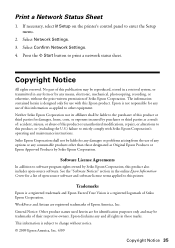
...Artisan are for damages, losses, costs, or expenses incurred by Seiko Epson Corporation. Copyright Notice All rights reserved. Epson is a registered logomark of this product or third parties for identification purposes only and may be liable for any consumable products other equipment. Epson... of this publication may be liable to strictly comply with this Epson product. General Notice: Other product names used herein are registered trademarks of open -source software. If necessary, select F Setup on the printer's control panel to print a network status sheet...
...Artisan are for damages, losses, costs, or expenses incurred by Seiko Epson Corporation. Copyright Notice All rights reserved. Epson is a registered logomark of this product or third parties for identification purposes only and may be liable for any consumable products other equipment. Epson... of this publication may be liable to strictly comply with this Epson product. General Notice: Other product names used herein are registered trademarks of open -source software. If necessary, select F Setup on the printer's control panel to print a network status sheet...


